This is the second part of my series on continuous lighting. In part one, we discussed a few types of artificial continuous lighting that you can use in place of flash for traditional portraiture. These include household lamps, clamp lights, and various professional fixtures using CFL banks, LED panels, and halogen or tungsten lamps. In this post, I'm going to demonstrate how to create a good portrait with basic, unmodified lighting fixtures.
Lighting Basics
Let's start with some portrait lighting fundamentals. Lighting techniques and theory are huge topics that take plenty of instruction and practice to master, but if you follow the simple guidelines presented here, you'll be able to put together a basic lighting setup for good results, without having to learn the finer points of portrait lighting. And because you're using continuous lighting, you'll be able to see the effect of the lights on your subject as you arrange your setup. This is a great way to get started with portrait lighting and it will help you if you eventually move on to using flash/strobe.
See my eBook, “Basic Lighting for Portrait Photography,” or my other ebooks, if you'd like to learn more about professional portrait light techniques. What you'll see in the descriptions that follow is how we build up the lighting one-by-one in a multi-light setup.
The Main Light (Key Light)
The most important light in any portraiture setup is your main light. In fact, sometimes it might be your only light. The main light is the one that defines the most prominent light and shadow areas on the subject. Its placement, along with the position of your subject's head, and the camera position will determine how your subject is “modeled”; how she appears as a three-dimensional object on a two-dimensional print or display.

With the main light in place, the turn of your subject's head further determines the lighting pattern produced.
If you'd like to learn more about positioning the main light, this video will explain the classic lighting patterns used in portraiture. Flash photography is discussed, but the examples are shown with a continuous light.
The Fill Light
With the main light coming in from one direction, strong shadows are cast on the areas of the subject receiving less direct light (or no light at all). This creates strong contrast, especially when your main light source is relatively small and striking your subject directly, without some sort of diffusion modifier. Contrast can be reduced in a controlled way by filling-in the shadows with some added light. This can be accomplished with a simple white panel or reflector (angled to reflect some of the main light back onto the subject), or with an additional light, striking the subject with less intensity than the main.
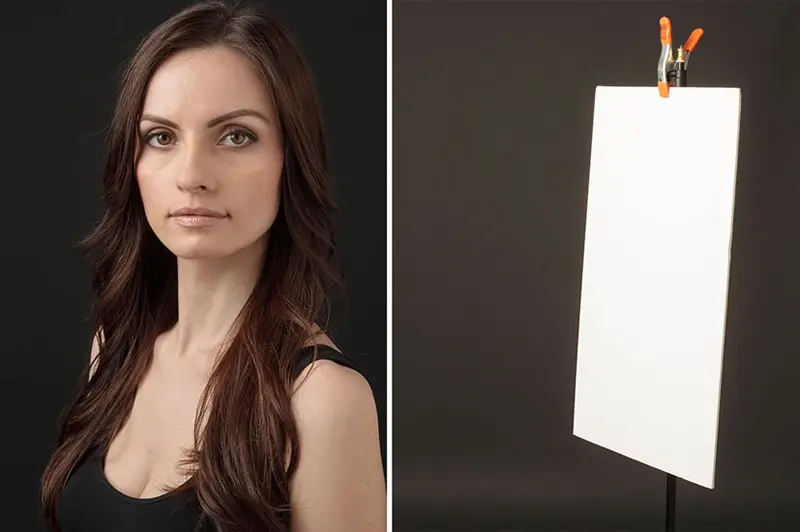
Fill lighting can be created any number of ways. You can introduce a second light source (fill light) or angle a reflector/panel near the side of the subject's face, opposite the main light.
The Hair Light
Another good tool to add dimension to your portraits is the hair light. This light is often positioned high above the subject and focused to just strike the top of the head, and sometimes the shoulders. This light creates a highlight that visually separates the subject from her background. Variations on the hair light include kicker lights that create highlights on one or both sides of the subject's form.
The Background Light
While the three lights described above complete the traditional three-point lighting scenario, other lights can certainly come into play, including one or more background lights. Just as with any lighting setup, the background light is something you can introduce into the scene, or it might already be a part of the environment you're shooting in. Either way, the background light generally serves to add interest and atmosphere to the portrait.

Left: Main, fill, and hair lights used. Right: Background light can help add interest to a portrait.
Light Placement
For the following continuous lighting examples, I used a 650 watt tungsten light source as my main light, and two clamp lights fitted with compact fluorescent lights as my fill and hair lights (for simplicity, the illustrations feature clamp lights in all three lighting roles). These lighting fixtures were described in my previous post. They were hung and mounted on standard light stands.
Place The Main Light First
With your subject in place, generally facing the camera, you'll want to place your main light just above her head and to one side. Look at where the shadows fall and adjust the position of the light until you like what you see. For basic portraits, shorter shadows are best and you'll get those by moving the light closer to the front of the subject's face rather than far off to one side. Lower, rather than higher light positions will also create shorter shadows. However, we don't want that light coming in straight from the front of the subject, because if the shadows are too short, there will be less visual information defining the subject's features. So, find a good mix of light and shadow and start from there. As discussed earlier, and as you'll see when working with your main light, even small turns of the subject's head can drastically alter the look of the shadows.

Main light positioned as shown is a good starting point for any portrait. Note that I used an Arri tungsten light as my main for the actual photo, but any light source could have been used, including a clamp light, as shown in the illustration.
Next, The Fill Light
Here, I'm using one of the clamp lights with a compact fluorescent light (CFL). This light is much less intense than the main, which is a good thing, because the fill light should not match or overpower the main light; it should be just enough to fill in the shadows as you see fit. Because my clamp light's power cannot be adjusted, I can control its intensity on the subject by increasing or decreasing its distance to the subject. This light is placed on the opposite side of the main light (left side of the subject in this case) in order to reach the shadow areas.

Fill light provided by clamp light introduced on the left side for this shot.
Finally, The Hair Light
The other clamp light with CFL was positioned above the subject and pointed down to strike her hair. Notice that the light doesn't have to be perfectly centered above her head, it's okay to have it off to one side a bit.

Hair light is created by another clamp light positioned just above the subject's head.
Mixed Lighting Issues
Something that you should be aware of are the problems that will arise when working with mixed lighting sources (lights that produce different colors in a photo). The tungsten light source I used produces a warm color, while the CFLs tend to produce a different color of light, depending on their color temperature.
It's usually best to either use light sources that have matching color temperatures, or alter the color temperature emitted from different light sources so that they all match. This can be accomplished with lighting gels/filters. In practice, the goal is generally to have all lights either on the warm side of the color temperature scale, or the cool side so that any adjustments made for color casts can be made easily for the entire image. Sometimes you don't have the right mix of lighting or the color-correcting filters to fix the problem during the shoot. In those cases, you'll have to deal with it in post-processing using overall, or selective, color-correction.
==========
See edverosky.net for a big selection of eBooks, courses, and great tutorials!


1 Comment
hi Ed, I was wondering if my two DIY softbox of approx. 60×80 cm, with 5 cfl 45w bulbs each is enough, alongside my external yongnuo speedlite triggered on an umbrella to gain enough exposure for a stock photo purposes, shooting for example, concept businessman or kidsplay at DIY studio. I still wait for the triggers ordered online, so I still havent tested this setup.