Getting a new DSLR can be quite an overwhelming experience for a new photographer. All the knobs and buttons seem to do a thousand different things (and they do), but the dirty secret of photography is that, at its core, knowledge of the exposure triangle is what will make your new DSLR sing.
If you know how the exposure triangle works, then you essentially know the basics of photography for beginners, you can build your skills with the manual functions of your camera on that solid basis and capture images with proper exposure. Basically, you need to learn a few facts about aperture, shutter speed controls, ISO, and how they affect one another and this will help with understanding exposure better.
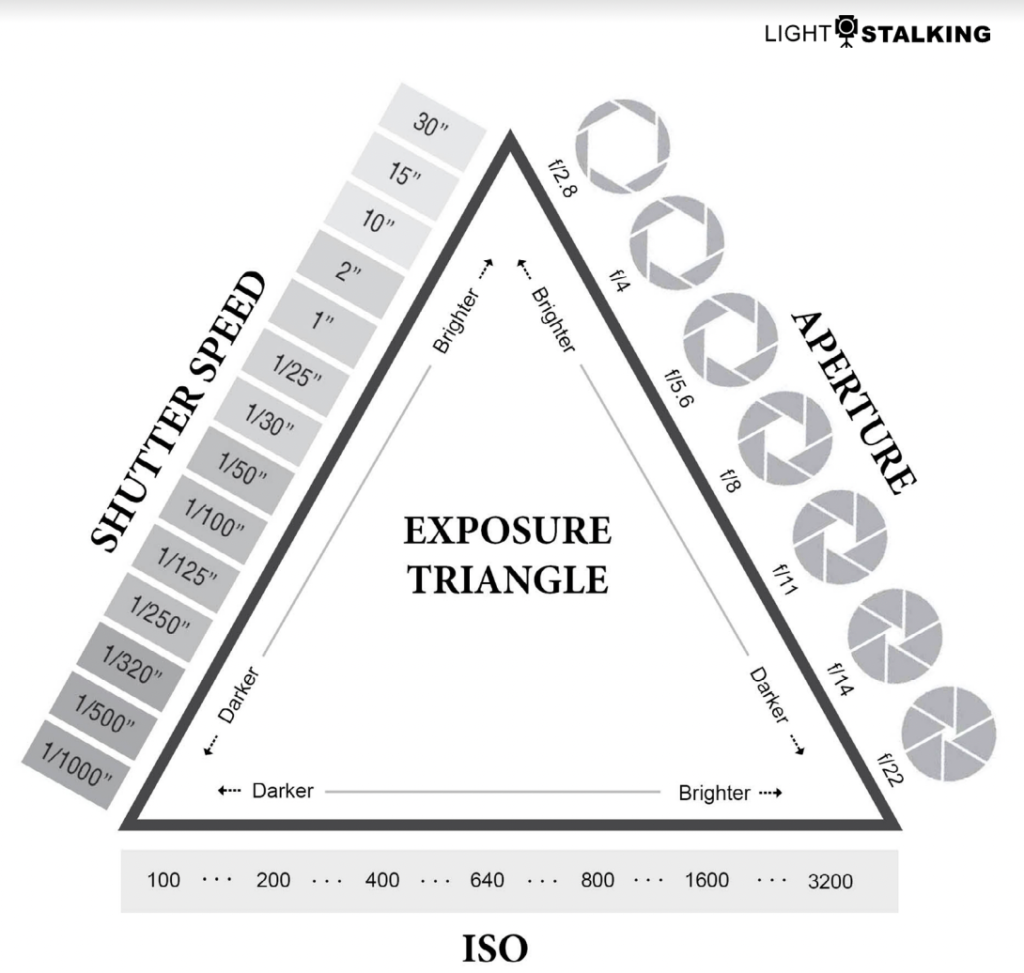
Having an exposure triangle chart can be really useful for learning!

Manual Control Over Aperture, Shutter Speed, AND ISO
The biggest benefit of having an advanced DSLR is that they allow manual control over camera settings, that is, control over most elements of the photographic process in terms of what's happening in the camera. But having that control is greatly beneficial if you know what elements you need to control and what they do. Let's look at the three essentials that make up the exposure triangle – ISO, Shutter Speed, and Aperture.
ISO – In film cameras, the ISO refers to how sensitive the film is to light. In a DSLR, the same concept applies, but it refers to the camera sensor (digital sensor) setting instead of film. The lower the ISO number, the less sensitive it is to light and higher the iso, higher the light sensitivity.
If you are out photographing things in the bright midday sun, then you will probably want to use the lowest setting available (probably ISO 100 or 200). Conversely, higher ISO settings are in order if you photograph poorly lit scenes. Just remember that the higher ISO settings often bring the problem of digital noise (unwanted speckles and spots in your images). Usually, the top-end DSLRs are better at handling noise problems at higher ISO settings. The larger camera sensor is capable of handling low light better.
Shutter Speed – This one is fairly self-explanatory. Shutter speed simply refers to the time the camera shutter opens when you take a shot and shutter speed determines the time for which a scene is exposed. It affects how much light enters the sensor. A shorter shutter speed (faster shutter speed) will result in less light hitting the sensor of the camera and will have the effect of “freezing” motion. Most cameras has a fast shutter speed of 1/4000s and professional range cameras have 1/8000s. A longer shutter speed (slower shutter speeds) will allow more light to hit the camera's sensor, and any movement in the scene or a moving subject in the frame will appear blurred in the direction it was moving (“motion blur”), which can often be a desirable effect depending on what you are trying to achieve.
Each shutter speed setting doubles (or halves) the speed (fast or slow shutter speed) compared to the next setting. Don't forget to check out our beginner's guide to shutter speed priority mode on your camera.

Aperture – This refers to the size of the opening in the lens that lets light hit the sensor. Wider apertures allow more light in, and narrower ones allow less light in. The opening size is measured as f/1.4, f/2.8, f/4, f/5.6,f/8, f/16, f/22, etc. (commonly referred to as “f stops”). The small the number, the larger the opening, and each “stop” up from there effectively halves the size of the opening (and thus the amount of light entering the camera). This is applicable for both artificial and natural light. The camera lens aperture also allows you to control the depth of field besides helping to capture the correct exposure. Also, check out our beginner's guide to aperture priority mode on your camera.
The aperture also depends on the camera lens – prime lenses usually have a larger aperture than zoom lenses.

How Does That Work In Practice? Exposure Triangle Explained
The three elements of the exposure triangle work or interact together and can form the basis for the exposure triangle definition. For example, reducing the shutter speed by a stop (increased light) and narrowing the aperture by a stop (decreased light) will result in an identical exposure. However, it may result in motion blur (due to decreased shutter speed) or a deeper depth of field (due to a narrower aperture).
ISO, shutter speed and aperture are collectively called the exposure triangle because they affect the exposure value. This is probably one of the most important technical concepts you can know in photography, and it's worth sitting down to learn (and standing up to practice) if you'd like to know how to use that shiny new DSLR (or any other camera, for that matter) to its potential.
Simply put, learn to handle ISO, shutter speed, and aperture, as well as you can, and your photography will improve a lot over time. It does not matter whether you use natural or artificial light for your photography.


22 Comments
Tell us how to override these hi-tech point and shoot cameras so that those of us who like experiment can override the auto systems.
Have you manual override on you camera, that is you can set ISO, aperature and shutter speed manually. you then get to play with depth of field etc.
Very helpful. Sending this to my son who loves photography. Thank you!
I’ve been really trying to wrap my brain around everything I’ve read with luck. I’m a visual learner. You kept it very simple & I get it! Thanks
I pass these items on to friends of mine who are just starting out. They are very easy to follow and it stops them harassing me every 10 minutes with such things like “Are ISO speeds the same as film speeds then”. Very useful.
Hi Rob, I have been following Light Stalking fr a while and learning all the time.
Can I ask a question? I can move the focus spot around the viewfinder, is this also the metering spot?
Can’t remember the last time I used auto on my DSLR. My usual choice is aperture priority.
In the part about aperture ( f/1.4, f/2.8, f/4, f/5.6,f/8, f/16, f/22) it is strange that f/1, f/2 and f/11 are left out with no plausible reason.
The f-stop or f-number is actually the ratio of the focal length of the lens divided by the diameter of its aperture. With that in mind you can see why f/1 and f/2, or anything in that range, would be rare. A 50mm focal length f/1 lens would be 50mm in diameter (almost 2″). An f/1 250mm zoom lens would be 10″ in diameter!
As for f/11, it is a common lens speed for deep sky telescopes 6″ in diameter and larger. Also, I remember a time when it was a common f-stop to use on manual lenses.
I find your hints very helpful. I’m a novice in the game.
Glad you’re getting some use out of our tips! 🙂
really enjoyed this thank you Rob I have shared with friends
Basic but good
Well explained and succinct????
This is so helpful. Thank you
This made the Exposure Triangle very clear – much clearer than my understanding of it was before! Thank you.
Even if we only get a small part right, then that something less to learn in the future. Thanks Rob…. always a good read. regards Peter B
I have a Olympus E-510 and I just need a basic set up on it ,Help !! Thanks!!
The problem is not understanding these concepts, it’s that no one is giving examples of them working together which was briefly mentioned here. Give
example scenario’s of how to shoot and compensate the triangle plus and minus according to the time, light, subject and purpose.
The key is your camera’s light meter. It should be 0 or as close as possible. If it is reading -1 and you already are at f/1.8 then you can either slow down your shutter or raise your ISO by 1 stop. Study about metering and the triangle will make sense.
Very helpful, great clarity, to this beginner.
Thanks!
Very helpful, to this longterm novice. Getting there but slowly.