Post processing allows photographers to put their final spin on an image, creating a landscape that's just as breathtaking as the original scene. But, editing can quickly turn into a long and tedious process, instead of a nice break from that long hike you endured to capture the shot in the first place.
Lightroom is a great tool for landscape photographers, but there's a few tricks to actually using the program to cut back on the time spent at the computer so you can spend more time behind the camera. Here are seven ways to improve your Lightroom workflow and still get that stunning end result.
Keep Lightroom Just for Editing, Not Organizing
Lightroom can be an organizational tool, but since that's not where it really shines, keeping the program just for edits will help minimize distractions and cut out the time spent searching for one particular image. Once you are finished with an edit, save the file as a DNG, or digital negative, with a JPEG overlay. Once you do that, you can delete the image from Lightroom. All your non-destructive edits will still be saved in that new DNG file, so you can go back and change the image easily. With fewer files in that sidebar, it's much easier to stay focused on current images.
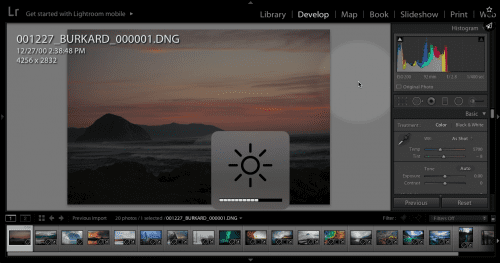
Turn the screen brightness down for better editing. By Chris Burkard
Turn the Brightness of the Screen to About Half Power
A print and a backlit screen are two very different things. If you are editing an image to print, turn your monitor’s brightness down to about half power. With the brightness reduced, you'll be able to preview your changes closer to how they'll look on paper, not on a screen.
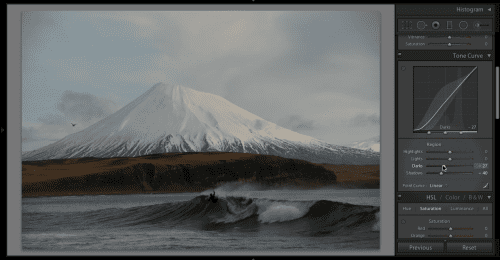
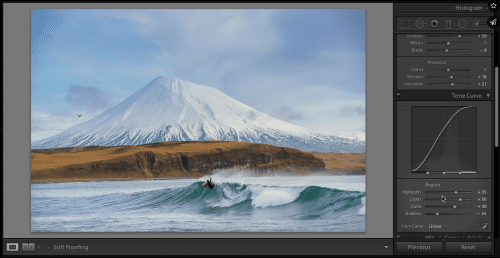
For the most control, start with the Tone Curve adjustments. By Chris Burkard
Start with the Tone Curve, not the Basic Sliders
One of the advantages of Lightroom is that all your edits are in the right hand side, so it's a bit quicker to access them. But, don't start with that first Basic panel. While it's easy to get comfortable with the simplicity of the basic sliders, they aren't the best for making the most dramatic changes, at least not for the first step.
Instead, start with the Tone Curve panel. The user-friendly basic sliders for options like highlights and shadows are actually degrading because they are applied broadly. The Tone Curve sliders, on the other hand, are more individualized. Here, you have options for both highlights and lights and both shadows and darks. Start here so you can control each individual option, then go back and use the broader basic sliders if needed to make further adjustments.
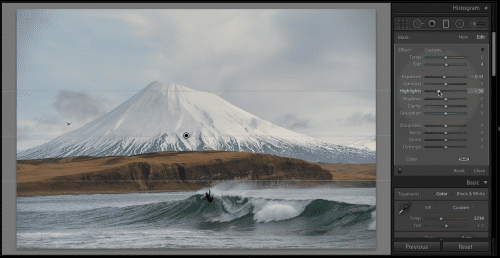
In landscape photography, it's all about the little details. By Chris Burkard
Perfect with Gradient and Paint Tools
Great landscape editing isn't made of sweeping, dramatic changes, but rather making small subtle changes that really add a big impact to the photo. The Lightroom gradient tool is one way to make subtle changes with a big impact, especially for scenarios that couldn't be shot with a graduated neutral density filter in the first place. Use the gradient to enhance the sky by adjusting the exposure and using the temperature to bring out more color. The gradient tool can be used for a lot more than just the sky though, identify any parts of the image that are too light, too dark or just aren't working the way the rest of the photo is and try applying a gradient tool to just that area.
For areas that are smaller or an odd shape, use the mask tool for smaller changes. Perhaps there's a rock or section of the water that's too bright or too shadowy—the brush tool is how you correct that. Just like the more traditional dodging and burning tools allow for small tweaks, the brush and gradient tools are a must for applying effects to only a portion of the image.
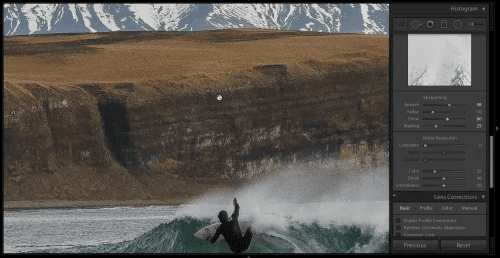
Save time by starting with a sharpening algorithm that works for most images. By Chris Burkard
Try a Sharpening Algorithm
Instead of messing with the sharpening sliders and watching how the images change every time, start with an algorithm to save time. A good starting point is to use:
- Amount: 98
- Radius: 1
- Detail: 60
- Masking: 30
That sharpening algorithm won't be perfect for every image, but it works well for many shots. Images taken at high ISO, for example, usually need to be turned down a bit or the noise is emphasized. By starting with settings that work well for most photos, instead of at 0, you can process your image a bit quicker.
Other edits will affect the image's color, so save saturation for last. By Chris Burkard
Save Saturation for Last
There are a lot of ways that you can enhance the saturation in the image, without actually touching the saturation slider. Save the saturation for last—adjusting your tone curves, making subtle gradient and brush adjustments and even sharpening will bring out the color in the image in a way that appears natural. Once those adjustments have been made, then tweak your colors. For a natural looking image, avoid the clarity slider and keep vibrance and saturation under 20.
Embrace Your Own Editing Style
The way you edit your images defines your own style just like the way you take the image does. Don't be afraid to find what works well for you and create your own Lightroom workflow that fits with your style. It will take some experimenting and experience, but once you identify a few adjustments and tools that work well for you, embrace them and use them to create a more efficient workflow.
Lightroom is a great tool for bringing out the best in your landscape images, but using it efficiently requires a few tricks. Maximize your productivity by keeping Lightroom just for editing and deleting unnecessary images (after they've been saved to the hard drive of course). Don't work with your screen on full power and start with the tone curve adjustments, not the basic sliders. Fine-tune the details, then apply a sharpening algorithm and keep saturation for last. Keep in mind that editing is just another creative process and embrace your own style.
Further Landscape Photography Tips
Our Landscape Photography Tips article is also well worth a read if you want a slightly higher level overview of the craft of landscape. It covers several other post-production issues as well as shooting considerations.




28 Comments
I could not disagree more with this:
“Lightroom can be an organizational tool, but since that’s not where it really shines, keeping the program just for edits will help minimize distractions and cut out the time spent searching for one particular image”
Lightroom is very, very good at organizing so I really do not understand where that statement even comes from! It is the centre of my photography processing. I always start and finish in Lightroom no matter what other application I may go to.
I must support Don. Lightroom really shines at organizing….
Thanks for the comment, Don! This is one of the primary reasons I added the “Embrace Your Own Editing Style” tip to the end. What works for me may not work as well for someone else. I just find digging through past work distracting, so I upload only what I need to work on at the time. I also save most of my work to an external hard drive and only keep current files on my laptop.
I agree with Don, and completely disagree with you on your first point. Lightroom is exceptionally good at organising and provides an ideal “home base” for any post processing. Your other points are interesting.
Like Don, Sandra and Steve, I disagree with your remarks about Lightroom’s organisational abilities and would argue that Lightroom is probably the best digital asset manager on the market today.
And I would not use the term “delete the image from Lightroom” when what you meant was to “remove the image from Lightroom”.
May I also suggest that the first place to start editing is in the Camera calibration panel by setting the Camera Profile, the reason for this is because doing so can drastically alter the hue, saturation and lightness of the image. If you do all the other editing before choosing a profile you can guarantee you will need to go back and make further alterations.
It may be that you always use the same profile such as neutral, landscape or whatever, but if you do, you can miss an aspect of Lightroom which may not easily be obtainable any other way.
Like the others I have do say they are right. Don’t get me wrong: The other tipps are good, but “don’t organize in Lightroom” is an idea I really can’t understand. It’s takes more strength and time to always delete the pictures in Lightroom then just keeping them. I’m really curious where and how you organize your pictures…
I also to chime in here and agree. Why would you keep switching programs or adding “key Strokes” to find you next image? Lastly the author suggests these things without to implement these changes which might have made for a stronger argument,
Cheers
Karl
Great article. Thanks for sharing your knowledge.
how do you save as dng with a jepg overlay.
i shoot raw, and after i an donr i just leave the pictures in lr. or export to desk top as jepg to send e mail or face book. am i doing some thing wrong?
Not the best article I’ve ever read on Lightroom. With 300,000 images in my Lightroom catalogue and the ability to find any one of those images within seconds, even if I can’t remember what year it was shot – I firmly believe as an organization tool it certainly does shine. Of course you do have to take a little time and learn how to actually use it !
I don’t like articles that say don’t use a product without giving a better alternative. I use Lightroom but I’m always open to a better product or solution.
I have to agree with Don, Sandra and Steve. I disagree with your comments about Lightroom not “shining” as an organizational tool. Lightroom is known for it’s organizational abilities and has amazing search capabilities.
If not for organizing, what additional piece of software would you use? LR is what I use and recommend to people new to photography.
Hi There, as a photographer who has been working with Lightroom since the very first version I couldn’t disagree more with this particular guide, both on the organisational part but also the grading part. Every image needs it’s own approach depending on the scene etc. There are lots of great tutorials out there and this is not one of them.
Good luck, Steen
I am not totally satisfied with Lightroom’s organizational ability, and I am curious to know what Hillary uses.
Thank you for an excellent article. Your workflow is completely different from mine, but I always welcome new ideas. I just grabbed an image from a local trip and went through your sequence. It is outstanding.
Rob
Rather than add to those who have already disagreed with your comment regarding Lightroom,s weakness in data management, I am curious about what you have found that works better. Perhaps my research is incomplete. Please advise.
I’m confused by this article too.
Lightroom is fundamentally built around an asset management model. The challenge is you have to know how you want to organize your photos. Rather than being prescriptive, you must define how you want to organize things. I think this is a strength, but it could be viewed as a weakness if you are looking for the software to tell you what to do.
I am also confused about using custom processing algorithms in Lightroom. I was not aware you could implement custom algorithms in Lightroom outside specialized plugins. I have gone looking for this capability online and in the help menu and cannot find anything related to custom image processing algorithms in LIghtroom.
I would appreciate some direction on how to do this outside of photoshop or specialized image processing tools.
Cheers
John
Hi John,
The sharpening algorithm is one that I actually type in each time. Instead of starting with the sliders at 0, I start with numbers that work for most photos, then I save some time using the sliders to find the perfect level, seconds yes, but every second counts, right? Hope that helps!
Hi, you can save even more time by creating a preset and applying it to images automatically at import, or manually by clicking the preset. Why type in manually every time, when LR gives you this capability? 🙂
I also could not disagree more with the statement that LR does not “shine” as an organizational tool. In fact LR Library feature is extremely powerful way to keep one’s work organized in so many way.Furthermore, it is a powerful image editor, helping one zero in on their “best” images from a shoot and has a very creative way to “collect” images for slid shows and movies. On top of that, LR makes it so easy to “publish” work to social media it is a crying shame. As an organizational tool, Lightroom Library rocks!!!
Wow! Poor Hillary!!! You poked a wasp nest with a short stick 🙂
Glad I do not use any Adobe imaging products, but thanks for the article anyway.
For over 25 years, I have been happily using PaintShop Pro, and I have no plans to switch, even if Adobe were to give me free copies of LR or PS, honestly.
I have played with both, LR and PS, and I hated them both equally.
I’m not a computer novice, by the way. I have just finished building my 9th generation machine!
My first PC was purchased in 1982, while I was a student at electrical and computer engineering school.
That was really interesting. Just goes to show how Adobe’s photo software can be approached from many directions to the benefit of the individual user. Photography continuing to be a mix of art & science…
Oh, this wasn’t Chris Burkard’s workflow, but it was Hillary’s? Thanks a lot google. Anyone ever seen an article on how Chris achieves the look he does with his landscapes?
I will buy your argument about organizing if you can give us a good alternative to Lightroom. But there is none.
Since Lightroom have become more unstable with the updates Adobe has released, The only thing Lightroom shines at is oraganizing. As a RAW-converter it produces a starting image that is flat and lifeless right of the bat. Compared to let say Capture One 9, one quickly notice that Lightroom is not as powerfull as Capture One.
I’ve personally used both, and still uses both, but for RAW edits I prefer Capture One 9 any day of the week, as mentioned Capture One 9 yields far more powerfull options and easier options to make that image pop. Where I find Lightroom makes things easier is when doing meta-data work like keywording and IPTC-work, exporting images to either be uploaded to sosial media or homepage, and for printing.
Also, the DNG-format ties you to the Adobe creative suite for RAW-edits, as many alternative editors struggles or present you with limited options once you’ve converted your camera specific RAW-files to DNG, I don’t view the DNG-format as that flexiable as Adobe first stated. Without the original RAW embeded within the DNG-file, you’re quickly stuck with a “lesser” file.
When it comes to saving the final edits, I would rather recommend exporting those picked files as TIFF or Hi-Rez JPEGs (remember to convert JPEGs to TIFF if later edits is to be done), as edits done in Lightroom is only partly transferable to other editor.
And recommending people to “delete” their images from the Lightroom catalog will only make for a greater mess with later organization. If one needs to declutter the number of images one is presented with, one should rather use colourtags and stars, as this meta-data is transferable to other DAM software, flags is only relevant for Lightroom. With tags or stars, one filter out the files not need for the work one does right now. But I can see what workflow you’re thinking of here, but Lightroom does not support options like Sessions as you find in Capture One.
Turning down the brightness of the screen is at best an idiotic workflow-step. Best pratice would be to calibrate your screen using calibration-tools like X-Rite ColorMunki or Spyder, as this yields a far better and consistent result, and a more stable platform to work with later when it comes to soft proofing.
Also using the curves-tool in lightroom is harder then working it in Photoshop or Capture One 9, as Lightroom won’t let you lock the center as you find in Photoshop curve tool. I would rather recommend setting a black and white point, make the basic contrast setting, adjusting the shadow and highlight slider for basic settings, and do noise and pre-sharpning, then move those edits over for heavy lifting i Photoshop, since Lightroom as of date don’t support layers. Yes, the brush and gradient tool is rather easy to use right of the bat, they are limiting in overview of what edit each new edits control.
To not use the Clarity slider, is a “wrong” approach, as clever use of the Clarity slider can provide you with subtle micro contrast that is the differnce between a lifeless Image and one that pops. But I see where you were aiming with it, as many amatures tend to overuse Clarity and Vibrance sliders to make images that look more like bad HDR-images.
So to sum up here, I would say it interesting to see what workflow people use, but I admit that what you recommend here is not a workflow I would recommend to any who asked me for advice.
I tried your workflow of editing a landscape image and it turned out better than any images I’ve edited in the last 2 years or so. I’m happy to find your blog and great tips.
I found what I was looking for. The sky looks great; hills look awesome! Bookmarking your site for future reference.
Thank you from India! 🙂
Thanks, it was nice to read your tips.
I must say that Bridge is better for me when I need to organize my photos.
The Lightroom interface simply does not work for me, I need to separate the image processing process