The histogram is one of the most useful tools in the camera that helps to evaluate proper exposure and is also one of the least understood and used tools. If you want to become a better photographer, you need to understand how the histogram works and use it to nail exposures. It is the best way to make sure that you are properly exposing the frame you are photographing.

[thrive_text_block color=”blue” headline=””]Understanding light is one of the keys to being a good photographer and understanding your histogram is a core skill in assessing available light. When you are ready to tackle the broader skill of getting amazingly exposed images, then you will want to take a look at the Understanding Light guide here. [/thrive_text_block]
Note to remember: Nothing can evaluate exposure better than your eyes, but then there are situations when the light is harsh or very limited, that you need some help evaluating exposure and you can use the histogram as a guide.
So, what is a histogram? A histogram is a graphical representation of the tonal values in a photograph (between 0 and 255) and is an accurate guide to exposure.
And what does it represent? It is a curve that represents tones and pixels in the image. The x-axis represents the tonal variations from black to white; that is, blacks, shadows, midtones, highlights and whites. The y-axis represents the amount of pixels for a given tonal value or range.
Here is a representation of the information you find on the histogram. Included here is only the luminosity histogram, but it is good to look at the RGB colours which we will look at in a different article.

In order to have a good variation of all the tones, the histogram needs to be a curve (almost bell-shaped, depending or an even spread of medium humps) touching almost all areas but not the very ends (which are the blacks and whites). The ends would mean a loss of pixel information, like complete darkness or completely blown out highlights and this is called clipping.
Here are some examples to see how the histogram looks when there are whites and blacks in the frame:

Image by Erik Scheel

Image by Pete Linforth
Note: If your scene has predominantly a lot of black areas, then you should not worry about the histogram hitting the left end of the graph and similarly if there are a lot of whites in the frame, the histogram may hit the right end of the graph.
Also, for clarification and ease of understanding, included here is another example, where you can see how the histogram varies when the image is correctly exposed, underexposed and overexposed. Using a single image for comparison while demonstration always helps!
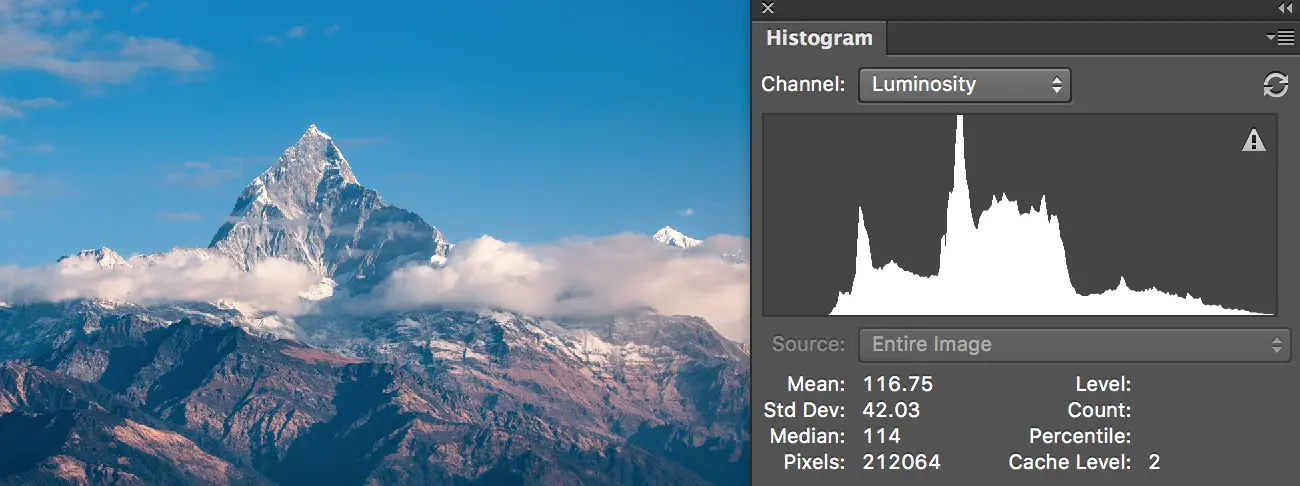


Image by Ambir Tolang
So how do you go about getting the exposure right?
- Keep the histogram active on the LCD screen when composing the image and that way you can watch in real time how changes in aperture, shutter speed, and iso affect your exposure (check the camera settings or camera's user manual on how to get the histogram on screen).
- If you are not using live view, keep it on when reviewing images to get an idea of the exposure, so you can correct it (do not always rely on what you see on the LCD screen while reviewing).
- Use the correct metering mode depending on the scene you are photographing.
- Always shoot raw, that way you get to pull out a little bit of the lost details (both in darks and whites) while post-processing, but, it is always good to get the exposure right in camera.
- Do not worry if the histogram hits the ends when you have blacks and whites in the scene. Also note that a little bit of clipping is ok and there are times when that is unavoidable in scenes that have strong reflections from water, glass, etc.
That's about it. It is really that simple and not complicated at all like many would think or refrain from using. If you have any other tips on using the histogram to get the exposure right, please share your thoughts in the comments section below.
To take your exposures a step further, you should consider going further than just histogram appraisal and looking at exposure in a more wolistic way. Take a look at the guide to Understanding Light here.


32 Comments
Nice Article, Dahlia.
Thank you Kent 🙂
Good and educative
Glad that you found the article useful. Thank you Lakshmi 🙂
Very clear explanation Dahlia. The examples are great and its good to know that the numbers 0 and 255 aren’t quite as nasty as first thought.
Thank you very much Graham. Glad that you found them useful 🙂
Hi again Dahlia. Question: what does it mean when a histogram is perfectly centred (no clipping at the edges) and dome shaped but the amplitude is quite shallow? I know the overall height of the histogram relates to the number of pixels but what does this mean in real terms? Low exposure? The reason I ask is because I recently took a photo which turned out looking fine to my eyes (exposure-wise) but the histogram was only half the height of the usual histograms I see?
Hi Graham, sorry, not sure how I missed this question. The x-axis represents the tonal variations from black to white and the y-axis represents the amount of pixels for a given tonal value or range.
If the histogram is flat, then it means that for that particular tonal range the number of pixels is less. This could be because the lighting in the scene was even without much contrast – which means the light was flat. Did you try increasing the contrast to see if there was a change in the histogram?
Thanks for the inputs. Very educative
Thank you. Glad that you found the information here helpful 🙂
Hi ,thanks for the explanation. You have made it easy to understand.
Hi Mike, glad that you found this helpful 🙂
Excellent explanation! Thank you.
Thank you Jan 🙂
This is a good, straightforward explanation of the hystogram, which seems to intimidate lots of folks. My question: I’ve heard it recommended “expose to the right” which to me sounds like that would produce more exposure to highlights and possible clipping. Does this really make sense in the majority of shots? Overexposure?
Hi James, when exposing to the right, you should expose in such a way that you do not blow out the highlights in the image. You expose to the right in situations where there are shadow regions and correctly exposing the scene may make the shadow regions darker. By exposing to the right without blowing out highlights, you will have details in the shadow and highlight regions. Hope this helps 🙂
Nice, simple, practical explanation – thank you.
As with James Rinaldi’s comment above, I’ve seen the seen the advice, “Shoot to the right”. Surely this leads to over exposure.
Personally, I believe that this advice – shoot to the right – leaves me with somewhat washed out shots whereas shooting slightly to the left gives me better general tonal results.
Would greatly appreciate your comment on this.
Thanks,
Jim
Hi Jim, thank you for sharing your experience on shooting to the right and shooting to the left. If I may ask, what would you do in a situation where you are shooting a scene that has a lot of shadow regions?
In my opinion, I think it is good practise to expose correctly, but in scenes where there are shadow areas, exposing correctly and then recovering shadow details while post processing may bring up noise in the image. This will lead to degradation in image quality. By exposing to the right, more shadow details are preserved.
Exposing to the right is to gather as much light possible (that is in the shadow regions) and that has to be done by increasing the exposure time and not increasing the iso.
Exposing slightly to the right (for example +1, depending on the scene) will help record more details in the shadow regions, than exposing correctly, but you need to do it in such a way that you do not blow out highlights in the image. This way you retain details both in shadow and highlight regions. Hope this is helpful 🙂
I’ve recently read 2 good articles (this one and one by Andrew S Gibson), on using the histogram on camera and shooting to the right. I intend to work on that to see whether or not I can get a better handle on it. By the way, I have begun to experiment with Lightroom’s histogram and find it interesting that substantial changes can be made to an image under processing merely by dragging the various areas of the histogram either to the left or right. Often this does the job I want, subject to a little tweaking using the Develop Module sliders.
Hi Myron, thank you for sharing your experiences on using the histogram within Lightroom. Let us know how shooting on the right works for you 🙂
Short, concise, to the point; and CLEAR!
definitely worth sharing.
Thanks, Dahlia, for a nice write up.
Thank you Jacques. Glad that you found the article helpful 🙂
Wherever the ‘like’ button is hiding… would be nice if it came out .
This is great. Thank you, so much for you efforts.
Thank you. this article clarifies in a simple way how to use and read a Histogram.
Hi Monika, thank you and glad that you found it easy to understand 🙂
I’ve read elsewhere that when you absolutely must choose between under- or over-exposing, it’s usually better to lean toward under-exposing because you can bring up details of the darker areas. And while I am far from expert in Photoshop/Lightroom, it seems like I have better luck improving the under-exposed area of a photo than I do when trying to cope with blown-out white areas. Your thoughts?
Hi Gallopingphotog, not sure if you managed to read my response to Jim. As you have mentioned, I agree it is easier to recover details from shadow areas, but, recovering shadow details while post processing may bring up noise in the image. This will lead to degradation in image quality. By exposing to the right, more shadow details are preserved. You cannot recover details from blown out white areas, so you need to expose in such a way that there are still details in the highlight areas.
Exposing to the right is to gather as much light possible (that is in the shadow regions) and that has to be done by increasing the exposure time and not increasing the iso.
Exposing slightly to the right (for example +1, depending on the scene) will help record more details in the shadow regions, than exposing correctly, but you need to do it in such a way that you do not blow out highlights in the image. This way you retain details both in shadow and highlight regions. Hope this is helpful 🙂
That’s why we call it ETTR
You’re right Ankit 🙂
I have taken photos for years and have never used or even looked at the Histogram, but I hope to start learning about that soon. Thank you for the article.
Glad that you found this helpful Derek 🙂