It’s probably safe to say that nearly everyone reading this has not only heard of the famed exposure triangle, but has also dedicated a decent amount of time contemplating this triple-faceted protocol of using aperture, shutter speed, and ISO to produce “proper” exposures. After all these are the three most fundamental technical components involved in making a good photograph — other than your own creativity, of course.
But at some point we all have to move beyond the basics, move from theory to practice. The exposure triangle can’t remain some abstract thing we think about occasionally; we have to have a working knowledge of it and be able to apply it with ease.
In order to get there, let’s take a closer look at the relationship between aperture and shutter speed — and ISO, too.
While ISO should by no means be considered an unimportant factor, the specific interaction between aperture and shutter speed deserves just a bit more of our attention, as these two elements have an especially symbiotic relationship. Combining aperture and shutter speed bears great implications for exposure, but there are other important aesthetic factors that are affected as well.
Aperture, Shutter Speed, and Exposure
Let us, for the sake of this discussion, not worry about ISO levels; in practice, you could set the camera to auto ISO or you could set ISO to a level of your choice and just leave it there (film camera style). Less important than which approach you would take is that we can simply disregard ISO temporarily.
Under any given lighting conditions, it is aperture and shutter speed that are most amenable when determining exposure; in other words, there are many different combinations of aperture and shutter speed that you can use to produce the same exposure. Choosing small apertures (high f-numbers) and slow shutter speeds is, speaking strictly in terms of exposure, the same as choosing larger apertures (low f-numbers) and fast shutter speeds.
Imagine that your camera takes a meter reading of your subject and determines that a correct exposure will be produced at an aperture of f/4 with a shutter speed of 1/250. If, for any reason, you wanted or needed to change those settings, you could still achieve a correct exposure at f/5.6 and 1/125. Why? Because these adjustments, known as “stops,” represent the halving or doubling of light. Going from f/4 to f/5.6 (one full stop) decreases the size of the aperture opening, cutting in half the amount of light that reaches the camera’s sensor (or film). Conversely, slowing shutter speed by one stop doubles the amount of time the shutter is open, thus letting in more light. So, in the end, it all balances out.

It doesn’t matter what shooting mode you are using (aperture priority, shutter priority, or manual); all you need to do is keep the light balanced.
Depth of Field and Motion Effects
As you see, when it comes to exposure, it doesn’t matter what combination of settings you use as long as one is properly compensating for the other. However, those combinations do matter when it comes to depth of field and motion effects. This is why it is important to get a grasp on correct exposure so that you can move beyond it and worry about the more salient point of creativity.
While you are busy changing aperture to let in more light or less light, you are also changing depth of field. Large apertures that allow in more light also render shallow depth of field; small apertures let in less light and create deeper depth of field.
The case for shutter speeds is quite similar.
Slower shutter speeds allow in more light and are useful when used with small apertures for deep depth of field; this can also introduce motion blur into your image. On the other hand, you can choose to use a fast shutter speed to freeze motion; fast shutter speeds also allow you shoot at large apertures for shallow depth of field.
Now, which route you take is entirely up to you; you may make a decision strictly based on exposure, or you may be going for a particular look based on desired depth of field or motion effects. Your subject and environment will, however, play major roles in determining how you combine aperture and shutter speed.
Like so many other aspects of photography, it makes no sense to get bogged down by too many rules; but here are two quick points to keep in mind to help you decided what setting to give preference to — aperture or shutter speed (use either of the corresponding modes — Av or Tv — or use manual mode).
Use aperture priority (Av):
- When shooting portraits. Portraits typically benefit aesthetically from having the eyes be the point of emphasis with the background out of focus. Larger apertures help achieve this look. Shutter speed serves here to prevent camera shake and, thus, ensure sharpness.
- For landscapes. As always there are exceptions, but the goal in landscape photography is generally to maximize depth of field, which is done by using a small aperture. Shutter speed will help prevent any visible motion effects in objects like clouds or water — unless you want those effects, a scenario which would require both a small aperture and a long exposure.

- Macro photography. There are certainly a number of approaches to this; using a large aperture will be helpful with a genre of photography that’s notoriously difficult to light. But depth of field will be painfully shallow. Set the shutter speed high enough to minimize camera shake and still get a good exposure. Or you could set a small aperture for great depth of field and use a longer shutter speed to let in more light; this method is far more practical in very controlled settings where wind, subject movement, and erratic lighting conditions don’t factor in.
Use shutter priority (Tv):
- When photographing moving subjects and you want to freeze their motion. You’ll need a fast shutter speed. You will need a large aperture to throw the background out of focus; if you don’t get the effect you want with shutter priority, then use manual mode to dial in a fast shutter speed and your desired f-stop.
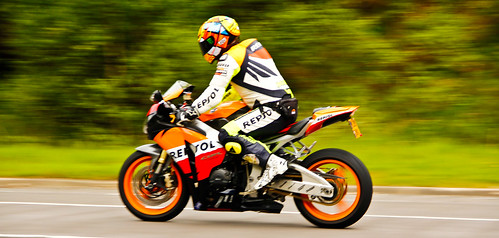
- When panning: following the horizontal motion of a moving subject. You will need a slower shutter speed. Aperture will be less of a concern since the background will appear blurry/streaky.
- When you want to give water a silky smooth look. This requires a slow shutter speed. A small aperture will allow you to get as much of the scene as possible in sharp focus.

Clearly, exposure isn’t the only constituent tied to aperture and shutter speed. Yes, it’s an important factor but in no way is it as singular as some would have us believe. The combination of shutter speed and aperture that you choose will go a long way in establishing the creative wealth associated with your work. Choose wisely and choose freely.


3 Comments
I’m photographing my sister’s jewelry collection. I use an electronic cheapo plastic light tent and have the camera on a tripod. The aperture is set to f8 (the highest I can go with my camera) and ISO is 60. I use a timer to eliminate shutter shake. Is this the best way to photograph jewelry?
Is this for artistic or practical (eg insurance) purposes. Macro shots of jewellery can be amazing. Short DoF at f/5.6 or less can also create wonderful images. Experiment! Best wishes with this:)
What looks best with your present camera, Lee. Tent sounds great.