You’ve probably come across presets for Lightroom that claim to create the film look on your pictures. And while some really do the job, most of the times it depends on the picture and rarely does a preset works by itself. Therefore if you want to really make the film look perfect, you’ll need to know how to make it yourself, from scratch.
What You Need to For The Film Look
The film look in itself is a fairly simple thing to achieve. You need to destroy some of the details in the shadows (mess up the blacks) and compress the highlights a tad. If you are doing it on a color image, you’ll need to do some split toning as well, but that depends on your personal preference.

You should also spice up the things with some grain (not noise, two different things) since that is one of the key features that film had which the digital sensor doesn’t.
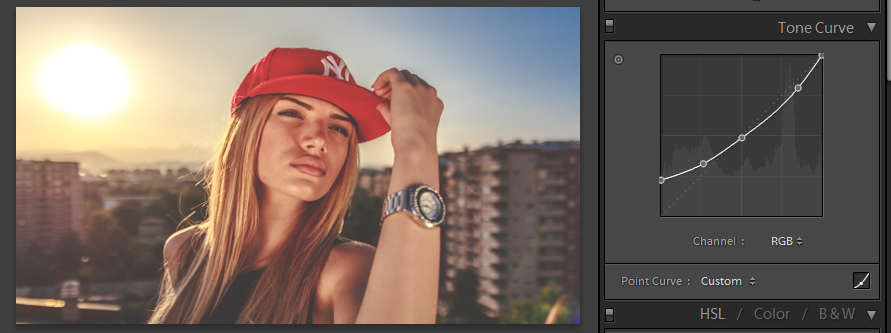
How to Adjust the Tone Curve
You need to lighten the shadows and compress the highlights a tad in order to create the vintage look. In Lightroom you can do so by using the Tone Curve on the left side. By default the curve isn’t a point curve – instead it has values which you alter by moving sliders. This gives you control of the Highlights/Shadows , but it is not what you need. You need to change it to a point curve, and you can do so by pressing the curve button in the bottom right corner of the Tone Curve box. This will remove the sliders and will allow you to fully control the curve to your liking.
Split Toning for the Film Look
You can do split toning in two ways – either use the tone curve (affecting just a single channel) or use the Split Toning box in Lightroom which is usually easier to use. You can basically add any color to the shadows and highlights with split toning, but not every color will achieve the desired effect. There are two things to keep in mind: that you should either use colors that are complementary in moderation, or look for color degradation in the specific film that you are trying to emulate.
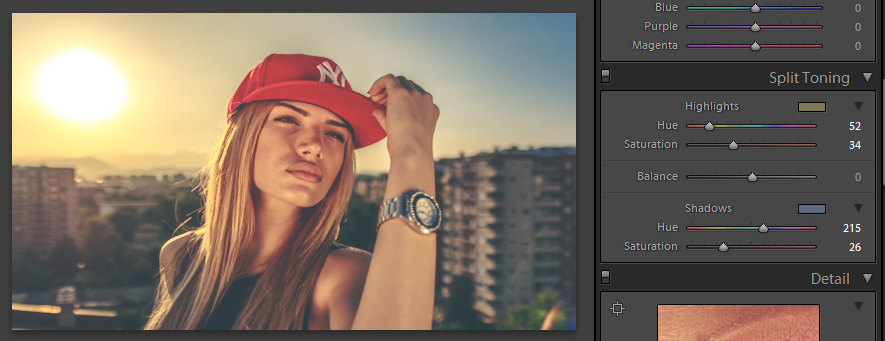
Just make sure that you don’t overdo the effect and make it look over-done. Moderation is crucial in this since it can ruin the colors quite quickly. Luckily, Lightroom is a non destructive software therefore you can adjust the amount of effect whenever you want.
Getting the Grain Effect of Film
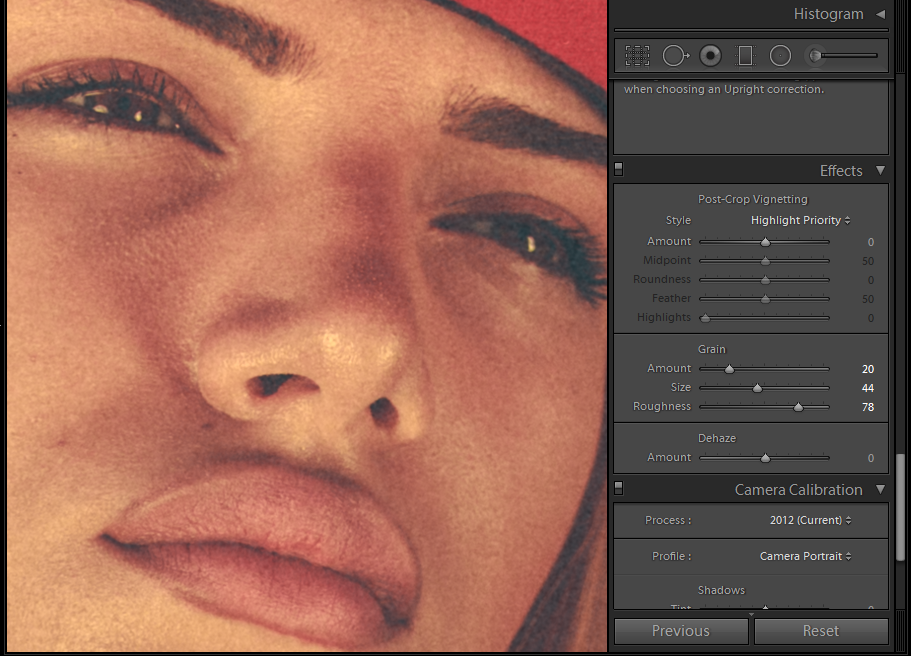
Unlike sensors, which generate noise based upon the lack of signal (or boosting the signal), film has grain. The difference between grain and noise is the size and distribution. One noise speck is always one pixel in size, while film has granules which are different in size, thus it looks and feels quite different.
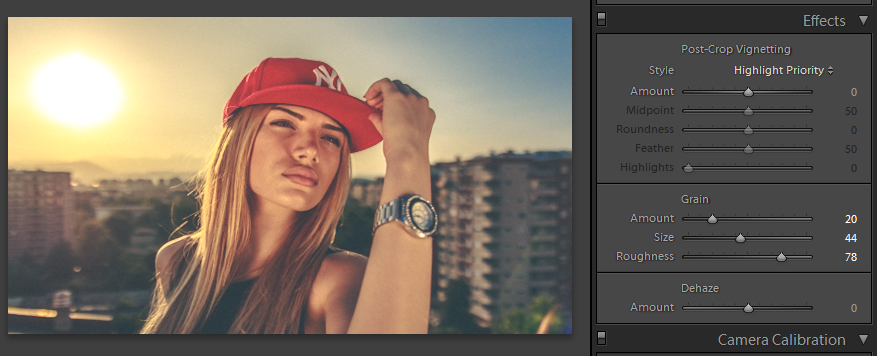
Lightroom can simulate film grain, with quite good control. You can find the grain controls in the Effects box under Grain section. There you can control the amount, size and roughness of the granules to your liking. I wouldn’t be able to give you exact settings since it will vary from picture to picture, and it will vary towards different resolution.
What About Colors?
It is obvious that many photographers prefer vibrant and rich colors, but when it comes to the film look you’ll have to tone them down a bit. Colors that are too rich aren’t something that you would often find in film. Yes, film can produce rich and vibrant colors, but you have to keep in mind that they didn't last too long. As with any other material, the elements damage the structure, thus film loses color information as it ages. And everybody is used to seeing that degradation with the film look, thus you’ll have to wash out the colors in order to achieve that look.
Trial and Error
Though the process is fairly simple, it doesn’t necessarily turn out the same for each photo. You’ll have to twist and turn each aspect to fit the look on the photo in order to achieve the proper film look. That is why presets almost never work perfectly, every photo is a story in itself, and it requires different ways of editing in order to make the most out of it.

Summary
The film look is something you should use in order to make a photo feel more melancholy and nostalgic. In other words, use it only if you shot with that intention. Yes, you can apply it to almost any image, but it can be counterproductive if the photo doesn’t require it. If you want photos which have the film look, shoot them with the intention for it to be applied afterwards. Make sure that you don’t just plaster it as a template over every photo just because it is a trend.




5 Comments
Very good article this, my best regards.
“Every photo is a story in itself ” – Lovely! I think it’s easy to forget the value of individual photographs, as well as the danger of overediting. Thanks for the common sense approach you take in all of your tutorials!
Thanks for providing clear, specific information on Lightroom processing on how to acquire the vintage look.
Good article but as a film shooter I would say all the images fell short to get close to real film. I’d suggest you need to shoot more film to train your eye. If staying within the realm of digital — the best film simulator is RNI All Films 4 Pro for Lightroom. It’s not a replacement of film but comes very close thanks to custom camera profiles.
I use iDealshare VideoGo to create old film look to video like add old film look to MP4, AVI, MKV etc.