Photographing smoke is nothing new and isn't the most difficult task to take on, but it is one that will require some amount of preparation and practice to get just right. It's also a great exercise for strobists or those without a bunch of expensive studio lighting and, camera aside, you can buy just about all the supplies you will need at your local drugstore. Let's get started!
The Setup
First things first, gather your supplies. You'll need your DSLR and a light source. An off camera flash outfitted with a snoot is ideal; however, a strong directional desk lamp will work in a pinch as well. With the flash route, you'll also need a trigger or sync cable to fire it. If you really want to get fancy, grab a reflector–or white posterboard–to go along with the lamp. Find a nice black background that is non-reflective such as a piece of cloth or posterboard. If you have a tripod, awesome! If not, you can still do this handheld or just sit your camera on a level surface. Now all you'll need is an incense holder, a package of incense, and something to light them with.
Find a nice dark location that is draft free. In other words, wait until nightfall, turn off any fans and don't work next to an open window. The smoke is easily moved with even the slightest breeze and that can make photographing it very difficult. Once you've got all this sorted out, you'll want to setup your work area. Below is diagram of what your setup should like. Don't worry if you don't have a reflector, it isn't necessary, just helpful at times. I use a speedlight so that's what I put in the diagram, but, as mentioned earlier, a good lamp can also be substituted.

Camera Settings
As far as camera settings go, it will vary depending on your specific setup. Just keep in mind that you are trying to freeze the motion of the smoke in your photograph. I've always shot these types of photos around f/7.1 with a shutter speed around 1/250th at a 105mm focal length. Others have had great success at f/5.6 and 1/100th. Take a few test shots at variable settings to settle on which works best for you. While you're setting up your camera, go ahead and turn auto-focus off since the moving smoke will confuse it. Instead, manually focus on the tip of the incense stick.
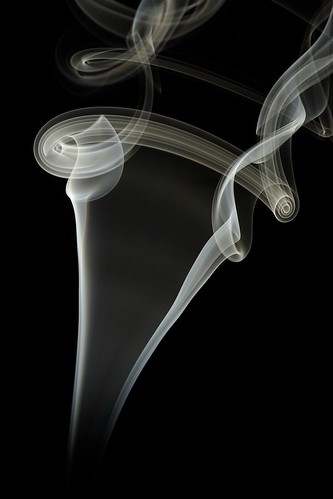
SpiralSmoke by deanfotos66, on Flickr
Get Creative
Light your incense stick if you haven't already, turn off the overhead lights, and get snapping. Fine tune your setup by moving the light closer and further from the incense until the you are getting a solid black background and crisp white flumes of smoke, similar to the photo above. Once you have that, you're ready to really get creative. Use a piece of paper to move the smoke or pick the incense stick up and twirl it around to draw patterns with the smoke. An assistant or a remote trigger will really come in handy about now. You can also try adding props to the image, like Charles Knowles has done here:

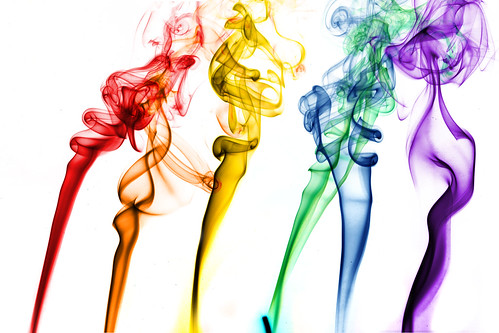
Because the nature of the smoke and its constant motion, you will probably find that you'll snap a lot of pictures just to get a handful that you find usable. Don't let this frustrate you, it will be the same way for everyone. Once you have a few photos to work with, import them onto your computer and weed out the good from the bad. The editing process is where these photographs really start to come to life. As you've seen in the photos above, you can swap the background and breath a little color into the smoke, or just sharpen up the images and call it a day. We'll cover all this in part two, so get some smoke shots taken and in the next installment, I'll show you a walk through of the editing process.


8 Comments
Excellent tutorial, just been trying it out now.
I’d like to add that if you have a grid to go over your snoot then you can dispense with the need for a background altogether.
Good tip, Will! Thanks for sharing!
Good tip. I got some interesting pictures with exactly this setting. With an additional remote control (timer) it was possible to move arround what changed the smoke direction.
I like this article. The advice is appropriate for any photographer what ever camera or equipment they have available. They (including me) can all have fun. One of my favourite pieces of photographic equipment only suitable for use with my small camera cost $5 in the local toy shop!
auto focus is new to me thanks…
Nice article! Now I’d like to read “part 2” about the editing tips for smoke photos. Does anyone have a link to this?
A setup which worked for me very well was placing a flash below the source of the smoke, and having an object blocking the flash to hit the lense directly. The results were amazing, and I created some smoke brushes out of them. If you want you can get them here for free and non-commercial use:
https://www.xresch.com/design-products/smoke-brushes/