If you have been a photographer for some time, you know that aperture, shutter speed and ISO help to control the exposure of a photograph and they are the three factors that form the exposure triangle in photography. You need to choose these three settings based on your creative vision and the most important roles are played by aperture and shutter speed when it comes to creative photography.
ISO invariance is an exciting topic in photography and a lot of photographers have been using this feature and have seen great benefits from using it. This can be a confusing term for some photographers and in this article, we will look at ISO invariance.

What Is ISO
ISO is a term used for film sensitivity or light sensitivity. The higher the ISO value, the greater the sensitivity to light. There is a huge difference between film ISO value which is fixed and digital ISO which can be changed as per requirements when photographing a scene.
ISO In Film
In film, the photosensitive (light-sensitive silver halide) materials determine the light sensitivity. If the ISO value is low, for example, ISO 100, then the film is less sensitive to light and these films are perfect for shooting in bright light situations. If the ISO value is high, for example, ISO 800 or ISO 1600, then these films can be used to shoot low light or nighttime photographs because of their increased sensitivity to light.
ISO In Digital Cameras
In digital cameras, the same ISO system used in films was adopted and in digitalISO, the light falling on the camera sensor is converted to electric signals which are then amplified depending on the setISO value. In digital cameras, you can change theISO values very quickly and easily in order to suit the scene you are photographing to get the desired exposure.

Most digital cameras these days have native and extendedISO values. Let us quickly look at it before we get into the most important topic of this article.
Native ISO
NativeISO is theISO range in the camera without any other enhancements made in the camera to bump up the sensitivity.
For example, let us consider the camera Nikon D750. It has anISO range of 100 to 12,800, expandable to 51,200. There is also a lower expandable range where you can shoot belowISO 100 although the nativeISO range starts fromISO 100.
NativeISO for the above camera isISO 100 to 12,800. When you capture photographs withISO between these values, the light falling on the image sensor is converted to electric signals that are amplified based on the setISO value.
Extended ISO
ExtendedISO is pushing theISO beyond the nativeISO value. This could be either on the higher or lower side.
So for example in the Nikon D750, when you use higherISO values beyond the nativeISO values like 25,600 or 51,200, the camera underexposes the image based on the highest nativeISO value which will be 12,800 in our example. Then through digital processing, the camera will bump up the exposure to suit theISO value 25,600 or 51,200 and as a result, you will have amplified noise in the image, less contrast, sharpness, and even artifacts.
A better choice to have greater exposure in these scenarios would be to shoot slightly underexposed images at the highest nativeISO, that is 12,800 and then bump up the exposure when post-processing. You can reduce noise during this process in your post-processing program.
These extendedISO values are not actual nativeISO values because they are processed in camera digitally. As a result, they do not help to produce good-quality images. In fact, they reduce the quality of the image.
The same applies when you useISO values below nativeISO. The camera will expose the image to the lowest nativeISO value likeISO 100, then through digital processing, underexpose the image to look like a lowerISO value, for example,ISO 50. This will reduce the contrast and even make the image lose details in bright areas and may reduce the dynamic range too.
It is always advisable to not use extendedISO especially when shooting raw. It may be beneficial when shooting jpegs. In the same way, when using theISO invariance feature, you should stay within the native ISO limits and we will see in a bit what ISO invariance is.
What Causes Noise In Photographs
A lot of us may think that noise in photographs may be created only due to high ISO, heating of the sensor during long exposures, as these are generated in camera. That is not true. Sometimes you can see noise in photographs that are a result of atmospheric conditions.
Sometimes, even when shooting images using low ISO values, you may be able to see some noise in images and this is due to photon noise. Photon noise is the randomness in the light signal entering the camera.
Then there is “read” noise. These can be front-end or back-end read noise. Front-end read noise can be due to heat and other electronics in the camera caused during image capture (analog amplification) and the back-end read noise is generated after the analog signals are converted to digital signals afterISO amplification (digital amplification).
This is a huge topic and if you are interested in the science behind the different noise generated in the photography process, you can read more about these in articles that talk about this in detail or watch some videos that explain this. It is interesting to know.

What Is ISO Invariance
ISO invariance can be quickly defined as a feature in some cameras where the resulting images have the same quality despite theISO values used to photograph them.
In order to explain this in a simpler way, let us consider two scenarios when photographing a low light scene. Make sure the images are shot in raw format.
- Using a particular camera, an image captured at a particular aperture value (for example, f/2.8), shutter speed (for example 1/250s) and higher (for example 3200) to get the right exposure in camera.
- Another image captured in the same camera, with the same aperture value f/2.8, shutter speed 1/250s, but low value (maybe ISO 100, ISO 200 or ISO 400). The image will be underexposed. This image is then post processed using a post processing software to get the exposure right, that is, to get a properly exposed image equivalent to the exposure in the first image shot at ISO 3200.
When you compare the quality of both the above images, it will be the same – almost the same quality for both images. Sometimes the image shot at lowISO and correctly exposed when post-processing may have a better quality than the image shot at highISO with the right exposure, in terms of rich colors and dynamic range. This could depend on the atmospheric conditions, light, and others. This leads to the belief that no matter whatISO you are using, the electric signals from the sensor are almost the same.
ISO invariance is a feature where you do not have to worry about the ISO settings much for capturing an image. You can always shoot at low ISO and capture an underexposed image and later correct it when post-processing. This is possible only if your camera has theISO invariant feature.
Note: Remember that you should not overexpose your photos in hopes you can recover data when post-processing. Chances are that you will lose a lot of details in the highlights as they can sometimes be never recoverable.
In general, the ISO invariance feature throws away the rule of “getting it right in camera.” Basically, you shoot at anyISO value in the camera’s nativeISO range and still get a usable and mostly good quality image when you bump up the exposure makingISO a not-so-significant factor for the resulting exposure.
Note: Cameras having nearly zero or very less back-end read noise can beISO invariant. If you are using anISO value where there would not be much front-end noise amplification, when you increase exposure during post-processing to get the right exposure and you get neat results, then the camera isISO invariant.
Here is an example to demonstrate ISO invariance. These images were shot using the Fujifilm X-T2 in the morning light.
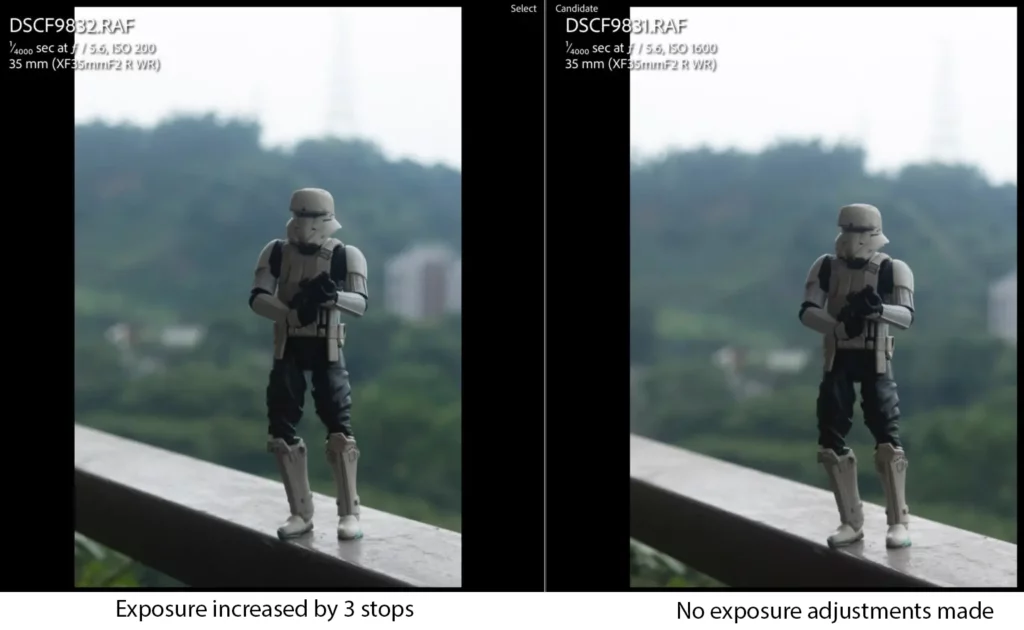
Zoomed in to compare noise in the images.

Here is the before/after for reference:

This way, ISO no longer seems to be an important factor in determining the exposure for ISO invariant cameras. I will be posting more updates here from various cameras and under other light conditions when I get a chance.
Why Or When ISO Invariance Can Be A Better Choice
Using the ISO invariance feature really depends on situations as to when and what you are photographing. It could be a better option sometimes and sometimes not. Here are some times whenISO invariance can be a useful choice:
- There are some scenes where you may only want to selectively brighten the image (specific areas of the image) leaving the rest of the areas dark. These situations are good for using the ISO invariance feature.
- When you are focussed on only brightening parts of an image, you can preserve highlight details by shooting at low ISO and then make local brightness adjustments when post processing.
- Night photography, especially astrophotography, can benefit from shooting using ISO invariant cameras. Shooting at lower ISO and then brightening later in post will give better results compared to shooting at high ISO in camera.
- You don't need to overly worry about underexposing your images.
Drawbacks Of ISO Invariance Feature
As much as ISO invariance can sound like a great feature to have, it can be technically used in some scenarios but will not work well for most situations. Here are some drawbacks of using the iso invariance feature.
- The biggest drawback when using the ISO invariance feature is that, since you shoot at lower ISO values, your images will be underexposed and you cannot see the preview of these underexposed images in case you need to.
- Using the correct ISO means, your camera will amplify the electric signals from the camera’s sensor based on the
- ISO value you have chosen. Based on your camera model, if it is one with a good sensor that performs well at high ISO values, then using the right ISO will be the best choice because your camera will automatically give you a better output than what you would achieve by underexposing and brightening when post processing.
- By using the correct ISO values, you get the exposure setting right in camera and will not need to spend more time post processing your images. You will be saving a lot of time if there are a lot of images that need to be post processed.
- ISO invariance feature cannot be applied to all genres of photography because at times, capturing underexposed images with intentional low ISO values can lead to artefacts, noise, and other banding issues depending on the light and atmospheric conditions in which you captured the image.
- If you are a professional photographer who shoots photographs for other clients, it will not be a good idea to use ISO invariance, especially weddings, architecture, real estate, events, etc.
- If you shoot jpegs predominantly or shoot in compressed raw format, then ISO invariance is a feature that will not be useful for you.
Best Scenarios For Using ISO Invariance
Some shooting conditions require stretching the ISO to get the right exposure. ISO invariance can be a good feature to use in those situations and then the exposure can be corrected during post-production. Here are some situations where the ISO invariant feature can be helpful.
Night Photography
Night sky photography and in general night photography elsewhere requires shooting at higher ISO values in order to get the exposure right. These are situations where you can use lower ISO values and capture an underexposed image and then increase the exposure when post-processing. There are many astrophotographers who use this feature for night sky photography and they recommend using it.

Action Or High Speed Photography
When photographing fast-moving subjects, you need to have a fast enough shutter speed to freeze actions happening in the scene. When using faster shutter speeds, depending on the light in the scene especially indoors, you may sometimes need to increase your ISO value to get the exposure right which may result in noisy images. These are situations when the ISO invariant feature in cameras can be used to use a lower ISO value and get an underexposed image which can later be correctly exposed by bumping up the exposure when post-processing.
Landscape Photography
For landscape photography, you will be using narrow aperture values to get the entire scene in focus and will also be using low ISO values to get a noise-free final image. For this reason, the shutter speed can sometimes be slower, and to compensate for this we usually shoot landscapes using a tripod. If for some reason, you have to handhold the camera, then you can always increase the shutter speed, shoot at lower ISO, get an underexposed image, and then increase the exposure when post-processing.
Also, there are times when photographing landscapes, you may have a beautiful bright sky, for example during sunrise and sunset. You may expose for the sky to get the rich colors and then this will, in turn, create dark areas in the foreground which you may work on locally using brushes when post-processing. Also, this will be a great way to preserve the dynamic range in images.
Another scenario is when post-processing landscapes, even if you get the exposure right in camera, there will be dark shadow areas (in single exposure shots, unless you exposure bracketed the images) where you will need to make use of local adjustment brush or gradient, radial filter to increase the exposure locally in particular areas. In these situations, an ISO invariant camera will help get neat details from dark and shadow areas without a great amount of noise.

Things To Keep In Mind Regarding ISO Invariance
Although having the ISO invariant feature in your camera can be an advantage, there are certain limitations you will need to take into account.
- Always shoot raw if you wish to take advantage of the ISO invariance feature in your camera. You can only recover details properly from a raw file.
- You don't always get good results, so do not rely upon the ISO invariance feature always.
- To get the best results, always shoot in the native ISO range and do not use extended ISO values.
- You need to spend more time tweaking your images when post processing if you underexpose them in an ISO invariant camera.
How To Check If Your Camera Is ISO Invariant
It is hard to tell if your camera is ISO invariant unless you or someone else has actually tested it for the ISO invariance feature. All cameras come with different features and specifications and hence performing this test yourself would be the best choice. You will not find this information in the camera's manual.
In low light conditions or dark situations, take an image with a higher ISO value, for example, ISO 800, and make sure the exposure is right. In the same situation, photograph the same subject using the same aperture value and shutter speed, but reduce the ISO to about 100 or 200, and capture the photo. Now you will get an underexposed image.
Now open the underexposed image shot at ISO 100 in your post-processing software and increase the exposure to match the exposure of the image shot using ISO 800. You should be able to recover all the details in the photo and should not notice much difference. Both the images should look the same and this is when you know that your camera is ISO invariant.
Repeat the test with a different ISO range. For example, shoot two images, one with ISO 100 and another with ISO 3200, or ISO 6400 and ISO 12,800. Import the underexposed image in your post-processing application as above, increase the exposure, if required, shadows to see if you are able to recover details similar to the correctly exposed photo without loss of quality. In this process, you will be increasing the exposure by many stops, for example, five stops or more.
You can also shoot at the highest native ISO value at the right exposure and then decrease the ISO value by a stop and take a photograph. Continue like this till you reach the lowest native ISO value. Increase the exposure for all images in the post to match the first image shot at the highest native ISO value. Compare these images to see how the resulting image quality looks for each ISO value and you may be able to discover the best ISO value to work within your photography workflow.
ISO Invariant Cameras
You may have this question in mind. Are all cameras ISO invariant? No, not all cameras are ISO invariant. Some modern cameras can be ISO invariant and again, it can be for a particular ISO range. The range actually can vary from camera to camera and the resulting quality will also vary with the camera.
There are a few selective models in each brand that are ISO invariant, so use the above method to find out if your camera has that feature. Here are some cameras that have been tested by photographers and there are many more that are ISO invariant.
- Sony A7R II, A7R III
- Nikon D750, D780, D810
- Fuji X-T1,X-T2, X-T3, X-E1
- Pentax K5
If you have personally tested a camera model and are sure it is ISO invariant, please let us know in the comments section below.

ISO Invariance – Better Cameras Or Sensors
ISO values are not something to be worried about when shooting in low-light conditions. Whatever camera you have, it is good to run an ISO invariant test on it to see how it performs at different ISO values. More recent cameras have advanced sensor technology, which means they are becoming more ISO invariant with a good dynamic range and high performance at most ISO settings.
The ISO performance of cameras varies from model to model and taking some time to understand the ISO performance of your camera will help you to create images that you desire irrespective of the camera you own. Being ISO variant or ISO invariant is not the only deciding factor that makes a camera or its sensor better. In fact, all cameras are good, it is just that they perform differently in different scenarios. They are just different cameras with different features and the photographer needs to take advantage of the camera features, understand how the camera operates, so they can successfully create good quality images.
Final Thoughts
ISO invariance can be a great feature in digital photography to have for situations where you may need to capture images using higher ISO values, but you want to shoot at lower ISO values in order to reduce image noise, for example, night photography. Invariant ISO in a camera does not mean it is a better camera or has a better sensor.
Recent cameras come with very good sensors, which means better noise performance in low light situations that even if you shoot at high ISO values like ISO 1600, ISO 3200, or ISO 6400, they still produce good images with not much evident noise. But then again it can depend on the sensor technology, sensor size, and resolution. Images from older cameras will struggle when you try to increase exposure in underexposed images.
Also in ISO invariant cameras, you may not always see good results when underexposing the images and it may not be possible to apply this technique for all genres of photography. So whether you are using an ISO variant or invariant camera, ISO is still useful in digital cameras (even if the camera is ISO invariant). Just take advantage of the invariant feature where necessary, if your camera has one.
You cannot always shoot at ISO 100 or 200 and rely on increasing exposure when post-processing. Also, you will not be able to preview images at all for any sort of technical, compositional, or other issues. So whatever camera you have, take advantage of its features and create better images. I personally would still be using the ISO features to get the right exposure in camera and may try the ISO invariance feature the next time when shooting the night sky to see how helpful it is.
Have you used the ISO invariance feature? What are your thoughts on it? Share with us in the comments section below.


