Want to know what the Lightroom Spot Removal Tool can do and how to use it? And why? Well, have you ever taken a great shot of friends or family, only for the final image to be ruined by a photo bomber?
An uncle in the background picking their nose behind your beautifully posed parents?
A toddler pulling his pants down behind a wonderful family group shot?
A “funny” guy doing rabbit ears on your subject?
We have all been there. It’s a constant source of irritation for anyone who whips out a camera at a group event. And it’s REALLY irritating for pros (drunk guests at a wedding being funny anyone?)
So how do you deal with it?
Well, the obvious way is to make sure you check your backgrounds before you press the shutter. That’s no big secret, but it also isn’t particularly helpful once the damage has been done.
If the photograph is already captured and there is no way of going back and recapturing it, then you need to rely on your post-production skills.
Enter the Lightroom Spot Removal Tool
Now, if you’re lucky, the photobomber is a small part of the photo (I am thinking a small dog in the distance or something like that) and you have relatively simple backgrounds. In this situation, the spot removal tool in Lightroom will often be enough to save you.
Take, for example, this image by Frans Van Heerden who tried to take a photo of his friend’s new boat only for the image to be photobombed by two rude jet skiers!

Let’s take a look at what Frans could have done to remove the interlopers.
Working in Lightroom
Let’s open up the Develop Module in Lightroom!
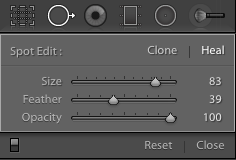
When you click the Spot Removal Tool (shortcut: q), you get the option to choose “clone” or “heal” (in the drop-down box that appears). They make different decisions on what to sample in order to replace the spot, but honestly, there is no best choice, so try both of them. Different ones work better for different images.

- Heal – matches the texture, lighting and shading of the area you select, but colours near to the fix.
- Clone – duplicates an area of the image onto the area you select (including colours and shades).
Troubleshoot: Getting colour bleeding in your fix? Switch from “heal” to “clone” and you should be good to go. Just remember that with clone, you should be looking for source areas of similar brightness and colour.
Try to have the size of the tool just a little larger than the thing you are trying to remove. You can change the size of the brush with the slider or use the [ and ] keys on your keyboard.
Click on the element you want to remove and you should see two circles appear – the “fix” circle and the “source” – whatever was in the fix circle will be replaced from the source circle. Click inside and drag the source circle if the automatic selection is not appropriate.
If the are you are trying to fix doesn’t fit in the circle, you can also click, hold and drag to cover the whole area – basically, draw it all in.
Workflow Tip: If the circles/outlines get in the way of you being able to see your edits properly, you can make them disappear by setting the “Tool Overlay” setting to “Auto” and moving your mouse off the image. Just press T to show the toolbar and that setting is on the left of the toolbar.

After you have made the edit, if it’s a bit obvious that you have replaced something then there are a few more things you might like to try.
- Use an appropriate feather on the brush so that it blends into its surrounds (using the clone option can give you a very rigid edge, so you will most often need to feather it somewhat).
- You can alter the size of the fix circle by clicking on its edge and dragging. Sometimes that helps get a little more control.
- If the edges of the cloned area don’t blend into their surrounds enough, try muddling the edges (a new brush that brings down clarity etc) to break it up even further. Try to throw the area into less sharp focus that way. You can also do subsequent clones of smaller areas to make the result look better.
With only the spot removal tool I was able to remove the top jetskier. I then set the feather to 20 so that the water blended in with its surrounds almost perfectly.

But what about that pesky bottom jet skier with the long wake trail? Is the spot removal tool able to do that too?
In this case, the answer is yes. Again, that is because it has a fairly simple background to blend into, but also because the wake is a long straight line.
Select the spot removal tool and simply click once on the jetskier. Next, hold the shift key down and click at the far right of the wake.
Voila! The spot removal tool edits the entire line of wake! Set the appropriate feather and you would never know there was ever a photo bombing jet skier or two in the picture!

Reaching the Limits of the Spot Removal Tool
Now the spot removal tool is just great on making simple replacements like the photo above where the background is fairly uniform and the subjects we are trying to remove are not intertwined or immediately behind our main subject.
But what if the problem is more complex? Like some idiot doing rabbit ears?
Look, I am not going to pretend that there is a magic bullet here. Sometimes you need to just accept that the shot is ruined and move on.
However, the “big gun” in post-production for this type of thing is to learn masking and learn it really well.
Effectively, that means selecting certain elements of the image (eg. rabbit ears hand) and removing/moving them or otherwise editing only that specific part of the image. The key is the very careful selection of only those areas that you wish to alter (and this can be extremely tricky depending on the image).
Now, basic cloning/healing edits can be done in Lightroom with the Spot Removal Tool, but if you have an emergency or you feel you might need those skills for a future emergency, then Photoshop is where it’s at (and that’s coming from a guy who is a Lightroom devotee).
Lightroom is the king of all over edits, but for specific areas of an image or detailed masking edits, then Photoshop offers a lot more control.
To get the exact skills we’re talking about is no small task.
But the upside can be quite a lot larger than simply saving some ruined images.
It also opens up the world of composite images that can really skyrocket your creativity. In fact, Kent DuFault (whose excellent Guide to masking is the current standard in guides on the topic) tells how his biggest-selling stock photograph of all time is actually a composite put together with masking skills.
The guide is absolutely worth a look to master a massive skill in the photographic world.


