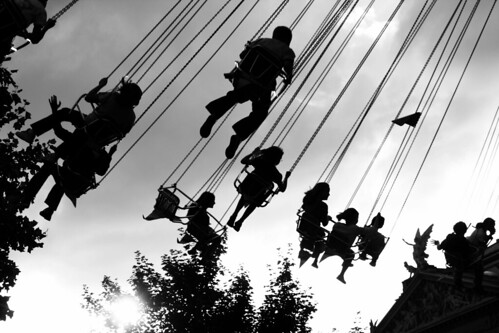
Black and white photography is often seen as some of the most pure forms of the art. Removing the color and only dealing with the composition and contrast and how it relates to brightness in the shades of gray, black and white can often show an image in a whole new way. Since digital photography has allowed us the luxury of shooting in color and converting to black and white we as photographers can always choose how we want to convert them. A few digital cameras offer a black and white mode but the results are mediocre at best, and converting yourself can be the more rewarding while yielding the highest results. There are however a few mistakes you can make while doing the conversion.

Don't use the Convert to greyscale option in Photoshop. This conversion strips so much data from your photos and yields some of the worst conversions available. Avoid this at all costs.
Poorly exposed photographs make poor looking black and whites. Don't assume that because you over or under exposed your image that converting to black and white will fix the problem.
Black is needed to make an attractive photograph, it says it right in the name, black and white. If you've grown into the habit of using the histogram in Photoshop or Lightroom to show you the black and white highlighted areas don't adjust the exposure or increase the fill light to the eliminate all the flashing area. Solid black in some portion of the image is not only acceptable, it's needed.
White is needed in the same way black is. Again, don't over-use the recovery tool in post processing if some areas appear to be over exposed, it's OK to have some pure white in your image.
Grey tonality is what will make your black and white conversions truly magical. There are hundreds of Photoshop actions and Lightroom, each slightly different then the other. In addition to the actions, you can further tweak the levels and curves of your converted black and white file, but in the end, you'll have to do them one by one. I have yet to find one way of converting a file, or one specific action that works on every single type of photo, so try a few on each and choose which one best fits specific photo.
Not having a properly calibrated monitor will cause you nothing but headaches. Nearly every computer monitor and laptop comes with the brightness level set to 100% and the contrast all the way up. This makes everything pop and look bright and amazing, but the reality is that the color representation to the real world is drastically off. If you edit your photos with the default monitor settings when you make prints or look at them on someone else s computer you could be extremely disappointed. That's because with the brightness set to 100% you'll be more likely to add contrast to the photo and the shadow area of the black and white will be edited incorrectly. It's like trying to edit with a blindfold.
Avoid in-camera black and white mode. As mentioned in the opening, some digital cameras offer a black and white mode, it's not great, it's not even that good. The processor in your camera is but a spec of dust compared to how big the processor in a computer is. Shooting in color actually gives you more range in the photo for the conversion process.
Bad composition is not fixed with a black and white conversion. Black and white photos are often seen as more artistic and pure a form of photography, but having a badly composed photograph does not mean it's instantly artistic by making it black and white.
The digital world means we can change the output of our photographs after we shoot, unlike film when we had to shoot with the intended purpose of whatever roll was in the camera. As beautiful as black and white can be, it can often be frustrating to achieve the perfect photo. Hopefully these tips will help eliminate your mistakes.


20 Comments
I can’t get enough of black and white!
Thank you for this post, very helpful! Avoiding shooting in B&W is one of the first tips someone told me when I first picked up camera. Definitely a good idea.
I do have a request though, are you able to post an article on B&W photos with color tones? for instance, this photo:
.. isn’t the greatest photo. However, it’s got a warmer tone to it. I see a lot of people using reds, blues, and green tones added to a B&W (not sure if there’s an actual term for it) and I can’t seem to figure out how to not make it look like I edited it in some kodak program that came with some P&S camera. Any advice would be helpful!
I meant this photo, sorry:
Good read. I’ve always been disappointed with my skill at converting to black and white and kind of long for a good roll of b&w film. Maybe this will help me get on track…
You say “don’t use the convert to greyscale option in photoshop”, which I agree is a terribly way to convert images to greyscale, but you don’t give people who may not know about it any good alternatives.
The (as of CS3) Black & White adjustment layer
The Channel Mixer
Gradient Mapping
Any particular method you prefer?
ugh… I hate it when I can’t edit the spelling/grammar in my posts 🙂
I would add that in my experience, not only can shooting in color really help you have more data to work with when creating black and white images, but actually doing 32-bit images through HDR before the B&W conversion can work really well:
https://farm4.static.flickr.com/3297/3413337498_296c29d417.jpg
I shot this at the local university’s library, with three exposures (one ‘properly’ exposed, and then two more at +/-2EV). Then combined those three into one HDR shot (which meant that I had better detail in both the bright windows and in the darker shadows). A quick run through my preferred black-and-white conversion recipe, et voila! Lots of beautiful black-and-white detail.
The only point I don’t agree with is the avoid in-camera B&W mode. I do it all the time with excellent results. What I do is shoot raw (nef files, on my Nikon camera), but with B&W mode. This way, I see the picture in B&W on the display, but when I get home, the real picture (the nef file) is full color. Than, I convert it to B&W with Lightroom. The black and white preview of the picture helps a lot on getting a good picture in post production.
I use a Nikon D300.
This is my best output in color to B&W conversion.
Still need to hone my skills on that. Better if you publish some ideas and techniques in this department.
https://farm3.static.flickr.com/2645/3952513552_45f7ac4294.jpg
Can I respectfully and mildly disagree with the in-camera B/W mode? I did a night street shoot and converted to B/W, which was fine. I then discovered that the Nikon D300 had a B/W mode that lets you tweak some of the settings. I set that, then went walkabout with the 50mm f/1.8 and a fixed ISO of 1600. That produced this set:
More than happy with the results. Well up there with the ISO3200 I went walking in Camden with on my F65 🙂
An excellent article and great that someone spells it out as it should be. Understanding that you can’t get a great B&W unless you start with a great color photo in the first place.
Although I really like the advice you give here, and thank you for the pointers, I feel that “Avoid in-camera black and white mode” is really poor advice. Unfortunately post processing has made it too easy to convert to black and white these days, but converting to black and white does not help you to THINK in black and white. I believe taking pictures in black and white is a totally different process to colour photography. When you strip away all the colours all you have is shapes, composition and LIGHT. Photography students have been using black and white to learn photography even well after the development of colour film, and this is not because it ‘looks more arty’ but it helps you to see photographically. You can learn to see and think in terms of contrast and light. Ultimately light is the most important factor to photography and I believe people should embrace the B&W mode in their camera and shoot in black and white for at lest a little while. Maybe just a day, a week, or a month. But saying that you don’t need to shoot in black and white because you can do it much better at home on your computer is like saying that you don’t need to buy a prime lens if you have a zoom lens. The process of taking a picture is simply different.
great post! i am sure i can teach this to my students
If I shouldn’t set my monitor to 100% brightness when edit/convert to b&w, what should I set it to?
This is one from my black & white series. Once just got out to the street and did try to make a completely BW set.
https://www.flickr.com/photos/mromka/4688431536/
Great Post… really helpful…. I used to use Greyscale a lot and most of the time hated the results… but in older versions of photoshop there was no Black & White under the adjustments menu.. until CS3 I think! Is there any websites that you can download B&W presets for Photoshop?
It´s good to know that I am doing my B&W photos quite right, of course I have a lot to learn, I´m just a Begginer, really a begginer in this but feels like I´m going the right way, nice article, just one thing, the monitor settings, what would be the best settings?, I´m lost in that one.
Good posting, thanks a lot!
like daniel, i want to know how should themonitor be set.
can i send some pics from mexico in a exotic place??????