Black and white photographs are beautiful and it makes many of us wonder how someone could have captured and post-processed such a stunning but simple photograph in black and white. In this article, we will discuss a few tips on how to capture and edit stunning fine art black and white photographs.
Black and white was how photography started in the early days and it is still one that is enjoyed and admired by everyone because of its classical beauty. One sees the world differently through black and white photography and it also helps to focus on the important bits and bring more emphasis to the subject.
Here are some great tips to capture and edit fine art black and white photographs, that you can share with friends and family or print and hang on the wall.

What Makes A Great Black And White Photograph
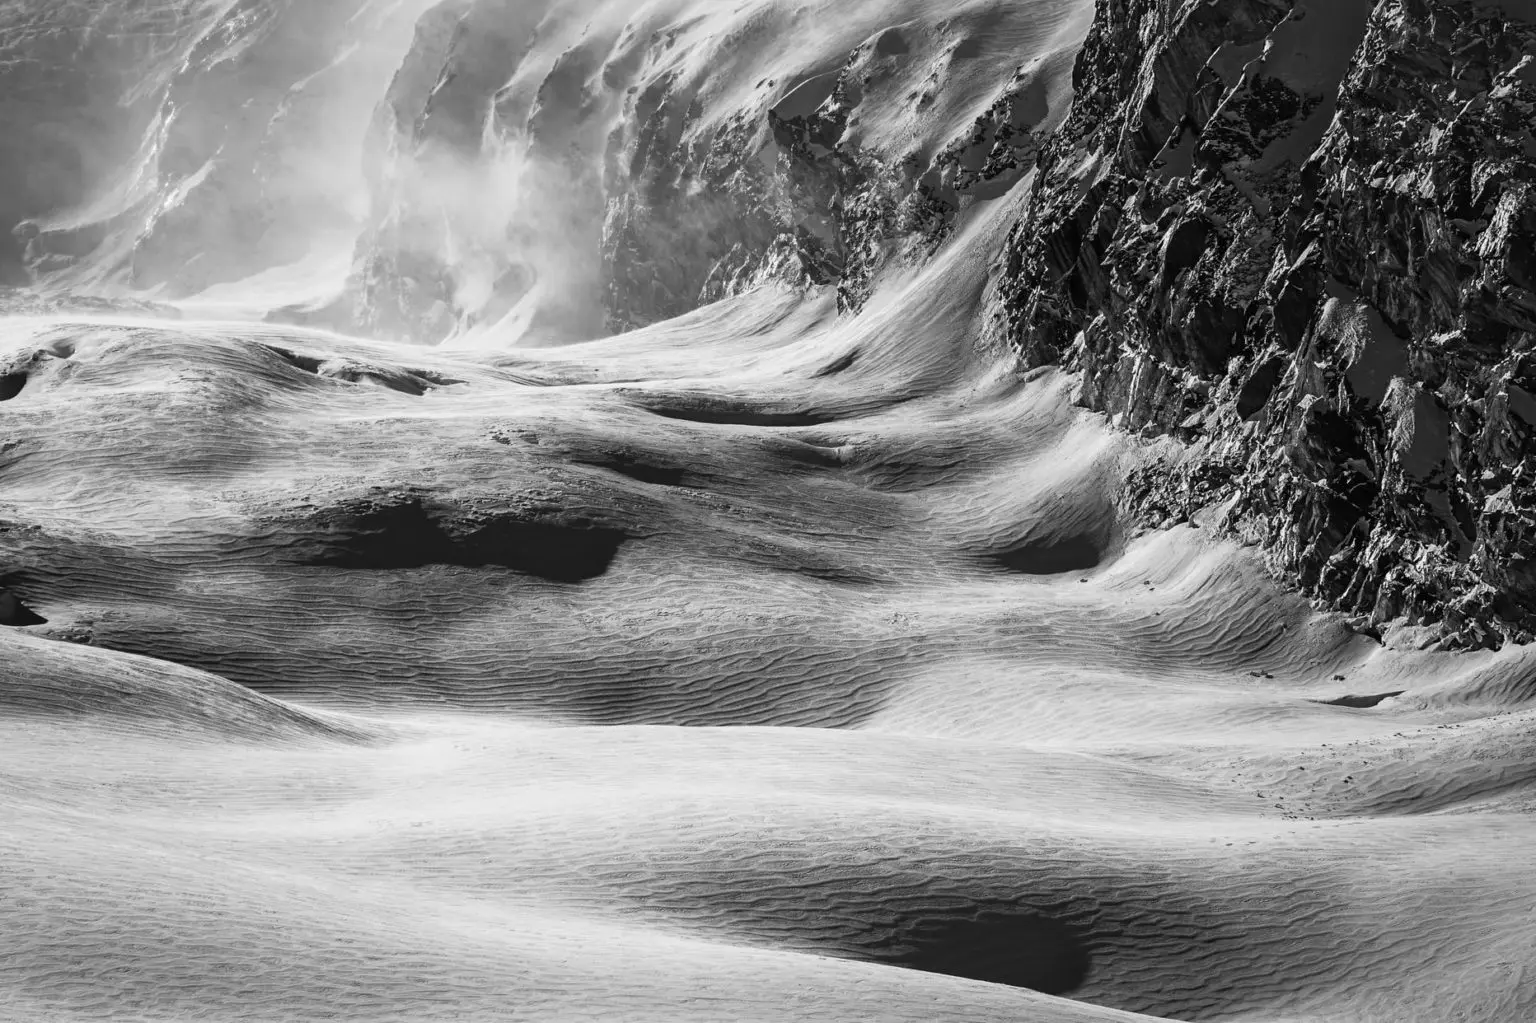
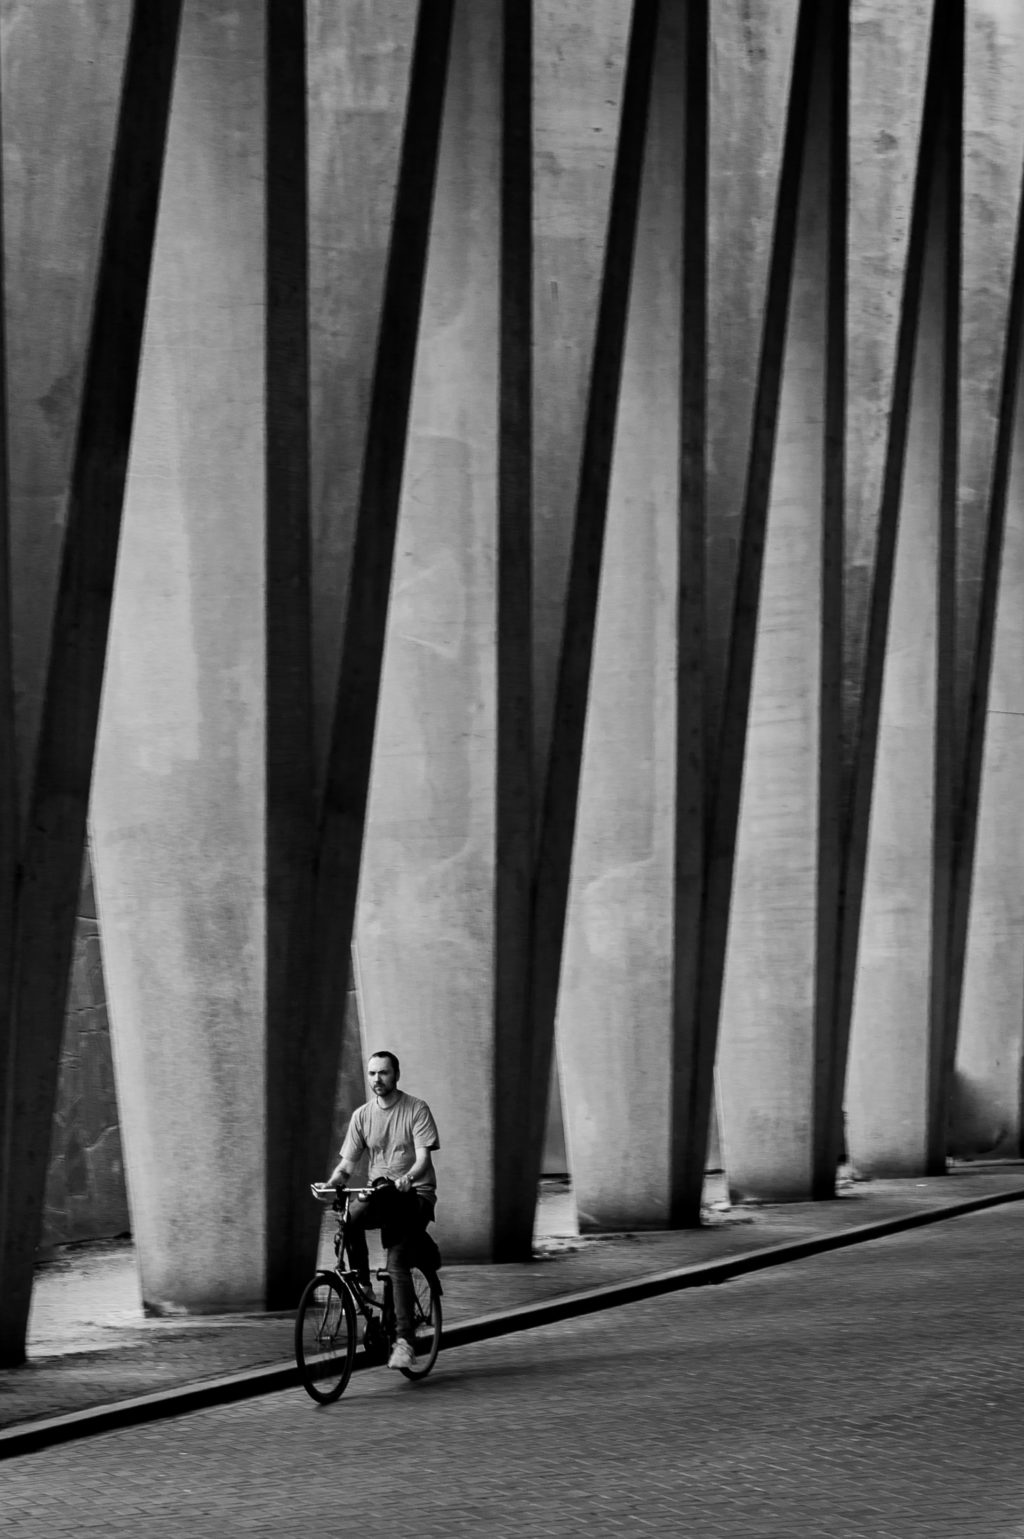
Great black and white photographs need to have a tonal range with notable contrast between the lights and darks. Besides contrast, shapes, patterns, textures, shadows, and composition can be key elements for a good black and white photographs.
For great black and white photographs, when looking at a photo or a scene that is right in front of you, you should be able to visualize if the frame will work better in black and white. For example, a scene may look brilliant with contrasting colors and other details, but when converted to black and white, it can look flat, dull, and boring.
You cannot just guess that contrasting colors can help with capturing stunning black and white photographs and you need to have a good understanding of tonality. Some colors may look distinct, but when converted to black and white, they may all end up with the same tones. Most of the time, if you shoot raw, you will be able to tweak the colors, change the luminance values slightly and bring in a tonal range.
Here are two examples:


For more details on learning to shoot in black and white, check out this article, “When Learning to Shoot in Black and White, You Can’t Just Guess.”
How To Capture The Raw Beauty Around For Stunning Black And White Photographs
In a black and white photo, you only have black, white, and different shades of grey and hence you will first need to visualize how the scene will look when converted to black and white. Besides, you need to pay more importance to how light works in the scene because light can add more depth, interest, and contrast to a black and white image and also accentuate the shapes and textures in the scene.
So when capturing for black and white photography, you need to pay more attention to the light and other features that can add contrast and drama to the photo and also use powerful compositional techniques. It is these features that will help a black and white photo stand out.
When composing for black and white photography, look for foreground and background elements, frames, and strong lines, so that they will help to add drama and interest to your frame and keep the viewers engaged. Try different perspectives like top or low angles, as these can also add interest to the image.
How To Choose The Best Light When Working In Black And White
When looking at the scene or subject you are planning to photograph, you will need to pay more importance to how the scene is lit at the time you are planning to photograph. Here are some light situations and what to expect when photographing under these conditions.
Dramatic light that is bright and strong works great for black and white photography. Early morning and late afternoon light are great to capture dramatic black and white photographs. Overcast days are also great depending on the mood you want in the resulting images.
Strong light helps to accentuate textures and add more depth to the image because of the shadows it creates. When the sun is low in the horizon, the shadows can be exceptionally long and lead to dramatic creative photographs.
Soft light like the ones on overcast days can be used to capture soft dreamy kinds of photographs. This is because of the soft grey tones created by the diffused light. You also get to work with soft light during the blue hour.
Midday light is often termed as very strong and flat light that can look boring in an image. Sometimes, depending on how you use it, you can make use of midday light as well for stunning black and white images. Most of the time, photographers stay away from using this light for photography, but if there is an interesting scene to work with, by all means, make use of this light for black and white photography.
Lenses For Black And White Photography
Although images shot with any lens and focal length can work well for black and white photography, wide-angle lenses help with capturing unusual perspectives that can add depth and drama to an image thereby enhancing its options of being a better photo for black and white.
Wide-angle lenses help to accentuate the lines in the scene for example in landscapes. It will seem to extend far into the horizon, making the image more engaging.

How To Get Ideas And Inspirations For Great Black And White Photographs
There are many great black and white photographers whose work inspires many. By looking through their works, browsing black and white photography magazines, and visiting galleries that exhibit black and white photographs, you can stay inspired and also pick up ideas to capture great black and white photographs from the scene that is right in front of you.

Camera Settings To See The Scene In Black And White
There are black and white filters that you can use on your camera lens that will help you to capture black and white images straight in-camera. Besides, some cameras come with profiles that may help you to capture the image in black and white.
It is however not recommended to capture the image directly in black and white, but to capture it in color and then convert them to black and white when post-processing. This way, you have a lot of details to work with and make adjustments to your image, for example, to create tonal contrast, based on your visual perception.
You can quickly preview a scene in black and white if you want to make decisions quickly on location to see how a scene will look in black and white. Most cameras come with features like film simulation, profiles, picture styles, or picture controls, that will allow you to preview the image in black and white. Even though the preview is in black and white, by capturing the raw file, you capture the colors in the image which will be helpful when converting the image to black and white.
The black and white or monochrome preview option can be great when you are quite not sure how a scene may look in black and white. These previews will also help you to adjust the direction of light and perspectives to get the shot right.
The next feature to keep an eye on is the histogram. Make sure your histogram is not too much towards the left, which means the shadows will be very dark. Keep the histogram as much towards the right, extending towards the left, so the tonalities are equally distributed and the image has enough shadow and highlight details, with no clipping.

When using the histogram to get the exposure right in some confusing or tricky light conditions, you can make use of the exposure compensation feature to get the correct exposure. Here is a quick read on “How to get the perfect exposure with a histogram.”
Tips To Edit Black And White Photographs For Brilliant Results
Now that you have captured some stunning images for black and white conversion, you need to import the images into your post-processing application to convert them to black and white. In this article, we will be talking about using Lightroom for this conversion, but the process will be the same for any software that you use to post-process raw files.
Some images may work well with just a black and white conversion. This can be done by either changing the profile to black and white, using the black and white treatment, or by dragging the saturation slider all the way to the left.

But, some images will look flat, and boring without much tonal contrast when you just convert them to black and white using one of the above processes.
So, we will look at how you can enhance the look of a black and white image using other controls in the post-processing application.
Converting the images to black and white has two main steps:
- Convert Colour Image To Black And White
- Use The Colours In Your Image And Editing Tools To Enhance Black And White Images
Here are the basic edits that need to be done before converting the image to black and white.
- Choose the image you want to convert to black and white and adjust the exposure.
- Work with the black and white sliders to make sure there are no clipped black and white areas in the image. This can also be personal taste, but make sure there are enough details in the white and black areas of the image.
- Use the highlights slider to add details and drama to the bright areas in the image.
- Use the shadows slider to bring out enough details from the shadow areas. These are especially useful when you want to add pop and drama to landscape images.
- Again at this stage, adjust exposure if required and then add a little bit of contrast as well if required.
- You can now add clarity to the image if there is a need. This can help to bring out the textures in the frame.
- The dehaze slider can be used to bring in a bit more contrast if the scene looks a bit hazy.
- After making the above adjustments, you can convert this image to black and white. Remember, after converting to black and white, you may sometimes have to revisit the above sliders to fine-tune adjustments.
There are a few ways to convert an image to black and white. Here are some:
- By changing the profile or treatment to black and white
- By making adjustments in the HSL panel
- Using presets and profiles in Lightroom or any application
1. Changing Profile To Black And White:
For the photograph, you wish to convert to black and white, change the profile to black and white which can be done within the basic panel. Now you will see that the image is converted to black and white.

You can change the way each color or tone looks in black and white by making adjustments in the “Black & White Mix” panel. You will see that there are separate sliders for different colors where you can adjust the values to positive or negative depending on your interest.

You can also use the adjustment tool on the top left of this panel, then click on the targeted color and drag the mouse up or down to increase or decrease the values. The adjustments will be made globally to wherever that particular color is in the frame.
Using these sliders, you can render the greyscale colors darker or lighter. This will help to edit the image the way you visualised it by bringing in the desired tonal range in the image.
For example, in landscape images, you can play with the blues in the skies to add drama to the sky. This will help the clouds to stand out. Besides, there may be green colors for the meadow, trees, etc. So play with the green slider for the greens and other colors if there are flowers or other colored flora in the frame. The green and yellow sliders may sometimes need to be used to work with green colors in the scene.
There is also an “Auto” option at the bottom right of this panel. Clicking this will make Lightroom analyze the image for the current settings and apply a setting that is appropriate for the image. You may or may not like this suggestion, but you can tweak your image from here to arrive at the desired result.
Here is an example for illustrating the above method:
In the screenshot below, you can see that the color image has the “Treatment” set to “Balck & White” with no other adjustments made. The image looks good as it is, but if you are looking for some drama in the image, you can make adjustments in the “B&W” panel with the “Black and White Mix” sliders.

In the screenshot below, you can see that after applying the “Black & White” treatment, I clicked on the “Auto” option in the B&W panel. These are the suggested edits after Lightroom analyzed the image. This suggestion looks less contrasty compared to the “Black & White” treatment above.

In the screenshot below, you can see that I have applied the “Black & White” treatment, then decreased the values for blue, cyan, green, and yellow at varying levels. This step depends on your visual appeal.
I then made slight adjustments to shadows, whites, blacks, and textures. Doing these has resulted in a dramatic landscape.

The screenshot below shows a comparison of just the “Black and white” treatment versus adjustments made in the “Black and White Mix” panel.

2. Making Adjustments In HSL Panel:
For this method, you can work with the color image without applying the “Black & White” treatment. Use the HSL panel and drag all the colors in the saturation panel to negative so the image becomes black and white.

Now use the Luminance panel to make adjustments to individual colors. If you drag the sliders to the right, it will add light to the specific color making it look bright, and if you drag the slider to the left, it will darken the specified color. Drag the desired sliders to bring in the right tonal contrast in the image. You can also work in the basic panel to add some needed contrast, clarity, texture, etc., to the image.

3. Presets And Profiles In Lightroom:
Besides the manual adjustments, Lightroom comes with a set of black and white presets and profiles for various types of images. New presets and profiles get added to this list occasionally during updates.
You can apply a profile or preset of your choice and then make adjustments to tweak your image using the other sliders in Lightroom if required so you can get the desired output.

To access the “Profile Browser,” click on the Profile Browser icon (the four-rectangle icon) present at the right side of the “Profile” tab.
You will see a list of profiles that come with Lightroom, one the default monochrome and others that are camera matching profiles.

Similar to Lightroom, many other post-processing applications come with profiles and presets, that you can use on your image and then make further tweaks as necessary.
Finalizing The Image
Once you have made black and white adjustments to the image, look to see what more you can do to make the image more compelling. Here are some ideas:
- Vignette – if you want to bring focus to the central part of the image, you can add a black vignette to enhance the look of the photo. This option is available in the Effects panel, a post-crop vignetting section of Lightroom. Do not overdo this and use it in the right amount. If you have a soft image with a dreamy look, white vignettes work great usually.
- Grains – use the grain section from the Effects panel to add grains to the image. This can help to render a classic black and white mood to the image. You can adjust the amount, size, and roughness of grains in the image by adjusting the various sliders.

- Texture – You can increase the effectiveness of fine textures of elements in the image using the textures slider in the presence section of the Basic panel. Again, work on this till you get the desired look, and do not overdo this.

- Colour Grading – Lastly if you want to apply tones to highlights, shadows, and mid-tone areas, then work with this panel to give a classic film look to the image. There are many film looks that you can emulate using this panel and the options are many. Just apply in limited amounts to get great results.

Here is a quick before/after look after using the color grading panel to create a selenium kind of tone:

Now that you know the steps to create great black and white photography, why not go out and capture a beautiful black and white image? You can even go through your archives and choose one or more images that you think will work great for black and white conversion. Use those images and make new edits to convert them to brilliant black and white photographs so you can take them to the next level.
Do you like black and white photography? What are the methods that you follow for black and white conversion and if you have any tips that you can share with us, please do so in the comments section below. We would love to know!
Further Resources:
- Four Reasons You Should Shoot Black And White Photography
- 3 Powerful Tips To Get You Started With Black And White Photography
- 5 Things To Think About When Getting Into Black And White Photography
- Bite Size Tips: 5 Ideas For Better Black and White Photography
- 3 Tips for Better Black and White Conversion using Lightroom
- How to Convert Your Images to Black and White in Photoshop


