If you have images with unnatural coloring from artificial lights, reflections, or other sources because you didn't manually set your white balance in your digital camera, and you also have Lightroom at your disposal, then you can easily change the hue of your image by tweaking your white balance. This becomes especially important when shooting portraits as you’ll need natural skin tones, despite what kind of lighting you encountered (such as incandescent lightbulbs indoors).
When you adjust your white balance in Lightroom, try to do it with a RAW file as opposed to JPG. While you can still adjust your white balance successfully in JPG, RAW will give you more versatility and an overall better quality photo simply because you have more information to work with.
Note: One of the best things about Lightroom is its ability to adjust many images at once, which makes it a prime choice for those who shoot weddings, sports, or other areas that call for batch editing. Not only will this save you time, but make all your photos seamless in appearance.
When working with multiple images, import the files you want to adjust and make sure they are all selected in your thumbnail strip below by CTRL+clicking them before you start to tweak your settings.
1. Open your image in Lightroom and press W to bring up the white balance menu and eye dropper. This is a very convenient tool as you can hover it over your image and select a color to adjust your entire photo to (Figure 1) – also known as your “neutral”. Usually, you can fix the white balance in this manner alone, but you may need to make individual adjustments. Also note the live preview in the upper left corner which lets you see the results before actually setting them.

Click anywhere on your photo to apply the white balance change seen in your preview window.
Note: If you’re looking to adjust skin tones, try selecting a white, black, or grey area (neutrals) with your dropper as this will usually give you the results you want.
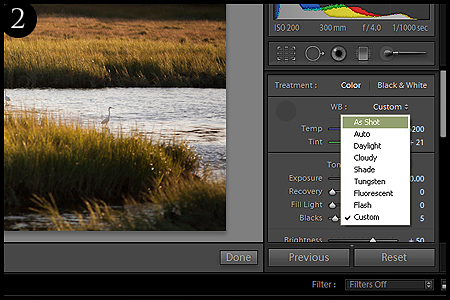
2. You can always undo whatever white balance adjustments you made by selecting “as shot” from the menu selection. Under this same menu, you can also choose one of several presets aimed to emulate certain conditions – such as daylight, cloudy, flash, etc. (Figure 2).
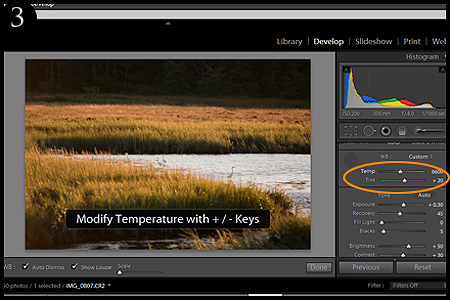
3. Even after you’ve adjusted your white balance with your dropper or have chosen a preset, you may need to tweak it manually until you get the results you want. If this is the case, go back to your White Balance menu and click once on either Temp or Tint (Figure 3) and by using your +/– keys, adjust your white balance as you see fit.
When changing your white balance, make sure you explore all the options available to you before you settle on a choice. What you find that works best for your image may be something you never even thought of.
Read more great articles by Christopher O’Donnell at his blog or follow him on Facebook.


2 Comments
Hi There:
Just to let you know, I added you to my ‘Lightroom Links’ page: https://bit.ly/LRTips
Mike.