Although originally developed as a image management tool, Adobe’s Lightroom has evolved into a powerful post production application. For many photographers, Lightroom provides all the tools required to make their images pop without ever having to resort to Photoshop. Lightroom’s tools are particularly suited to landscape and urban photographers who want to squeeze every last drop of quality from their images. Today we are going to look at three powerful tweaks that will make your outdoor images sing.
1. The Graduated Filter
Although it’s name suggests a similarity with it’s real life equivalent, it is in fact so much more powerful than that. It is found just below the histogram in the Develop module, the third icon from the right. The obvious use for this tool is to darken and liven up skies, however, you can in fact rotate the filter so it effects any part of the image. For instance if you wanted to change the hue of the sea, you could use the graduated filter from the bottom up.
To use the filter, select it in the Develop module. You then click on the starting point of your filter and drag across the screen to the point where you want the effect to finish. You will now see three lines on the screen denoting the extents and midpoint of the filter. The important stuff however happens in the Develop module, where a whole new section has opened up containing a number of different sliders. These sliders will effect only the graduated filter and enable you to not only add density to the filter using the exposure tool but also change contrast, highlights and shadows, clarity saturation and sharpness.
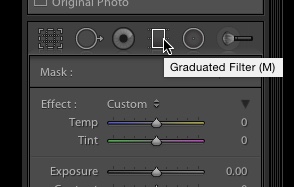
The Grad Filter is found just below the histogram
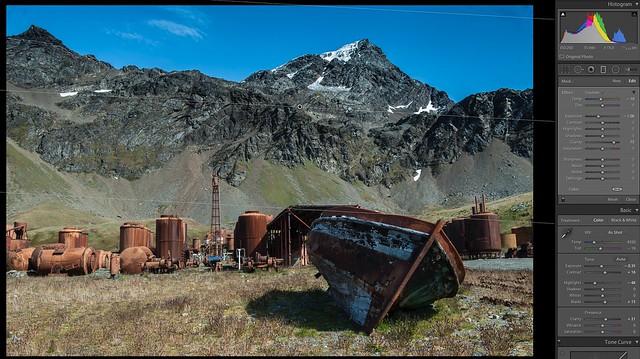
Here I have deepened the blue of the sky
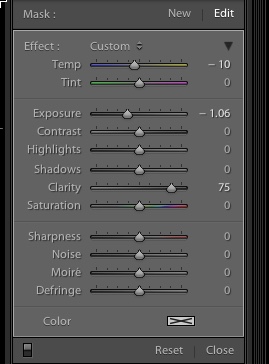
If we return to the idea of changing the color sea, we could try to do this by using the Temp and Tint sliders at the top. By sliding the Temp tool to the left, you will see only the filtered area changes color, the effect graduating to nothing on the other end of the filter.
At the very bottom of the Graduated Filter tool box is a Color swatch. Clicking on this will allow you to finely adjust the color of the filter.
Other things that you can use the Graduated Filter tool for include de-noising selected areas of the image and creating differential focus by using the Sharpness and Clarity sliders.
There are many controls available within the Grad Filter
2. Hue/Saturation/Luminance
To tweak the subtle differences in color and luminance in a landscape photograph we need a subtle tool. About halfway down the Develop module we find it. It is called HSL/Color/B&W but were really only need to understand HSL to get some great results.
The HSL tool is found halfway down the Develop Module
What the HSL tool does is allow us to create subtle changes to hue, saturation and luminance within individual colors. For example if we have an image that has some overly saturated red flowers in it, we can select the Red slider and slightly reduce the saturation or luminance of those red flowers. Conversely, we might want to increase the saturation of the grass by sliding the green or yellow sliders.
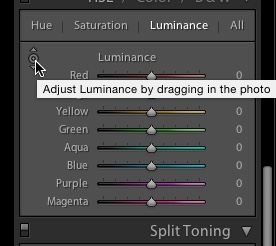
As well as simply moving the sliders, there is an almost hidden feature that allows us to finely control colors. To the top left of the HSL tool, underneath the word Hue is a small circle. Clicking on it reveals and up and down arrow, however the real fun starts on the image itself. You will now see that the cursor has changed to a cross hair with arrows. Clicking this on a specific color in the image will allow us to effect only parts of the image with that specific hue. We can change its Hue, Saturation and Luminance by selecting these in the tool box itself. The advantage to this hidden tool is that many colors will not fit exactly the color profiles proved in the tool box. When you use this tool, you may well see two different color sliders being moved at the same time.
HSL's neat fine control tool

Here I have enhanced the rust using the HSL saturation settings
3. Clarity and Vibrance
These two simple tools can make a tremendous difference to the way an image looks. I have left them to last because that is what you should do when when post processing. Once you have got your image looking more or less right, slide the Clarity tool gently to the right and watch what happens. What the tool is doing is increasing contrast in the mid tone regions, giving your image a subtle but significant increase in apparent sharpness. Be careful not to push the effect too far, you may start to throw off some of your exposure adjustments. A small increase in Clarity can really make a Landscape sing.
The Vibrance slider is similar tool. This one adds extra saturation but only to colors that are not highly saturated in the first place. It is much less of a sledge hammer than the Saturation tool and works particularly well on blues. If you have an uninspiring blue sky, increasing the Vibrance can add a bit of zest to it.
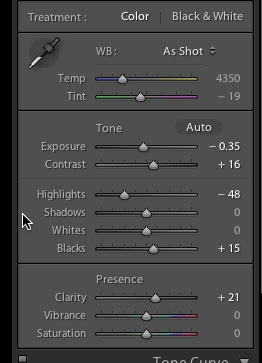
Clarity and Vibrance are found at the bottom of the Basic section
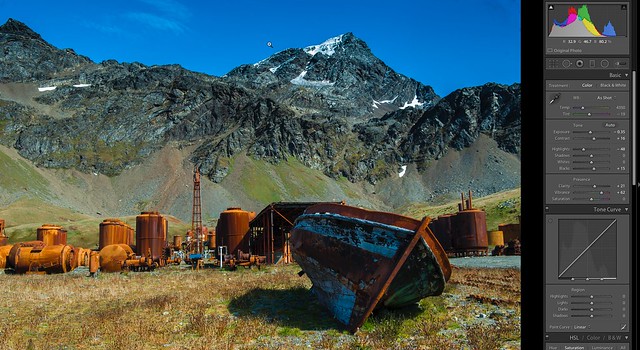
Here, Vibrance has enhanced the blue sky and the green grass
Lightroom is full of great tools for the outdoor photographer, but these three are amongst the best for making your shot pop.


12 Comments
Really useful and informative article, thank you.
I am a huge fan of Lightroom. Most of my processing is strictly in this medium. Although I have Topaz and Nix plugins I only use them under certain circumstances. I use Lightroom much like a darkroom. I use the tools you mention here, but most of my adjustments are made using the Adjustment brush just like dodging and burning. Fabulous piece of software!
Jason, your tip was excellent usinh LN as it relates to landscapes.
Keep bringing them on.
Cheers
This is a amazing tool
Thank you for explaining this feature so clearly; as a Lightroom user I will certainly use this more now.
Very nice! Some great tips on how to get more out of LR. Thanks!!!
Wow!!! Already used HSL and struggled at times to get the right color selection. This to cool.
Very useful tools thanks Rob
Absolutely brilliant, an amazing insight into these L/R tools, thanks Jason!!
Thank you.I have been using these tools but your tips will help me use them more efficiently.
The Radial Filter (2nd tool from the right under the histogram in Develop module) can let you direct attention to the point of interest by creating a subtle cone of desharpening, declarity, desaturation around it. I often do this instead of post-crop vignette in Effects (which is quick and also cool), where i move the midpoint to the L, and the roundness and feather sliders to the R..
Clarity and Vibrancy Rock !
They do what normal sharpness and saturation can not.