Those of you, who use Lightroom, will know what a powerful and multi-faceted program it is. It is fair to say that along with its now discontinued rival Aperture, Lightroom revolutionized the way we manage our images once they have left the camera. We can now upload, edit, manipulate and export images so much quicker than a few short years ago. Doubly so for RAW files which were once clunky awkward images to edit but now are treated no different to a JPEG. Being such powerful piece of software, there are always some little features or functions that can speed your workflow up even more. Today we will have a look at some of them.
1. Import Photos Quickly
Many photographers like to import their images to a specific location on their hard drives before importing to Lightroom. However, you can use Lightroom to import your images directly to a folder of your choice, by-passing the need to import to your computer first. When you plug in your card reader or camera with Lightroom open, the import dialogue will open. At the bottom, you will see the destination section with all your drives and folders there. Find your images folder and if you need to create a new folder inside this, simply right-click and Create New Folder.
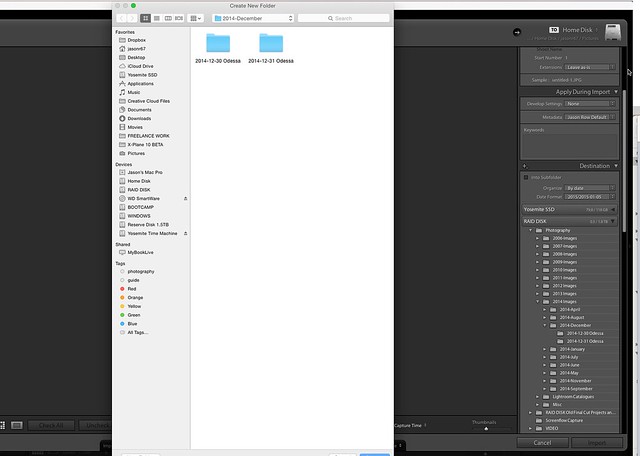
Import directly to your folder hierarchy
2. Rename and Add Metadata on Import
Another really useful function, to speed up workflow, is the ability to rename your files upon import. This is done from the top of the Import window in the File Renaming section. Clicking the Custom Text drop-down allows you to define your own naming convention. As well as the renaming, you can also create a metadata template upon import. This is found under the Apply During Import section. The template can add useful data such as your name, telephone number and copyright statement as well as adding other IPTC data and generic keywords.

Rename on import
3. Speed Up in the Develop Module
One excellent function in Lightroom is the ability to cut and paste your Develop settings to another image or batch of images. This is particularly useful if you have a batch of very similar shots and can save a huge amount of post production time. One you have completed the adjustments on an image in the Develop module, right click on Develop Settings and select Copy Settings. A new window will open showing all the potential develop settings that you can copy. Select the ones that you wish to apply and click copy. Return to the Library module and select all the similar images that you wish to develop. Right click on one of those images and select Develop Settings – Paste Settings. The corrections, that you copied, are now applied to all the selected images.
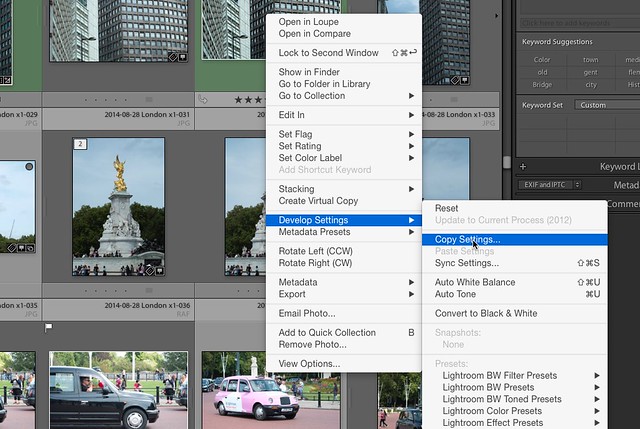
Cut and paste your Develop settings
4. Mass Metadata
As with the copying the develop settings you can also copy and paste any metadata that you have added to an image. This is particularly useful for stock photographers who might have a number of similar images that require the same captions and keywords. To do this, in the Library Module, select the image with the metadata added. Right-click on it and select Metadata Presets – Copy Metadata. The Metadata template opens and you can select which elements of this you wish to copy. Captions are found at the top under Basic Info, keywords at the very bottom. Click on copy then select all the images that you wish to apply the metadata and click Metadata Presets – Paste Metadata.
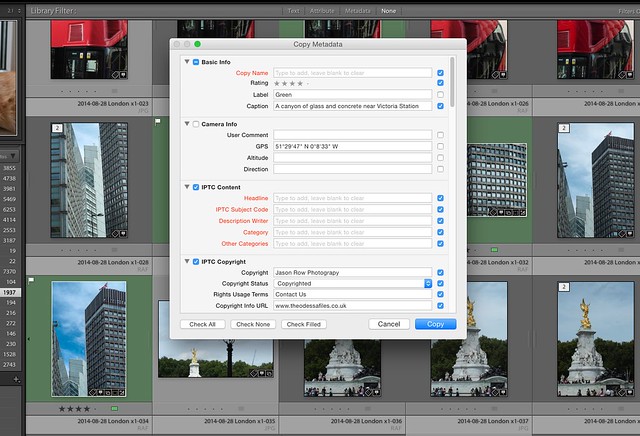
Bulk copying the keywords and captions
5. Speedy Export
Our last tip for today allows you to quickly export your images to a specific location of your choice. To do this, we create our own export preset. To create a preset select an image in the Library Module and right click on it. Select Export. With the Export window open on the left side we see an Add button. Click on this and name your new preset. Now from the main window you can select standard export locations, file renaming, image format, define an export size and even add a watermark. Clicking Export will export that image with those settings and save the preset. Now you can select any number of images, right click and select Export. You will see your preset amongst the list of other presets.
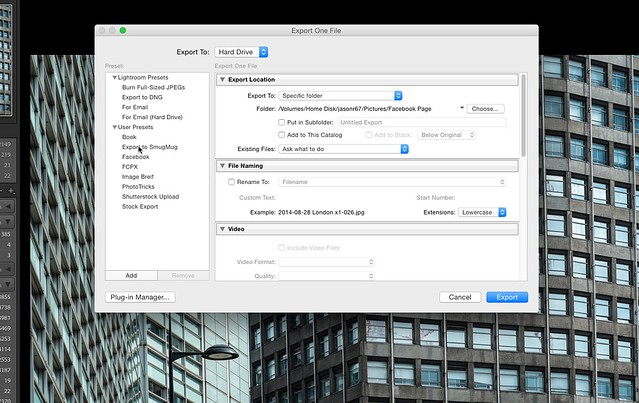
Export Presets
Lightroom is full of little, time-saving features. The ones mentioned here are amongst the best for creating significant time savings to your workflow.


4 Comments
Great tips! An improvement regarding point 3:
My current preferred method (rather than copying and pasting settings) is to develop one “standard” photo in the set, and, while still in the Develop module, select the other photos that I want to similarly process in the Film Strip, and click the Sync button at the bottom of the right side panel. It does the same thing, but requires fewer clicks and keystrokes, and also saves you having to go back into Library mode.
(Note the Sync button changes to Sync Metadata in Library mode, so this trick can only be used in Develop).
Agreed, Isaac, Develop Sync is a very powerful tool that allows us to be highly selective about which specific adjustments you want to apply.
Great tips, however there’s another way to develop a series of similar shots say for a panorama to ensure everything is the same. Process one of the photos in the range, with the photo selected in the film strip below, shift and click on the others in the range to select them, at the bottom right hand side of the panel one of the buttons will change to “Synchronize” button. When clicked it’ll throw up a range of options that you can elect to include or not in the sync. I recommend that the white and black shouldn’t be selected for each photo, especially in a pano and that local brushes and spot removals should be done individually.
Hi
Thank you for the tips
I actually tried this after a photo shoot with friends, was testing this copy and paste settings after getting tired of adjusting each one individually, it worked very well, I still had to do minor light and exposure corrections since I shoot in raw but the tones and color and all was perfectly copied, a really appreciated time saving.
Will try the other tips for sure