Adobe Lightroom offers two excellent tools for increasing the apparent contrast and saturation of an image without resorting to taking everything to the max. These are the Clarity and Vibrance sliders found at the bottom of the Basic tab in the Develop module under Presence. Let's take a look at what they can do for your images.

Better Photos With The Clarity Slider
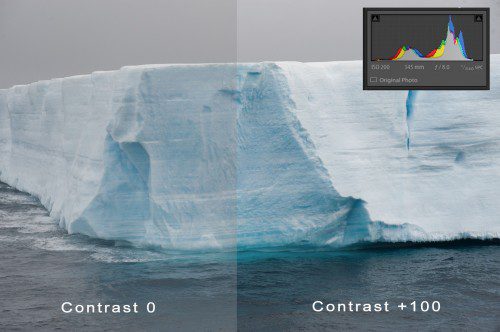
Clarity is, in effect, a contrast tool. However, rather than boost contrast across the entire range of the image, it boosts it only in the mid-tones. There is a very simple way to see how the Clarity tool differs from Contrast and that is to use them whilst looking at the histogram. Take any reasonably well exposed shot and in the Develop Module slide the contrast to its extremes both left and right. Watch how on the histogram, the Blacks and Whites dramatically move. Sliding Contrast to the right, adding it, moves tones from the middle of the histogram out to and beyond the edges. In other words, boosting contrast too far will introduce highlight clipping and the potential for noise in the shadows. Return the contrast to the middle, 0.00 and repeat the same exercise with clarity.
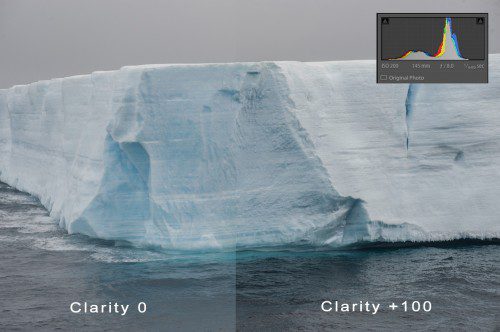
What you will see is that although the outer edges of the histogram move slightly, the majority of the movement is in the tones either side of the mid-tone point. If you look at the image whilst doing this, you will begin to see why they call it the Clarity tool. As you slide the clarity up, to the right, the image appears to become sharper without the overall contrast getting too high.
When to Use the Clarity Slider
This much more subtle tool is excellent for adding punch to our images without making them look unnatural. The secret is to get all your primary corrections done first, exposure, color, highlights and shadows but not to touch the contrast. Keep the histogram within limits and then when happy with the result, slowly add in some clarity, keeping one eye on the histogram. Like any tool push it too far and the result will start to look unnatural but used carefully it can add some real sharpness to even the dullest of shots.
Improving a Shot With the Vibrance Slider
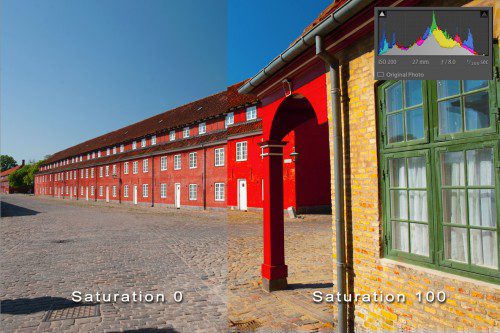
Vibrance is in many respects like the Clarity slider in that the effect is much more subtle and controllable compared to the Saturation slider. Again we can demonstrate this by comparing the two sliders on the same image and watching the RGB values in our histogram. Like the Contrast too, when we slide the Saturation to the right, a lot of the color in the mid-tone moves out to the edges of the histogram and beyond. In this example you can see both the blues, yellows and greens have equally increased in saturation.
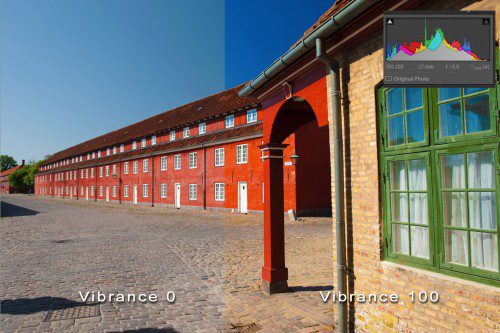
Repeating the exercise with the Vibrance tool shows a markedly different effect. Like the Clarity tool, sliding Vibrance to the right is only effecting the mid-tone regions of the histogram. Looking at the example you will see that the blues and greens have significantly increased in saturation but the yellows hardly at all.
When to Use the Vibrance Slider
In effect the Vibrance tool boosts the saturation of muted colors but does not touch colors that are already highly saturated. Again this makes it an excellent choice for boosting color without getting that oversaturated look that we discussed at the beginning of the article.
Used in combination, the Clarity and Vibrance tools are an extremely powerful way to boost contrast and color in an image but with much more finesse than the Contrast and Saturation tools. As with all post production tools, care must be taken to keep the image within the limits of the histogram but careful, considered use of these two tools will give you striking and sharp looking images that still look natural.
Using a Vibrance & Clarity Preset to Save Time (Grab This One Free)
Presets are an easy way to save a lot of time in Lightroom. While there are a myriad of potential effects that you can get, having a few presets that do the lion's share of your editing is a good idea to save you time and having to remember specifically what your normal starting point is for an image. Having one for adjusting clarity and vibrance is very handy as you can see in this image:

You can download the exact preset here (right click and save the zip file).
See some of our other very handy presets here and their effects here that take advantage of the clarity and vibrance sliders as well as several other handy effects.


4 Comments
Great tool. Most Lightroom tutorials by other photographers just skip over that Presence section. I like the Clarity and Vibrance sliders. I tend to not use the Saturation slider as it is so easy to over the top with that. Thanks for sharing.
I agree with Karen. It’s about time someone took the time to explain the simple way to make a photo shine. I’v been wondering how they did that.
Thanks Jason
Thank you, this article clearly explains the difference! Very useful information.
Nice article which explains the utility of the two adjustments.