The HDR trend has come and, for many, gone, but what came of it is the easy-to-digest concept that creating one photograph may actually require several images, then blend them together. For HDR photography it's the need of multiple exposures to compensate for what a digital sensor cannot do on it's own – properly expose both highlights and lowlights in an wide range photograph without sacrifice. With the same concept, focus stacking is also possible.
Like HDR, focus stacking comprises of two main components; series of photos of the same subject and some creative post processing. That's about where the similarity ends.
What Exactly is Focus Stacking?
Focus stacking is taking multiple photos at the same exposure but at different focal lengths and is best applied for macro photography. A longer focal length lens and a very shallow depth of field result in a pinpoint focal plane and often leave crucial elements of the image slightly soft. While very desirable, it can often result in less than stellar photographs. A great example of a macro photograph that could benefit from focus stacking is this one:
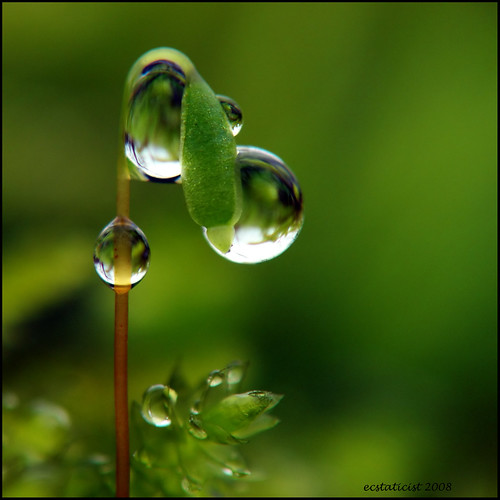
Zero Gravity by ecstaticist, on Flickr
The photographer says these three water drops are on a piece of moss only about one inch in height. While the lower drop on the stem is tack sharp and the one above it also seems very sharp, it's easy to see even at web resolution that the right most droplet is soft. This is where focus stacking really shines.
What Gear Do You Need for Focus Stacking?
The gear you will need to create photos that are good for focus stacking comprise of:
- Digital camera
- Macro lens
- Tripod
- Cable release (optional but very helpful)
- Matte focusing screen (optional but really makes a huge difference)
We'll assume you are using a DSLR for this, it's possible with higher end point and shoots and even mirrorless digital cameras, but the DSLR is really what you want to be using. Additionally, you're going to need a high quality, stable and preferably heavy tripod. We're a huge fan of lightweight carbon tripods but there's something to be said about the weight of a heavier aluminum one will give you in terms of stability, especially when you consider you'll be manually focusing.
A focus screen is probably the least commonly modified piece of camera equipment on a camera, however it can be one of the most crucial. A proper screen, available for most camera makes, will make your job focusing far more enjoyable because you can't rely on auto focus or focal points.
How Do You Shoot Your Stack?
Set up the camera like any other macro subject, nothing here will change. What will is the number of photos you capture. You'll want to start at the far end of the subject and work near you, ending in 4-8 photos depending on the total size of the piece you're photographing. Manual exposure is also a must, so you don't have any alterations in highlights or lowlights. Remember, we're aiming for a uniform, sharp focus across a broad subject, not HDR.
How to Focus Stack in Photoshop
With your photos in computer, it's time to fire up some software, and you'll need at least Photoshop CS4, or CS5 for this. Load all of your photos into one file, keeping the layers in proper alignment in the order they were shot.
Select all the layers and go to Edit > Align Layers.
After the layers are aligned, go to Edit > Blend Layers and photoshop will begin its work.
Because of the blending that's being done, the sides of the final image are often slightly blurry, a simple crop will eliminate this.
A great example of focus stacking is this beautiful photo:
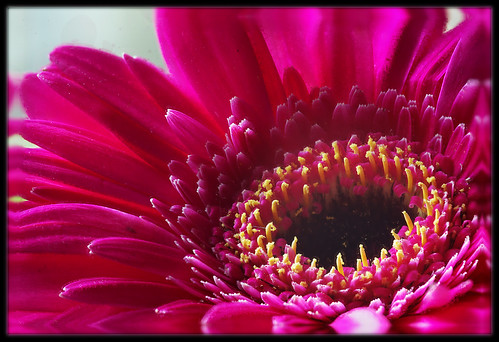
focus stack by SFB579, on Flickr
But you say, I really like the shallow depth of field looks and so do we! You have full control over what exactly you focus on!
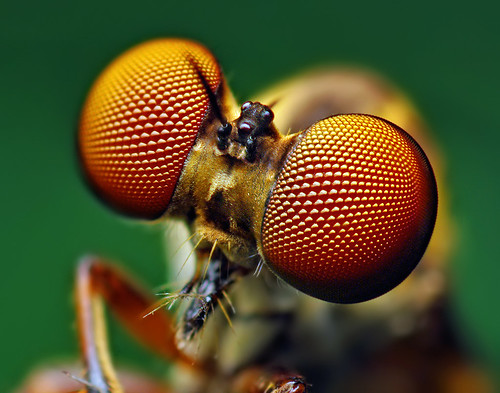
Eyes of a Holcocephala fusca Robber Fly by Thomas Shahan, on Flickr
This amazing photo stacked macro image comprises three photos that show the entire head in wonderful focus, while the antenna and body remain out of focus with a wonderful bokeh. Had the photographer only taken one shot, the sharpness would not be in both the head and the open mouth.


17 Comments
I am anxious to try this. I have been using a great little piece of software called Helicon Focus. Nicer, however to stay within photoshop.
Thank you for clear, simple explanation, I didn’t realize photoshop could do this automatically. I constantly read photography books but have never heard of a focusing screen.
Most high end cameras allow you to change the screen supplied with the camera. However its very easy to scratch the screen with the tweesers supplied as part of the kit. My advice is to get a camera repair tech to do it for you!
Hello, thanks for sharing this technique. It is one of the best tutorial posts I raed on any site recently. I have a question regarding practical aspect of focus stacking. I was playing with it last year, and was totally not successful. I was always missing several images with focus in between, and after stacking it looked, well, weird. Do you have any suggestions on how to change focus from image to image, how many images to shoot at with what f-stop?
Very interesting; would love to try this in the future.
Thanks for the clear explanation, have just tried it and it works great.
Focus stacking will certainly be part of my skill-set from now on. Very useful for the stock images I’m shooting.
Thanks again
– Microstock Man (aka Tim)
I know I’m kind of a purist so while I understand the end result of stacking is quite beautiful, I still prefer taking one shot with a very low aperture, tons of light and pray I got it (well, I usually shoot several times).
Anyway, great article as usual Mike.
https://www.flickr.com/photos/91218441@N04/8475486420/in/set-72157632767008059/
The Nikon D800 doesn’t have a focus screen that can be user fitted.
However, you can get pin-point focus by using the Live View option and the zoom button before manually focusing on the desire point.
and so goes the rule of thirds, like the zone system-
I’m an amateur so I read anything and everything I can about the types of photography I’m interested in. Macro is amazing so this will hopefully help. It seems that everyone is a “photographer” these days with iPhone and Android apps being so good but I still believe that there will be room for us all. Thanks!
Ok I am using the same 7d as others , 60mm 2.8 macro lens, Subject Live, As nat Geo photos met be as it is, not dead, and keeling your subject , is a NO NO!. So How to get away with photo stcking with a live subject?
Moving subject is a real challenge and stacking on it is an impossibility. However, if the subject would stay still just enough to capture few photos, it is a possibility. Using the rack focus feature of Magic Lantern. It can shoot many photos on stepped focus on each frame idepending on how much step and ho many photos you want to take. Just pray that during the process the subject didn’t move. This is IMO the best way to do stacks in less amount of time.
Thanks for the focus stacking info. My first attempt at it was a success.
Andy
I really want to start doing depth of focus stacking. Unfortunately, I have not been able to get Photoshop CC to do the job. I have been following instructions for the process to the letter. I get all completely black masks except for one completely white one at the bottom and the process takes a very short time. Also, is it okay to use the camera’s autofocus to get a series of shots? Why manual focus?
@Michael Knight: auto focus will defeat the object of the exercise. You need to control the plane of focus for each shot. Dunno why PS CC won’t do it; if the ‘merge to panaorama’ feature works, so should this. Maybe you tried autofocus for your images?
@Mario: go below f/11 on a modern hi-res dslr and you’re well into losing sharpness from diffraction. Don’t believe me? Take a series of macro photos of a peice of woven cloth at apertures from f/2.8 to the smallest your lens can manage. You’ll get nice patterns at f/32 (say), they just won’t be the same ones that you see at f/4 or f/8. By hi-res, I mean around 14Mpixel plus for APS-C and 24Mpixel plus for full frame. On the new 50MPx Canon, you probably won’t want to go below f/8 for best results.
Nikon users have a good free alternative to Helicon Focus: DigiCamControl. This has limited Canon support as well.
Hi
I have tried focus stacking a fews times and it has worked really well. However my last couple of attempts have ended with a ghosting around the edges of some parts of the photo. I’m photographing flowers and especially around the edges of the petals I am getting like a ghosting or blurring
Any suggestions ???
Ruth
It is needless to say that the Holcocephala would be dead as a door nail1