The goal of this article is to give the reader, that’s you, a clear understanding of what frequency separation is. Now you may think that FS is the anxiety a photographer feels when he or she is repeatedly separated from their camera gear, or better yet, maybe FS is the extreme anxiety audiophiles experience after too much time away from their stereos, but happily, for you and me, neither of these “one-liners” is true. In reality, frequency separation is the commercial retoucher’s secret weapon, and now you can learn to use it as well.
Let's pretend for a moment – what if the separate detail and color information of a digital image, your photograph, could be easily separated for retouching, and what if by separating these colors and details into two layers, you could work on one aspect without affecting the other; or Is that even possible? And how about this – what if you could make all sorts of corrections in a portrait, for example, could you still retain the natural textures of the skin?
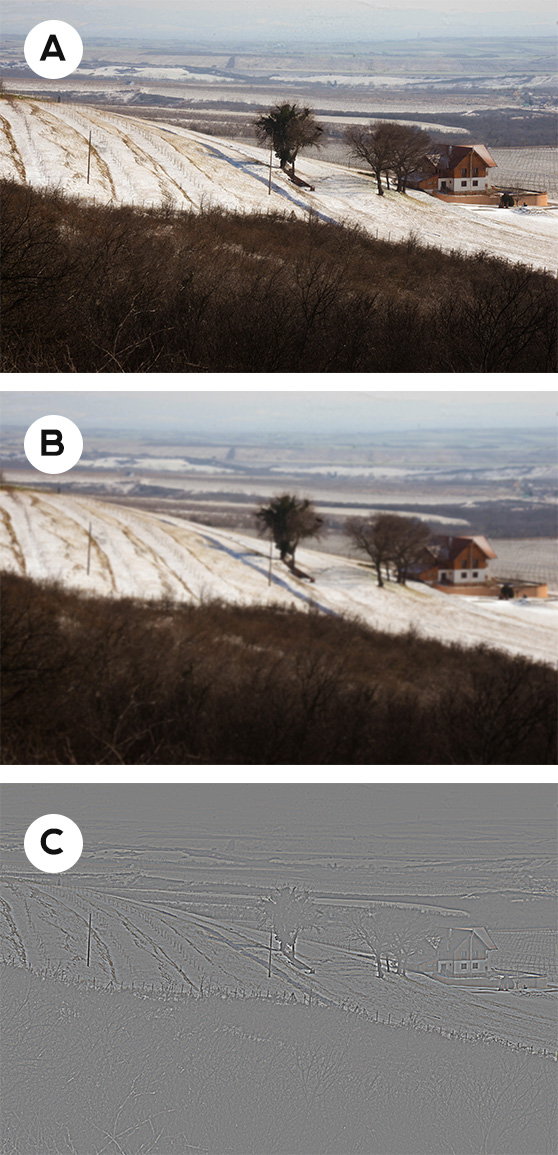
Well you already know the answer, it’s called “frequency separation”. By dividing your image into two separate layers, one layer being the high frequency information, which contains all the detail in your photograph, and the other being the low frequency layer which contains all the tonal and color information. Sure, some people will prefer the usual retouching tools and methods, including airbrushing, clone stamp tool, Gaussian blur, healing brush, and so on, but frequency separation retouching will give you another option for enhancing not only your portraits but landscapes/cityscapes and inanimate objects as well. Whether you’re working with RAW images or JPEGs, you can learn to utilize the power of FS to improve your photos.
Lesson #1 – Basics
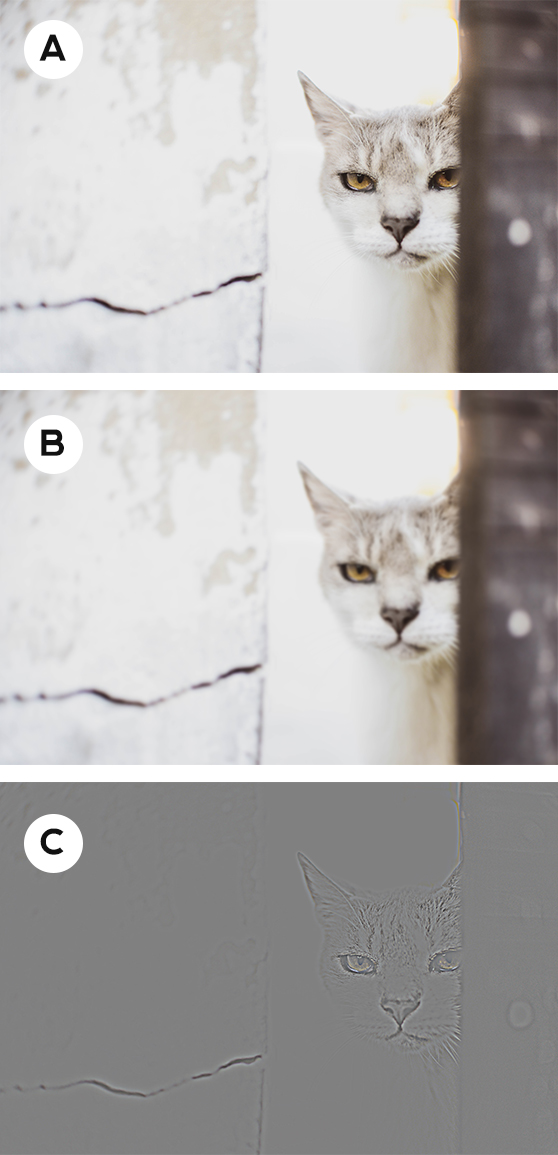
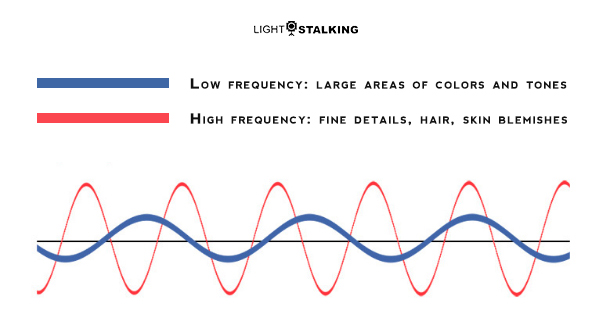
There are many frequencies in every photo, and each of these frequencies contains information based on the size of the image. Every image can be broken into low and high frequencies. Much like music that can be represented by sine waves, you can break up a photographic image into high frequency and low frequency layers.
High frequencies that contain fine details, like skin imperfections, hair, skin pores, grains of sand, and stone textures, whereas the low frequencies carry information about an image's colors, lights, shadows color, and tone – think sky, soft clouds, and marshmallows.
Imagery encoded digital information
The high frequency layer in your photographs includes fine details like skin texture, hair, wrinkles, pimples, pores, or even the stitching in fabric, all of which easily shows up on today’s high-resolution cameras. Everything you see when you look at an image closeup. The low frequencies carry information about an image's colors, tonal transitions, lights, and shadows – everything you see in the image when you look at it from further away.
Why FS uses only two frequencies
The reason for this is because when you digitally analyze any image, it’s made up of only two kinds of information: color (low frequency layer), and details (high frequency layer).
Color
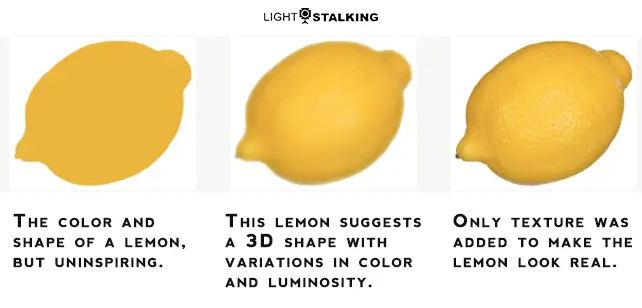
Color is the uniform area that contains very little variation within the image. If you imagine a picture of lemon against a white background, you can coarsely describe it as the color and shape of a lemon or as vague and soft information, (see the image below). Now when you add variations in color and luminosity the lemon begins to look real.
Detail
If we focus again on our low frequency information, you will notice that the one thing missing to achieve a high quality representation of a lemon is the detail. And so by adding detail or texture information to our imaginary lemon, it now resembles a real object. This detailed information is what makes up the high frequency layer.
Side note
As an analogy, if you imagine acoustic waves, such as music, they are composed of many different frequencies. If you listen to only the low frequencies, (the bass) they will have a very broad and uniform sound that changes slowly with time, while the higher frequencies will have a narrower spectrum, and will change more quickly and precisely in space and time. Continuing this analogy, if the sound frequency is something that describes how quickly a given event happens over a certain amount of time, then it is the “spatial frequency” that describes how swiftly something changes in a certain amount of space, such as a photographic still image. It is this spatial information that also describes the periodic distributions of light and dark in a photograph. Now if you add time to a spatial image, you have a picture with motion, or what we call a motion picture.
Lesson #2 – Portraiture And Landscapes
A high frequency layer is made with the high pass filter. It holds the sharp details of your photo. A low frequency layer is made with the Gaussian blur filter and holds the tones and colors of your photo.
When combined, these two layers form a normal-looking image. By adjusting the balance of these two layers, you can choose how much softening to apply in the low-pass layer and how much detail to restore in the high-pass layer. You don’t really need to know how the whole FS process works but understanding the basics will allow you to tweak the process and achieve your own interesting effects.
FS in portrait photography
When you think about it when your subject has a wrinkle, and you remove it with maybe the clone tool or one of the healing tools, it can look artificial, which can make your subject look like they’re made out of plastic, but if you want to make your subject to look real, frequency separation is a perfect way to tone down the wrinkles and remove temporary imperfections so that they don’t distract the viewer.

Misconceptions about portrait retouching
Many people believe that skin retouching should focus on getting rid of the texture and making the skin smooth. This is misleading because it is the skin texture that actually brings a photo to life and makes it appear realistic. The goal in retouching any photo is to repair any temporary skin imperfections, such as skin redness or blotchiness, as well as fix or enhance the shadows. The frequency separation method is much preferred to the Gaussian blur method. The FS method preserves all the detail you want. It is the preferred method of professional retouchers for magazines and print advertisements.
Skillfully using FS can help with problem areas like dark shadows, uneven highlights, smooth out areas of light and dark, as well as soften a subject’s skin without degrading the skin texture. Our visual system is very sensitive to the slightest variations in texture, and if not careful, a poorly retouched photo will be painfully evident.
The bottom line is; if you want your photos to look realistic, and keep all the fine details, it’s better to use a non-destructive retouching method rather than blur your photo, by randomly using the healing brush tool, clone stamp tool, or perhaps Gaussian blur.
FS and landscape photography
Frequency separation is also an extremely useful tool for editing landscape/cityscape photos, and if used tastefully, can dramatically improve a composition.
To reiterate, FS works by automatically separating the color/tone and textures of an image into two separate high and low frequency layers that allow a person to retouch each layer independently without affecting the other.
16-bit vs 8-bit image retouching
When using FS, always use 16-bit color depth if possible. This rule actually applies to any photo editing case. The higher the color depth of your image – the better. To give you a comparison, 16 bits contain 256 times more numerical values than 8 bits.
If you were to put it on a graph, this is what it would look like:

Limitations
FS isn’t intended to remove major blemishes; rather, it should be used for less pronounced skin characteristics. This technique should find a place in your workflow after exposure adjustments and major blemish removal but before more stylistic edits such as dodging and burning. Skin retouching with FS is rather subtle.
Often, the most pleasant and sought-after effect in skin retouching is softening the skin tones. The results are often disappointing when working on an image with no FS, the skin texture and fine details can get lost, and you may end up with an unrealistic “porcelain doll” effect.
Frequency separation can also be used to bring out some details not necessarily related to skin retouching. One example relates to the eyes. When we look at a real face, we’re often led to look at the eyes, and the same thing happens with a portrait image. By focusing on the eyes, we expect them to be perfectly sharp.
Lesson #3 – Common Issues
Every digital image consists of its most fundamental elements; the pixel and each pixel is associated with information that describes the image using a mathematical language. Individually the pixels can’t tell us much. In fact, they’re only colored squares, but when they’re put together and related to each other, not only do they allow us to see our final image, but they allow us to make considerations about how they relate to each other. There are many ways to analyze these mutual relationships, and frequency separation is one of the most used.
In essence, it’s possible to break down a photographic image into spatial frequencies; which is a technical term that implies we can make divisions according to the level of detail contained within different areas of an image, and then work selectively on these zones or layers without affecting the other layer.
Problem areas fixed using frequency separation:
- Smooth out and color transitions in the skin
- Give a facial shape more dimension and shadow and light
- Remove blemishes while maintaining skin texture
- Remove stray facial hairs and distracting flyaway hair
- Cleanup of dust and scratches on a product
- Remove the glare off a window
- Even out significant differences in skin tone, including fake tan lines
- Remove sun flares, human/animal tracks, or any out-of-place elements
- Create amazing sharpness in sunrise landscape images
- Retouch architectural, fabric, and automobiles imperfections
- Remove wrinkles, bags under the eyes, and blemishes.
Texture grafting using frequency separation
From a retouching standpoint, there are few things more challenging than dealing with chunks of hair on the face, missing patches of skin texture and large folds of skin. The existing tools in Photoshop such as the healing brush or patch tool often fail in these situations. When all else fails there is a technique called texture grafting which utilizes the power of FS. It works by gradually replacing texture and then blending the tones and brightness to recreate a realistic appearance. This can be a time-consuming technique, depending on your experience in terms of retouching in Photoshop.
This texture grafting technique involves four stages:
1: Separate the image into high and low frequencies using frequency separation
2: Replace areas of missing or undesirable texture with areas of good texture
3: Blend the underlying tones
4: Add polish with dodging and burning
If this wasn't clear enough, check out this texture grafting video tutorial:
Common Technical Frequency Separation Mistakes
1. Too large brush size – it should be smaller than the contours of the surface you're working on. In areas around the mouth, eyes, nose, chin – there are lots of contours in a tight space. Beginners often use too large of a brush here and end up flattening these areas out.
2. Not respecting the direction of light change: paint along with the gradations and not perpendicular to them.
3. Relying on Clone Stamp entirely; some tasks are easier tackled with the help of the Healing Brush tool or even a Paint Brush.
4. Doing too much retouching work with just frequency separation and forgetting about dodge & burn.
5. Not sampling often enough when applying corrections on frequency layers.
6. Making selections on the low frequency layer and blurring them instead of carefully correcting issues with a brush or the Healing Brush tool.
7. When working on the high frequency layer to graft texture from one area to another, not making sure that close attention is paid to how this borrowed texture now appears in its new location. Oftentimes, the appearance of sharpness/softness can vary greatly depending on the information underneath, on the low frequency layer (determined by factors such as the lighting, depth of field etc.) and must be adjusted accordingly.
8. Remember: high & low frequency layers should always be working in unison.
9. Using an inappropriate radius setting that is either too large (which introduces color and contour into the high layer and makes working close to edges problematic) or too small (which leaves texture on the low frequency layer).
10. Beginners often don't completely understand what texture actually is. Many believe that texture is just the smallest details on the high frequency (top) layer – but that’s not entirely correct. You have to be mindful of the middle frequencies that end up on the low/bottom layer as well. If you don't, the image will look blurred as you zoom out even if it looks fine when you’re zoomed in close.
11. The main problem with this technique is when people use it as a shortcut. For instance, instead of doing the basic skin cleanup by hand. Using it this way usually means it winds up being much more heavy handed than it would be if you just put in the careful work with more traditional techniques.
12. And last, but not least, one of the hardest things for beginners to learn is restraint, keeping the work subtle.
Conclusion
If you have seen some of the portrait retouching videos on the internet, you have probably stumbled upon the term “frequency separation” at one time or another. FS is perhaps on the more advanced side of image editing, but that doesn’t mean you need to be an expert to learn it.
We hope this article helped you understand FS better. It can be useful in both landscape and beauty retouching and while it can be rather time consuming technique, FS is definitely worth the effort. Check out our another tutorial on FS which is very detailed and shows you all the steps you need to take in order to master FS in Photoshop. This tutorial focuses on portraiture but you can experiment with it and apply it to landscape photography too.
Good luck!
Valuable Video Resources:
Frequency separation may sound complex but there are mounds of tutorials online that break down the precise how-to and set-up. Those references are listed below:
- Frequency Separation For Beginners
- Landscape Frequency Separation Tutorial
- Frequency Separation Image Clean Up
- Frequency Separation Retouching In Photoshop
- PHP Method Of Frequency Separation

