A while ago, I was looking at ways to improve the performance of Lightroom. One solution was to move the entire catalog to an SSD drive. The actual process was remarkably easy. However, it also got me thinking about some of the other obscure but handy things you can do in Lightroom.
I spend a lot of time in Lightroom and many of the things I take for granted may be unknown to those who do not use the program so much.
With that in mind, I have put together a brief list of my favourite Lightroom Classic hacks, starting of course with moving your catalog.
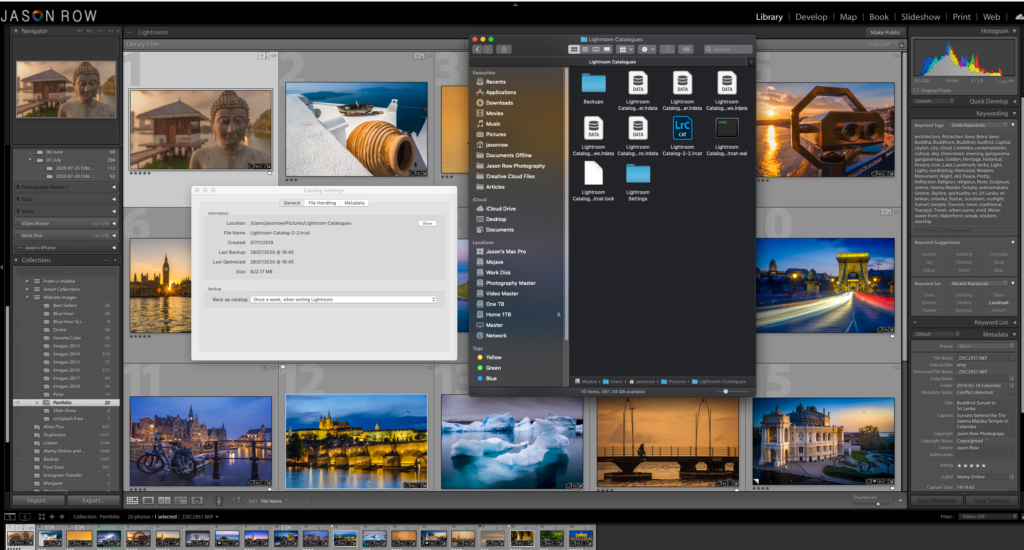
Moving The Catalog
There are two main reason for moving your Lightroom catalog – speed and space. If you are running out of hard drive space or your Lightroom is running sluggishly then moving the catalog to a bigger/faster drive is a good idea.
It’s important to know that the actual catalog is independent of the image files. You can have the catalog on one drive and the image files on another, or even spread over several drives.
To move the catalog you need to locate it first. On Windows go to Edit – Catalog Settings, on Mac go to Lightroom Classic – Catalog Settings. From the General Tab click on Show.
You now need to copy the files Catalog.Ircat, Previews.Irdata and SmartPreviews.Irdata to your new drive. Make sure to copy, not move. This will keep your old catalog intact in case of issues.
Now simply double click on catalog.Ircat file and it will open Lightroom Classic.
Changing The Crop Overlay
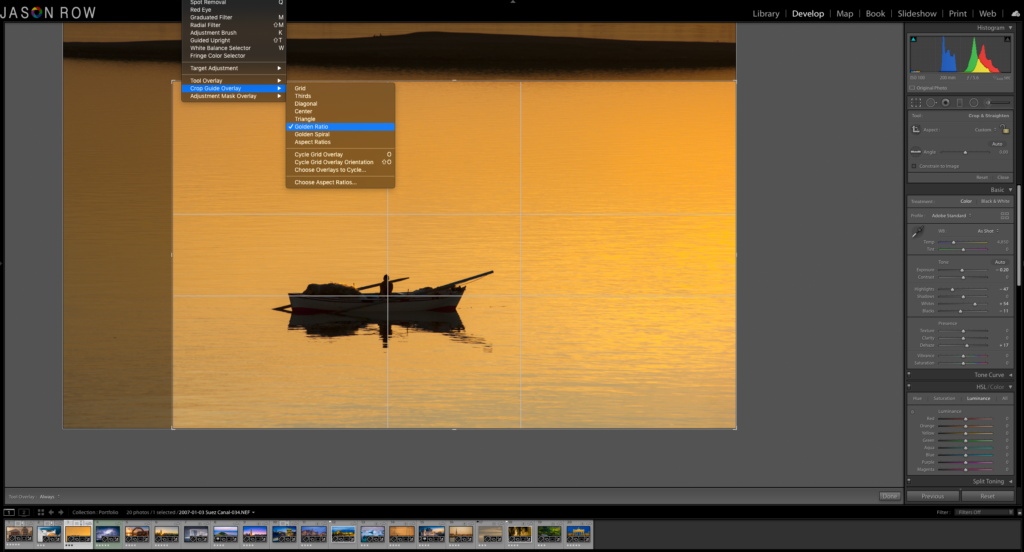
Many of us need to crop our images in Lightroom. But did you know that there is an overlay tool that provides guides to aid our cropping? Better still, those guides are in the form of many popular compositional rules.
To see these guides, you need to have your image in the Develop Module. Select the Crop tool, just below the Histogram. Now, from the menu select Tools – Crop Guide Overlay. You will see a selection of very useful guides.
Comparing Images During Editing
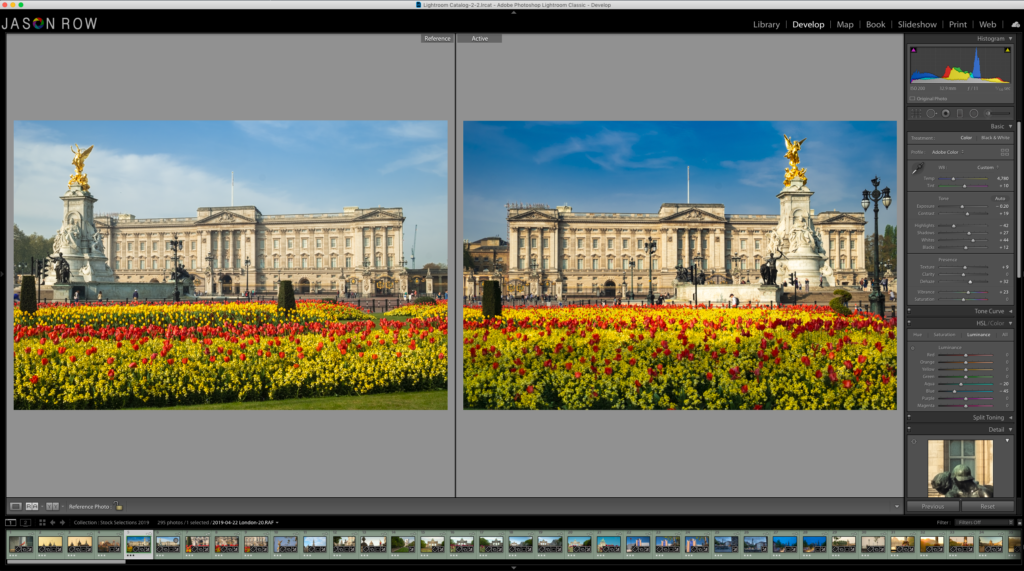
You may be familiar with the compare function in the Library Module. However, you can also compare images in the Develop Module and edit the active image at the same time. This is useful if you want to match similar looking images. You can also see a Before/After edit comparison.
In the Develop Module, select the image you wish to work on. At the bottom of the window you will see three icons – a double box, RA and YY.
The double box is the single image mode. Clicking on RA will show two images – reference and active. You can drag any image from the timeline at the bottom onto the reference side. On the active side you can carry out edits.
Pressing the YY will allow you to see the image you are working on in split screen mode. This allows you to actively edit the image and see the original one at the same time.
In both cases, the position of the Active/Reference can be changed from left/right or top/bottom. This is done via the small triangles to the right of each icon.
Copying Edits And Metadata
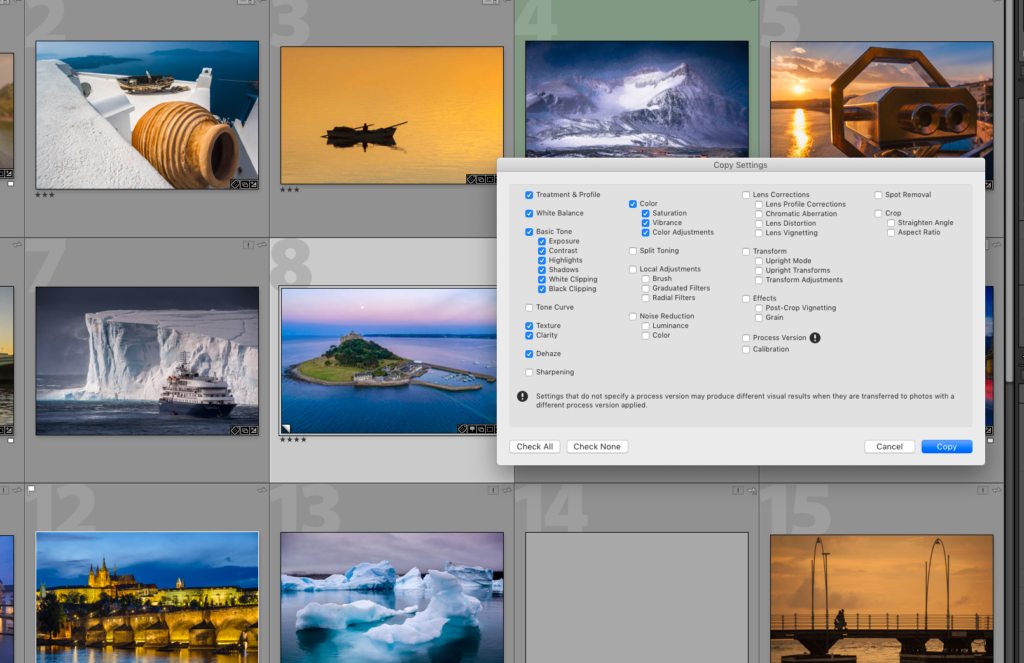
This hack is very useful for improving your workflow speed. You can copy both the edits and metadata from one image and paste them to multiple others.
To copy the edits, in the Develop Module right click on the image and select Settings – Copy Settings. A window will open with all the settings.Check the ones that you wish to copy over and click on Copy.
Now you can either go to the next image you wish to edit, or select multiple images from the timeline and paste the settings. For a single image, right click, select Settings – Paste Settings.
From the Timeline multi select the images, right click on one and go Develop Settings – Paste Settings.
Metadata pasting is best done in the Library Module. Select your reference images. Right click and select Metadata Presets – Copy Metadata. Select the data you wish to copy from the window and click Copy. Now select or multi-select the images you're editing. Right click and select Metadata Presets – Paste Metadata.
Resetting Adjustments/Edits
This incredibly simple hack can save your work when you have pushed your editing too far and want to get back to base. Double clicking on the text beside an edit slider will reset that slider to default. For example, a double click on Exposure will reset the exposure slider to 0.
However, this goes beyond individual sliders and covers pretty much all the sections in the Develop Module. Double clicking on Tone in the basic tab will reset Exposure, Contrast, Highlights, Shadows, Whites and Blacks. The same is true for most sections. Double clicking on Transform will reset the Vertical, Horizontal and other sliders in that section.
Hiding Panels
Sometimes the Lightroom panels can be intrusive when editing. To move them out of the way, simply click on the triangle on the outer edge of the panel and it will hide itself. Click the triangle again and the panel will show up.
Changing The Mask Color
If you do a lot of brush and mask edits in Lightroom, you will know that the default mask color is red. However, this can be problematic when working on an image that contains a lot of red. For this reason you can simply change the color of the mask.
To do so, you will need to be in one of the mask modes, for example Radial Filter. Make sure Show Selected Mask Overlay is checked at the bottom of the screen to show the mask.
Now press Shift + O together to cycle between Red, Green and Grey mask overlays.

Adding Your Own Identity Plate To Lightroom
Perhaps more of a vanity hack than a workflow one! You can replace the Adobe/Lightroom logo, top right, with your own logo.
To do this go to Edit > Identity Plate Setup in Windows or Lightroom Classic > Identity Plate Setup on Mac. From the new window you can choose to use a stylized text plate or upload your own Logo using the graphical identity plate selection. You can even change the typeface of the Lightroom Modules here, although I leave them on default. If you are a photographer that uses Lightroom to preview images to clients, this can be a nice little touch.
Going Full Screen
The next and probably simplest Lightroom Classic hack is going full screen. Full screen is useful for check accurate exposure and color correction during editing. To do so, select a single image then, simply press the F key in either the Develop or Library modules. Pressing once will take you to full screen and pressing again will return you to the standard interface.
Moving An Image To Photoshop
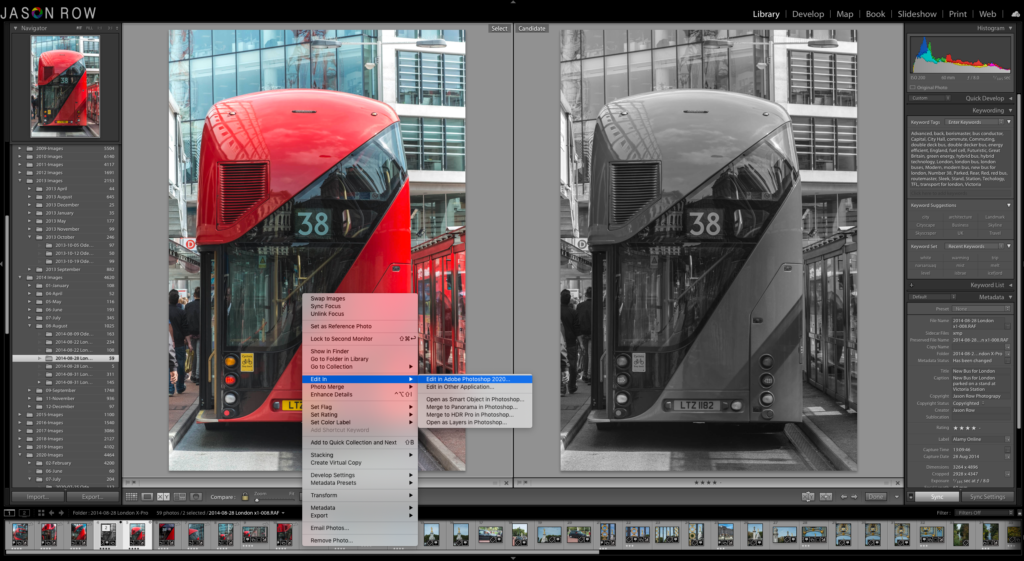
There are times when Lightroom’s tools are simply not good enough for the edit we wish to achieve. To solve this, we can easily move our image over to Photoshop, edit it and then return it to Lightroom.
To do this, right click on the selected image. This can be in the Library or Develop module. Select Edit In Photoshop. Lightroom will now open Photoshop and transfer the image to it. Carry out your edits in Photoshop then simply select save and this will return the edited image to Lightroom.
If you are looking for a visual reference for this article, we have created a tutorial video here:
So there you have ten useful hacks that you may not have been aware of in Lightroom Classic. Do you have any other simple but useful hacks that you wish to add? Let us know in the comments below.


