Of all techniques that have come with the advent of digital photography, perhaps the most controversial and divisive is HDR or high dynamic range. Some people love the surrealistic almost cartoon like quality of extreme HDR, others hate it with a passion, in photographic terms it is on a level with the PC and Mac arguments of the computer fraternity. That said, HDR is an extremely useful tool for creating realistic images that are beyond the scope of a single exposure. The secret is to get the dynamic range similar to what the naked eye can see at not beyond. In this brief tutorial we will have a look at how to do that in Photoshop.
How to Shoot HDR
Firstly, you need to get the shots. Rather than shoot several varied exposures, go for three. Expose one to retain detail in the sky, this will be the under exposed shot. Shoot one to capture the mid-tones bang on, this, under ideal lighting will be the metered exposure but this may not always be the case and finally one to retain some details in the shadows. If you are comfortable with your camera’s histogram, use it. For the over exposed shoot, you are looking for the majority of the graph being on the right side of the screen but not beyond it. If it goes beyond you have blown the highlights and this may show in the final HDR. For the under exposed shot, the reverse it true with most of the graph bunching up on the left side of the screen. The mid range as it’s name suggests should be approximately in the middle of the graph.
Now It's Time to Combine Your Shots
With the images shot it is time to merge them for this article we are using Photoshop CS6 but the same technique apples to CS5. From the Photoshop file menu select Automate – Merge to HDR Pro. Once the initial merge has completed, it's time to make the adjustments. We will do this manually, not using any predefined settings. Firstly we are looking to raise the shadows enough to keep the blacks, black but to keep detail in the non black shadows. To do this we are going to use the HDR’s curve function. Drag the curve line in from the left side towards the right, until it is just touching the edge of the graph. Now if there are any peaks in the graph on the shadows end, click the curve line near the peak and gently raise the curve to lift the shadows.

Adjusting the shadow end of the curve
Next we will drag a point, just inside the highlight end of the curve carefully down the right hand side of the graph. Make sure the upper right point of the histogram remains anchored to the graph. You will see the sky start to get darker and add definition. What you are trying to avoid is any halos appearing between the darker and lighter areas of the image, this is the typical give away of an HDR image.

Adjusting the highlight end of the curve
Next, we will lower or raise the mid tones by clicking a point in the middle of the curve and adjusting it up or down to suit the image. You can make several points in the curve and gently adjust each section to get the best result. We will leave the Edge glow settings as is unless there has been some halo effects creeping in, in which case reduce the Edge Glow Radius to try and eliminate them. Lastly gently increase the details slider to give an overall increase in contrast and perceived sharpness. Once happy click ok and the HDR image will open in Photoshop.
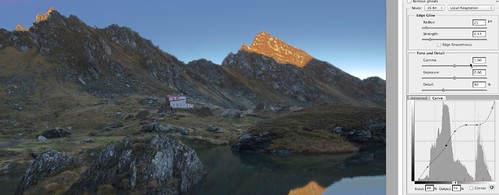
Adjusting the mid tones
From the main Photoshop tools you can further adjust the levels, color and saturation in order to get a visual appealing but not over done HDR image
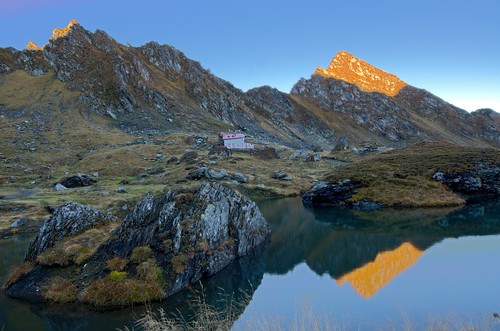
The Final Image
As you can see, with a little care, it is possible to create HDR images that remain lifelike.


8 Comments
Hey I respect your opinion “The secret is to get the dynamic range similar to what the naked eye can see at not beyond.”
I personally like HDR’s that are a little hyper-realistic.
Having Photoshop and HDR seems a little like having a nuclear weapon. Sometimes there’s the terrible temptation to use it when some other weapon is less drastic and more efficacious.
Good post for HDRs that are aiming to achieve realism.
Nice done. I hate too processed HDR so I’ll try it definitely. Thanks
I struggle with making a photo HDR unrealistic and realism. Both have a place. It’s a matter of what you like. There is no right or wrong.
Can HDR be used field depth/sharpness as well as range? Example: I have a particular scene that I want that has a near-field and a mid-field object that I would like to keep in sharp focus. But it also has some distracting background that I would like to be little more than soft blur. Having tried many different f stops and focal points, I have come close, but can’t seem to get both objects in sharp focus and the background off. Would HDR correctly merge 3 images with different focal points shot at different f stops?
You should use the technique called focus stacking. Check out this tutorial on Light stalking here: https://lightstalking.com/photography-tutorial-focus-stacking
Although in the article the point is to get everything in focus, opposed to having the background soft, but I think if you leave the last image(s) blurry, it can work.
I haven’t tried it myself but it seems a viable solution to your problem.
I think it is a matter of taste. I do think it is used more than people know looking at photos and you can add it in part of the picture not to make the photo unrealitstic.