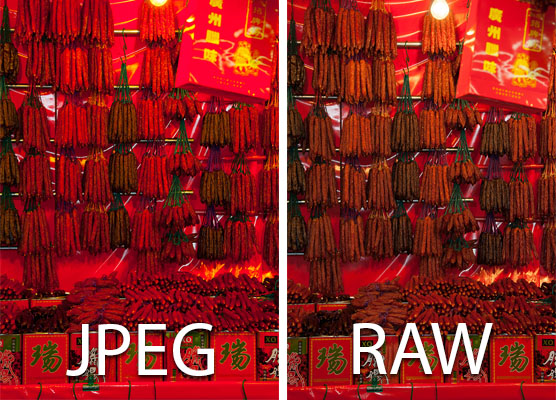
Red, it is one of the most powerful and emotive colors in the spectrum but have you ever noticed that when you take a predominately red image, those reds have a tendency to over saturate or blow out? You are not alone, and it’s not your technique either. The fact is that reds are not captured well by most digital sensors, even in the best cameras. The reasons for this are best left to the scientists but in general terms most CMOS sensors, the most common type of sensor in digital cameras, are more sensitive at the red end of the spectrum compared to the rest. Forewarned is forearmed as the old idiom goes, so having a little knowledge that this can happen will help us prevent or overcome it. So how can we control our reds better.

Red is a powerful, emotive color
Shoot RAW: Raw shooting is often bandied around as a cure-all for many digital imaging evils but in many cases it is true. In the case of blown reds, the extended dynamic range of shooting in RAW format gives us more headroom in post production. In applications like Lightroom or Photoshop we can pull back the highlight regions of the red channel reducing the saturation. We can also reduce saturation purely in the red channel, helping restore some definition into the subject. If shooting RAW in a studio environment, it is worth using a grey card to help neutralise the color in post.

Shooting RAW gives you more control over Reds>
Understand the Histogram: Many of us use our camera’s histogram to analyse our exposure. However, for the most part we use the luminance scale which is a combination of the Red, Green and Blue channels. Most modern cameras will also have the ability to display an RGB histogram, in other words showing the individual exposures for the Red, Green and Blue channels. Although we, obviously, cannot control these individual channel, we can see when the red channel is clipping and potentially oversaturating. This will be shown as the red line on the histogram graph, moving off of the right hand end of the graph. If this effect is seen, we can bring it back simply by reducing the exposure a little. Take care not to under-expose too far, as we can make the whole image too dark. Keep an eye on the left end of the histogram to make sure none of the RGB channels slide off to the left.

Switch your camera's histogram to RGB mode
Use Manual White Balance: Sometimes if the subject of a photo is predominately red, in other words filling much of the frame, the camera’s auto white balance can be fooled and over-saturate the image. To counter this, we can use either on of the camera’s preset white balances or create our own custom white balance. In most cameras this is done through the menu system and is as simple as metering from a piece of white card or paper under the same lighting conditions as your scene.

Set your white balance manually
Change Your RGB Mode: Many cameras come set with sRGB as their default color mode. This is because most printers use the sRGB color space. The issue with this though is that sRGB limits the range of colors that can be reproduced. Whilst for most situations this is not noticeable to the naked eye, if the image is predominantly red, the restricted color space may cause issues. A better option is to use the Adobe RGB color space, this covers a wider range of colors (gamut) compared to sRGB. If you need to print images, you can always convert the shot to sRGB in the post production where you will have more control over the red channel.
Reds have always been a little tricky to control in digital cameras, particularly red flora, which can also be reflecting infrared light. Understanding why your reds are not coming out quite right is half the battle, using some of this tips above will help keep them under control.


5 Comments
You mention Infrared but forgot to mention the availability of Infrared Cut filters, this is an easy fix. For example, here is:
Hoya 77mm UV and IR Cut Filter
Here is a great video that demonstrates how Infrared can impact an image, It’s addresses videography but is also relevant to still photography
Looking at: Infrared Pollution
If I set my camera on Adobe RGB and forget to convert it to sRGB in post, will the print uploader tell me there’s a problem? And since the printer uses sRGB, will my efforts to control the reds be for naught and look “out of control” again? (in other words: the post processing is only effective for digital display?)
Veronika, The print uploader has no way of knowing whether your image is sRGB or Adobe RGB, so it can’t tell you that there might be a problem. If you submit an Adobe RGB file to a printer that expects sRGB, you may be disappointed by the dull colors in your print. So I recommend that if you upload photos directly to a print lab, without doing any editing yourself, that you continue to use sRGB and try some of the other techniques listed in this article.
Outside of any Sigma camera, all other sensors use a beyer-based sensor system. 50% of the total sensor area captures the red spectrum. What do you expect!!
“This is because most printers use the sRGB color space.” That is a tiny bit misleading, I think. Printers don’t actually “use a colorspace”. WI would put it more like this: “most printers have a gamut that roughly fits inside the sRGB color space” and this depends not on the printer as-is but the combination of ink and paper, and the way the printer’s driver handles the conversion from RGB values received from the printing software to it’s own values (CMYK, or often more). I think it’s not a so-good advice to convert to sRGB prior to printing, because, especially in the reds, many photo printers exceed the sRGB colorspace (and even the Adobe98 colorspace). Converting from Adobe98 jpg to sRGB jpg will only make things worse when printing. This is valid when you print yourself, of course. I you use Lightroom for instance, by all means print from your developed raw file directly to your printer without converting to jpeg, so Lightroom will map your image from the develop-module’s ProPhoto colorspace directly to your printer’s gamut using your preferred intent. You will then benefit from the full potential of your printer, ink and papers and obtain smoother gradients and deeper reds. And if you must convert to jpeg, then export one copy converted to sRGB for sharing, and one to Prophoto (or at least to Adobe98) to use for printing.
If you use online services, this might be a different story: they might ideed require sRGB images (which is probably a company policy to avoid complaints about image quality by customers not being aware of what real colors their submitted images contain, given that wide-gamut monitors are very very far from mainstream as of now).
PS: I read above that the printer uploader has no way of knowing what colorspace an image is in, and that is untrue also. Jpeg images are tagged. Unless you deliberately un-tag them. Which is a bit non-sensical.