When most people think of Hawaii they think of sunshine, surfing, and lazy afternoons spent on a beach. Ask any astrophotgrapher that has photographed the stars from Big Island's Mauna Kea and you will hear quite a different story. The two-million year old volcano expands over 30,000 feet from the ocean floor to it's peak, technically making it earths tallest mountain; however, most of that is underwater. Still, at 14,000 feet above sea level, the Mauna Kea summit is infamous to it's visitors because of it's harsh, winter-like weather which often times involves snowy or icy conditions. Bring warm clothing and allow yourself plenty of time to see the mountain during daylight hours. I arrived at the base of the mountain just in time for sunset. The views are world class regardless of the time a day.
Mauna Kea is somewhat of a mecca for the astronomy inclined–both scientifically and photographically. Due to an unusually unwavering and arid atmosphere around and above the volcano, it boasts one of the highest percentages of clear nights in the world, making it an ideal location for stargazing. So much in fact that 13 telescopes are aimed towards the sky at any given time, all of which are operated by organizations from around the world including NASA. These aren't just any telescopes either, among them are three of the largest, most powerful telescopes in the world. We're talking some serious stargazing.
Grab your Milky Way Photography Blueprint for free right here.
Go Prepared!
If you plan on making the trek to the summit of Mauna Kea, there are few things you should know. First, it's bitter cold, essentially barren, and altitude sickness is a real issue. Drink plenty of water before and during your adventure to prevent dehydration. It's arid up there and you will become dehydrated much quicker than usual. The drive to the summit is easy if you have a four wheel drive vehicle, but be sure to stop at the visitors center for at least 30 minutes to acclimate to the change in altitude. Allow yourself plenty of time to adjust, there is 40% less oxygen and air pressure than at sea level. Don't miss out on your chance to photograph the stars because you were in a hurry to get to the summit and picked up a nauseating case of altitude sickness on the way up. Also, the actual summit closes to traffic after nightfall for weather related safety reasons, but there are plenty of other spectacular areas to photograph from.
Location! Location! Location!
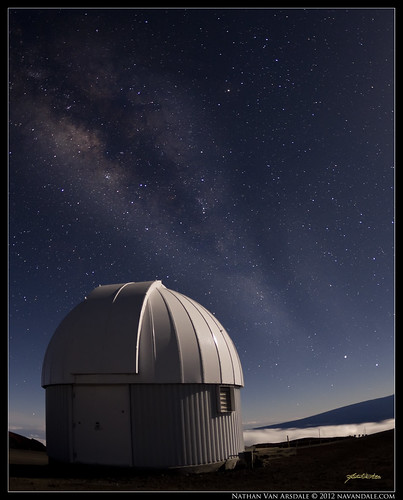
I set up camp near one of the telescopes at 13,550-feet to help block the wind from shaking or potentially knocking over my tripod. Once I was sure my dslr was safely perched on a secure tripod, I opened my aperture up to f1.8, set my ISO as high as it would go, and set my focus at infinity. I started by taking a few 30-second test shots to help me find my composition. The pictures will be grainy beyond belief and completely unusable, but you will be able to see everything that is in the frame and make adjustments to the composition and focus as needed. The human eye will miss out on many elements that your camera will pick up, so take the time to work the scene this way until everything is where you want it to be within your frame.
Getting The Shot
Once your composition is aligned, adjust your ISO back down to an acceptable number range, preferably in the 100's to eliminate as much noise as possible. I did several shots on ISOs ranging from 100 to a max of 640 on a Nikon D7000, which is not particularly known for good low light performance. I left my aperture wide open at f1.8 and kept my shutter speed to 30 seconds, which is the max allowable before I am forced to switch to bulb mode. With these new settings I took a few more test shots, decreasing the shutter speed in 5-second intervals until I found the correct exposure.
Do The Math
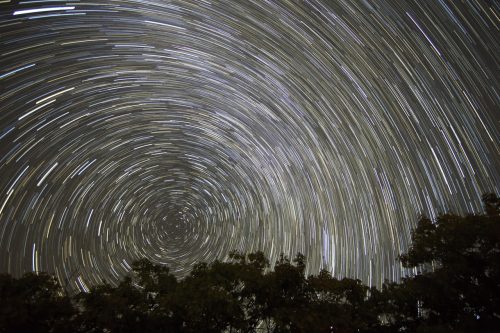
It's easy to forget that the we are in orbit and as earth spins on an axis the position of the stars is constantly changing. What this means is that if we leave our shutters open for too long we will begin to pick up this movement in our exposures. The resulting blur is called a star trail which is a very fun technique to learn but, since I was shooting during a meteor shower I wasn't looking to make star trails. The trick to avoid capturing star trails is to take the focal length of the lens you are using and divide it by 600. The resulting number is how many seconds you can safely have your shutter open before the stars will start tracking across the image. For example, if you are using a 35mm lens, you would use this equation: 600/35=17.14. With this lens I could make 17 second exposures without risking any blur from earths rotating axis. If needed, increase your ISO one stop at a time until your exposure is spot on. The photo below is a great example of a star trail which used an exposure time of one hour and 20 minutes but, if you are not trying make a star trail, stick to focal length rule to keep your stars looking sharp.
I was fortunate enough to visit one of earths prime stargazing locations, but don't be discouraged if this is not within your reality at the moment. There has been a lot of great astrophotography done right from people's backyards. When scouting your location look for somewhere with minimal light pollution, usually in the countryside. Also, gain a working knowledge of the moon phases, as the light pollution from the moon will also affect your photography. Shooting during a new moon is best for maximum darkness. That being said shooting during a full moon can add its own element to a photograph. Most importantly, pay attention to the weather! Making a long trek to the middle of nowhere and getting set up in sub freezing temperatures only to realize it's overcast and about to rain is hugely disappointing. These trips, like most photography trips, take a lot preparation and forethought. In other words, prepare for the worst and hope for the best!

4 Comments
Nice article and photos. Your equation for calculating the maximum exposure duration is described incorrectly. It’s 600 divided by the focal length, but you typed the inverse. Also, the max aperture of a lens is going to impact that value fairly significantly depending on the lens being used.
Good point, thanks for clarifying that! 🙂
Great photography, Tiffany. My camera seized up and wouldn’t work because it was too cold up there. Bad luck. Even then I wouldn’t have known about exposures and such if I hadn’t read your blog 🙂
so if the summit is closed to visitor access, how is it that you were able to set up camp up there ? just curious..planning a trip up there here shortly…