Night sky photography is really one of the joys of photography. Stars are everywhere – whether you live in the Northern or Southern Hemisphere or in the Tropics, the night sky never fails to amaze anyone willing to spend some time out in the night exploring the sky. You need to be willing to stay outside when most people are in bed, but you get a stunning view of the night sky as a reward.
There are some fundamental things you will need to take care of before you start your night sky photography journey. When photographing the night sky, what you need is a location away from light-polluted areas and clear skies. Of course, you also need the gear required to shoot the images as well.

Most photographers, especially beginners, shy away from astrophotography or even attempting to photograph at night because they assume that it is a very difficult process and that only experienced photographers are capable of doing it. Expertise in night photography helps you to set things up easily, locate areas to shoot, and get the shot you want quicker, but you only get to that level through experimenting, practice, and experience.
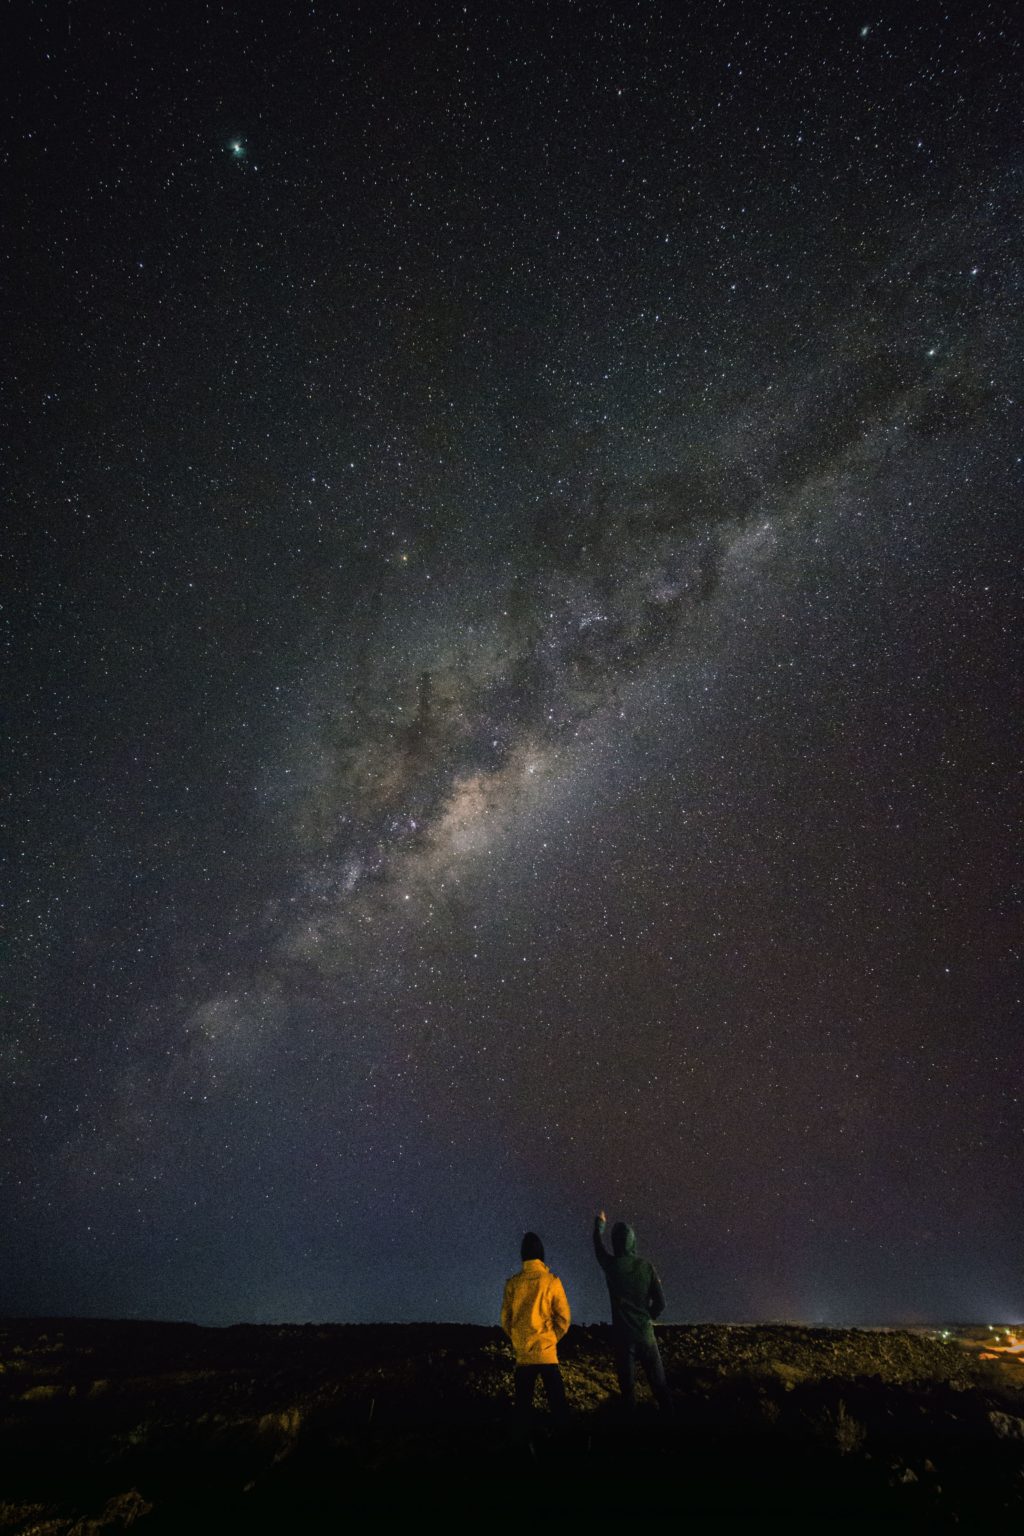
Now, when you think of the night sky, what is it that comes to your mind? The stars? The Milky Way Galaxy? The Moon? The Planets?
Whatever it is that comes to your mind, capturing a photo of the Milky Way or star trails or an aurora is every night sky photographer’s dream. Certain times of the year make this possible, but during the other seasons, you can just photograph the night sky and capture the stars in there, or create images with star trails, or, depending on where you live, you can shoot the aurora.
Here Are 8 Fundamentals That You Need For Photographing The Night Sky:
1. Location:
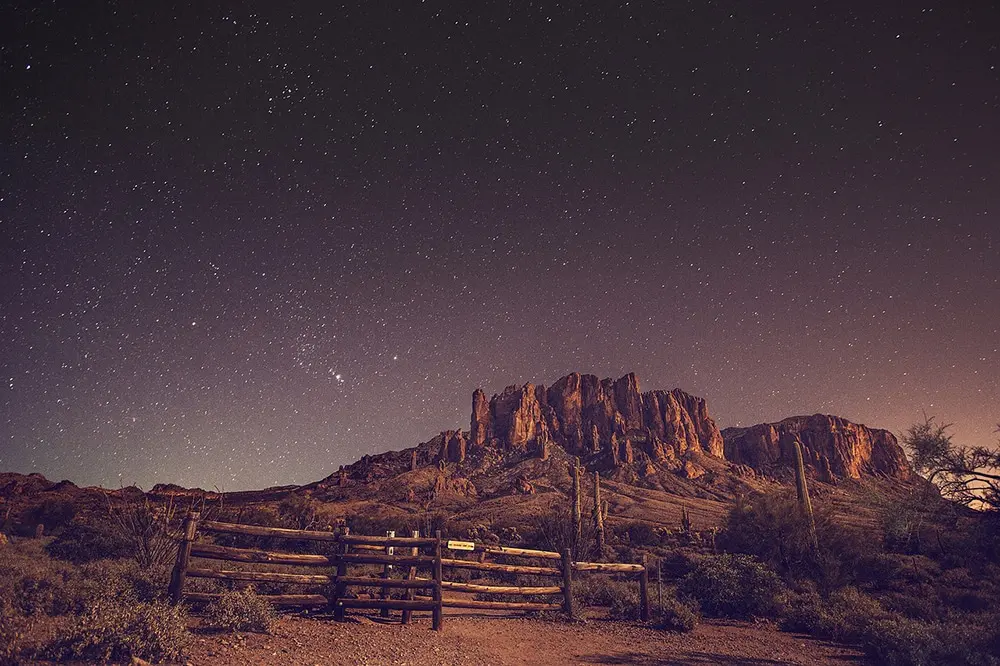
This is of prime importance because you need to be away from the city lights in a place that lets you see the stars and milky way with your own eyes, and that way, you will be able to capture amazing images of the stars or the Milky Way with your camera. – ideally 20 to 70 miles away from the nearest city, depending on how large the city is and how light-polluted it is. If you love the mountains, they are the best places to stay at night and photograph the night sky
Check out the Light Pollution Map and the Dark Sky Finder to find dark skies or locations nearer to where you live.
2. Composition:
You can just photograph the Stars, the Milky Way, Moon, etc., when it is high up in the sky, but adding a subject of interest or a foreground element will take your photograph up one level. Look for interesting elements like mountains, trees, lakes (which lets you capture reflections), buildings, ruins, etc, to add a focal point and interest to the image, and bear in mind that the farther you get away from the city, street lights, the lower the light pollution.
Foregrounds or any elements that you add in the frame most of the time get recorded as a silhouette. If you want the details to show up in the image, you will have to paint them with light using a flashlight or something similar or shoot HDR.

3. Managing Or Using Moonlight:
The advice out there for photographing the night skies is to shoot in complete darkness on a new moon night or on a day when the moon is not in the sky and then add the required light to light up the scene using flashlights, speed lights, headlamps, small LEDs, etc. depending on what you want to show to the viewer. It takes a few attempts to get the effect that you are looking for and keep an eye on moon phases to decide on a completely dark night.
Alternatively, you can get enough foreground details using the moonlight to light up the foreground. Having the full moon can overexpose the foreground and make the stars look faint, but during the quarter moon, the light will be just enough to get the foreground correctly illuminated. It is best to have the moon at the back of the frame in this situation.

4. What If You Want To Shoot The Moon?
If you want to have the moon in the frame in your night sky image with enough foreground details, you will need to go down the route of compositing while post-processing. Take an image exposing for the foreground and another one exposing for the moon and combine them while post-processing. Make sure you use the same focal length for both images.

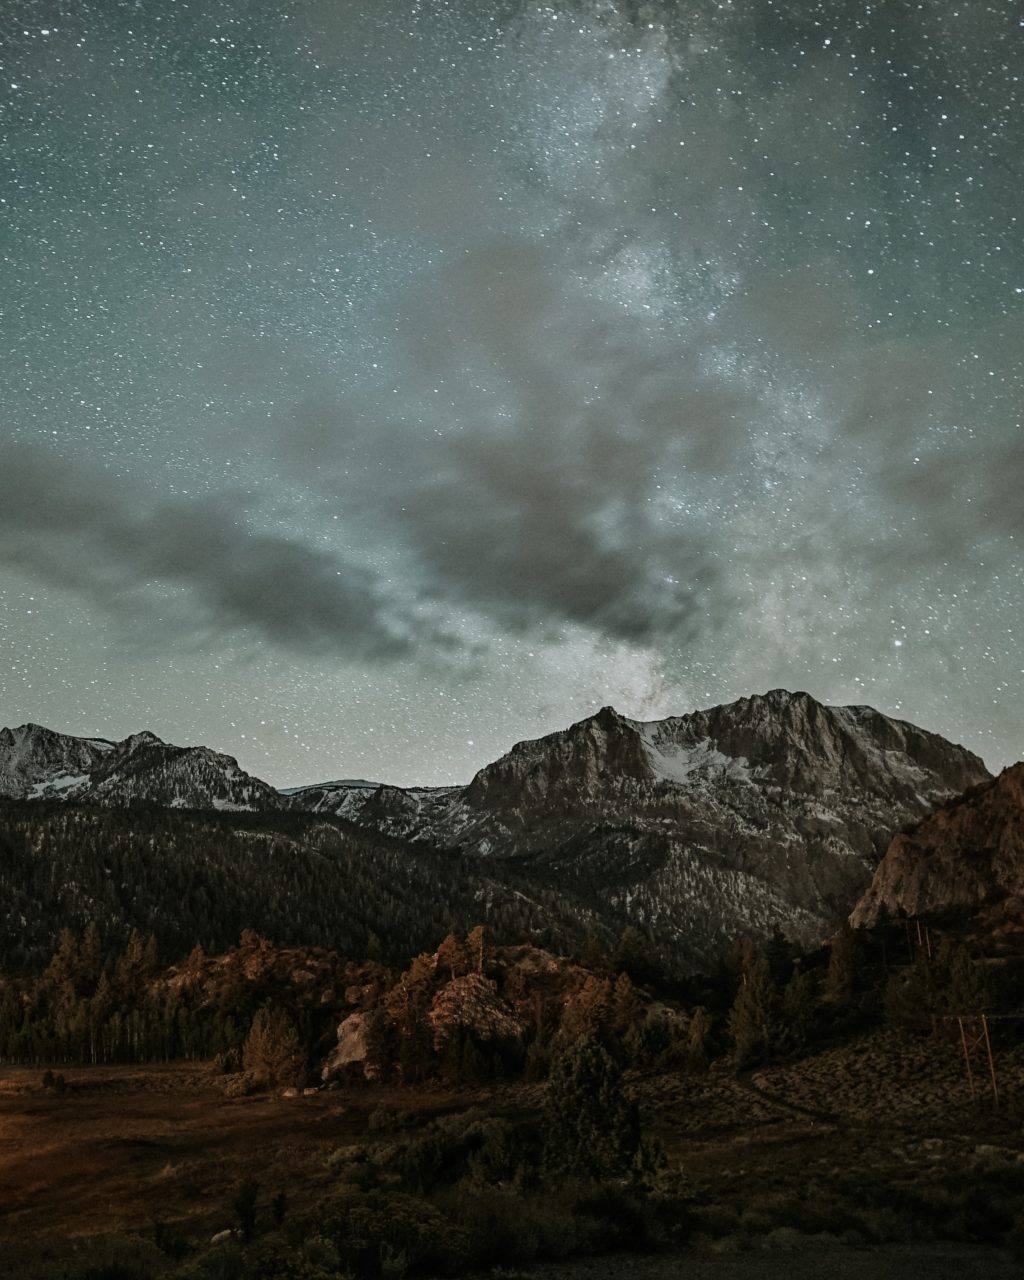
5. Understanding The Night Sky:
If you are planning on photographing the sky at night, a basic understanding of the sky at night is required if you are looking to photograph the Milky Way, the moon, circular star trails, or include planets in the frame – in other words, basic astronomy (I am not talking about astro imaging here). Astronomy is very interesting, fun, and easy, and it doesn't hurt to know something extra!
Some of the basic things you will need to know are:
- Basic understanding of the directions like north, south, east, west, NE, SW, etc. Keeping an eye on the sunrise or moonrise directions will give you a rough idea, although the direction changes slightly over the year.
- Rotation and revolution of the earth – these contribute to the understanding of star trails and the Milky Way season.
- Moon Phases + Moonrise and Moonset times – always know what the moon phase is by keeping an eye on it through knowledge or by using an app. This contributes to deciding on when to shoot for the stars and Milky Way (as moonlight can make them look faint) and when to shoot for the moon and night landscapes when you need the moon in the sky to illuminate the landscape.
- Locating the North Star (for Northern Hemisphere) and the Southern Cross or Sigma Octantis (for Southern Hemisphere) – helps with recording circular star trails. If you are a beginner and find it difficult to locate these stars in the sky at night, use an app like the Sky Guide app or Star Walk 2 to locate The Polaris for the North Celestial Pole and the Sigma Octantis for the South Celestial Pole. It is very handy and easy.
These apps for night skies photography can accurately show you the location of the stars at any given time or tell you at what time the stars rise and set. Polaris is always above the horizon.


- The Celestial Sphere – the hemispherical dome that you see when you look at the sky with the stars. For both the hemispheres put together, that is, both the hemispherical domes put together form the celestial sphere.
- The Celestial Poles – the poles on the celestial sphere are celestial poles, and any stars near or around the celestial poles (for example, the Polaris or the North Star as it is commonly called and the Southern Cross) seems to be moving in circles in the sky.


- Locating the Planets – If you wish to photograph events like oppositions and conjunctions, etc., you need to know where the planets are located in the night sky, as sometimes they are mistaken for very bright stars by beginners.
6. Apps You Can Use To Locate Objects In The Night Sky:
If you are a beginner in night sky shots, do not refrain from taking images of the stars or the night sky just because you have very little knowledge about the stars and the sky at night. Instead, make use of apps that will help you locate the Stars, Milky Way, and other celestial bodies that you wish to include in the frame you are planning to photograph.
An online program called Stellarium helps you locate the stars that are in the field of view in the location where you are and shows you moon phases and the light pollution levels of the location you are in as well.
These apps below can accurately show you the location of the Milky Way, Stars, planets, etc. at any time or tell you at what time these deep sky objects rise and set.
- The Sky Guide app for iOS gives an accurate location of the objects in the sky.
- If you are looking for a free app for iOS, Sky View Lite is a good enough app to locate objects in the sky at night. The Sky View is free for Android.
- For Android users looking for a good app Star Walk 2 is the on Stellarium to go for, alerts you of astronomical events, and it is free.

7. Time Of The Year:
If you are planning to shoot only the stars or star trails, you are good to go ahead and do it all year round as long as the skies are clear, the moon is not in the sky, and you are away from the city lights with TH least light pollution. You need to gather as much light possible from the object in the sky without the hindrance of artificial light and the light from the moon.
If you are looking to photograph the elusive Milky Way, then you need to make sure that the Milky Way is up in the night sky, as, only during certain times of the year and depending on where you live, you will be able to see the Milky Way in the sky at night. The months between April and October are the times when the Milky Way is above the horizon in the sky at night, and it is during the summer seasons of July and August, that the Milky Way appears as a bright band across the sky at night. During other times, it is close to or below the horizon at night.
If you are looking to photograph the Aurora, the best time to get into Aurora photography is from the start of the fall season until early spring when the nights are longer, as the summer season has long days with very short nights or brighter nights. This applies to both the Northern and Southern Hemispheres. The best months to view the aurora are:
- For the Northern Hemisphere, it is from September to March
- For the Southern Hemisphere, it is from March to September
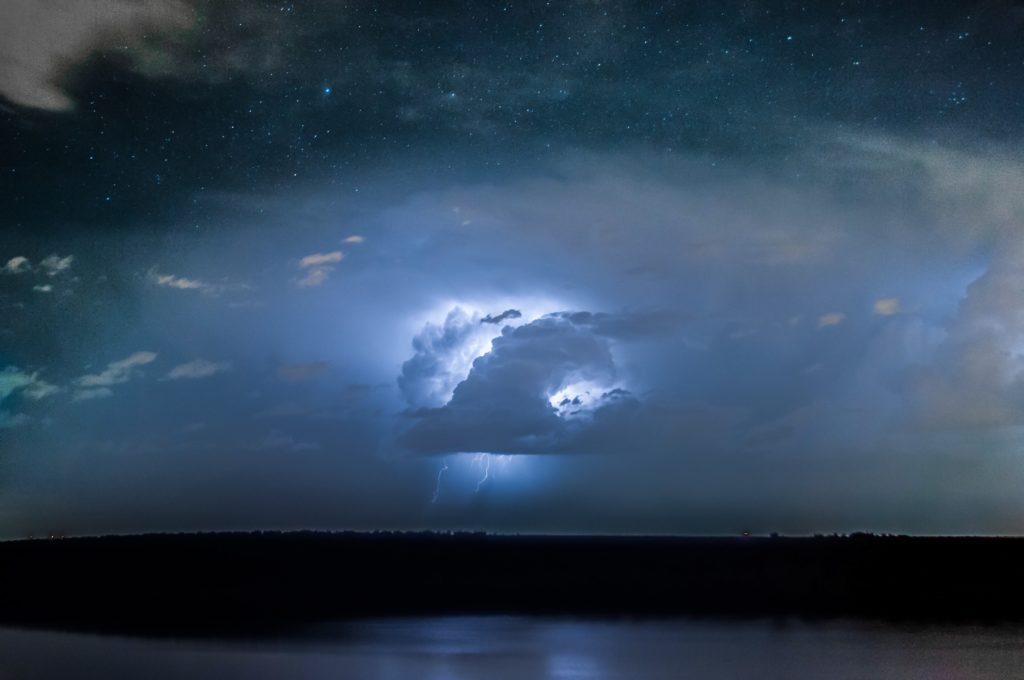
8. Weather:
When getting into night skies photography, look for days when there is a forecast for clear skies, or occasional clouds are fine too. But what if there was something totally unpredictable? You are out there and there are storm clouds? Make the best use of the storm clouds at night as they can help create dramatic images, but safety first.
Do not forget to protect yourself and gear against any bad weather.
Now that we have understood the basics, let us dive into it…
Here Is The Nitty-Gritty Of Night Sky Photography.
What Gear Will I Need To Photograph The Night Sky?
You will need a camera that can shoot using manual mode functionality, a very sturdy tripod to stabilize the camera during the long exposure, and to keep the camera stable during windy conditions, preferably a wide angle lens and a remote or cable release to avoid any blur due to camera shake. Have fully charged batteries and spares depending on how long you will be shooting and what you will be shooting, and some spare formatted fresh memory cards to get you through the whole shoot.
Photographing the Night Sky With a DSLR
If you have a DSLR, you will be able to shoot in manual mode. It is better to have a camera that responds well in low light and higher iso. Remember to have the camera on a tripod during long exposures, turn off image stabilization when on a tripod, use the mirror lockup feature to reduce camera shake during shutter release, and use a cable release or a remote shutter release to release the shutter. Focus on a distant star manually, and set the iso to anything between 640 and 3200, depending on your camera’s performance.
At the widest aperture, use the 500 rule or 600 rule to calculate the shutter speed or maximum exposure time and take a test shot. Depending on how much light or how the stars are recorded, increase or decrease the exposure by increasing or decreasing the iso. It is best to stay within iso 3200 above which noise may be quite evident.
Photographing The Night Sky With A Mirrorless Camera
Using a mirrorless camera is very similar to using a DSLR in terms of settings, except for the fact that you do not have a mirror and hence no need to use the mirror lockup feature.
What Are The Best Lenses For Night Sky Photography?
The best lenses are wide-angle lenses with the widest aperture possible. It is recommended to have at least lenses with a large maximum aperture of f/2.8, but if you have an f/1.8 or f/1.4 lens, go for it, as you can shoot at a lower ISO.
In terms of focal length, it is best to have a lens between 14mm to 24mm so that you get some decent foreground elements and the sky in the frame. When shooting the aurora or the milky way, it is best to go as wide as you can so you have the whole of the aurora show or the Milky Way in the frame.
Night Sky Photography With An iPhone Or Phone Camera
With smartphone cameras getting better each day, most photographers are now tempted to try techniques to get better images with their smartphones. If you are one of them, then there are a few good long-exposure apps out there that can help you with photographing the sky at night with your iPhone or other phone cameras.
Bear in mind that you will need to mount your phone on a tripod and use a remote release or the timer delay feature to release the shutter so that you avoid all blur due to camera shake. Manually set the camera to the widest aperture, iso around 400 to 800, and take a 5 to 10 seconds exposure. Depending on what you get, make adjustments to iso and shutter speeds to get the brightest stars recorded.
The Best Apps For Night Sky Photography
These are some of the apps for smartphones for night sky photography, including the aurora. These apps let you have manual control over the camera settings.

Other Tools For Night Sky Photography
If you are a beginner, do not refrain from taking night sky images just because you have very little knowledge about the stars, the galaxies, or the Aurora, but make use of the tools below that will help you locate the stars, MilkyWay, other celestial bodies, and aurora that you wish to include in the frame you are planning to photograph. There are also resources to help you find dark locations free from light pollution.
- Stellarium – an online program that helps you locate the stars that are in the field of view in the location where you are, shows you moon phases, and the light pollution of the location as well.
- Photopills for iOS and Android – helps you calculate events for any genre of photography. You can easily calculate the exact date and time the scene you imagined will happen.
Apps To Locate The Stars And The Milky Way:
- 500 rule app for iOS – gives an accurate location of the Milky Way, stars, and planets and alerts you of astronomical events.
- Sky View Lite – a free app for the iOS, that is a good enough app to locate the Milky Way, stars and planets. The Sky View is free for Android.
- Star Walk 2 – For Android users looking for a good app, this is the one to go for and it is free. It lets you see the position of the milkyway, moon, stars and planets for future dates and times which I think is a good feature of the app.
- Sky Safari for iOS – helps to locate planets, constellations, satellites, and millions of stars and deep sky objects
- Sky Map for Android – helps to identify stars, planets, nebulae and more
Apps To Find Dark Locations:
- Dark Site Finder – helps to find a dark location near you
- Light Pollution Map – helps to locate areas with less light pollution
- Dark Sky website – helps to find a dark location near you.
Apps To Calculate Exposure Time For Night Sky Photography:
- 500 Rule Calculator for iOS – useful tool for night sky photographers who need to calculate proper exposure time for star photos and avoid star trails
- 600 Rule Calculator for iOS – another tool for photographers to calculate proper exposure time for star photography
- Pin Point Stars for Android- helps to calculate the best exposure times to capture star and milkyway images
- Sharp Stars for Android – helps to determine the longest exposure time that will produce sharp stars when printed
Here are some night sky photography tutorials that will help you with taking images of the night sky.
Here's How To Photograph Some Amazing Celestial Bodies
1. The Milky Way
How To Find The Milky Way In The Sky
Before looking for the Milky Way in the night sky, you need to make sure that you are in a location where the light pollution is very low and that you have clear skies with no moon as any of these can make the details washed out and make it impossible to see and photograph the Milky Way. March till September is the best time to photograph the Milky Way as it is up in the night sky.
If you are a star-gazer and have experience finding constellations and asterisms in the night sky, then look for the Teapot asterism in the constellation Sagittarius. It is easy to spot in a dark sky during the Milky Way season. When you look in that direction, you’re looking towards the center of the Milky Way galaxy.

If you are a beginner with stars, the easiest way to locate the Milky Way is using an app like The Sky Guide app for iOS, Sky View Lite a free app for the iOS or Star Walk 2 for Android users, as most of us have a smartphone in hand these days. These apps can accurately show you the location of the Milky Way at any time or tell you at what time the Milky Way rises.
How To Photograph The Milky Way
Locate the milky way in the sky and mount your camera on a tripod facing the milky way and framing a composition that you like. Manually focus on distant stars. Set your lens to the widest aperture and depending on the performance of your camera and aperture value, set the iso between 640 and 3200. Calculate the shutter speed based on the 500 rule to avoid star trails.
Take a test shot and see how the image turns out. If the image is too bright, lower the iso, and if the image is too dark, increase the iso.
What Are The Best Settings For Photographing The Milky Way?
- When photographing the night sky, that is the stars or the Milky Way, it is best to use a camera that can perform well in low light. Set the white balance to tungsten or daylight to get the correct sky colors, but you can change this to your preference while post-processing as you will be shooting raw.
- Set the aperture to the widest on the lens – having at least f/2.8 is advisable, but if you are a beginner and have only the kit lens, then go ahead with it at 18mm, f/3.5
- Start with the lowest iso possible, perhaps between 640 and 1600. Depending on what you get, if you need you can increase the iso up to 3200, above which the image quality can start to deteriorate.
- Put your lens on manual focus and focus on a very bright star in the sky. Adjust the focus manually by zooming in on live view till you get a point sharp image. Do not change focus or change to autofocus in between shots so that you get the stars sharp in the image. Take a test shot to make sure the focus on the stars is sharp.
- Depending on the focal length that you are shooting with, you will need to calculate the shutter speed based on the 500 rule, taking the crop factor into account.
- Do a series of test shots to get the composition and settings right.
We have a very detailed article on how to photograph the milky way in 12 steps. Worth having a look!
Best External Links For Milky Way Photography
- How to photograph the stars, moon, and Milky Way: a beginner’s guide to night landscape & astrophotography
- How To Photograph The Milky Way With A Portrait Subject
- How To Find The Milky Way
- How To Photograph The Milky Way Like A Boss
- How To Photograph The Milky Way In Places With Light Pollution
- How To Plan And Photograph The Milky Way
- Space Photographer Explains How To Shoot The Milky Way In Light-Polluted Skies

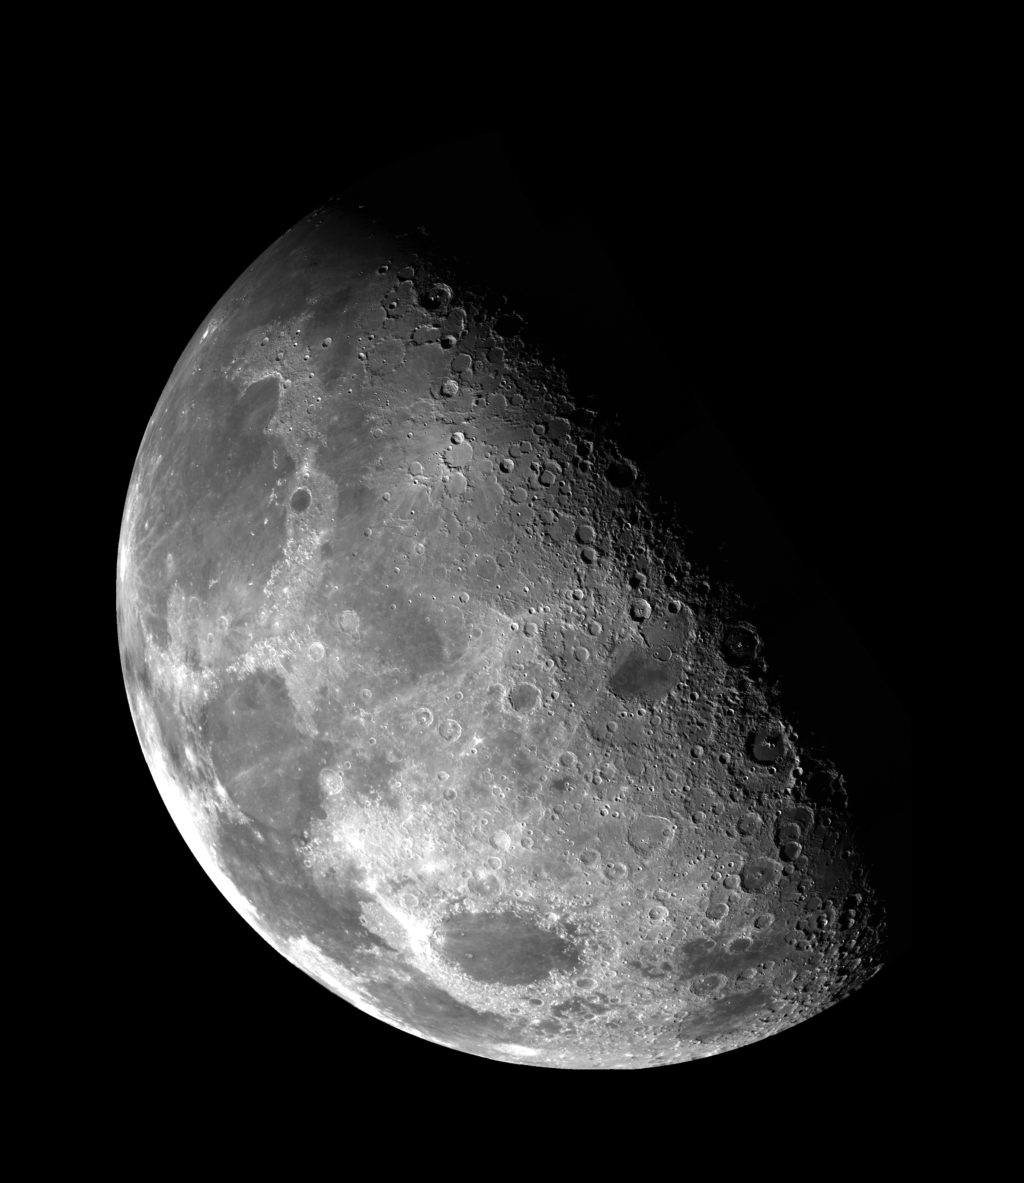
2. The Moon
How To Photograph The Moon
Since the moon is the brightest object in the night sky, the light meter in your camera can get confused and hence, using spot metering mode is wise in this case. Once you have your camera on a tripod, turn off image stabilization. Use a cable release to release the shutter and mirror lock up if you are using a DSLR.
Set the aperture between f/5.6 and f/11. Have shutter speed at least 1/125s or faster as you do not want to record blur due to the movement of the moon – the more you zoom in, the more evident the movement. Start with the lowest iso possible, maybe 100 or 200 and go up from there if the exposure isn’t right. Manually focus on the moon. Zoom in and focus using live-view. Take a shot and depending on what you get, you can increase the iso a bit.
We have a very detailed article on how to photograph the moon. Check it out!
Best External Links for Moon Photography
- How To Shoot The Moon
- How To Photograph The Moon Using Your Smartphone
- How To Photograph The Moon: From Urban Landscapes to the Lunar Surface
- Lunar Photography: How to Photograph the Moon
- 10 Things: Moon Photography Tips
- How To Take Pictures Of The Moon
3. Star Trails
How To Photograph Star Trails
Use the settings that you would generally use for night sky photography to photograph the stars. To capture or create star trails you will need to take multiple exposures with an interval of 1 second or less and stack the images while post processing. Make sure that you do not turn on low light noise reduction as it will increase the time between each exposure.
You need a minimum of 50 exposures to get some star shots of the trails, but having 100 to 200 exposures will get you dramatically long star trails. Make sure that you do not move the tripod or change frames between the shots. Make use of the camera’s inbuilt intervalometer if your camera model has one or use an external one. If none, then use the continuous shooting mode to shoot multiple shots.
If you are looking for circular star trails, if you are in the Northern Hemisphere locate the Polaris and point the camera towards that and if you are in the Southern Hemisphere, locate the Southern Cross (use apps mentioned before for this) and point your camera towards that. These will be the location of the north and south celestial poles around which the stars “seem to rotate” because of earth's rotation.
Here is an ultimate guide on how to photograph star trails.

Best External Links For Star Trail Photography
- How To Photograph Star Trails With a Digital SLR Camera
- How To: Plan Your Night Photography For Perfect Star Trails
- How To Take Star Trail Photographs
- Photographing Star Trails
- Learn How To Do Star Trail Photography Like A Pro
- How To Maintain Star Colour In Your Star Trail Images
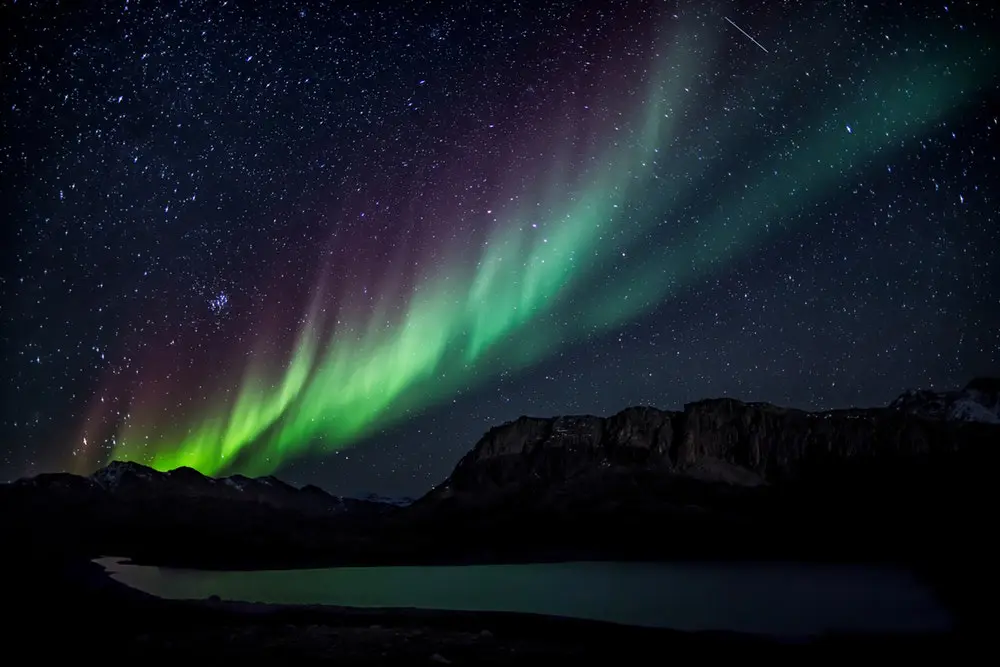
4. The Aurora
How To Photograph Aurora
To photograph the aurora, you will need to be in a place inside the auroral oval where aurora will be visible, and you also need to make sure that you have clear skies and no light pollution. You will need a camera that can shoot manual, a tripod, a wide-angle lens with a wide aperture of about f/2.8 and cable release to release the shutter instead of pressing the shutter button.
Use the forecast to make sure the aurora is visible from where you live – you need really dark skies to view and photograph this spectacular phenomenon. The geomagnetic activity (kp index) depending on where you live lets you decide if you will be able to see the aurora or not. There are many apps that will let you track the aurora for your location.
Apps To Track The Aurora:
- My Aurora Forecast & Alerts for iOS and Android: gives you the current Kp index with a list of best locations to view the aurora.
- Aurora Now – Northern Lights for iOS: provides real-time predictions for auroral activity including the next 30 minutes.
- Aurora Alerts – Northern Lights Forecast for iOS and Android: notifies the user of possible auroral activities in their location and when the Kp index reaches a certain value.
- Northern Lights Alerts for iOS: alerts you of auroral activities around your area.
- Aurora Forecast for iOS: lets you plan your aurora watching experience as it alerts you of the auroral forecast, auroral predictions, lets you track real-time solar activity and auroral nowcast.
- Aurora Notifier for Android: makes use of the Google Cloud Messaging service to inform you of times when it is possible to see the aurora.
- AuroraCast for iOS and Android: features live Kp and magnetic field info and gives an idea of aurora forecast for 3 to 27 days.
- Aurorasaurus for iOS and Android: gives a real-time Google map with weather and aurora predictions for where the aurora will be visible and also alerts you when the aurora is visible in your location.
When you are at the location to photograph the aurora, mount the camera on a tripod and turn off image stabilization. Manually focus on a distant star and lock the focus. Choose the widest aperture and use iso between 100 to 800 and shutter speed between 20 to 30 seconds depending on the available light from the aurora as the intensity of light quickly varies. Depending on what you get, you will need to change iso and exposure time.
If the aurora activity is very high, you may have to decrease the exposure time to 0.5 to 5 seconds to freeze movement and capture the details as the movement of aurora will be fast. Crank up the iso if required and using a faster wide angle lens is always recommended.
We have a very detailed article with information on everything you need to capture stunning images of the Aurora.

Best External Links for Aurora Photography
- A Photographer’s Guide To Capturing The Northern Lights
- How To Photograph The Aurora Borealis: Pro Tips For Getting The Best Shots
- How to Photograph the Aurora Borealis in the UK
- How To Photograph The Northern Lights With An iPhone, Smartphone Or Camera
- How To Photograph The Northern Lights With Today’s Digital Cameras
- Capturing Clouds Of Light: How To Photograph The Aurora Borealis
- The Northern Lights: 10 photography Tips For Beginners
More Tips To Master Night Sky Photography
What Are The Best Exposure Rules For Night Sky Photography?
The rule most commonly used for night sky images is the 500 rule. If you are not satisfied with the exposure and want to increase the exposure time, you can use the 600 rule.
- 500 Rule
This is a rule used to calculate shutter speed for various focal lengths in order to get the exposure right without any star movement for night sky photography. Depending on the focal length that you are shooting with, you will need to choose the shutter speed using the 500 rule and taking the crop factor into account if you are not using a full-frame camera.
For example,
If you are shooting at 18mm, then for full-frame cameras, shutter speed or exposure time should be less than or equal to 500 ÷ focal lengths = 500 ÷ 18 = 27.7 = 28 seconds.
For a crop sensor camera, you need to take the crop factor into account. So for a Nikon crop sensor camera, the crop factor will be 1.5. Hence, shutter speed should be less than or equal to 500 ÷ (18 x 1.5) = 500 ÷ 27 = 18.5 = 19 seconds.
- 600 Rule
This is very similar to the 500 rule above but instead of dividing 500 by the focal length, you need to divide 600 by focal length. Use this rule if the exposure using the 500 rule doesn’t yield good images for you. For example, if you are shooting at a focal length of 18mm, then exposure time should be less than or equal to 600 ÷ 18 = 33.3 = 33 seconds.
Moreover, you may see small trails in the image when enlarged, so this rule could be used for photographs you will be using on the web and not for printing.
How To Deal With Light Pollution In Night Sky Photography
As advised before, it is best to shoot night sky images from a location where there is the least amount of light pollution, but there are times when it is difficult to get to a location where there are dark skies. There are two things you can do to capture the night sky from areas of light pollution.
- Expose to the right (ETTR) – You shoot at higher iso values like iso 3200 or 6400 and expose the image to the right in a way that you do not blow out the details in the image. This way the histogram is shifted all the way to the right. During post production, decrease the exposure and increase the contrast to get the details back. This method yields less noise in the image.
- Another way is to use a light pollution filter as these filters block certain wavelengths of light from reaching the camera sensor. This can help remove the glow caused by light pollution from being recorded in your photograph and have the stars or milky way more detailed in the frame.
Please bear in mind, these results are not going to be great like the images you take from dark sites with no light pollution.
How To Include People And Foreground In Night Sky Photography
To include people in night sky images, you can choose to use one of the methods below.
- Use low-power flash to illuminate the subjects during night sky exposure. Once the flash is fired, people can move out of the frame very quickly.
- Use light painting technique to paint the subjects for a short period (1 to 5 seconds as required) during the night sky exposure, so that you get the right exposure on the people. Once done, the people can quickly move out of the frame.
- Composite two shots – one exposed for the people and another for the sky and combine them while post processing.
To include foreground in night sky images, you can either light paint the foreground landscape or composite two images.
- While light painting the foreground, during the exposure for the night sky, you will have to paint the foreground with the right intensity of light for a short period to get the foreground elements correctly exposed. If there is a quarter moon or if you are photographing the aurora, the ambient light should be enough to illuminate the foreground. For Milky Way shots, make sure the moon is not up in the sky as it can make the Milky Way look faint.
- If the foreground is at a distance, light painting may not be possible. In this case, you will have to take two images of the same frame. One exposed for the sky and another exposed for the foreground and then stack them using a post processing application.
Note: When exposing for the foreground, depending on where you are (how dark the location is) , you may need to have exposure times 3 to 6 times or longer than the exposure time for the sky in order to gather more light and details from the foreground. For example, if you exposed 20 seconds for the sky, you will have to expose 1 to 2 minutes or more for the foreground. It is best to do test shots and adjust exposure accordingly.
Post Production And Night Sky Photography
- For stars and Milky Way: The straight out of camera image is going to look a bit dark. You need to use a post-processing app like Adobe Lightroom to adjust basic exposure and contrast and work with the highlights, shadows, blacks and whites sliders to get the details out of the image. Adjust white balance if necessary and add a tad of clarity if required. You may need to work on noise reduction if it is very evident in the final image.
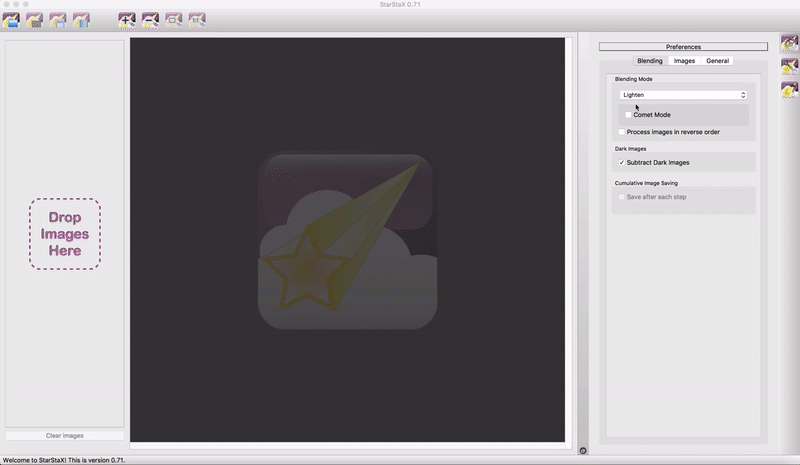
- For Star Trails: StarStax is a very easy to use app that can be used to stack your images in a matter of few seconds. Just drag and drop the edited images into StarStax, select the Blend Mode to “Lighten” and click the “Start Processing” button. Your star trail image will be created in a few seconds.
Alternatively, you can use Adobe Photoshop to stack the edited images. Import the images into photoshop as layers and combine them into one file by choosing “Blending Mode” as “Lighten.” This way you get the star trails created in a matter of few minutes.
- For Aurora: Adjust the white balance to your taste because most of the aurora images may have more green color cast. Straighten and crop the image if necessary. As you would make adjustments to any images, use the basic adjustments panel to adjust exposure, contrast, blacks, whites, shadows, clarity, and vibrance – it all depends on your personal preference. If there is haziness, use the dehaze slider in limits to pump up the contrast a bit.
The Best Online Resources for Night Sky Photography:
- Some of the Best Photos of the Night Sky, and How to Make Your Own
- Astrophotography Tips: How To Shoot Photos Of The Night Sky
- How to Take Decent Pictures of the Sky at Night
- Night Sky Photography Tips
- Night Sky And Star photography Techniques
- Heavens Above! 5 Tips For Capturing The Night Sky With Your Smartphone
- How To Take Professional-Quality Photos Of The Stars And Night Sky
- How To Take Pictures Of The Perseid meteor shower And The Stars
- How To Take Pictures Of Stars: An Astrophotography Guide
Some Quick Handy Tips:
- Moonless skies and locations away from the city lights (at least 50 miles away from the city is recommended) are the best for night sky photography
- Always try and include a foreground to create compelling images of the night sky – examples could be lakes, mountains, desert sand dunes, old barns, ruins, etc.

- Try some light painting under the stars

- Always use manual focus so the focus does not change in between shots
- Use manual mode so that shutter speed or other settings do not change in between shots
- Shoot raw all the time
- Keep an eye on moon phases and moon rise and set times so that you prepare for your shot well in advance. Photograph interesting phenomena like moon halo.

- Look for different perspectives

- If you are shooting time-lapse or star trails, do not forget to turn off high iso noise reduction and long exposure noise reduction as these can consume a huge amount of time to process the image in between shots.
- On cold nights, wrap the lens barrel with flannels or hand warmers, to avoid moisture from condensing on the lens.
FAQs For Night Sky Photography
1. What is the 500 Rule?
The 500 rule is to calculate exposure time for night sky photography so that you expose for the right amount of time without creating star trails. You simply divide 500 by the focal length and if using a crop sensor camera, you divide 500 by the focal length times crop factor. It is that simple.
2. How To Take Pictures Of The Night Sky With An iPhone
When it comes to photographing stars the night sky with an iPhone, the settings are almost the same as compared to what you would do with a camera. Mount your iPhone on a tripod, and use one of the long exposure apps mentioned earlier in this article, that are used to take night images.
Adjust your settings manually – widest aperture, iso depending on your iPhone performance, preferably between 200 and 1600, exposure time between 5 to 30 seconds. Depending on what you get, you can change the iso values and exposure time to decrease or increase exposure. Remember to use a remote trigger or use the delay timer facility to avoid blur in the image due to camera shake while shutter release.
3. How To Take A Picture Of The Stars
Once you are in a location with clear skies and the least light pollution, mount your camera on a tripod and put it on manual mode. Put your lens on manual focus and focus on a bright star in the sky by zooming in on live-view. Do not change focus after this.
Set the lens to its widest aperture and depending on your camera’s performance to low light, set the iso between 640 and 3200. Using the 500 or 600 rule, calculate the exposure time. Take a test shot. Depending on what you get, change iso values and take another shot. If over exposed, decrease the iso and if underexposed, increase the iso.
Remember to use the cable release or timer delay to release the shutter. If using a DSLR, use the mirror lockup feature.
4. What Settings Are Best For Night Sky Photography
Set aperture to the widest, iso between 640 and 3200 depending on the sensitivity of your camera’s sensor, and calculate shutter speed using the 500 or 600 rule.
5. What Lens Should Be Used For Night Sky Photography
You will need a wide angle lens (for astrophotography) typically something between 14 to 24mm range so that you get the whole scene in the frame including some foreground interest. It is also best to have a fast lens with an aperture value of at least f/2.8, but if you have only your kit lens, that should not stop you from photographing the Milky Way. Shoot at the widest aperture and focal length possible.
6. How To Focus For Night Sky Photography
Put your lens on manual focus and focus on a bright star in the sky or a distant light by zooming in on live view – the focus should be point sharp. Take a practice shot to see if you get sharp images of the stars and if not, check your focus again.
If you are looking for foreground elements to be in focus, just like you would with landscape photography, focus one third into the scene. If it is difficult to focus in the dark, shine a light in that area using a flashlight and manually focus in that region. This should help to have the entire scene in focus.
7. How To Edit Night Sky Photography
Make sure that you shoot raw all the time, as you have the flexibility to work with all the information on your file. So the basic edits would be to adjust the white balance if you did not get it right in your camera and make adjustments to exposure, contrast, highlights, shadows, black, and whites to get enough details out of your image.
You can add a bit of clarity to make the stars pop, but use this sparingly as overdoing it can cause weird artifacts and outlines in your image. Apply noise reduction features to reduce noise if there is any evident noise in the image and if there is any hazy look, that can be reduced using the dehaze tool.
8. How Do I Include People In Night Sky Photography
As discussed previously in this article, if you want to include people in your night sky images, you can do that in three ways.
- Light paint your subjects with a soft light for a few seconds during the longer exposure time and the people can leave the frame quickly once this is done.
- Use a Speedlight anytime during the exposure to illuminate your subjects, but the light needs to be softened using a softbox so that the exposure matches well with the background.
- Take two exposures – one exposed for the sky and another exposed for the people and combine them while post processing.
9. Can Mirrorless Cameras Take Good Night Sky Photos?
Yes, just like the performance of a DSLR, the mirrorless cameras come with a high quality sensor and amazing glass that helps with making stunning images of the night sky.
Final Thoughts
Thank you for reading this article on How To Master Night Sky Photography. We love photographing all the amazing celestial bodies in the night sky – it is challenging, but the images you can get are…well…out of this world.
If you are out this season photographing the night sky, please feel free to share them with us here in the General Photo Chit Chat Forum. The forums are a great place to grow your interest in photography, as well as get some of your photography-related questions answered by avid experts and amateurs alike. We would love to see what you create!
Further Learning
If you want to take amazing pictures of the stars with nothing more than a basic DSLR camera, then you should check out Milky Way Mastery by Expert Photography.


_by_Night_(Star-Trails).jpg?_fs=6cab9e74-fb84-42f8-8846-f32d1e0cce1c)
6 Comments
One essential bit of gear is a small torch. Another useful thing to take is your camera’s manual. And a bit of software that’s worthy of mention is the “Photographers’ Ephemeris” – it’s an APP that is a great help with things like sunrises/sunsets, moonrises/sets, as well as critical information on lighting.
Hi Richard, thank you so much for the suggestions and information 🙂
Hello Dahlia,
What a tremendous amount of information you’ve put together for this article. Reading through it quite quickly here has certainly given me inspiration to learn more about this part of photography, so I’ve saved this article to read and learn at my own pace.
Thank you for sharing your passion , knowledge and experience to capture such beautiful images.
Best Regards in your travels and shutter clicking.
Sue Oxborrow
Hi Sue, thank you so much and glad that you found the information helpful 🙂
Your intellectual and literary generosity is well beyond awesome. This article is a reference piece on this subject. I made a copy of it for future reference. Thank you forever!
Hi Jorge, thank you and glad that you found this helpful 🙂