In my previous article, I talked about how powerful luminosity masks are in blending multiple exposures. However, using the same exposures as last time I'm going to show you an alternative method to blend exposures using the Gradient tool in Photoshop, which is quicker, and easier, but not quite as controlled as luminosity masks.
Essentially this is a superb sky replacement method that allows you to not only blend two exposures, but to also smoothly blend two completely unrelated images where you wish to swap-out the sky.
Similar to working with a Graduated Neutral Density filter (GND), it's important when using this technique to have a relatively flat horizon. Otherwise, you may end up with black edging where the images are blended.
Exposures We'll Be Working With
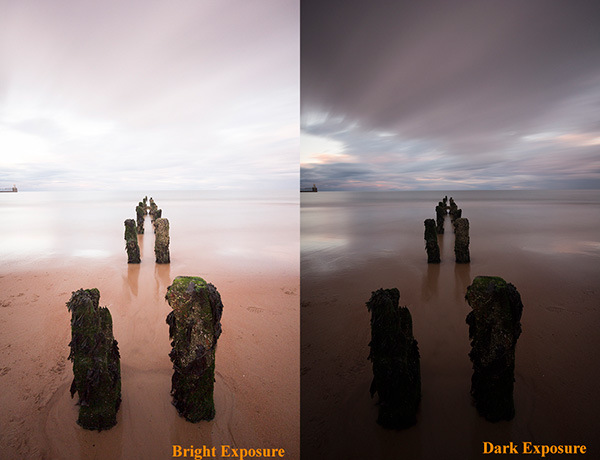
One over-exposed image and one under-exposed image: we'll be replacing the sky from the over-exposed image with correctly exposed sky from the darker exposure.
You can download these images here: overexposed, underexposed.
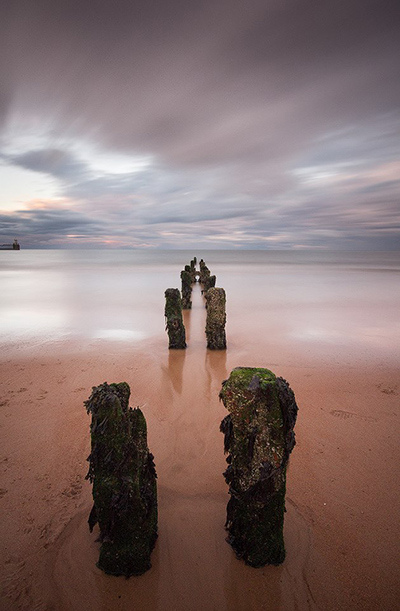
The Final Image That We'll Create After Blending The Two Exposures
Sky Replacement Video Tutorial
You can follow along with this video tutorial or you if you prefer text to video, you can skip to the next section.
How to Replace a Sky Using the Gradient Tool in Photoshop
If you prefer written tutorials, you will see each step below. Please use the image below as guide for each step.
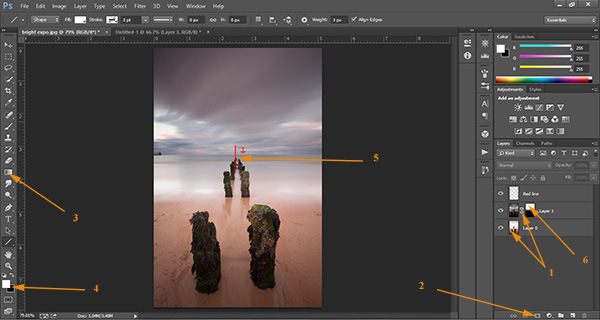
1. Layer your two exposures in Photoshop, with the darker exposure on top. Name the under-exposed layer ‘Sky', and your over-exposed layer ‘Ground'.
2. Select the Sky layer, and then create a layer mask by left-clicking on the square at the bottom of the layers palette, which has a circle in the middle. A mask will appear next to the Sky layer. With this mask selected, press Ctrl + I (CMD + I on a Mac) to invert it to a black mask. The Sky layer should now be invisible.
3. On the toolbar to the left, midway down, you will see the Paintbrush tool – Right-click on it to see the other options. Choose the Gradient tool.
4. Move down to your foreground and background colours. Your foreground should be white, and the background black. This can be done quickly by pressing the small black and white icon to the left of the foreground colour. Now, moving upwards to just below the navigation menu, make sure the settings you have are the same as the ones in the image below.

5. We are now ready to create the mask. We have to draw a line from just above the center of the image, where the horizon is, downwards. This doesn't need to be a big line. As you can see above, the distance from the top of the line until the horizon is about the same as the distance from the horizon to the bottom of the line. To draw a straight line, hold Shift and the left mouse button while dragging the cursor down. You will now see the over-exposed sky in the Ground layer disappear, to be replaced with the sky from the Sky layer!
6. If you look at the layer mask next to the underexposed thumbnail, it now has a gradient going from white to black. This is the feathered layer mask you just created.
The whole process should only take a few seconds when you're comfortable with it, but it can yield superb results. I hope you have fun with this and that it adds another dimension to your processing.


4 Comments
Wow that was great! Thank you so much, it’s really going to come in handy!
Outstanding article. It takes real skill to break down complicated Photoshop techniques and use simple language to teach them. Maybe I’ll eventually try to contribute to Light Stalking too. Thank you as skies pose all sorts of issues…
Alternatively, could one not just use the gradient tool in Camera Raw?
Thanks alot for sharing