As you get more and more into photography, you'll find more and more places to upload your photos on the Internet and will probably end up with quite a diverse set of places where your photos can be found. Blogs, websites, social media – they all make it simple for anyone to grab one of your photos if they need it for their own uses, even if they haven't paid for it.
so what can you do?

Unfortunately, there isn't a lot you can do to stop all the bad seeds out there from using your work in ways you don't want them to, but embedding your contact and copyright information into the image itself may help deter some. Plus, it's pretty easy to do, so even if it only stops one person from helping themselves to your photos, it's probably worth the added effort.
Not to mention it's really useful to help you stay organized by utilizing keywords.
EXIF vs IPTC Metadata
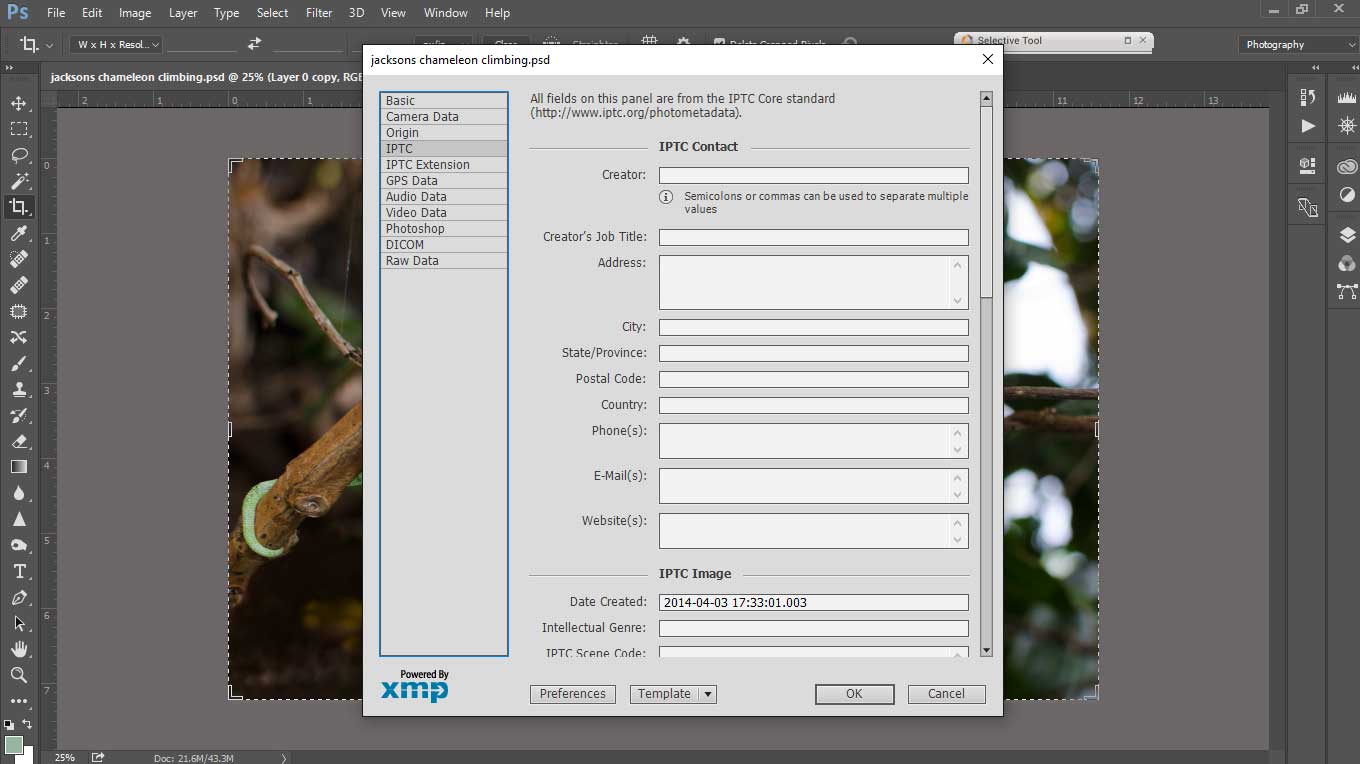
Digital cameras automatically include some metadata into your photos–this mostly pertains to the details of your camera, exposure settings, and sometimes location data. Depending on how you've set your camera up, the EXIF data can also include a copyright name, but you can add even more useful details during post production such as:
- Keywords,
- Detailed contact information,
- Model release information,
- And image descriptions by embedding IPTC metadata.
If you're not already familiar with IPTC, it is short for International Press Telecommunications Council and their metadata system is widely recognized as the industry standard of metadata.
It is the most commonly used standard among news and stock agencies. In fact, if you sell or plan to sell your photography to news outlets or agencies, embedding IPTC data into the images can help streamline the process of organizing and submitting images.
IPTC breaks their metadata structure down into three different categories:
- Administrative – Creator's name, contact info, etc…
- Descriptive – This usually includes the title, keywords, subject, etc…
- Rights – Contains copyright information, model release details, property release, etc…
Once we get into our program of choice and have the file info pulled up for our photo, you'll see these categories broken up into more specific entries. So, let's not waste any time going into great detail here, it will all start making more sense once you have the form right in front of you.
Using Adobe Bridge
First, I'll show you how to add IPTC metadata using Bridge.
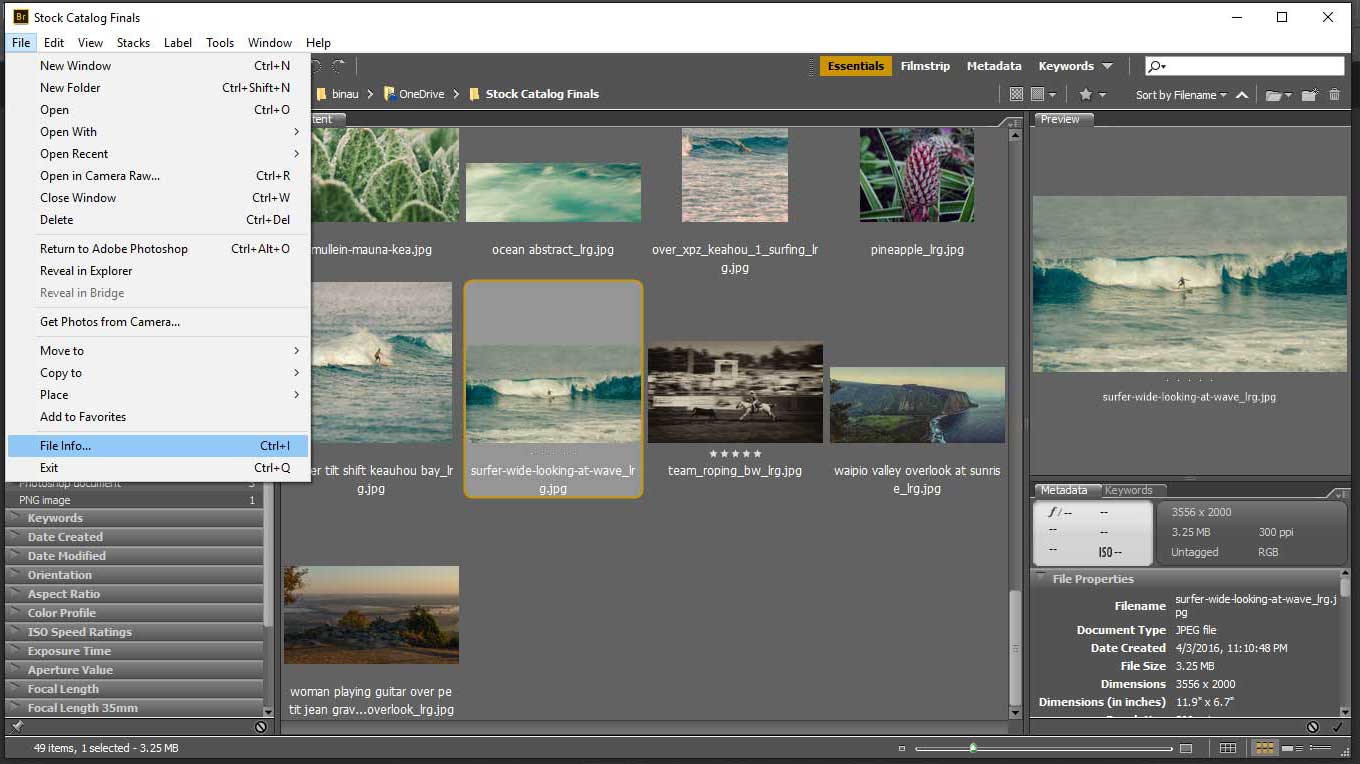
- Start by opening Bridge and navigate to the folder or photo you want to add metadata to. Make sure the image (or images if you want to apply the metadata to a batch of photos) is selected and click on File, then click on File Info.
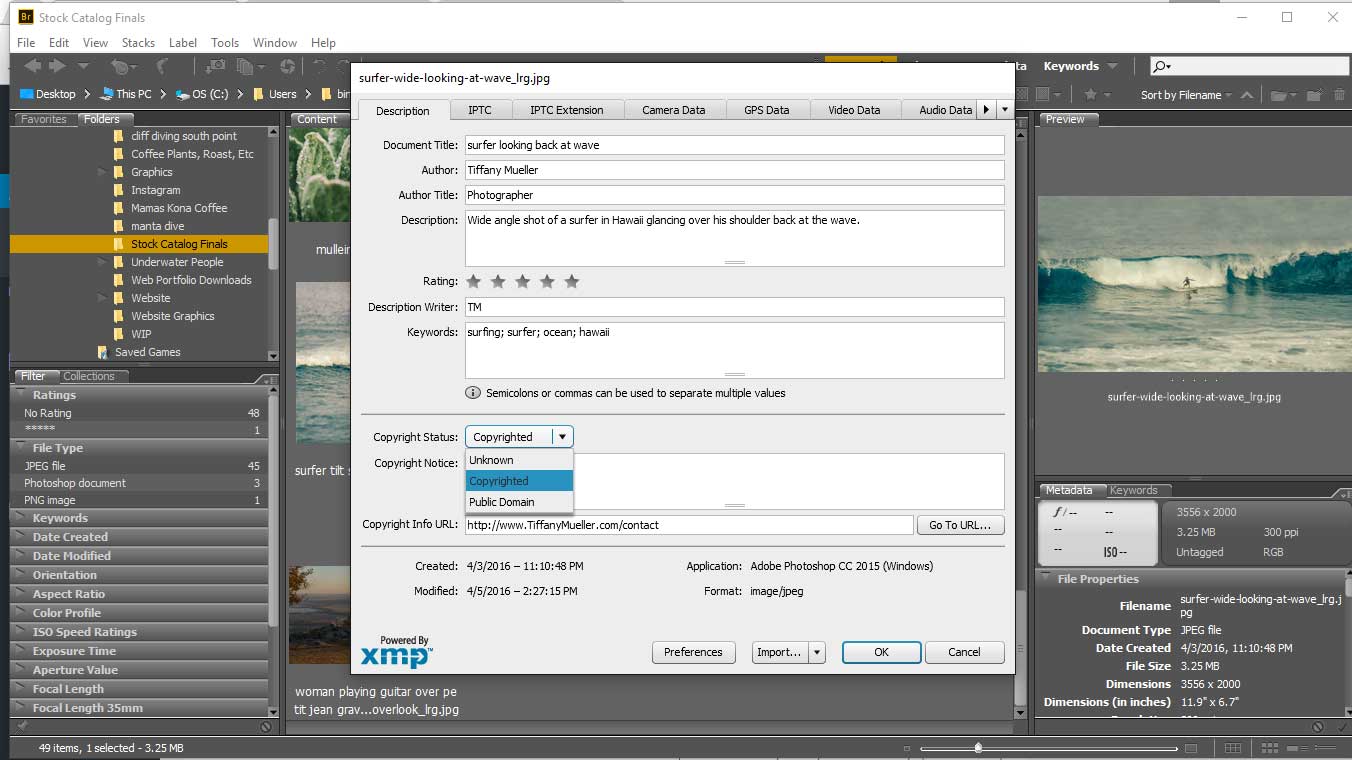
- Once the pop-up appears you can fill in the data fields on the Description tab. When you get to the drop down menu for the copyright, select the appropriate copyright–you can choose from Unknown, Copyrighted, or Public Domain.Then, below the drop-down, you'll see a comment box for you to add details of the copyright and an entry line to add a URL. Here's an example of what I filled in:
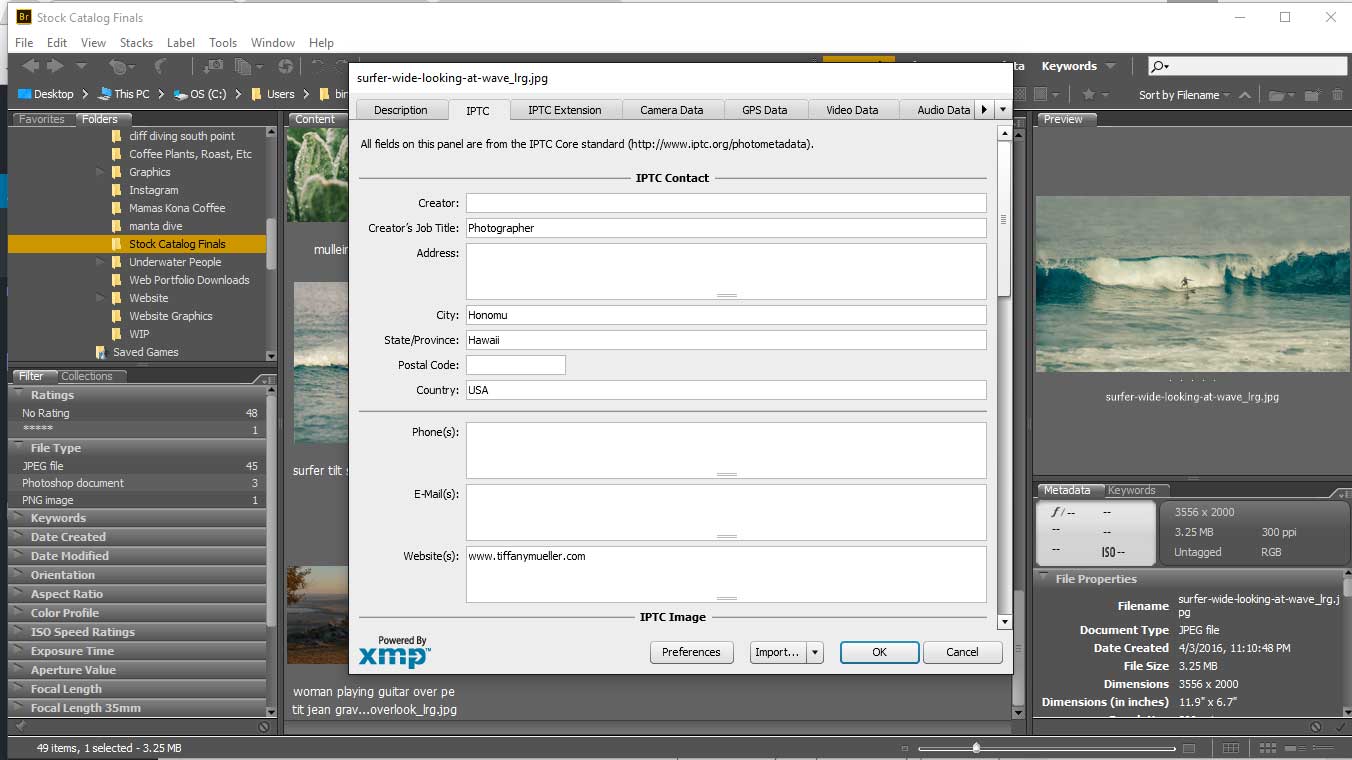
- Next, jump over to the IPTC tab. Fill in each of the entry fields as you see fit. Be sure to scroll all the way to the bottom of the tab to make sure you've filled in all the fields.
- The next tab is titled IPTC Extension, there you'll find entries that are pretty specific. If you have a model in the image, you can add their contact details, age, and model release information.There's also a section for location release details and more specific details about any artwork or objects that may appear in your photo. For the casual shooter, a lot of this may be overkill so feel free to skip it. But, if you're up to the added effort and things like model and location releases are relevant to your photo, go ahead and take the time to info to help you stay organized.
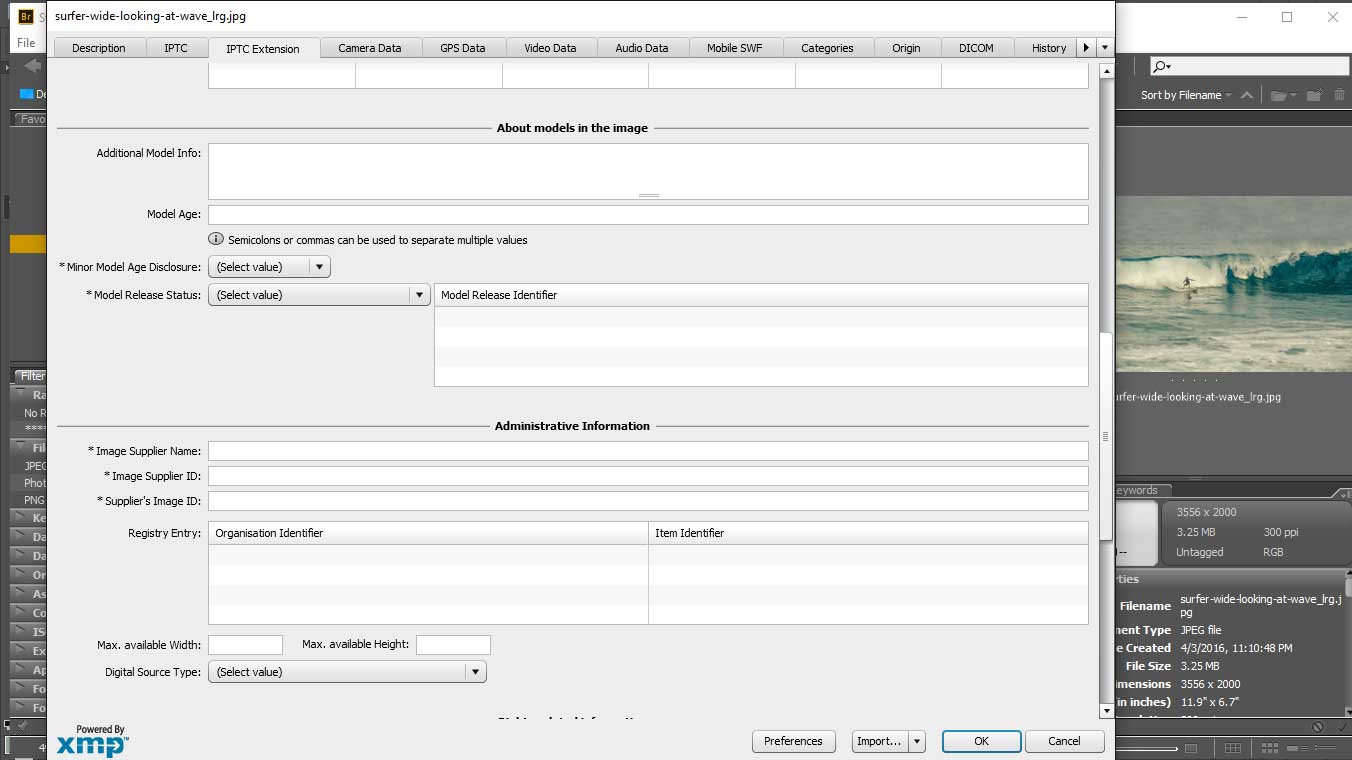
- Once you have all the relevant fields filled in, you can click “OK” to embed metadata. You also have the option of saving the entries as a .xml file so you can import it into other photos and save you the hassle of having to retype it.To do that, just click down-pointing arrow on the Import button and select Export. A popup will appear where you can give it a name so you can select it later.
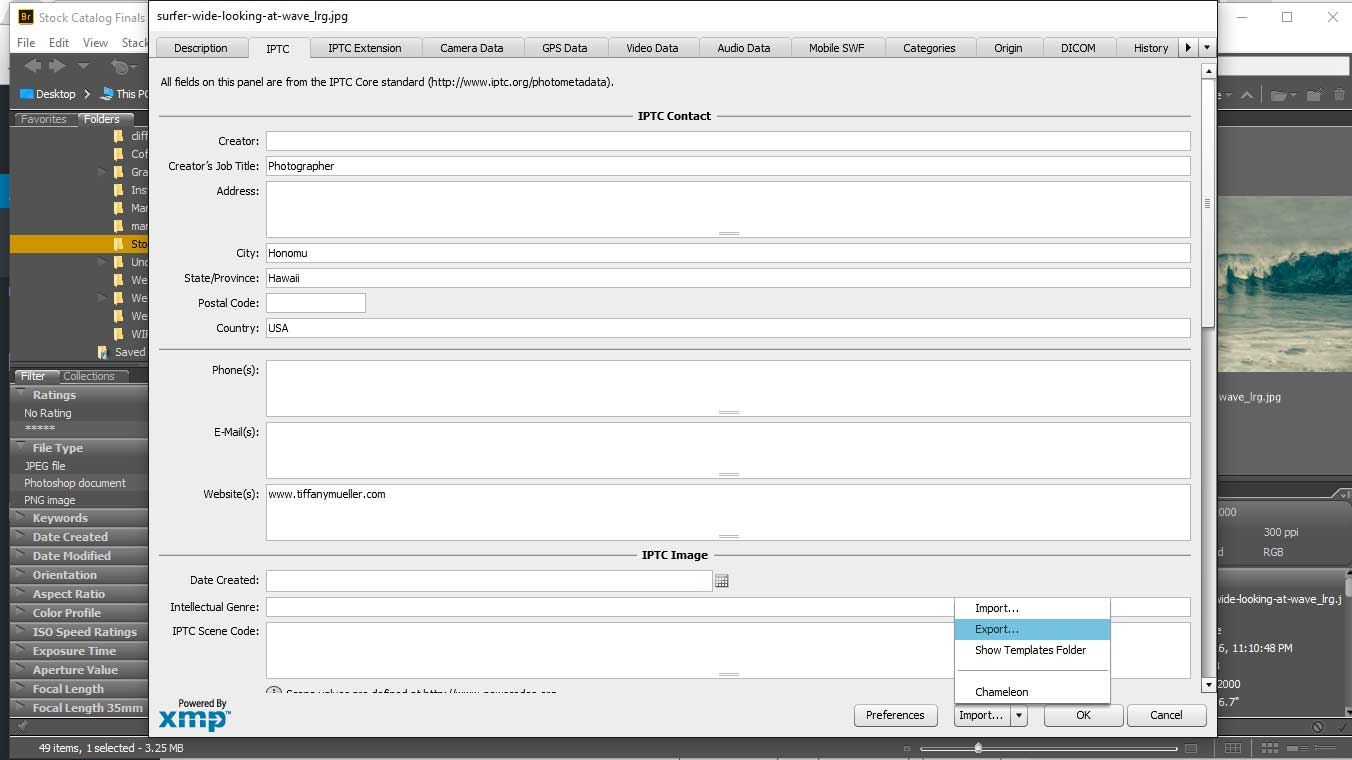
In the screengrab above, you can see I already have a metadata xml saved named “Chameleon” from a shoot I did featuring lizards. If I wanted to use the same metadata from my chameleon photoshoot, I could skip steps 3-4 and just import that data and click OK. Easy peasy!
Before reading on, fancy improving and your post-processing skills to the next level? In any case, it's a great idea, so we've got this Video Course The Understanding Post-Processing Complete Online Video Course to enable you to build your skills and enjoy photography…even more!
Add Metadata Using Adobe Photoshop
In Photoshop, the process is identical to the Bridge process. The only difference is that you can only do one photo at a time. Once you have your image opened up in Photoshop, follow steps 2-5 from above.
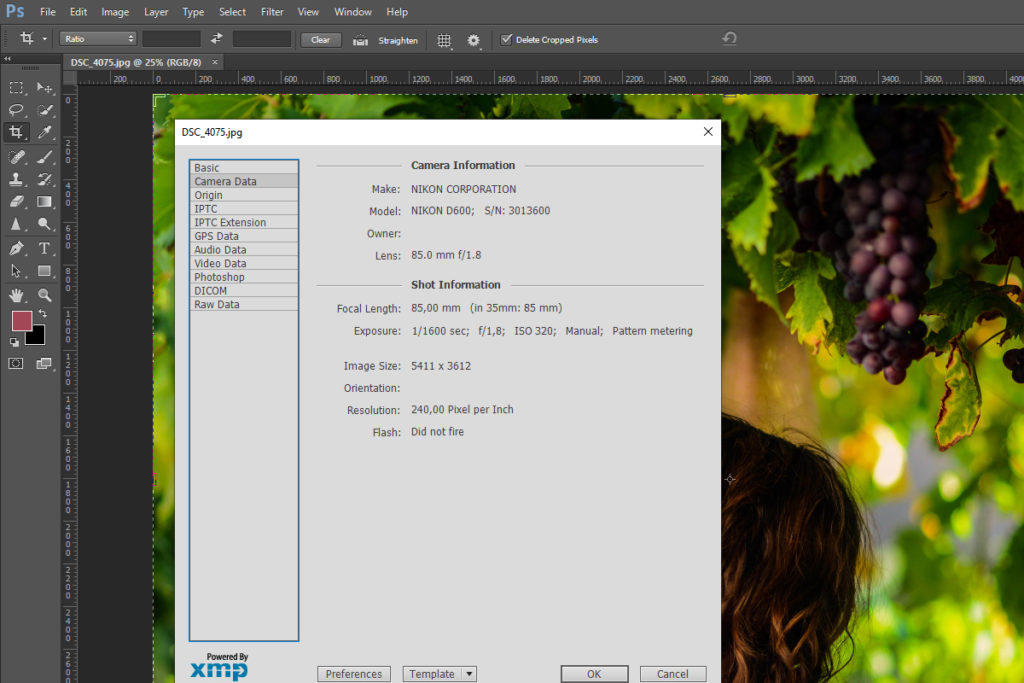
You can also watch this short, but extremely useful video on adding metadata in Photoshop.
Add Metadata Using Adobe Lightroom
Lightroom is slightly different. You can create a new metadata preset when you Import new photos into a catalog–just expand the “Apply During Import” panel on the right-hand side.
- If you already have a preset made, you can select it to apply it. If not, click on “New”.
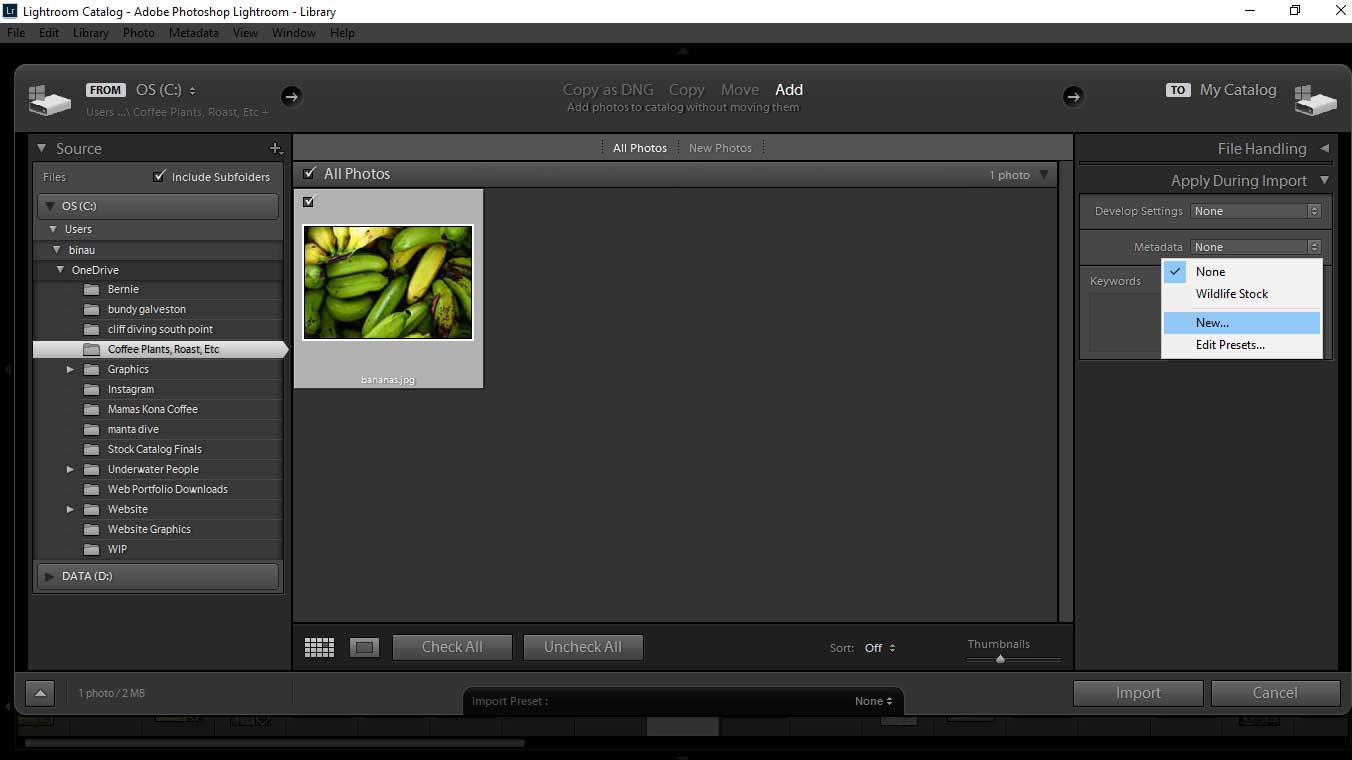
- When the popup form appears, go through and fill out all the entries you think are necessary for what you're going to be using the photo for. Be sure to give the preset a name at the top of the form. When you're done click “Create”. It's as simple as that.
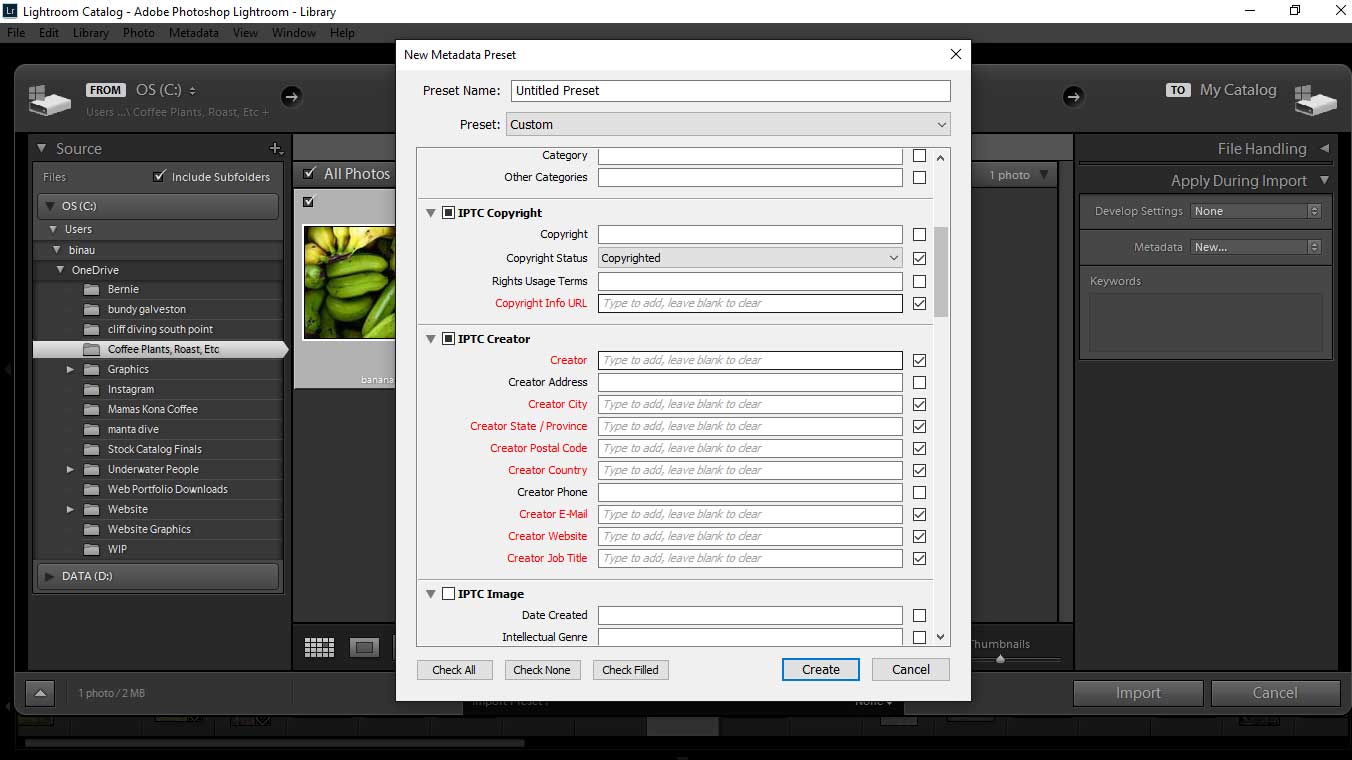
If you want to add metadata to a photo that has already been imported into Lightroom, navigate to the photo in the Library module. You can select multiple photos if you want to apply the metadata to a batch of photos. On the right-hand side, expand the Metadata panel.
You can either select an existing preset or click on “Edit Presets” to create a new one. The same popup form will appear from the step just above-fill it out and click “Done”. It will give you the option to save the new entries as a preset.
If you think they'll be useful later on down the road, go ahead and save them. Otherwise, just click “Don't Save”. That will apply the info to the selected photo(s) without saving it as a preset.
What Metadata Won't Help You With
This method isn't going to prevent copyright infringement 100% of the time. If someone really wants to steal your photo, truthfully, this probably isn't going to stop them. Embedded data can be stripped out of an image, by you or anyone else with a little know-how.
It's also worth nothing that if someone uses a screengrab to acquire your photo, the embedded metadata won't be grabbed with it. Additionally, some social media platforms automatically strip metadata from your images, so be sure to do your research on the sites you upload your photos if this is of concern to you.
Finally, embedding your copyright information into your photo is not the same as registering it with an official copyright office.
In many places, your work is automatically copyrighted upon creation, but in addition to this implied copyright, you can and should register it with a copyright office if you want to maximize the protection of your work and give you additional leverage and resources should you ever need to legally pursue a copyright infringement claim.

Taking your post-processing skills to the next level, in any case, is a great idea, so we've got this Video Course The Understanding Post-Processing Complete Online Video Course to really boost your power as a digital photography editor.
Further Resources:
- Setting Boundaries As A Pro Photographer
- How to Decrease The Chances of Your Images Being Stolen
- 4 Things To Consider Before Uploading Photos Online
- Adding Copyright Metadata To Your Photos In Lightroom
- How To Add Contact And Copyright Info To Images With Photoshop
- Adding Copyright Information In Camera


7 Comments
First of all I would like to say excellent blog!
I had a quick question in which I’d like to ask if you do not mind.
I was interested to know how you center yourself and
clear your thoughts before writing. I’ve had a tough
time clearing my thoughts in getting my thoughts out there.
I do enjoy writing however it just seems like the first 10 to 15 minutes are generally lost just trying to figure out how to begin. Any recommendations or tips?
Thank you!
Soooo helpful! I’ll definitely be using this as a reference as I was trying to decide whether I should add contact & coppyright or not.
hello
thanks
so now how can protect photo prevent for metadata change ?
By entering info this way and adding your name and copyright, etc., will your name and copyright info be physically printed on the back of an image if you send this digital file to someone to print? Just wondering if this was a way to “watermark” a photo on the back of a digital file and not have to “watermark” with a logo/name on the front of an image. Thanks.
How to lock copyright information in EXIF
To do not Delete for others?????
Thank you, when I export a photo showing the copyright meatadata from lightroom to a .JPG the copyright gets carried over but the rights usage terms are not carried over, at least they do not show up in ifranview or with explorer and if I export the photo as a .PNG not even the copyright shows up. I have set exports as all metadata
How to check the copyright owner of an image???