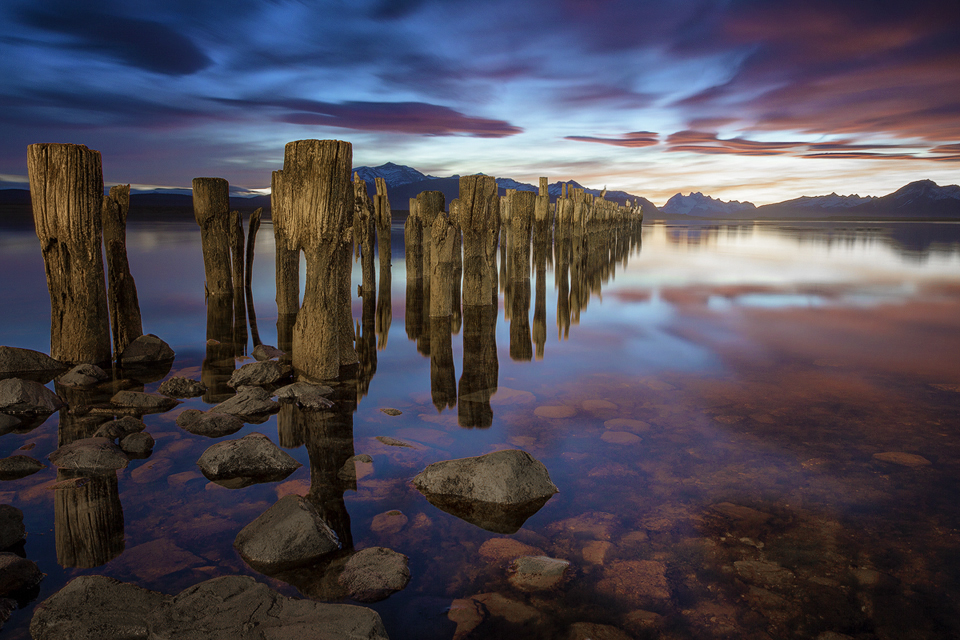
From exposure blending to fine contrast adjustments, luminosity masks are one of the most powerful set of tools available to photographers in Photoshop. Throughout photography websites worldwide, we can see amazing image after amazing image created using luminosity masks. Yet, very few photographers know what luminosity masks are and how they can transform their imagery.
This article will be split into two parts. Firstly you will learn what luminosity masks are through applying them to a simple contrast adjustment layer. The second part, however, is a video tutorial that will show you one of the most exciting aspects of luminosity masks – advanced exposure blending.
What Luminosity Masks Are
At the most fundamental level, luminosity masks are a selection tool. They allow us to make advanced selections based on how bright or dark an area is. While this doesn't sound very exciting, the flexibility these advanced selections give us is incredible.
To give you an example of this, load any image into Photoshop. You can download and work with this image if you prefer – Download Image Here. Once you've done that, go to your Channels Palette.
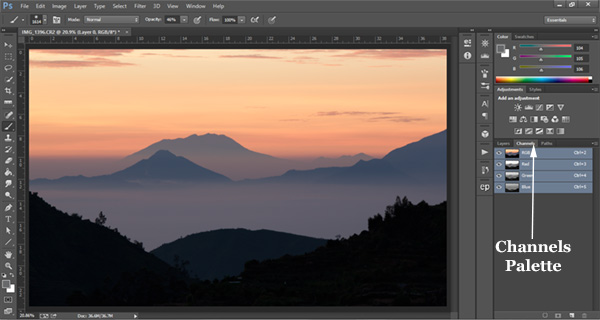
This is where luminosity masks live once you've made them. Right now, you will see the RGB, Red, Green and Blue channels. Each monochrome channel can actually act as a luminosity mask. Try this, click on the channel which has the greatest contrast. In this case, the Red channel has the strongest contrast between highlights and shadows. Once clicked, your image will become monochrome. Now, while holding Ctrl (cmd on a Mac), click the left mouse button on the thumbnail of that channel.
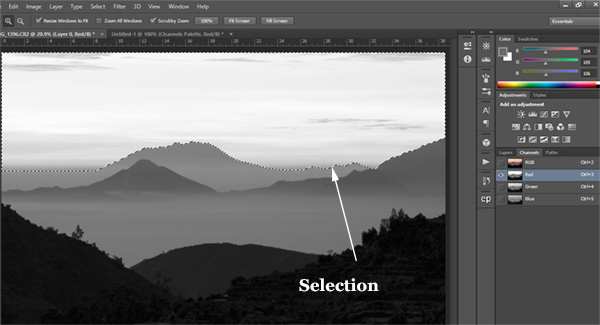
You'll see a stream of marching ants appear. You've just made a selection based on luminosity. Whatever is black in this channel will not be selected, whatever is white will be selected. The darker the area the smaller the effect, the brighter the area the larger the effect. If you're not familiar with masking in Photoshop, it is essential to learn more before continuing with this article. See here: What is Masking in Photoshop?
Here are the marching ants that represent the Red channel selection from this photo:
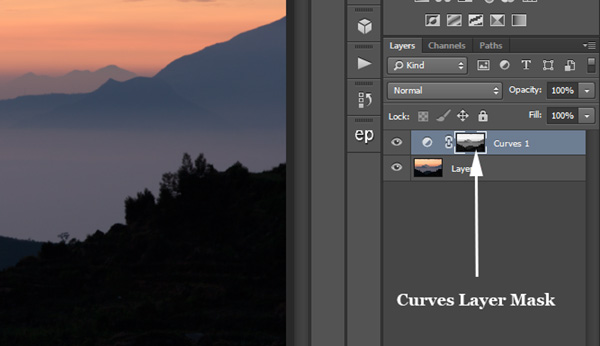
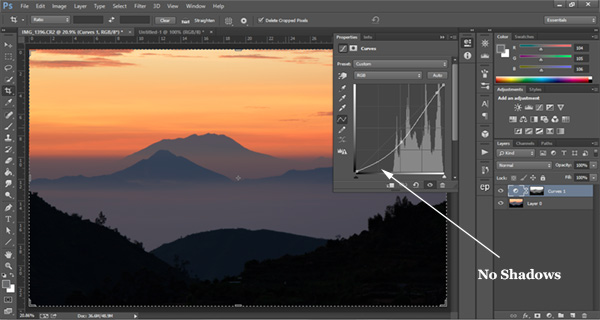
With this selection, we can go back to our Layers palette and click on our original image to select it (in some circumstances you will need to double-click this layer). Now we can see how useful this selection is by creating a Curves adjustment layer (or any adjustment layer) and adjusting the contrast.
The first thing you'll see is that the Curves adjustment layer immediately takes on the mask that we created in the Channels Palette.
When we open up the Curves layer, the histogram shows no shadows – only mid-tones and highlights. This is because our mask has cut the shadows out of the equation. Any adjustments we make in the Curves will not affect the shadows.
To deepen the colour in the highlights, bring the highlights down. You can see in the final image below, we haven't affected the under-exposed areas, so we've managed to preserve details.
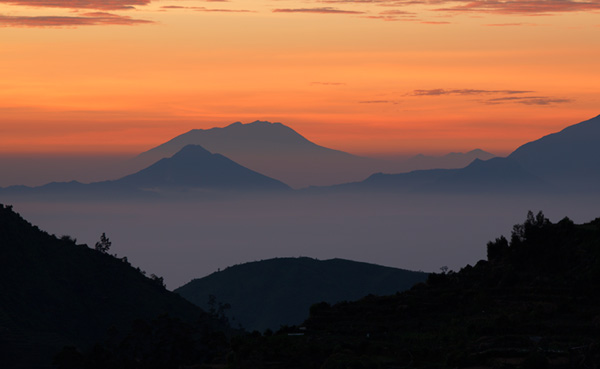
However, if we apply this same Curves adjustment without the luminosity mask, we lose the details in the under-exposed area in the foreground.

Curves Adjustment Without Layer Mask
With this type of selection we are not limited to contrast adjustments. We can make any adjustment we like, but luminosity masks allow us to make those adjustments with precision.
Luminosity Masks and Exposure Blending
This is where luminosity masks get really exciting. But for exposure blending, we need something more powerful than the three colour channels available to us. We need to create our own, more advanced luminosity masks.
This is a long and complicated process which isn't covered here. For now, you can follow along with the video tutorial and make your own luminosity masks later, or you can download my 18-point luminosity mask actions for free in my Easy Panel.


27 Comments
Although having gone to my desktop to read the article, I found it very useful.
Will this action work in PS Elements?
Sadly Elements doesn’t support luminosity masks, Debbie.
i found myself in a never ending loop of subscription trying to download the actions
Hi there, could you please message me on my website and I will sent the actions/panel to you.
Jimmy,
Could you also email me the actions/panel. Thanks, Jeff
Hey Jeff, could you message me via my blog please.
Hi Jimmy, Thanks for the great tutorial. You make it easy by describing all points easily.
Great article can you please email me the actions
Regards
Jon
Can’t believe I’ve wasted so long using normal masking! This is so much quicker and more effective! Thank you….you are a legend!!
Love your work Jimmy.
Could you please send me the actions/panel as well?
Excellent presentation
thank you jimmy!!!
Hi Jimmy….i am trying to follow step by step as per your tutorial….But even when i pressed CTRL n simultaneously put my mouse (tried left n right click..lol) on the thumbnail of Bright 3, this doesnt appear on my Layer panel….I am only using ONE image to work with (must it be TWO o more images for Luminosity Masking? ) Thank you very much, Jimmy .
@Evelyn Lim: pressing CTRL and clicking on the thumbnail of any channel won’t automatically create a layer. It will make a selection, which you can then use as any other selection, to create a layer mask for example.
If you are not sure, try CTRL + click (left ;))on the thumbnail of Bright 3 and select any adjustment layer.
@Jimmy: sorry for the intrusion, correct me if I’m wrong.
Thanks – I took one of my “better” pictures and was amazed at how the simple change really brought out so much additional detail.
Hello,
Very informative article. Could you kindly e-mail the actions to me. I have had some difficulty downloading them.
Thank you and regards,
Alberto
Hi Alberto, could you please email me via the contact form on my blog and I will send them along to you. Thanks
Hi- Very informative! Would love to use your actions but have been unable to download them. If you would email them, I would appreciate it! Thank you
Hi eric, could you please email me via the contact form on my blog and I will send them along to you. Thanks
Hi,
is it possible that the EP doesn’t fully work? channels from alpha 1 to 6 are all the same… and same thing happens from 7-10, 11-13 and 14 to 17…
ty
Hi Dave, does the same thing happen when you run the actions included in the same download?
Great tutorial…My first on luminosity masking! Thank you
very simple and useful, thanks.
Hi, Jimmy. I realize it would be too long to tell me the techniques but can you at least give me an idea what I can use luminosity masks for in my portrait, boudoir and fashion editing? Like, what about dodging and burning? Anything?
Thank you, sir.
i use win xp and cs3 on a very very reliable machine so i am a happy Bunnie. On the web site it states actions but
not the panel can be used with cs3 examination of the download shows the files to be java script and not Photoshop actions where can i get the cs3 compatible actions ???.
Purchase of a new computer and latest Photoshop is a no no ! As my work is non commercial.
Hi Jimmy,
Thank you for this, I have subscribed, however before I download the panel, please advise if the panel works with the Mac OS – El Capitan – and Photoshop CS 6.
Kind regards,
Lee