In the final part of this current series on Apple’s Aperture, we are going to have a brief look at one of the program’s most powerful features, the Adjustment Panel.
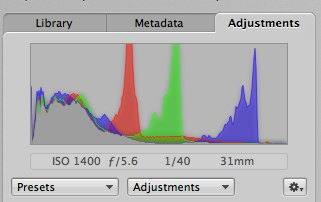
Situated in the Inspector Window, the first thing you will see at the very top is the histogram. As well as showing a combined RGB histogram you will also see the individual RGB channels as well. Directly below this, you have the image exposure information.

Next down are three drop-down boxes. The first from the left is presets. As the name suggests this has a range of preset adjustments including a useful Quick Fixes section. Here you can increase or decrease exposure, auto adjust highlights or shadows or make an overall auto adjustment. This preset will adjust the histogram into what Aperture thinks is the correct overall exposure/colour for the image. On relatively flat images it can a great tool to color correct and add some punch. Other presets include Colour, White Balance and Black and White. At the very bottom, with the Edit tool, you have the opportunity to redefine any of the presets to your own taste.
The next drop-down to the right is Adjustments. Listed in this box are all the different tools available for use in Aperture. At the top of the drop-down, Quick Brushes gives you access to a range of Photoshop type brushes for selectively modifying parts of an image. These include blur and sharpen brushes, contrast, colour and skin smoothing. Clicking on any of these brushes will bring up a HUD display over the image allowing you to configure the brush to your needs by changing the brush size and strength among other things.
Below the Quick Brushes are listed all of Apertures available imaging tools. Any tool that has a small black dot next to it, is by default shown in the main Adjustments panel. When you click on a tool without a black dot, it will appear in the main panel allowing you to make the adjustment. Each tool shown in the main panel has a little cog icon to the top right. Clicking on this will allow you to either remove the adjustment or add it as a default to the main panel. The last drop-down, on the right, allows you to remove all adjustments and define colour options as well as what is shown in the histogram.
Underneath the drop-downs, we have the default set of tools and adjustments. For each particular tool, you can tell whether it has been used on the currently selected image by looking at the check box in the top left. If it is checked, this tool is already applied to the image. The first of the default tools is White Balance. This allows you to adjust the balance in degrees Kelvin from 2500 to 10000. By clicking on a neutral mid grey with the included eye dropper tool you can make a rough auto adjustment to establish the correct colour balance.
The next tool is exposure. In this you can adjust the exposure by up to two stops either way, recover blown highlights, adjust the black point to reveal detail in the shadows and change the overall brightness.
Next we have the enhance tools. Similar to what is available for Photoshop, they allow quick colour and contrast adjustments but you will get more accurate results using the levels tool. The highlights and shadows tool is a very powerful tool that does exactly as it‘s name suggests. It should not be used until you have made you final levels adjustments.
The Levels tool is very similar to it’s Photoshop equivalent, with sliders for shadow, mid tone and highlights as well as auto exposure and auto colour buttons. You can work in RGB, Luminance or individual colour channels.
Last of the default adjustments is the colour tool. Here you can make adjustments to the Hue, Saturation, Luminance and Range of the primary or secondary colours as represented by the six colour boxes. By selecting one of the boxes and using the eye dropper tool, you can define a specific colour within the image to selectively adjust. This is a powerful way to enhance, for example a blue sky, or the colour of a model’s eyes.
As before, this is only touching the surface of Aperture’s features, there is so much more that can be done with this powerful management and editing program, far more than can be covered in a brief series like this. I will however leave you with one often overlooked resource when it comes to all Apple’s professional software, the manual.
Clicking Help/Aperture Help in the menu brings you to a clean looking concise help screen. The first item in the list is the Aperture manual and clicking on this will reveal a searchable, illustrated encyclopedia of all Apertures feature. It’s well worth a look, if you wish to improve your knowledge of this excellent image software.
Jason Row is a British born travel photographer now living in Ukraine. You can follow him on Facebook or visit his site, The Odessa Files. He also maintains a blog chronicling his exploits as an Expat in the former Soviet Union


1 Comment
One question:
The Adjustments Panel shows only a few options by default. White Balance, Exposure, Enhance, and Highlights & Shadows.
If you add a vignette to an image and go the next image it does not show that adjustment in the Panel. Is there any way to get the Panel to show the adjustments that I know I’m going to want to use by default rather than having to activate them all every time?