In the first of this series of tutorials, I showed you how to import images into Aperture, Apple’s image management software for Mac OSX. With the images now safely in an album we are going to have a closer look at the basics of the Aperture interface.
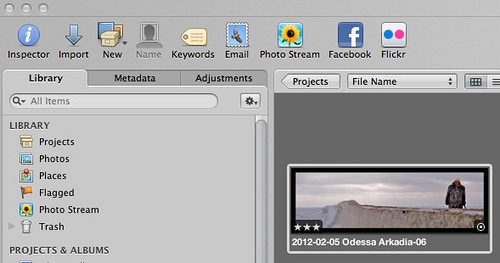
Lets start at the top. Along the top of the interface we have the toolbar. This has icons both on the left and the right. Starting on the left, we have the Inspector icon. Clicking this shows or hides the Inspector, which is the three tabbed window directly underneath. Next to Inspector we have the Import icon that we used in the first tutorial. The New icon reveals a drop-down box allowing you to create anything from a new project to a new slideshow and is a very useful icon. The Name icon is only valid if you have Faces switched on and is something we will discuss in a later tutorial. Keywords opens a Keyword HUD and again we will discuss this later. Clicking on Email when you have an image selected in the browser will automatically open your default email client and attach an optimized version of the image to a blank email. After this we have a series of export options including Facebook, Flickr and in the latest update, Aperture 3.2.2, Photo Stream. Photo Stream is part of Apple’s iCloud service and allows you to seamlessly stream images between Apple devices. Clicking on the icon will synchronize all images you have taken on your iDevices in the last 30 days and create an album for them in Aperture.

The Toolbar Left
To the right of the tool bar, the first three options allow us to define how we display images in Aperture. Browser will show all the images within a selected Project or Album. Split view will show any selected images in the main viewer with a filmstrip browser below and Viewer shows just the selected images in the main window. Faces and Places we will discuss in another tutorial.
The Toolbar Right
Loupe is a very powerful tool. Clicking on it will reveal a virtual loupe that allows you to examine images at various magnifications in all view modes. On the handle, you will see a number, usually 100. Clicking on this number will allow you to change the magnification whilst if you left click and drag the end of the loupe’s handle you can change the size of the loupe itself.
Using the Loupe
The tool bar is also fully customizable. Right clicking anywhere in the toolbar will reveal a menu. At the bottom is the option to customize toolbar. Clicking this, will bring up a window with a smorgasbord of different options. To add an icon, simply drag it into the toolbar at the top, in the position you want it and to remove an icon, drag it from the toolbar to the customize window.
Customising the Toolbar
Next, on the left side of the screen, we have the Inspector. This has three tabs, Library, Metadata and Adjustments. I will give you a brief description of each and go into them in more detail in later tutorials. The Library shows all entire catalogue hierarchy, from Projects, Folders and Albums to your Photo Stream, Facebook Uploads and Flickr Streams. If you see a small triangle to the right of an icon, this means there are further icons inside. Clicking on it will reveal the contents within. At the bottom of the Library Tab, we have a small section called Vault. This is Aperture’s very powerful back up system and will will talk about this in a later tutorial.
The Library in the Inspector Panel
The Metadata tab allows you to assign keywords, captions and other IPTC data to any selected images whilst at the top of the window you will find basic EXIF information such as exposure, lens and focal length, metering and exposure modes and file type.
The Metadata Tab
The Adjustments panel reveals a wide range of image adjustment tools, those of you familiar with Photoshop will recognize many of them. Also included are a number of presets that allow you to make predefined corrections to an image.
The Adjustments Tab
So lets get to the main window of Aperture, the Browser or Viewer. When you select a project, folder or album whilst in browser or split mode, you will see all the images inside. If you select an image and either double click it, or select viewer from the toolbar it will show a large version of the image in the main screen. If you select multiple images in the browser, all these images will be shown in the viewer. Depending on your settings, each image will have various bits of information on it, again, we will go into detail about the viewer/browser screen at a later date.
Top – Browser Mode, Bottom – Viewer Mode
So that’s a brief introduction to main parts of the Aperture interface. I will leave you with one last thing for this tutorial and perhaps my favorite part of Aperture. With an image selected in the viewer mode, press the F key. All the interface elements disappear to leave you the basic image on screen. In the next tutorial I will go into a little more detail about the browser/viewer window.
Doesn't Aperture Look Great in Fullscreen Mode?
Jason Row is a British born travel photographer now living in Ukraine. You can follow him on Facebook or visit his site, The Odessa Files. He also maintains a blog chronicling his exploits as an Expat in the former Soviet Union


