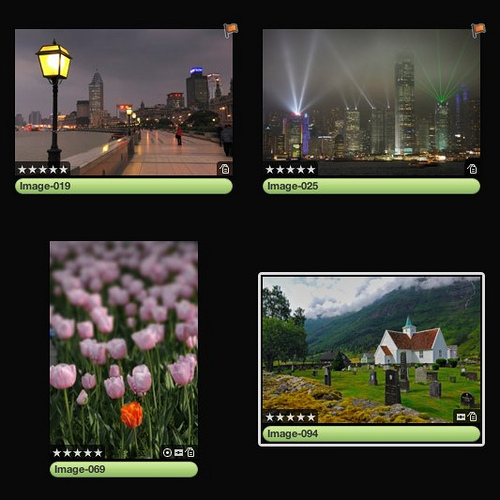
One of the most powerful features of Aperture and indeed Adobe’s equivalent, Lightroom are their powerful key-wording and rating systems. In this tutorial we will have a basic look at Aperture’s metadata and rating system.

Firstly we are going to have a look the image information in Viewer and Browser modes. One of the most powerful features is the rating system, you can assign a star rating from one to five to any selected images, simply by pressing one to five on your keyboard. The rating is shown in the bottom left of the image in all modes. In addition pressing nine will assign a reject rating to the image, displayed as an x in the bottom left. Pressing zero will remove any rating. The ratings can also assigned by right clicking on the image and selecting from the menu. Also shown when right clicking are labels. These will assign a color to the filename in Browser mode, and put a small colored dot in the bottom right of an image in Viewer mode. You can assign specific wording to labels in the preference/labels menu. In Browser mode clicking on the top right of an image will activate a small red flag this is useful for identifying images that need work or perhaps have been worked on already.
As we mentioned in the last tutorial, we can define what data can be seen in each of the view modes. Available in Browser, Split or Viewer mode, the metadata button on the bottom right of the screen allows us to change the information that is shown underneath a particular image. When the button is clicked, at the bottom of the menu, is an edit option. Selecting edit, opens a window which allows us to select from a variety of presets or to define our own requirements.
So that’s a basic rundown of what can be displayed on an image in the View window. Now we will take a look at the Metadata panel in the Inspector Window on the left of the screen. The first thing you will see at the top is a semi graphical information panel showing the camera shooting data. If you do not see this, it can be activated from the cog icon on the top right of the panel. Below this is a repeat of the ratings system we just looked at, stars, labels and flag.
Underneath this, to the left is a drop-down box. This box has a wide range of metadata presets and an edit selection for us to define our own preset. Each preset defines what information we will see in the panels below and can range from the EXIF info, this is the information embedded into your camera image files, IPTC data, IPTC stands for International Press and Telecommunications Council and defines a wide range of data that can be embedded into images, such as the creators name and contact details, copyright information, captions, keywords and headlines. You can create your own preset with your own contact details and copyright information embedded.
For most people the most useful preset is General. Under this preset you can change the version name, add a specific caption to describe the image, and keywords to allow you or others to find an image in a search, as well as adding your own copyright data.
To the right of the drop-down, the small cog like icon allows you to replace or append a preset to a selected image, batch change a range of images and clear the IPTC data from an image.
So what use are all these ratings and metadata options without the ability to search them. Fortunately, Aperture includes powerful, yet simple to use search tools. The best way to access these is from the top right of the View screen in any viewing mode. Clicking the button that looks like a magnifying glass over a folder reveals a range of search parameters including searching by rating, labels or text.
Search by text will reveal any image that contains the entered text in among others, the caption, headline or keywords. Each of these searches can be used individually or in combination. For example you could search for all images rated three star within a project, or you could search for three star images with Istanbul in the text and a red label. At the bottom of the search window, the New Smart Album will create an album containing all images found within your criteria. The beauty of this is if you update an image by changing its metadata, it will be removed from the Album if that metadata no longer fits the criteria. The search box to the right can be seen as a quick search option allowing you to look for images based on rating, label or flags. The search functions can be applied to a project, folder or album.
So thats a brief look at Aperture’s metadata and rating system. There is a lot more depth to it than we an cover in this brief article but this should give you a working knowledge of some of its more powerful features. In our final article for this series we will give you a brief look at adjustments in Aperture.
Jason Row is a British born travel photographer now living in Ukraine. You can follow him on Facebook or visit his site, The Odessa Files. He also maintains a blog chronicling his exploits as an Expat in the former Soviet Union


1 Comment
Yea! I am all caught up and ready for this one! Thanks for these tutorials..they are clear, easy to understand, and very helpful! THANK YOU!