Shooting in a studio is completely different from the process of shooting using natural light. Studio lighting is artificial lighting used indoors in an enclosed space and the photographer has full control over the lighting setup. Studio lighting takes a lot of practice and through experimentation, the photographer gets the desired results.
There are many lighting techniques used for shooting portraits where each lighting technique is employed to evoke a different mood in the image and it depends on what the photographer wants to show through their image. High key and low key lighting are two creative lighting setups where the “High Key Lighting Setup” produces images that are almost free of dark shadows and the highlights are the dominant areas in the image.
Note: In contrast, low key photography focuses on dark tones, sometimes strong shadows and dark backgrounds. This lighting setup can be used to capture a mysterious or moody portrait for example, where the subject’s face or features are not too bright.
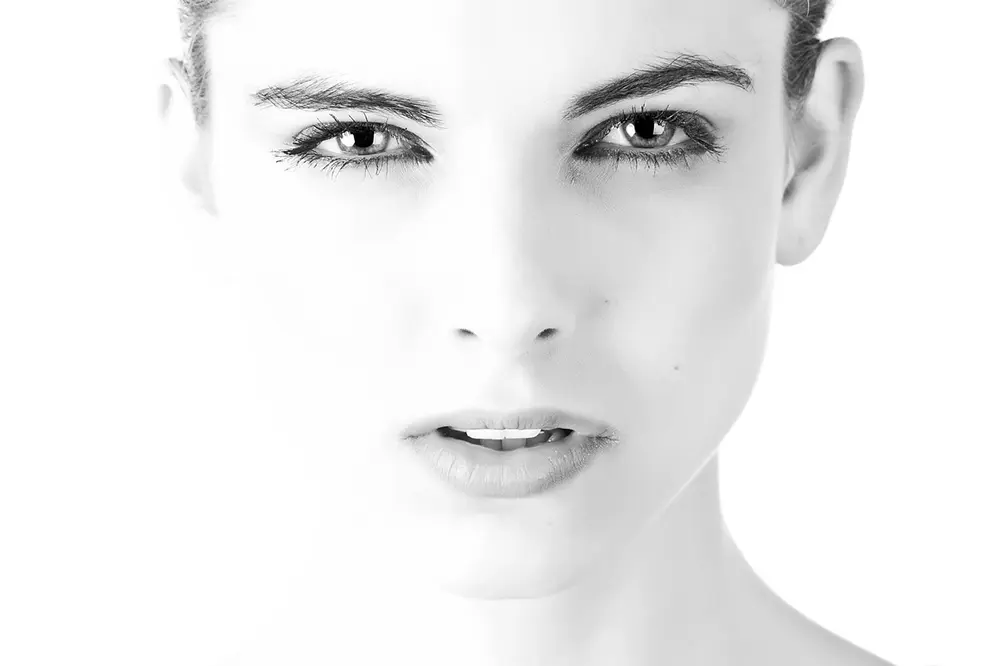
Photo by Engin_Akyurt
What Is High Key Lighting?
High Key photographs have a lot of white and light tone areas and very little mid-tones and darks or blacks. This is achieved through high key lighting that is set up strategically in a way that the tones nearer to the mid range tones become almost white, while the whites are very white. The lights used are too bright so that they blow out all or most of the harsh shadows and other darker tones; in other words, the aim is to reduce the amount of shadow detail.
High key lighting is not devoid of blacks, but has them in very less amounts. If there is true black in the frame like eyes or hair, they will be captured as black. High key images hence evoke a sense of cheerfulness and upbeat mood in contrast to low key lighting that renders a dramatic mood to the image.

Photo by Erwin_1968
Where Is This Technique Applied?
High key lighting is used mostly in portrait photography and also in still life photography to deliver a positive or cheerful feeling. Many photographers also use the high key technique for business photos, wedding, newborn and fashion photography.
Besides the above, high key setup is also applied in product photography as it makes the product stand out and gives it a high-quality look. High key is used for some cinematic shots, when capturing images for catalogues, posters, billboards, etc. and also the preferred lighting style when photographing humorous and comical scenes.

Photo by Scott Webb on Unsplash
Can You Capture High Key Images Outdoors?
The answer is yes! If you cannot afford studio lights or if you are an outdoor person, then you can always capture high key images outdoors.
A lot of photographers now experiment with high key photography in various other genres like landscape, nature, wildlife and street photography. This is specially possible in brightly lit scenes with soft shadows or minimal shadows.

High Key Lighting For Outdoors
When shooting outdoors for high key photos, the photographer needs to pay special attention to bright light and bright backgrounds that will help with great results when capturing a high key image because a bright lighting setup is important for high key photography. You need to choose the right time and light for outdoor high key photography and the best condition would be light on an overcast day that will help to illuminate the background evenly and also capture light tones from the subjects and other elements in the image.
The soft light on an overcast day has low contrast and hence will help to reduce shadows in the scene. You will need to experiment with the ambient light, settings, angles, etc., and take some test shots to decide on which works best.
When shooting outdoors, make sure the background is light and does not have deep blacks or shadows as you do not want to create patches of high contrast within the frame. You will need to work with the right resources and light outdoors and make sure they work together to produce the outcome that high key lighting requires.

How Is The Lighting Set Up?
If you have a good understanding of light, you will know that large light sources will create soft shadows and hence the key to capturing elegant high key images with soft shadows is using large light sources. Smaller lights may work for certain situations for example, when you shoot low key images or for a low key lighting setup.

Besides the above, using lighter backgrounds help with amplifying the ambient light in the scene. So along with the right light source, it is important to have the correct background and fill lights for successful high key photography.
Key light refers to the main light source that illuminates the subject and there are many ways in which high key lighting can be set up. The basic would be to have at least three lights, where the key (main) light is positioned at an angle of about 45 degrees to the subject, while the other two background lights are positioned to illuminate the background to make it completely white. It is best to use some neat and smooth white backgrounds (preferably linen or 9 ft wide roll of white paper, to avoid reflections) so that the background is free of any specks.
Note: You don't have to stick with 45 degrees, experiment with various angles starting from 15 degrees onwards. Some setups even have the light in front of the subject which is not usually recommended.

Having only the key light shine on the subject can create some harsh shadows on the other side of the subject and hence to avoid that, you can use a fourth light source (smaller and less intense than your key light) as fill light on the other side of the subject (at about 45 degrees to the subject) so it can smooth off and brighten the shadow areas. Remember, you don't have to stick to any angle of incidence, but instead, try various angles for both key and fill light and choose what is visually appealing.

Key Points To Remember For High Key Lighting Setup:
- Use a pure white background to help create a perfect white background easily in the final image.
- A three point lighting works great for a high key effect – one key light and two lights for background
- For the best results, it is good to have four lights – one key light, one fill light and two lights for background
- Do not stop with four lights when you use high key lighting for photography, in fact, you can add more light sources wisely to create artistic high key images using different lighting styles.
- In high key setups, adjust the angles at which the key light and fill light fall on the subject to create a different effect in your high key photography.
- Practise a lot with the lighting set up as your first shot is not going to be the best. So practise and experiment till you get the look you desire.
- Although the colour of the main subject or the subject’s dress colour does not matter much for high key photography, it will be good to stick to pastel tones in the frame to get a soft look in the final image.
- Do not stop with portraits and products, but experiment with other genres as well by brightly lighting your subject using natural light!
- Do not hesitate to make slight final adjustments while post processing although getting the lighting correct in camera is recommended.
If you are looking to make beautiful portraits and are struggling with lighting, here is your chance to truly master light and produce amazing and inspiring images of your own. Discover the secrets to controlling and manipulating light in this ebook Understanding Light by Photzy.


