For quite a few years now, high dynamic range photography, or simply HDR, has been an important trend in photography as it allows the photographer to create an image beyond the limits of the camera’s sensor in order to recover lost details in shadows and in highlights. The results can range from extremely subtle to almost surreal but however the HDR is done, there is one thing that a common denominator for HDR processing is to have several shots with varying exposure. But what if you have a single image, maybe one taken a while ago that has great composition but suffers from a poor dynamic range. Well if that image was shot as a RAW file, it is possible to create a pseudo HDR image from just that one shot. Here is how we can do this in Photoshop.
Select the RAW file that you wish to confer and open it in Adobe RAW. You are going to need an image that is well exposed with a histogram more or less within the limits of exposure. The aim is to translate the extra dynamic range of a Raw file when compared to a jpeg, to the final image.
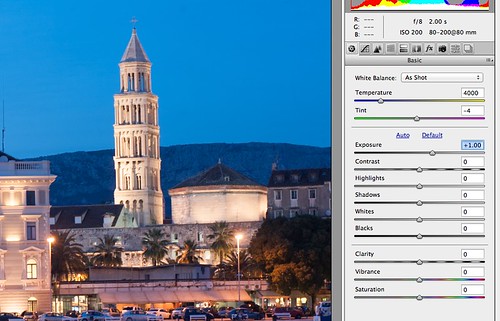
On the right hand palette, make sure the mode is set to basic, this is denoted by the little aperture icon. In the basic mode, you will see an exposure tool. Sliding this to the left, decreases the apparent exposure or makes the image dark, sliding it to the right increases the exposure. For our first image we are going to move the slider left to -2.0.

Under Exposed – By Jason Row Photography
From the bottom of Adobe Raw, select save and give the image an unique file name, for example Underexposed Minus Two. For the very best quality select the TIFF file format and click save. Your original Raw will still be open in Adobe Raw.
HDR images can be made from up to 7 different exposure but when making a pseudo HDR it is generally best to stick to just three. So the next step is to return the exposure slider to 0, in other words the original metered exposure. Again save this with a unique file name in the same location.
Lastly we need to create an overexposed image. We need to take care with creating the overexposed version in Adobe Raw. You may find that plus two on the exposure scale is too much, look at how much the highlights are clipping and balance that with how much the shadows have been lifted to determine what will work best. Once again save with a unique file name.

Over Exposed – By Jason Row Photography
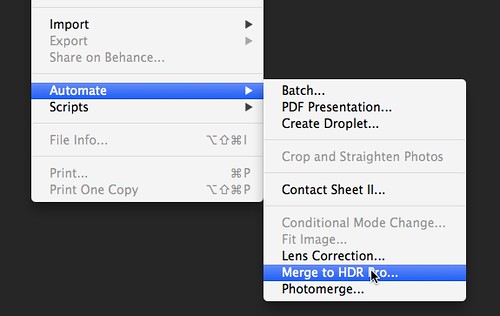
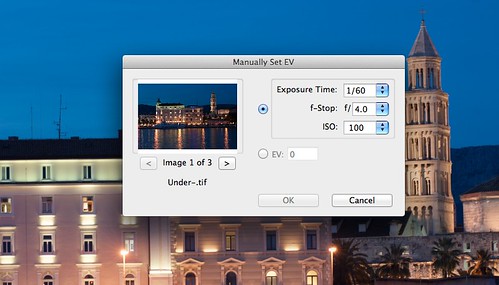
Now it is time to create our HDR image. Click Done on Adobe Raw to clear it. Now from the main Photoshop menu select File – Automate – Merge to HDR Pro. Your images will open and start to be processed. You may find that you get a warning dialogue advising you to use original Raw files. You can dismiss this, Photoshop is expecting unique images with different exposures but obviously we are using three variations of the same exposure. You may also find that a second dialogue box opens asking you to manually set the exposure. It is useful to do this as it will tell Photoshop which image is which. I tend to adjust the shutter speed, increasing or decreasing it by the same amount that we adjusted in Adobe Raw.

Creating the HDR – By Jason row Photography

Set the exposure values By Jason Row Photography
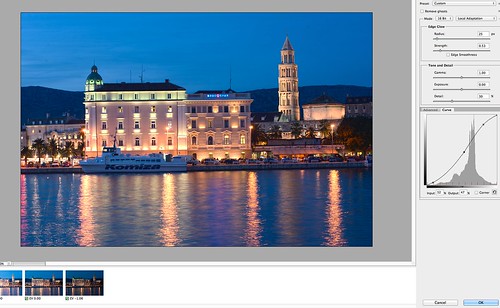
Once all the images have been merged, an HDR version will open in Photoshop. You can now play around with various aspects of the HDR tool to achieve the look that you require.

Create the HDR Image – By Jason Row Photography
From the top right of Merge to HDR Pro you can select from a number of presets, including surrealistic and photorealistic. Below that you can manually adjust gamma, exposure and detail, whilst at the bottom you have the more advanced controls such as shadows and highlights as well as a useful curves tool.
Single shot HDR will never be as effective as a real, multi exposure HDR image however as a tool to improve the look of some suitable images, it can, if used carefully, add extra life and dimension to images shot in difficult lighting conditions.


5 Comments
Brilliant! that make perfect sense; why didn’t I think of that. Cheers.
Lol it’s the city I live in! 😀
THANK YOU SO MUCH!! you just made my day… I’ve only just recently taken to shooting RAW (still pretty much newbie) and haven’t got to the point of multiple exposure. BUT I’ve always wanted to try my hand at HDR and this is a great help. Now I can dabble a bit before getting into it for real.
thanx a million 🙂
Just came across your blog while searching for how best to achieve an HDR from a shot . I v been trying to experiment with this for some time. Thanks so much for this writeup. Quite explicit and informative too.
Jason,
Great article.
Does Photoshop contain both Adobe Raw and HDR Pro?
Just recently became interested in HDR.
Dale M. Brown