Have you heard of the Harris shutter effect in photography? This effect was named after its inventor, Robert Harris of Kodak during the days of film photography. To achieve this effect, Harris used a device, which was a strip that had three coloured filters separated by opaque sections. The three colours were the primary colours, red, blue and green.
The filter strip (called the Harris Shutter) setup looks something similar to this illustration below. The Red, Green, and Blue areas are glass filters with the black opaque sections in between.

Basically, the set up used for this photography technique called Harris Shutter Effect, had a thin cardboard box, that had holes on opposite faces so that the lens could see through. This cardboard box, acted as a guide to let the filter strip setup slide through in front of the lens when the film was exposed in bulb mode. This is a type of long exposure photography.
Although Harris shutter effect is an old technique from the days of film, there is nothing to cringe at, as this can be now developed for digital colour photography and can be an interesting and fun project to work on if you like playing with colours in photography.
You can be creative and make your own art if you get the idea of how this works. Apart from the red, green and blue colours, you can even play with slightly different colours, but make sure you stick to the colours which when combined will give resulting colours that are pleasing to look at.

What Is The Harris Shutter Effect?
The Harris Shutter is a strip device with three colour filters that helps to make colour photographs where the effect of the red, blue and green filters are recorded in a single image.
Originally the Harris Shutter Effect was made by re-exposing the same frame of film (similar to today’s multiple exposure in camera) three times, through three different coloured filters (red, blue, green), keeping the camera stable while photographing the same scene.
The areas with movement or the moving elements in the frame, have the colour of the filter used when photographing at that time and the areas with no movement (static elements) appear as normal colours because the red, blue and green combine to reproduce the original colour. This effect can be achieved in cameras that let photographers take multiple exposures, using the process below.
The image is made by shooting three exposures of a scene, through a red, blue and green filter in succession. The images are shot one on top of the other as multiple exposures, . This way , the static elements in the frame appear in ordinary colour whereas the moving elements show up in one of the three colours, red, blue or green or other rainbow colours depending.

In areas where the movements overlap two or more colours, the image will have the combined effect of the colours, for example, there will be magenta colour where there is a combination of red and blue colours, etc. This technique is a great way to show movements in photographs in an artistic way.
With the availability of advanced digital technologies and post processing applications, the Harris Shutter effect or technique can be created in camera or using post processing applications.
How To Achieve The Harris Shutter Effect?
- You will need a camera that can take multiple exposures.
- You will need to mount the camera on a tripod in a location that has static elements and some movements.
- Now, expose a frame three times with different coloured filters each time – you will need to use the red, blue and green filters, while keeping the camera steady in the same position. Doing so will generate a colour on or around any object that moves within the frame.
The Harris Shutter Effect on a single image can be achieved in two ways:
- You can either take a multiple exposure shot (3 exposures) by changing the filter in front of the lens (red, blue, green) for each exposure
- You can build a filter strip with three coloured (red, blue, green) gel filters similar to the filter strip setup above (a drop through filter) that you can just drop the strip through the filter holder during the exposure. You may have to slightly increase the exposure time for this method so that the shutter is open for the entire time the filter strip slides through the filter holder in front of the lens. Make sure you adjust the exposure settings to compensate for the long exposure.
If your camera does not support multiple exposures, you can take three separate exposures, each with different coloured filters (red, blue and green) and then stack them using a post processing application. Make sure that your exposure settings are the same while using all the three coloured filters.

Gear Required For Harris Shutter Effect:
- Camera that can shoot multiple exposures
- Tripod to mount the camera (you need a tripod because with multiple exposures or long exposure or while changing filters, you need the camera to be steady without any movements)
- Red, blue and green coloured filters or drop through filter strip setup (you could even use coloured sheets in front of the lens, as long as they do not deteriorate the image quality)
- Optional cable or remote release

What Are The Best Situations For Harris Shutter Effect?
In order to have a beautiful image where the effect is evident, you should choose a scene that is static and has some movement. This is a great way to creatively show movement in a photograph. Some examples are
- A busy street
- Water drops photography
- Waterfalls, a flowing river, water fountains
- Fast moving clouds
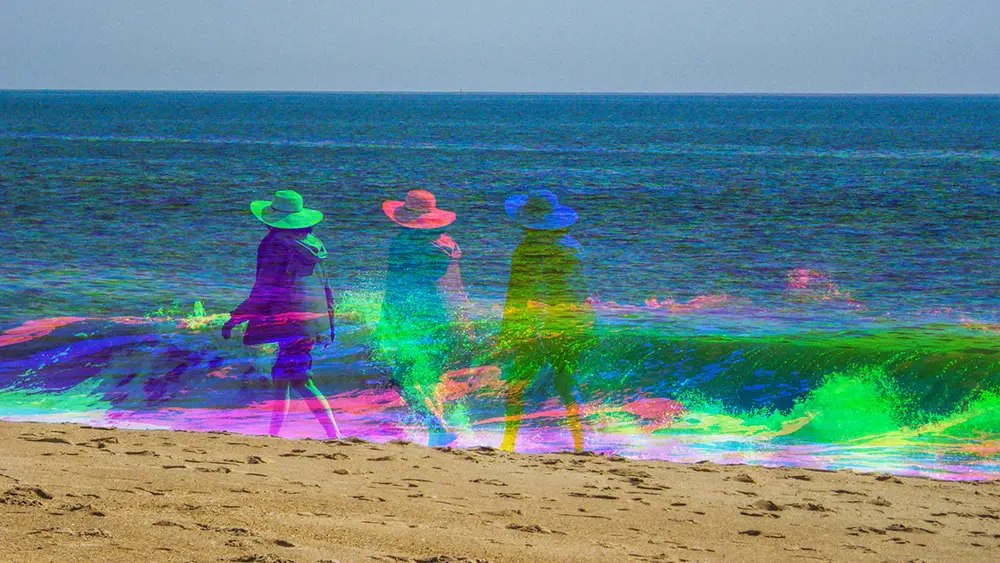
- Waves in a beach

- Roads with vehicles moving
- A park with people or children moving around
- Carnivals
- Fire
- Smoke
- Try this when doing Light Painting. You will get some brilliant colours.
- Animals moving in a national park
- Sports scene
- Creative portraits
- Anything that moves in a static scene. Be creative and create your own movements to use the harris shutter technique for creative photography.

Can Harris Shutter Be Achieved Using Post Processing Applications?
Yes, if you do not have the filters, if your camera does not support multiple exposures or you do not want to get into the hassle of taking multiple exposures, you can use any post processing application like Adobe Photoshop or a free one like GIMP to achieve this effect.
Note: Remember, making a photograph where you use the Harris Shutter technique is more exciting that creating this effect through post processing.
Overview Of The Process:
You will need to be in a place or create a scene where these is a moving subject or element. Any genre of photography works just well as long as something is moving in the frame. Just shoot three normal colour photographs (without any filters) in succession and then create the Harris Shutter effect while post processing.
When post processing, you will need to separate the red channel from one image, blue channel from the second image and green channel from the third image and then combine them to get the final image.
An important thing to keep in mind when taking photographs for the Harris Shutter Effect is to make sure there is some movement in the frame in order to get the effect. For very fast moving subjects like a train or a speeding car/bike, you can use the burst mode to get the subject in frame all through the three shots.

Here Is How Harris Shutter Effect Can Be Created Using Photoshop:
As discussed above, you need to take three photographs of a moving subject in a static scene. If you are able to handhold your camera still for the three shots, you can do that or, it is better to use a tripod for precise photographs. Once you have the photographs, there are two ways in which you can create the Harris Shutter Effect.
By Separating the RGB Channels:
Here are the steps to follow:
Open the images in your favourite post processing application. It should be a program that allows you to isolate the red, green and blue channels.
Here are the three images that were used.

The next step is to isolate the red channel in the first image, green channel in the second image and blue channel in the third image.
To do this, open the three images as layers in Photoshop. Hide visibility of layers 2 and 3. Select the first image (layer), right click and choose “Blending Options”

Layer Style Window opens

In “Channels” uncheck “G” and “B” leaving “R” checked. Click “OK”

Hide visibility of layers 1 and 3. Select the second layer and repeat the above and in blending options, uncheck “R” and “B” leaving “G” checked. Click “OK”

Hide visibility of layers 1 and 2. Select the third layer and in blending options, uncheck “R” and “G” leaving “B” checked. Click “OK”

Once the above process is complete, make all layers visible to see the Harris Shutter Effect. You can merge the images and save the final image.

Here is another set of images to show how the colours in the static areas are preserved and only the moving areas have the Harris Shutter Effect. The quality and composition are not good in these images, but these were quickly captured before it got dark, to demonstrate the process.
These were the three images used:


By Using Color Balance:
The steps are as follows:
Open the three images as layers in your favourite post processing application.
Hide visibility of layers 2 and 3. Select the first image (layer), and in the Image menu -> Adjustments -> Click “Color Balance.”

The “Color Balance” window opens.

Adjust the colours so that the image has only one colour, which means it will look monochromatic. For the first layer, drag the slider (Cyan slider) all the way to the right for “Red”

Repeat the above process for the second image after hiding visibility of layers 1 and 3, but drag the second slider (Magenta Slider) all the way to the right for the green colour.

Now repeat the same process for the third image after hiding visibility of layers 1 and 2, and adjust the third slider (Yellow Slider) all the way to the right for “Blue” colour.

You can also choose intermediary colours and if doing that, choose colours in a way that they look good when put together.
Now change blending mode to “Lighten” for each layer (you can play around with other blending modes as well) and merge the three images. You have an image that looks similar to one created using the Harris Shutter Effect.

Yep, There Is An App For That!
There is even an app called Harris camera for iOS users if anyone is interested. This app is real quick and gets the photo done in the device itself in a matter of few seconds.
In the Harris Camera app, you will need to take three photos in succession and each time you press the shutter, the photograph is taken with a different coloured filter on. The app then combines the three images and gives a resulting image that looks very much like the Harris Shutter Effect. Like the above methods, you need to have a moving element in the scene in order for the Harris
There are a few filters in the app that can be used to create slightly different effects depending on your taste and you can even adjust the strength of the filters.

If you are looking for a weekend project and running out of ideas to create something new, you can try the Harris Shutter Effect. All you need is a moving element or subject and you can get creative from there. Remember to share the images you create and your experiences with the community at Light Stalking. We would love to see them.
Have you tried the Harris Shutter technique before? If yes, which method did you use? Do you have some tips that would help other photographers? Please share them in the comments section below.
Trick photography can be interesting and if you are someone looking to take breathtaking special effects shots with just your regular camera, then you should check out Trick Photography by Evan Sharbonneau.


3 Comments
Fun and interesting technique.
For the poor man camera owner that doesn’t have a camera that supports mutiexposure but has bulb mode, by using a strip similar to the Harris’ original design and a cheap square filter holder (or home made one) and adding in front of all the color filters a piece of dark gray gel that decreases light by let’s say 3 stops, like ND filters do, and using a handheld mate black cardboard to cover the lens between filter movements.
Get your exposure as normal without any filter, then calculate the total exposure time by increasing it by the average of the stops lost in each of the color filters, this’s a known factor that will remain constant for your strip as long as you don’t change the gels (.
Now using reciprocity adjust the aperture and ISO to get the wanted exposure time, divide it by three and get ready to expose using a remote shutter release and a crono. Remember that the time you have the black cardboard over the lenses it doesn’t count to as exposure time and you can hold it as long as you want to get more accentuate movement and to change from one filter to another to get more accurate timings.
Hi Alfonso, many thanks for sharing some tips for cameras without multiple exposure options or bulb modes. This will be of great help for many readers 🙂
I like Alfonso’s reply.
He is explaining how to make a Harris Shutter with corrected RGB filters so one gets a good colour balance without the normal resulting colour caste.
For photographers wishing to find the correct RGB filters I have attached a link to the availability of the recommended filters for those brave enough to attempt this project!
LINK: https://www.photo.net/discuss/threads/rgb-tricolor-filters-for-separation-photography.5509841/