Probably one of the most common questions we get at Light Stalking is how to photograph lightning and get those spectacular shots you see in magazines. But to photograph lightning can be a damn tricky thing to do!
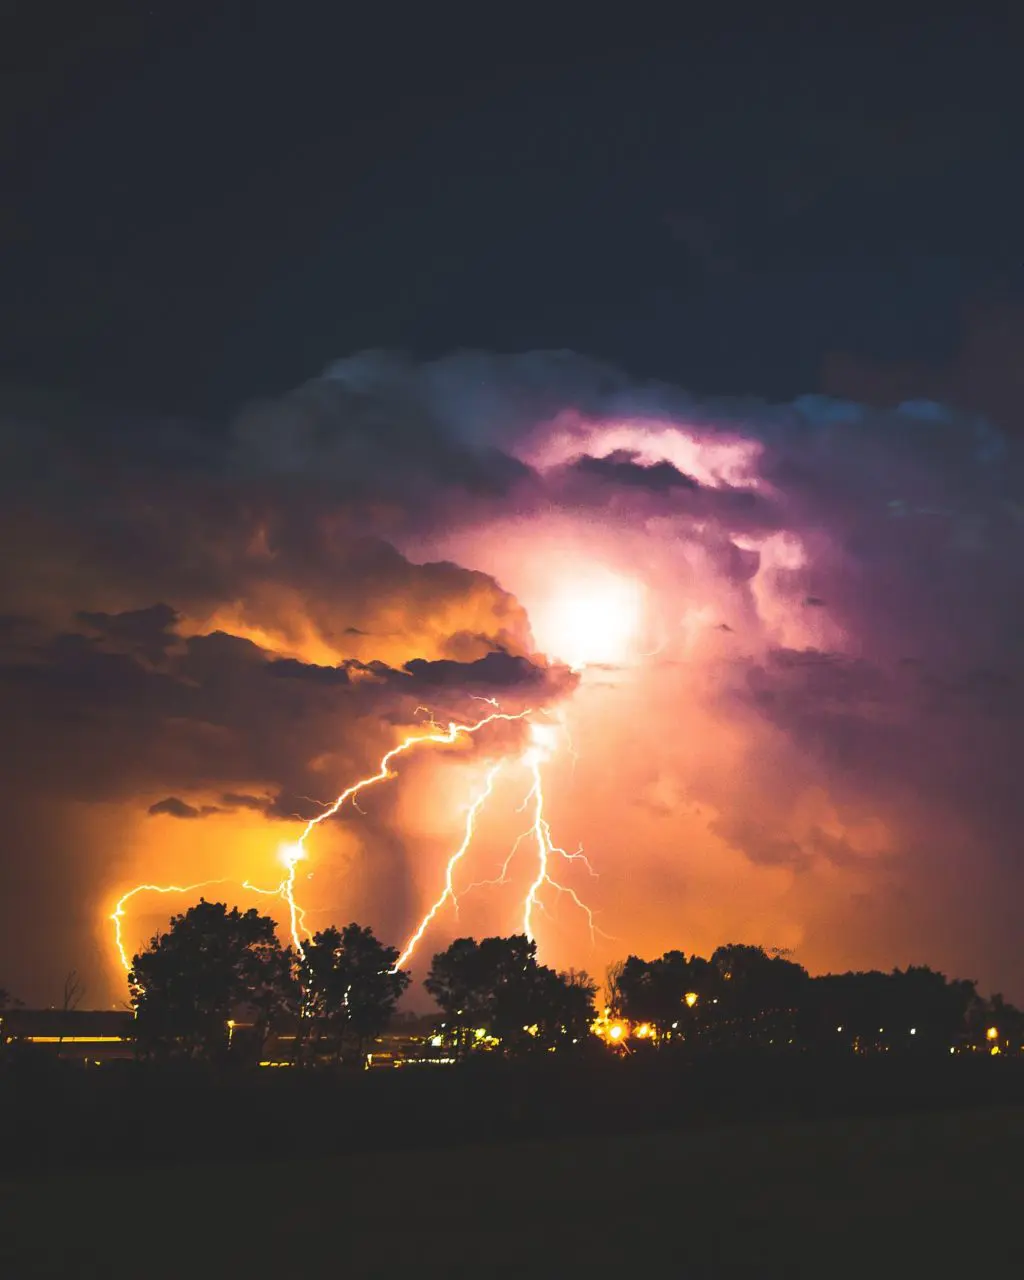
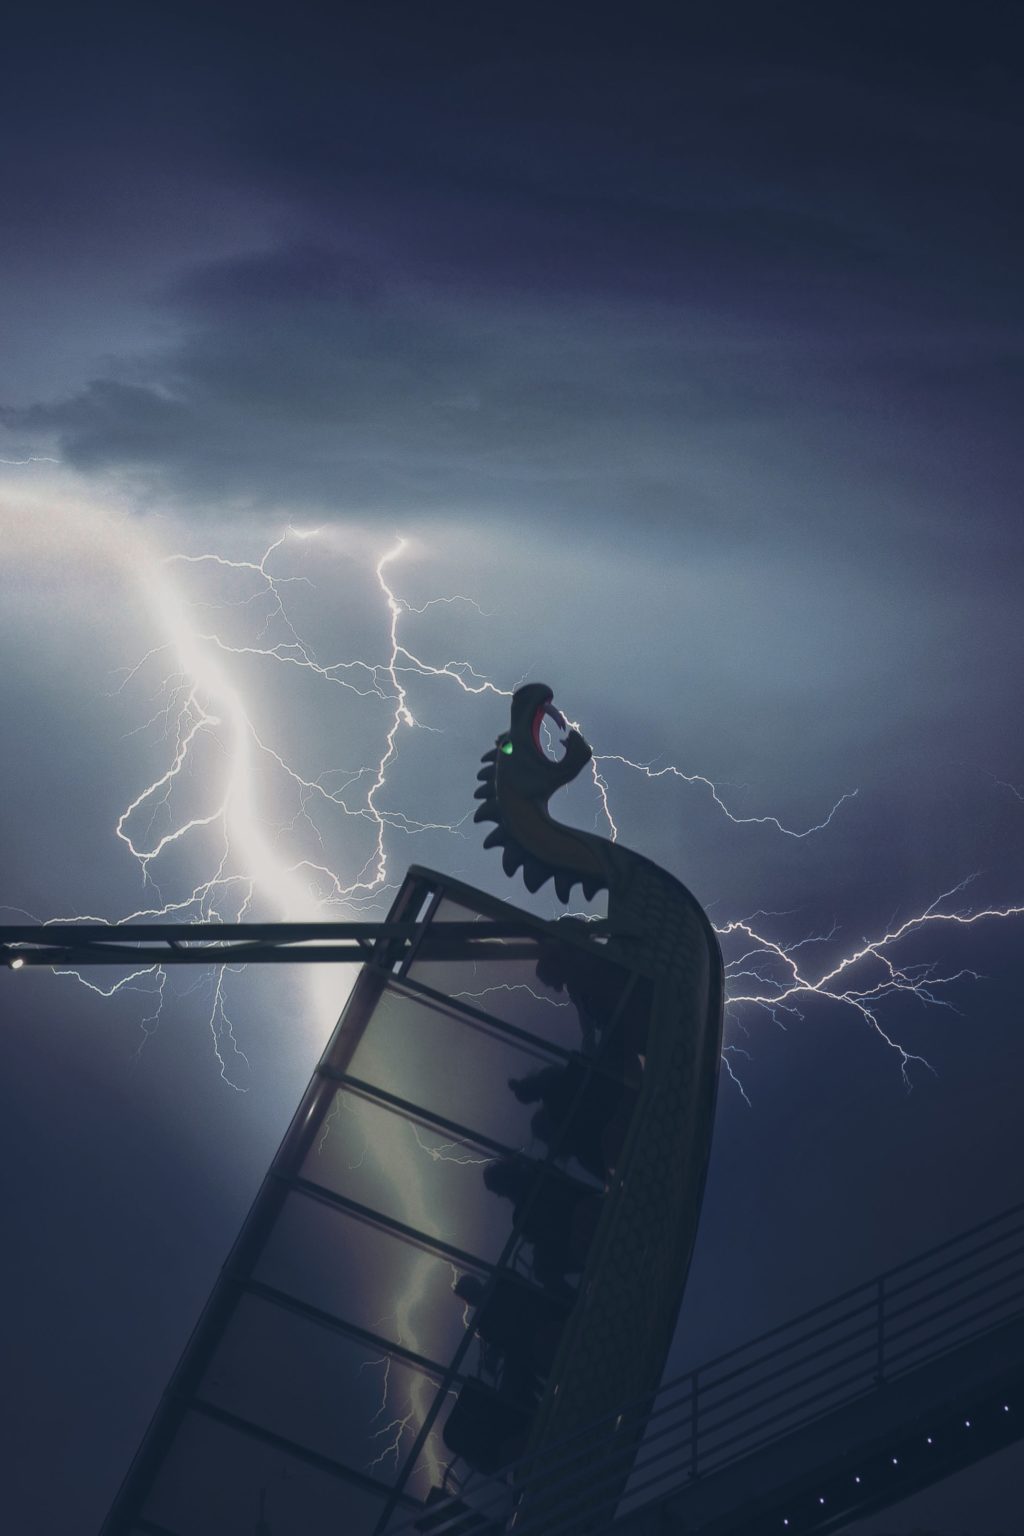
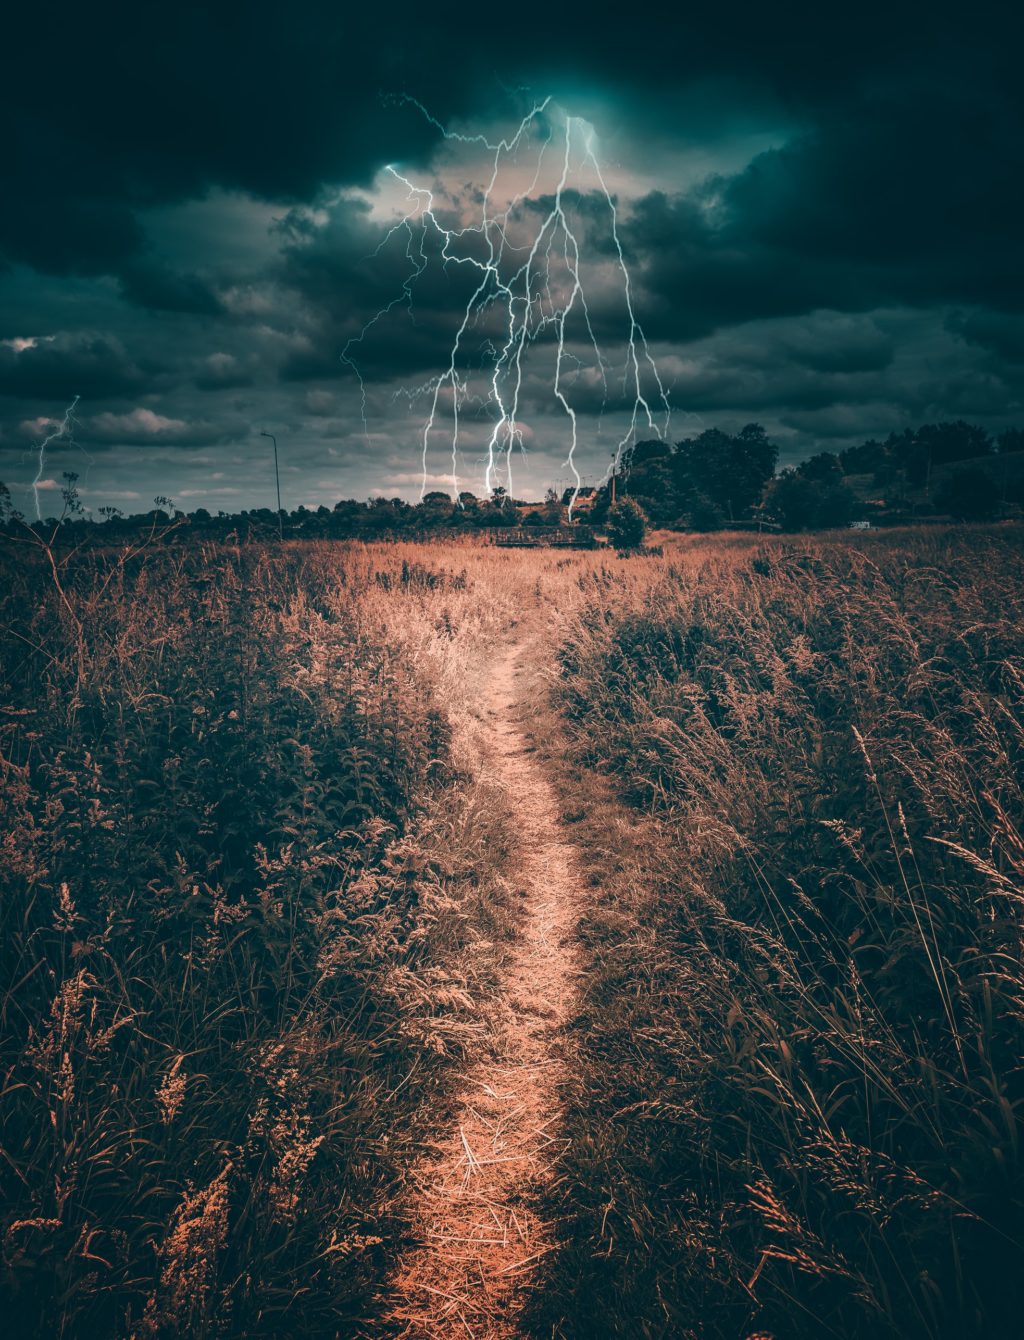
Even so, as the shots below show, good preparation and knowledge of shooting lightning bolts properly can lead to some incredible landscape photography!


Camera Equipment For Photographing Lightning
It’s important to get your camera setup right for photographing lightning! Here is some of the stuff you will need as part of your quest:
- camera and wide angle lens capable of letting you set the shutter speed and manual focus (usually you’ll need to use the B setting for shutter speed so a Mirrorless or DSLR camera is probably what you will need).
- Cable release or remote trigger to hold the shutter open. This allows you to create photos with an extremely long exposure time.
- Sturdy Tripod (the heavier the better as wind can move it around) to avoid shaky photos. Putting the camera on a tripod can help you capture great pictures of lightning. While a tripod typically works best, in reality any steady surface will work.
- if you're a film shooter, ISO 100 film or equivalent digital camera setting (ISO 200 is also acceptable and even preferable for certain situations explained below).
- Good flashlight if it is dark outside – not just to see in front of you, but also to paint light on the foreground to make the scene look more dramatic.
- A spare battery. It is best to have a backup battery so that you will not miss the best strikes after your camera battery dies.
- A pocket full of memory cards. You might be taking a lot of photos. Be prepared to delete photos with no lightning strikes, or pop in another card.
Also, remember that it is likely you will be in a spot where you and your camera equipment are getting rained on! I always carry a poncho or an umbrella in my camera kit for such occasions..
To be honest, I have never found the perfect solution for shooting in the wind and rain while photographing lightning strikes so if you have some advice for safely and effectively capturing photography of lightning then leave it in the comments! Take shelter whenever you can – there is no easy solution for storm photographers.
Waiting For Ideal Weather Conditions
The fact that you have to wait for a thunderstorm for lightning strikes is quite obvious, but not every thunderstorm is necessarily ideal for shooting lightning photography. You sort of have to make a judgment call on this, but here are some advantageous atmospheric conditions to be on the lookout for:
- Supercell or rotating thunderstorms. These thunderstorms are characterized by the presence of a mesocyclone: a deep, persistently rotating updraft.
- Thunderstorms that form in advance of an approaching cold front. These storms often produce lightning strikes every couple of seconds.
- Local isolated thunderstorms.

To find out what’s the best time for shooting thunderstorms, you can consult one of the weather forecasting sites listed below:
- Wunderground – This amazing website with over 250K members provides localized weather forecasts which include storms and lightning.
- Accuweather – One of the most popular forecasting sites today is certainly Accuweather. It gives detailed and usually accurate weather predictions across the world.
- Windy – Originally designed for surfers and other water sports, this website is highly useful and it allows you to see real-time graphics of various weather phenomena.
LightningMaps – This website is designed specifically for lightning enthusiasts. You just need to zoom in on your preferred location and check where the lightning bolts are!

Technique for Photographing Lightning Strikes
The Simple Explanation
In the perfect scenario, learning the technique and settings for how to photograph lightning at night should be quite simple.
Just make sure to have the camera on a tripod to reduce camera shake as well as cable release or remote shutter release. As for camera settings, set the focus to infinity, the ISO to 100 or 200 (on DSLRs camera) and set the aperture to f 5.6. Make sure the shutter is open until the bolt of lightning goes off and then press it just after you get a flash of lightning (you will probably need several attempts if the lightning is not constant). Make sure the camera is set to shoot in raw. These are approximations as camera settings depend on local conditions at the time of shooting a bolt of lightning.
This is obviously a lot easier in situations with many lightning bolts or cloud lightning – you can try to capture them multiple times!
Another tool that can help you achieve good photos is a lightning trigger. A lightning trigger causes the shutter to open in the exact moment when the lightning strikes.
Sharpness Matters!
If you really want to get things right, then it's probably a good idea for you to study the ways that landscape photographers assure themselves of getting sharp images. While you probably won't be able to match the sharpness of a landscape taken in perfect conditions due to the stormy nature of lightning photography, the general technique will still serve you well. Just be aware that your aperture setting might need to change depending on the intensity of the lightning strike.
While it is not necessary to do any more than above, there are also a lot of devices on the market that can detect lightning and fire the shutter of the camera at the ideal time. While not specifically necessary, these types of devices can make life easier for a lightning photographer. There is no real need to get them, but they are useful.

Choosing The Correct Aperture For Lightning Photos
This is going to take a little bit of time on your part! These values largely rely on how intense the lightning is and how far away it is. This table of aperture camera settings is a useful guide, but it’s not set in stone. The top row refers to the brightness of a lightning storm and the first column refers to how far away a lightning is.
| Blinding | Average | Dull | |
| Close Lightning | ISO 100 @ f/16-22 | ISO 100 @ f/5.6-11 | ISO 100 @ f/5.6 |
| Mid-distance | ISO 100 @ f/11 | ISO 100 @ f/5.6 | ISO 200 @ f/4-5.6 |
| Distant Lightning | ISO 200 @ f/4 | ISO 200 @ f/2.8 | ISO 200 @ f/2.8 |
Generally speaking, f/11 does the trick in most cases. With this aperture you can get good depth of field and sharpness while keeping a reasonable (not too long) shutter speed. You can certainly shoot at f/16, but that may require a very long shutter speed. Likewise, you can try an aperture of f/8, but you might not get the optimal depth of field.

Shutter Speed And ISO For Lightning Photography
The assumption is that you will do your lightning photography after dark – if this is true, then you will need long shutter speeds. How long? It depends, which is why it’s best to use the camera’s “bulb mode” so you can have more control over how long the shutter stays open and do a few test shots. If you want to set a specific shutter speed, try between 15 and 30 seconds to start with.
When it comes to ISO, keeping it low (ISO 100 or even ISO 50) will minimize the noise in long exposures with a lightning strike. Even at low ISO you can often start to see a bit of noise creep into your night time shots around the 20 to 30 seconds shutter speed mark.

How To Photograph Lightning And Capture Good Composition
When you are intent on photographing one component of a scene, it is very easy to get caught up in just that one thing. It's easy to forget that photographing a lightning storm is simply one aspect of your overall composition.
What this means is that you need to think of the overall scene of your storm photography. Look at the images on this page for example – the most effective ones would have been reasonable shots even without the lightning strike and have typical wide angle landscape shot compositions. It is imperative that you think of the components of a good composition in order to achieve the most effective lightning images. Check out our article on 7 composition tips for landscape photography to give you a start on that

Storm Safety
Storms are dangerous and when learning how to photograph lightning it is important to remember that safety is far more important than any photograph. Photographing lightning might sound exciting, but it’s also quite risky.
Remember that if a storm is nearby and you are on a hill, on top of a building, near a tree, in an open field, on the phone or near a power pole or fence, then you are already in danger. Be sensible! Check out this lightning safety page before you do anything and when you have finished reading it, read this one too.
A few of tips from their fact sheet include:
- A lightning bolt is likely to strike the tallest objects in a given area—you should not be the tallest object.
- Be sure to find a safe location. It is best to stay inside a building, car, or other object that can protect from a direct strike.
- Avoid isolated tall trees, hilltops, utility poles, cell phone towers, cranes, large equipment, ladders, scaffolding, or rooftops when shooting lightning.
- Don't go to open areas, such as fields. Never lie flat on the ground.
- Retreat to dense areas of smaller trees that are surrounded by larger trees, or retreat to low-lying areas (e.g., valleys, ditches) but watch for flooding.
- Avoid water, and immediately get out of and away from bodies of water (e.g., pools, lakes).
- Stay away from objects that conduct electricity (barbed wire fences, power lines, windmills, etc.)
- Never use a cliff or rocky overhang for shelter
- Do not lean against concrete walls.
Patience
Outdoor storm photography is all about finding the light, finding the composition and being patient. It is one of the ultimate tests for a photographer, but adding lightning to an image takes things to a whole new level with the amount of patience required.
It takes a lot of practice to get a good shot of lightning. Even with using an automatic lightning trigger, this could mean you take dozens of photos in a row during the same storm, with the exact same composition. Be patient. Expect that most of your shots won’t work out. Sometimes, you may return home empty-handed just because of bad luck! However, a good photo is just around the corner; it is bound to happen eventually. Remember that when one does work out it will be worth the wait. Just keep taking pictures in sequence. You never know which one will turn out perfectly.

Wrapping It Up
Before we proceed to post-production, we want to make sure that you have all the important steps when it comes to taking photos of lightning. Any modern camera with a good lens can be used to get great images of lightning bolt.
Here's a brief recap of all you need to know:
How To Photograph Lightning – In Easy Steps
- Secure your camera to your tripod
It’s vital that you are using a sturdy tripod, as any movement (you may have to deal with strong winds) will cause the image to be blurry.
- Set your camera to bulb mode
It is typically indicated by a “B” on the mode dial.
- Dial in your exposure settings
You need to understand what aperture, ISO and shutter speed to use – check out the aperture table we provided!
- Mind the composition
Check to make sure you’re happy with the framing and composition of your pending shot.
- Be careful with focusing
Focus on something in the distance or focus to infinity; in either case, manual focusing is going to work best.
- Get ready
Open the shutter using the remote shutter release.
- Be patient
Wait for a lightning strike (or multiple strikes) to occur within the frame of your shot.
- Release the shutter
Alternatively, you can use your camera’s continuous drive mode and hope that a few lightning strikes occur during shooting.

Post-Production Of Lightning Photography
It is recommended to set your camera to shoot in raw so that you can easily develop your images. Virtually all of what you do in editing will be a matter of personal taste, but you may want to pay particular attention to basic editing.
Raw format will also give you a limited ability to recover overexposed bolts. Again, RAW recovery is limited, and the more severe the overexposure, the less quality you'll be able to pull out of the image. Severely overexposed bolts will tend to be too ‘fat' and have unsightly haloing.It's always better to get the exposure right if you can. If you're just a little over/under exposed, the RAW will give you the ability to ‘tweak' it just enough to look good.

Basic Edits
Make sure to adjust contrast, white balance and black level!
- Contrast – It will most likely need a moderate boost.
- White Balance/Color Temperature – Cooler/bluer images have more of an “electric” feel. Feel free to experiment with color temperature – it doesn't have to be technically correct.
- Black Level – Decrease blacks to boost overall saturation while also further darkening existing black areas to draw even more attention to the lightning.

Stacking
You can stack multiple images in post-processing if you want to get an amazing scene with many lightning bolts! But prior to doing this you need to capture a series of images with identical compositions, containing different lightning strikes.
You can do this in Photoshop quite easily – you just need to select the images you want to use, import them as layers and then change the blend mode of every image to “Lighten”. This useful blend mode makes the parts of each layer that are lighter than the below layers visible and that’s exactly what we need. It might not work perfectly for every set of images, but it’s a good method to start from.
To stack images in Photoshop, follow these steps:
- Open the first image
- Open the Layers toolbar
- If the image layer is a background, right-click on it in the Layers window and choose “Promote to layer”
- Open the second image.
- Select the entire second image (CTRL-A) and copy it to the clipboard (CTRL-C)
- Paste the second image onto the first image (Photoshop should create a new layer for the second image)
- Repeat steps 4-6 for each image you want to stack.
- Highlight (select) all of the layers in the Layer toolbar.
- From the main menu, go to Layer > Smart Objects > Convert to Smart Object. All of the layers will be grouped into one Smart Object layer.
- From the main menu, go to Layer > Smart Objects > Stack Mode > Maximum

Conclusion
The next time a thunderstorm breaks out, snatch up your gear and get out there. Some incredible images await for sure! The tips and tricks outlined in this article aren’t set in stone, but are a very useful template. Try them out and feel free to customize them. Just always remember to have a safety plan to protect yourself because a lightning bolt is very dangerous. Happy shooting!
More Lightning Photography Resources:
- Photograph Lightning by BrightHub
- Lightning Photography Tips
- Photographing Lightning by Shot Addict
- How To Photograph Lightning with Your iPhone
- Comprehensive Guide To Photographing Lightning
- Photography Techniques: Lightning


18 Comments
Really beautiful works.
One of the photos was once a wallpaper on my PC 🙂
Thanks for the tips!
I used to chase lightning back in the film days in Florida. I need to start again! I miss it!
@Ilan – Thanks for stopping by again! Yeah, I might set one to my wallpaper too!
@David – Throw us a link so we can check them out!
I’ve made a clear Perspex Unit to house my camera and have a remote with 100 Mt range so I can shoot from safety this coming season. The test will be how stable it’ll be in strong winds. If it works, I’ll return and show some images of the set-up.
That’s actually an awesome idea! Can’t wait to hear how it works out!
I generally use my van’s trunk to sheild myself from the rain and wind. Doesn’t always work, but it helps a bit!
Good idea. I think when the weather gets ugly, you need to use whatever you can!
https://twitpic.com/17kic1 Not sure if this will work lol this was taken on my farm.
lol – coincidence!?
I wouldn’t recommend using an umbrella in a thunderstorm! You can get some very good waterproof jackets for your camera these days.
If you are getting wet, you are in the wrong spot to shoot the storm, because you are in it. You need to be in front, behind, or adjacent to the storm to shoot the lightning. Next most essential tool to the camera itself is a laptop / iPhone / iPad with a weather radar feed to see where the storm is moving!
Wondeful explanation, thanks for the aperture guide, too!
“Be patient. Expect that most of your shots won’t work out.”
You can say that again! Last time I did lightning shots, I took 700 and got 2 good ones!
In response to your question about avoiding wind and rain, I recently shot lightning from my car. Setting up the tripod with such odd feet was its own challenge, but not having more than a window cracked just enough fo the lense to worry about when things got really heavy was a blessing.
I use a window mount (like you’d put a spotting scope on) for my camera when I’m out chasing storms. It allows me to remain in the safety and comfort of my truck and out of the rain. I also devised a camera cover using a large kitty litter bag and doing some plastic welding–much better than spending $30 on someone else’s plastic bag.
Here are a few examples of my results: https://www.flickr.com/photos/36775022@N00/sets/72157627052278374/
I did an internship with a videographer who parked and setup in carwash (quarter-style) to take weather shots. Worked out beautifully and we never even got damp.
Lightning.jpg
I use a Canon EOS 7D with a EF-S 10-18mm for shooting lightning. I set the lens to manual focus, 10mm, and focus on the horizon. I set the camera to manual and use 25 seconds and f/6.3 for the exposure. I use ISO 100 and set the drive to continuous. I connect a cable release, depress the button, and lock it down. With the drive set to continuous the camera keeps taking 25 second exposures until I release the button on the cable release. In April we had a lightning storm and I set the camera up and let it shoot for over an hour. There were 157 exposures, 43 of which had lightning. I’ve also found that you can take multiple individual photos of lightning strikes and combine them into one picture using your favorite HDR software.