Have you ever wondered how to shoot a beach portrait like a pro?
It's not difficult. But… it's also not as easy as you might think. Let's take a look at a few ways that you can shoot in order to get some great portraits on your local beach.
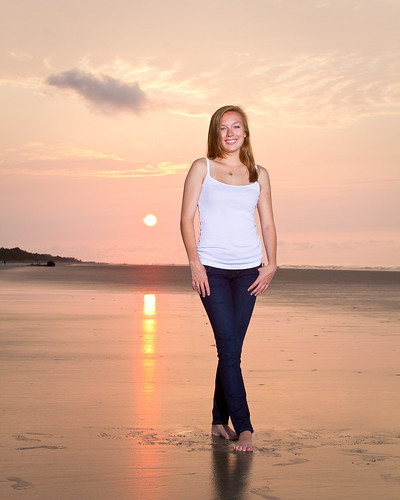
Walking Away by Kent DuFault, on Flickr
These are the steps to consider before you ever step foot onto the beach.
- What will be your location?
- What is the angle of the sun to your chosen shooting location?
- What time of day will you shoot?
- How will you handle weather issues?
- What clothing will your subjects wear?
- How will you pose your subjects?
- How difficult is the access to your chosen location?
- How will you light your subjects?
- Will you bring a helper?
- What poses will you attempt?
Let's examine each of these creative decisions one at a time.
How to Pick the Best Location
If you are familiar with your shooting location, this is an advantage. But don't fret if you aren't; pre-planning will keep you on-track for a successful shoot. Always visit the shooting location prior to your shoot. When you walk the beach, look for several things: A beautiful background. What the angle of the sun will be to your subjects. Will there be crowds of people? Will your subjects be able to walk to the location?
Finding a beautiful background is usually the easy part. You want to pay attention to the small details, however. Are there any trash cans, guardrails, buildings, cars, or other unsightly objects in your background. Once you've picked your location, you must decide whether it will be a morning, or evening, shoot.
You don't want the sun rising, or setting, directly into the face of your subjects, nor is it generally acceptable to place the sun directly behind them. If you expect crowds, is there a spot nearby that may be less crowded (perhaps further from the parking lot)? Finally, can all of your subjects walk to the location? Don't want to pick a location that requires a mile long walk if elderly grandparents are part of the group.
Access by Kent DuFault, on Flickr
What You Need to Know About The Angle of the Sun
A common mistake by beginning beach portrait photographers is to place their subjects looking directly into the sun, or to have them completely back-lit. There are times where these scenarios can work. But you should work those shots into your bigger plan. Generally you want some type of sidelight from the sun. This will use the sun to your advantage without making your subjects squint or in silhouette. If you have no external lighting equipment, (flash), keep the sun to the side of your subject, but to the front half of their face. This will provide a portrait lighting scenario of sidelight to Rembrandt. If you DO have an external flash, you can experiment with putting the sun to the side, but behind your subject. This will provide rim lighting, and your flash becomes the main light. Be aware that most built-in flash units will not be powerful enough to balance your exposure to the sun: especially in a complete backlit situation. It's also recommended to put the flash on a stand with a remote triggering system, or, on a bracket. This will give your flash exposure some modeling effect.
Posing by Kent DuFault, on Flickr
What Time of the Day Will You Shoot?
Plan on a sunrise, or sunset, shoot. If your chosen day ends up being overcast this opens you up to shooting when the sun is higher in the sky. But the overcast scenario is not preferable as it will make your photographs lackluster (low in contrast in saturation), and they will require a lot more Photoshop work to make them acceptable.
In the morning, the best time to start your shoot is about five minutes before sunrise. Have everyone arrive early so that you're on the beach and ready to shoot when the sun breaches the horizon. Once the sun is up, you'll have approximately 45 minutes before it will become too bright and your subjects will go ‘squinty'. In the evening, you will want to start approximately one hour before sunset. This will give your portraits that warm glow of the setting sun, and it will be less bright for your subjects to keep their eyes open.
Be sure to check and see what time the sun rises and sets on the day of your shoot. This time will change on a daily basis. So, you can't plan your shoot time in April and expect it to be right in June.
Weather Issues That You Will Need to Consider
There are two main weather concerns for the beach portrait photographer: wind and rain. Here is how to deal with the wind. Find a way to pose your subjects so they're facing into the wind. This will keep their hair from blowing in their face. Fly-away hair around the head can be easily dealt with in Photoshop. Another alternative is to give your subjects action oriented poses such as walking along the beach, jumping, running, etc. This helps conceal that the hair was flying around anyway.
Rain can be a shoot stopper. You can't shoot in the rain. But don't give up too easily. Sometimes the most beautiful beach portraits occur right after a rain storm breaks and the sun comes out. Always bring some plastic garbage bags to cover your equipment in case you're dodging rain showers.
What's The Best Clothing for Beach Portraiture?
Many beach portraits are shot with the subjects wearing white and khaki clothing. There is a reason for this: neutral earth tones work best. If you would like to incorporate some color try using blue, green, or black. Avoid bright red, yellow, or pink clothing as they dominate too much in the finished portrait. This is especially true if the sun provides a warm glow, as the light will over-saturate the color of the clothing.
Posing Triangle by Kent DuFault, on Flickr
Posing Your Models
Single subjects can posed in many ways, especially children. Your main concern will be to give them something to do. Don't just have them stand there with their hands dangling at their sides. Have them stand, sit, kneel, squat, jump, walk, run, look at you, look away from you, etc. With groups you want to pose them in a way that the heads form an X pattern or a triangular shape. And once again, make your groups active.
If you have a large group to photograph start with the entire group. Then break it down into individual families and finally the children alone. If grandparents are present, photograph them with all the kids. If there is a single aunt, or uncle, shoot them with all the kids. Remember that you need to work fast to get those precious expressions from the children.
Access to Your Shooting Location
Ask yourself these questions. Will there be enough parking? Will there be entry fees? If you have elderly folks, or special needs folks, will they be able to comfortably arrive at your shoot location. You don't want to start your shoot with tired sweaty subjects.
What You Need to Know About Lighting Your Beach Portraits
Reflectors are almost worthless in beach portraits unless you're bringing a crew with you. This is because there is almost always wind at the beach, and the wind turns those reflectors into huge sails.
A good STRONG flash is your best choice. You want to use that flash as a fill for the shadows created by the sun on the faces of your subjects. Balance your flash output so that it is from 1/2 stop to 1 stop brighter than the ambient exposure
Overcast by Kent DuFault, on Flickr
Can You Get Some Helpers?
A helper can be invaluable. It doesn't have to be a photographer; it could simply be a family friend. The helper provides a second set of eyes. They can also help corral children and keep everyone focused on the task at hand. If you are in the portrait, the helper can click the shutter and get everyone's attention, as opposed to a self-timer which is a total guess at the point of exposure. A helper can also keep an eye on your equipment, the ladies purses, and everyone's shoes. Nothing takes the fun out of a beach portrait session faster than a stolen purse or cell phone.
Posing X Shape by Kent DuFault, on Flickr
These tips should give you an excellent start as you make your way into beach portrait photography. Now get out and start practicing!
More Beach Photography Resources:
- Better Beach Photography. Make A Splash With These Tips On Gear, Settings, And Composition
- Photographing at the Beach: 10 Tips for Better Beach Photos
- 7 Quick Tips for Better Beach Photography
- How to Shoot a Picture Perfect Beach Portrait
- How to Photograph Beach Life for Great Shots
- 10 Tips To Create Beach Photos You’ve Only Dreamed About


18 Comments
Very helpful article, thank you for sharing!
You’re welcome!
Oh! I can’t wait to try!
Have fun!!
I love this. It’s perfect for what I am looking for, Thank you so much.
i will share this with all the members of our photo group.
You’re welcome.
To me it seems there is too much flash. I would with 1/2 to 2/3 under. Do not have a natural look.
People want to see the details of their face. Be careful you don’t make the facial details too dark.
Just a personal opinion, but this “khaki and white” theme is so bland. Throw some bold colors into those shots!
We recommend natural colors: khaki, white, blue, green, black. We tell clients to avoid bright colors such as pink, red, orange. We also recommend solid color over patterns.
Thank you for this information. Could you explain more why not bold color, and patterns?
thanks for the tips! totally wishing i lived near the ocean now 🙂
You will be ready the next time you’re there! 🙂
Kent, Just ignored my question earlier. I reread entire topic again and I do understand it now.
Thanks again,
Ethan
what will be the camera settings for this?
It’s also recommended to put the flash on a stand with a remote triggering system, or, on a bracket. This will give your flash exposure some modeling effect.
May I suggest that you Advise female subjects to wear a “nude”, or similar skin colored bra to avoid the white bra showing through the white shirt as seen in the portrait of the elderly couple.
good point!!!!
Kent, I have a Canon Rebel….is that camera good enough for a good family photo on the beach? I feel like I”m always playing around with settings and messing it up so I end up using my iphone in the end. Can a good Holiday worthy photo be taken with the iphone X camera or should I keep playing with my Rebel? Going to Naples in June and would like to get a good picture of the kids there for a holiday card. The thing with the Rebel is if I try hand the camera to someone to ask them for a quick family photo, they are quickly intimidated so my husband and I rarely make the yearly photo! LOL any tips?