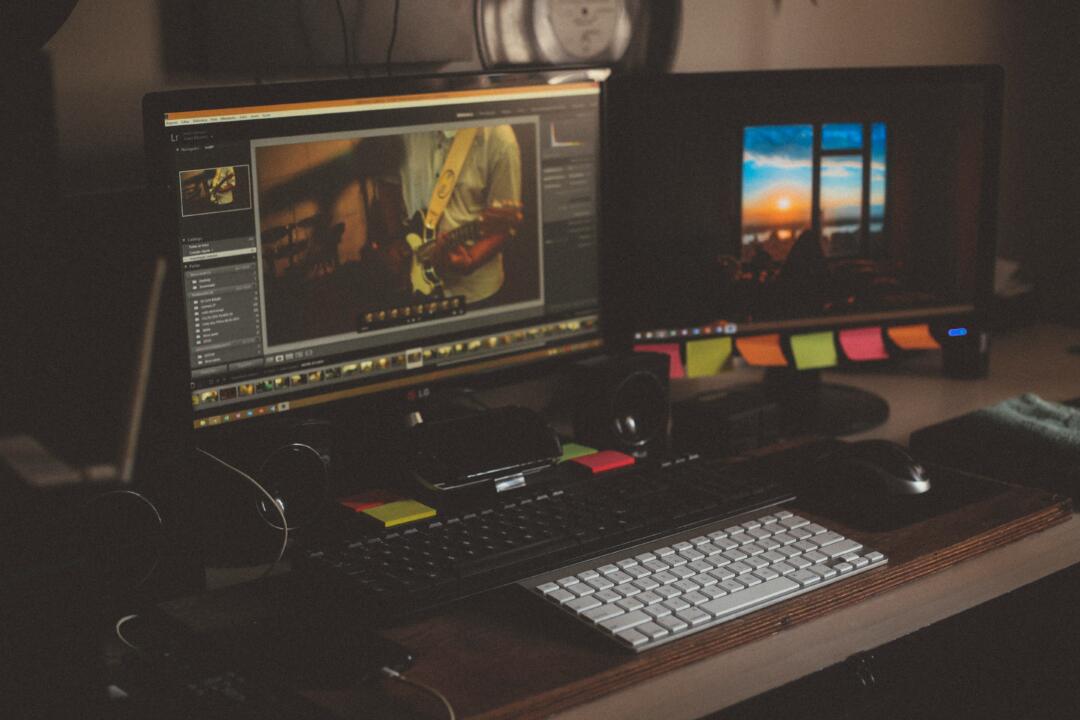
By default, we are used to Photoshop doing the heavy lifting, with all sorts of techniques and tricks being used. However, Lightroom is a tool that can’t be underestimated in this field too. Ok, it doesn’t have the flexibility that Photoshop does, but it's certainly very capable at retouching portraits.
Get It Right In Camera to Speed Up Your Work Flow (Big Time)
This applies whether using Lightroom, Photoshop, Gimp, Snapseed, or any photo editing software. You should always be keen on getting the picture perfect in the camera. That will save you time in post processing later on, and the less post processing you do, the more natural the picture feels, no matter how good of a photo editor you are. Therefore, don’t avoid proper makeup and proper hairstyle. They do wonders in achieving a great shot.
If you are still working on your camera craft for portraits and how to “get it right in camera” when shooting them, then you should take a look at Kent Dufault's excellent guide to the subject here. It will take you through the elements of composition and lighting that get you to the point at which post processing can simply add the final touches – just as photography should be done.
How To Recognize General Issues And Correct Them
There is no right or wrong way to do this. You’ll edit the picture in any way you please. However, it is good to know where the common issues arise and how to avoid them.
Whites
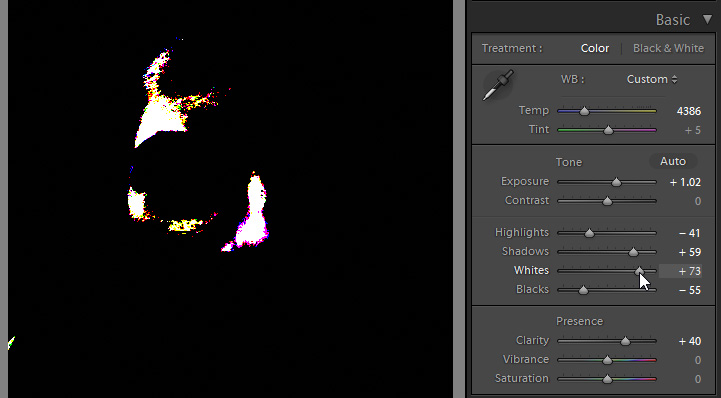
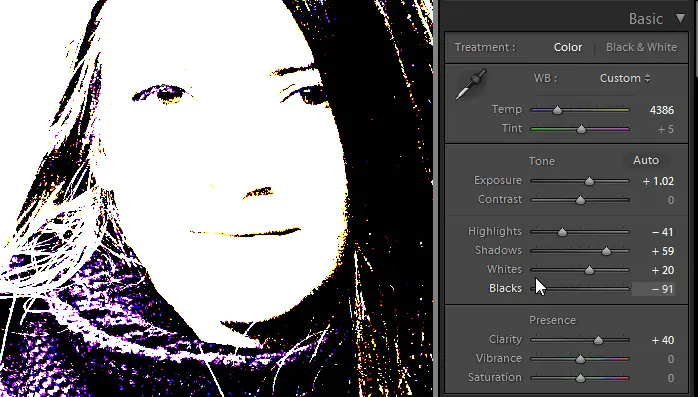
The Whites Slider basically pushes the white point of the image towards the clipping point. This means that it will brighten the picture. However, instead of working as exposure does, it somewhat creates contrast.
Pushing it too far will ruin the skin tones around the highlights areas. So, be very careful how far you push this slider. If you feel like the image is too dark and the tones start to crunch, maybe you need to use the exposure slider first.
Blacks
Even though it's harder to ruin the tones with the Blacks Slider, you’ll still need to be careful around the dark areas of the image, since it might add black specks. The most critical areas are around the eyes and the beginning of the hair line. Usually, there is a shadow that creates discoloration if pushed too hard.
Clarity
Clarity creates contrast in the mid tones only, meaning it acts as something between contrast and sharpening. Safe values are up to +30ish. Depending on the image you can go even further, but it is easy to overdo it and make it look like it went through a bad HDR filter.
Onto Editing Your Portrait In More Detail
Spot Removal
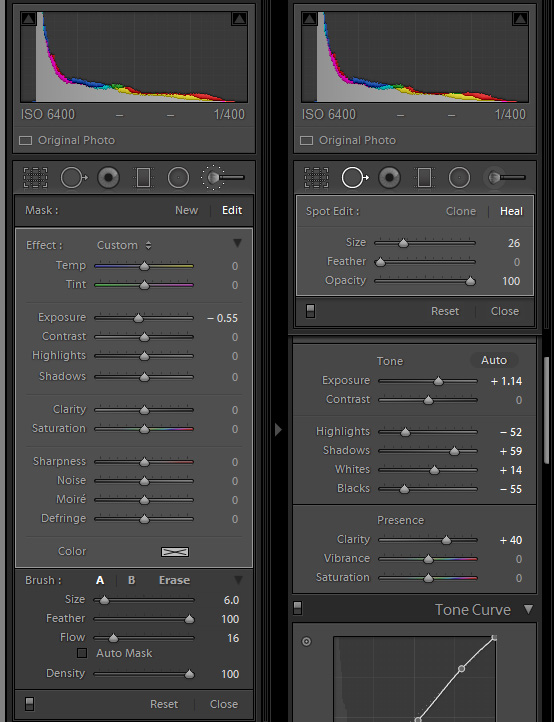
The Spot Removal Tool in Lightroom works in a manner that is between the Patch Tool and the Healing Brush Tool in Photoshop. It retains the brush features from the healing brush but has the ability to move the point of sampling similar to the patch tool. The advantage is that you can move the source and target area after the fact.
You can use this tool in various ways, but you can do even heavier lifting when compared to the healing brush tool, since you can control the opacity. For example, you can remove wrinkles without achieving an unrealistic look, since you can lower the opacity so the wrinkles aren’t completely removed, but rather just subdued.
Adjustment Brush
Probably the most powerful tool in Lightroom. It lets you do selective adjustments by painting with a brush. The adjustments use the RAW data therefore, you can do some quite powerful tweaks to your image with maximum quality possible.
You can use this to apply advanced dodging and burning, with the ability to change the amount. Plus, you can selectively recover or add highlights, shadows, clarity and so forth.
Using the Adjustment Brush with lowered clarity (something around -50) can be used to smoothen skin, but the value can vary depending on the portrait itself.
Let's Put What You've Learned Into Practice
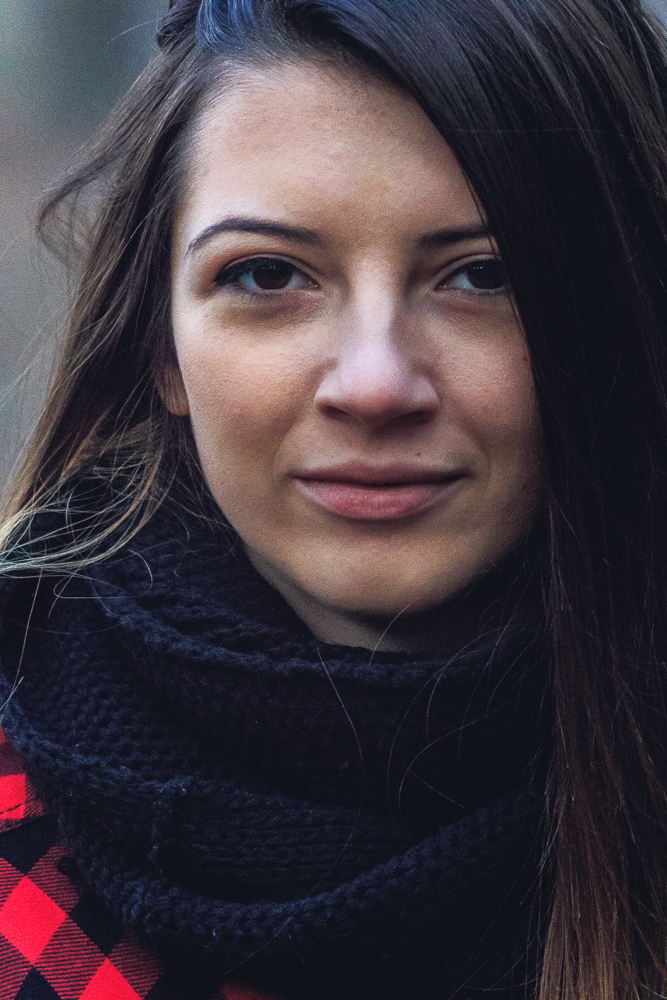
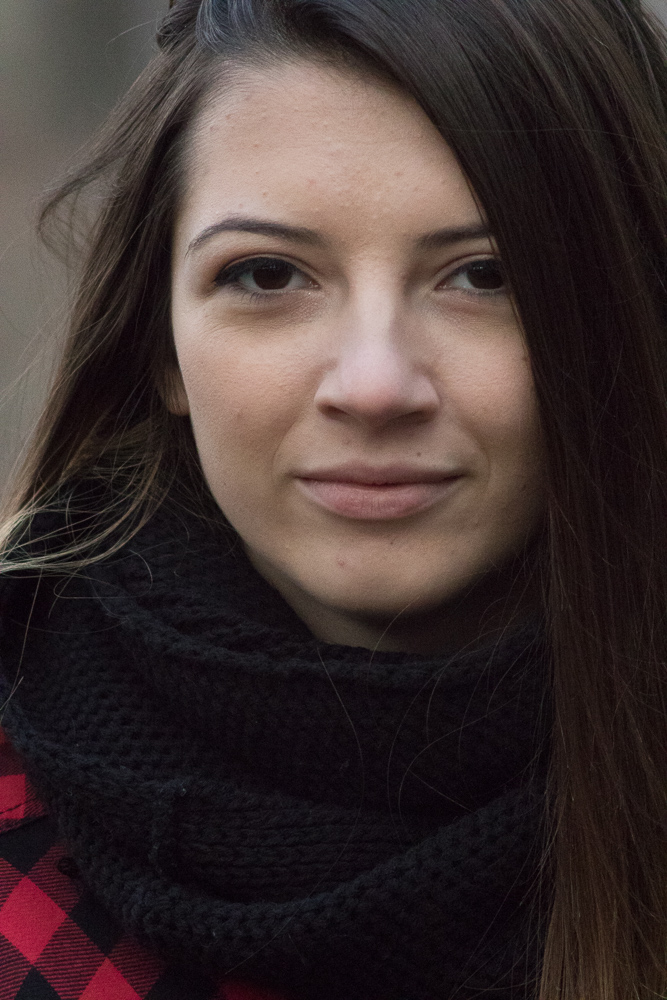
For this example, I’ll be using a picture that basically breaks most of the stuff mentioned before. The photo is just a casual shoot, no makeup artist, no professional hair dresser – basically an everyday outfit for the model, nothing more.
The light itself is not dramatic, then again the idea was casual photography, not a cover for a magazine.
General Adjustments
Camera Profiles
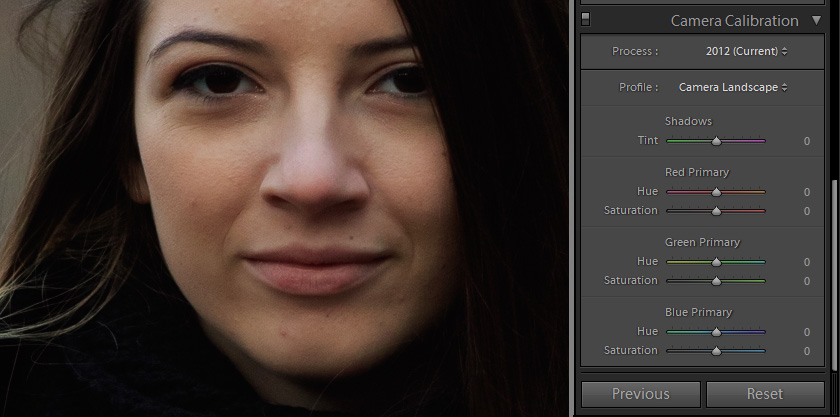
In this case, I’ve used Landscape profile for a portrait (I do like to live dangerously). But this is due to the fact that Portrait profile looks kind of weird in the skin tones. Not sure why, but this is happening often with the 7D Mark 2.
Anyhow, it is not the name that matters, it's the result. I like the color rendition of the Landscape profile and that is that.
Lens Corrections
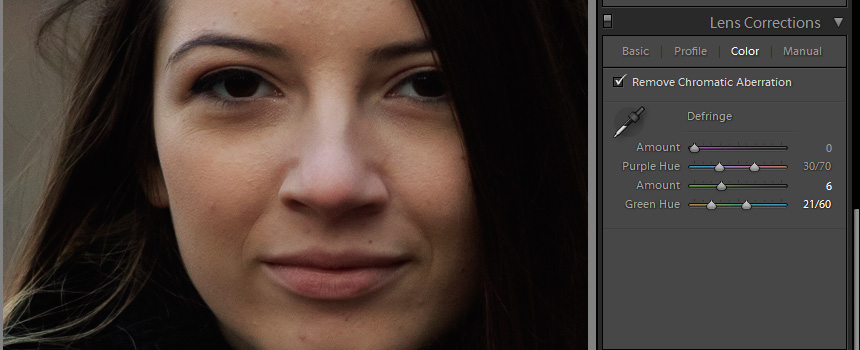
Since this photo was made with a vintage Zeiss 300mm f/4 lens (originally made for medium format) there is no lens profile available, and the fringing can’t be corrected sufficiently. Slightly, but not completely.
Sharpening & Noise Reduction
There isn’t much to be said here, other than the fact that this part is done purely by eye. I’ve increased the radius of the sharpening so it can catch the larger details as well (details bigger than 1 pixel, smaller than 2 pixels), other than that it is a standard sharpening setting.
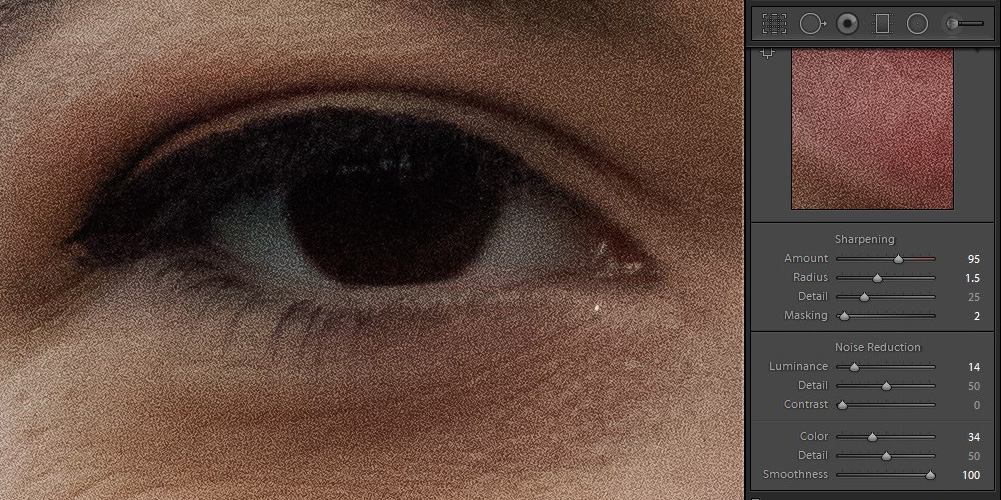
In an effort to avoid some of the color inconsistency (due to overcast weather), I’ve ramped up the color noise reduction (this part of the noise reduction doesn’t hurt the details that much, so you can safely do larger amounts if necessary). One important thing about color noise reduction is to stop when the color noise is gone. It won’t reduce luminance noise,
One important thing about color noise reduction is to stop when the color noise is gone. It won’t reduce luminance noise therefore, there is no need for higher values. As soon the color noise is gone, that amount is sufficient.
Highlights, Shadows, Tone Curve, Clarity, And Blacks And Whites
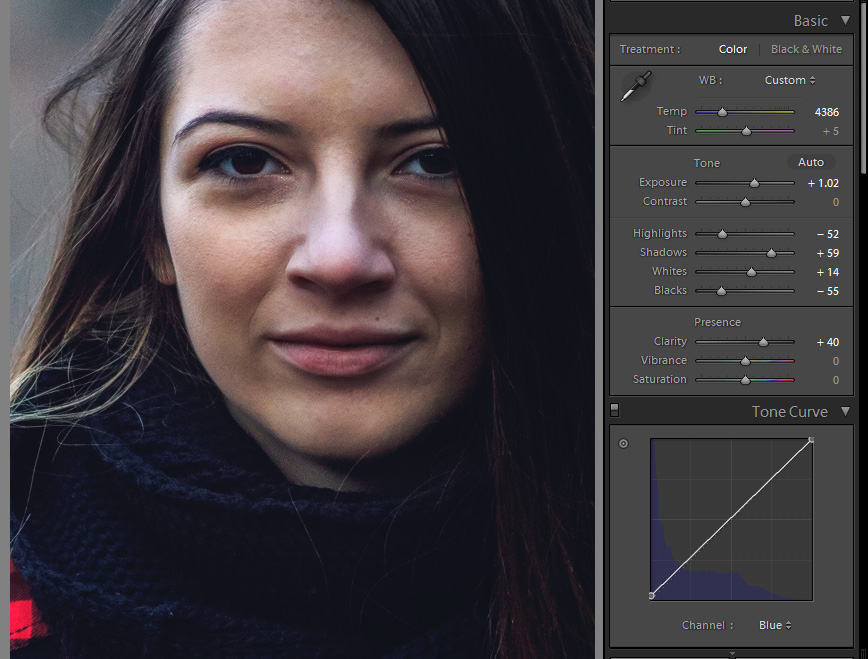
Following the same principle as before, skin tone was a tad too bright and basically falling apart in the highlights, thus the recovery with the highlight slider. I wanted to bring back some of the shadows which were close to clipping too, so I’ve increased the Shadows Slider.
I've also used Blacks & Whites following the exact same principles as mentioned before, to adjust the black and white points.
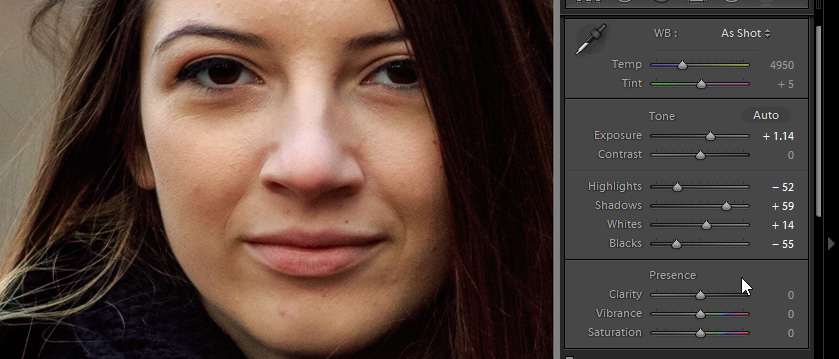
Clarity is being pushed to +40 to add more depth to the image. Due to the overcast weather and a tad flatter look, we can push Clarity higher, otherwise +40 would be way too much.
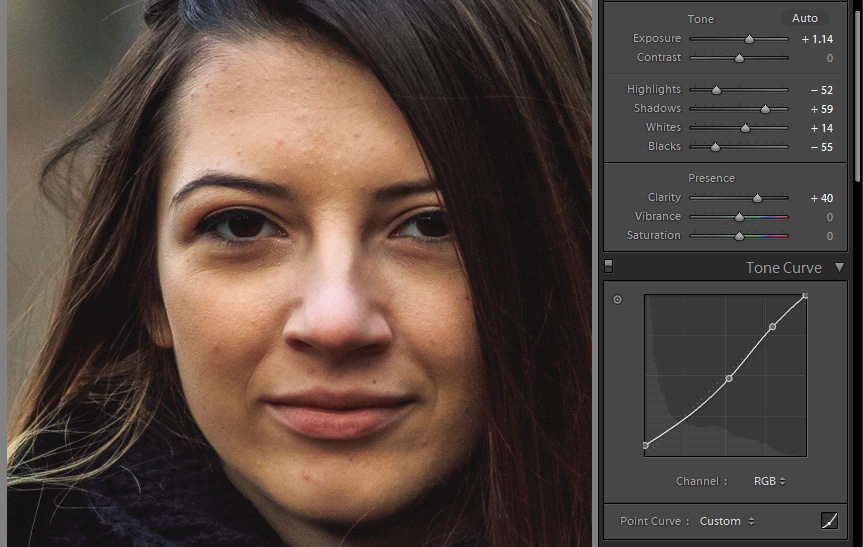
Tone curve has some fade and mid tones compression to enhance the contours and give it a slightly more natural feel.
So, we've learned that improving your Portrait Photography requires some patience but eventually the results you're after will really shine through. This Guide on The Art of Portrait Photography will no doubt give you that boost you're after in mastering the essentials.
Retouching And Refining Your Portrait
Spot Removal
This next edit is fairly simple to use, and we will be removing the blemishes one by one. This is a sort of an extreme case for edits like these, with proper makeup and light there would significantly less edits to do.
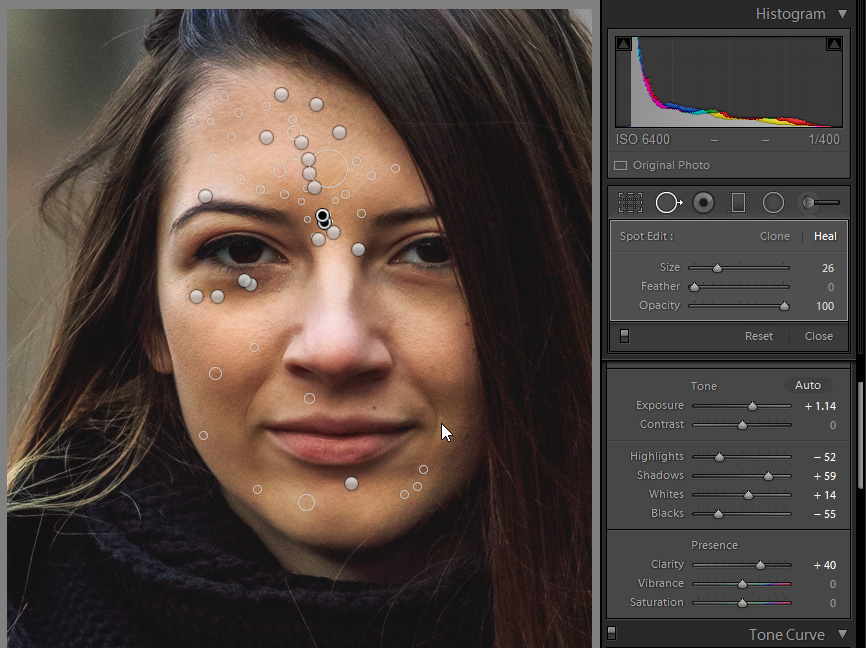
After several dozen spot removals, you can notice that there are pins all over the place. This is due to the fact that Lightroom will treat each brush stroke separately, and you can adjust each and every one separately. Which is quite neat.
One issue with that, which can bother many photographers, is the resource requirement. I’ve done something like 50 spot removal actions (a rough approximation), and it seems like Lightroom cannot handle more.
Once I turn off the tool (basically select another tool) it stops lagging and it works quite better (but far from smooth). This is a 20 megapixel RAW file from the Canon 7D mark 2. Lightroom already uses 100% of my i5 3570K @ 4GHZ, and more than 11GB of RAM.
This is not having a rant against Lightroom, because the resource consumption is probably justified. However, it is something to consider according to the system you are working with.
Adjustment Brush
When using the Adjustment Brush it is imperative not to be messy with it. Use one or two pins (one brush setting) for dodging, one or two for burning, and one for the skin repairs. Don’t create 15 pins with dodging, 20 with burning. You won’t be able to keep track of them. Of course, you’ll need more sometimes but minimize it as much as possible. It saves PC resources, and it makes it easier to remember which is which as well.
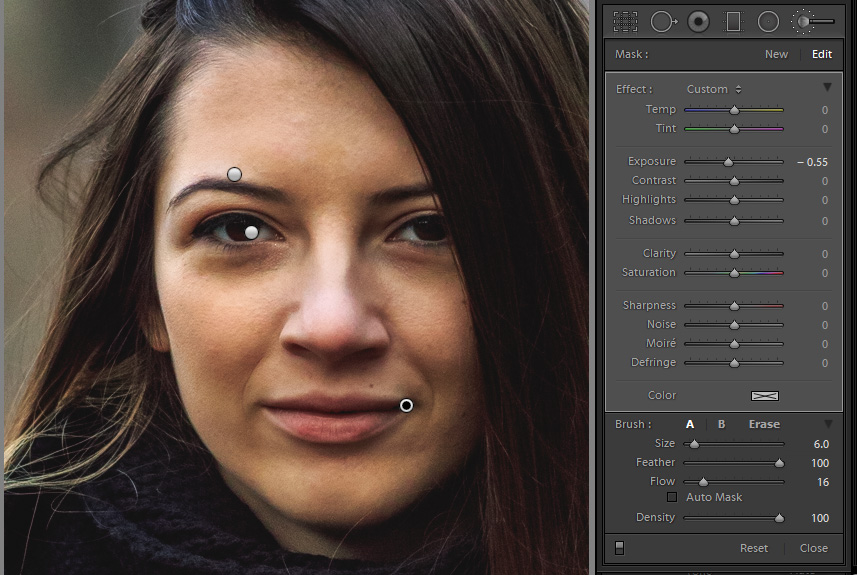
The Clarity Brush is a tad tricky. Sometimes if you need a more hardcore skin smoothing, it will reduce the general contrast on the skin. Therefore, you’ll have to counter that with the Contrast Slider and the Dehaze Slider as well (dehaze works similarly to clarity but it doesn’t sharpen as much) so you are basically countering the contrast loss but keeping the details loss in the skin.
Of course, you’ll have to exclude some areas, like the eyes, eyebrows, mouth, and so forth, in order to keep the important details there.
Final Touches
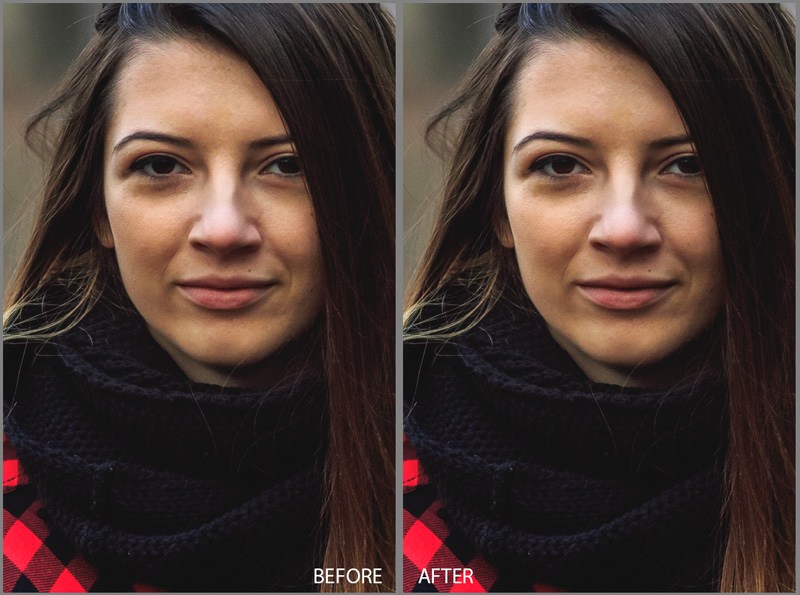
Two graduated filters from the side to bring the attention towards the face of the model, and some slight tone curve adjustments to act as a color grade. Exposure is reduced as well to achieve a darker look.
I’ve also modified the White Balance towards the cooler side, and a slight hint of blue in the shadows, in order to simulate the time of the day. And that's everything.
To Summarize Everything
It may seem counter-intuitive, but Lightroom is capable of some heavy edits. It does it slightly differently than Photoshop, and some of the tools work quite a bit slower than Photoshop (however, they do grant you non-destructive workflow).
If you understand how Lightroom operates, you’ll be able to do quick portrait edits on the fly. Being able to do everything in one software solution (instead of bouncing around several applications) saves quite a lot of time (except, of course, if Lightroom starts to hang).
Any comments welcomed below.

Further Resources on Portrait Photography
- The Art Of Portrait Photography by Kent DuFault. Get ready to absolutely transform your portraits…
- Steele Training Lightroom Made Easy by Phil Steele. Master the Lightroom skills and secret pro tricks that will transform your photos today!
- Steele Training Headshots With Speedlights by Phil Steele. Learn to Shoot Studio-Quality Portraits with Your SLR Camera and Flash. Lightroom“size-full wp-image-446770″ src=”https://www.lightstalking.com/wp-content/uploads/joao-silas-EpJOBZNzrVo-unsplash-1-scaled.jpg” alt=”” width=”2048″ height=”1365″ /> João Silas[/caption]
- The Art Of Portrait Photography by Kent DuFault. Get ready to absolutely transform your portraits…
- Steele Training Lightroom Made Easy by Phil Steele. Master the Lightroom skills and secret pro tricks that will transform your photos today!
- Steele Training Headshots With Speedlights by Phil Steele. Learn to Shoot Studio-Quality Portraits with Your SLR Camera and Flash. Lightroom
- The Art Of Portrait Photography by Kent DuFault. Get ready to absolutely transform your portraits…
- Steele Training Lightroom Made Easy by Phil Steele. Master the Lightroom skills and secret pro tricks that will transform your photos today!
- Steele Training Headshots With Speedlights by Phil Steele. Learn to Shoot Studio-Quality Portraits with Your SLR Camera and Flash. Lightroom“size-full wp-image-446770″ src=”https://www.lightstalking.com/wp-content/uploads/joao-silas-EpJOBZNzrVo-unsplash-1-scaled.jpg” alt=”” width=”2048″ height=”1365″ /> João Silas[/caption]
- The Art Of Portrait Photography by Kent DuFault. Get ready to absolutely transform your portraits…
- Steele Training Lightroom Made Easy by Phil Steele. Master the Lightroom skills and secret pro tricks that will transform your photos today!
- Steele Training Headshots With Speedlights by Phil Steele. Learn to Shoot Studio-Quality Portraits with Your SLR Camera and Flash.
By default, we are used to Photoshop doing the heavy lifting, with all sorts of techniques and tricks being used. However, Lightroom is a tool that can’t be underestimated in this field too. Ok, it doesn’t have the flexibility that Photoshop does, but it's certainly very capable at retouching portraits.
Get It Right In Camera to Speed Up Your Work Flow (Big Time)
This applies whether using Lightroom, Photoshop, Gimp, Snapseed, or any photo editing software. You should always be keen on getting the picture perfect in the camera. That will save you time in post processing later on, and the less post processing you do, the more natural the picture feels, no matter how good of a photo editor you are. Therefore, don’t avoid proper makeup and proper hairstyle. They do wonders in achieving a great shot.
If you are still working on your camera craft for portraits and how to “get it right in camera” when shooting them, then you should take a look at Kent Dufault's excellent guide to the subject here. It will take you through the elements of composition and lighting that get you to the point at which post processing can simply add the final touches – just as photography should be done.

How To Recognize General Issues And Correct Them
There is no right or wrong way to do this. You’ll edit the picture in any way you please. However, it is good to know where the common issues arise and how to avoid them.
Whites
The Whites Slider basically pushes the white point of the image towards the clipping point. This means that it will brighten the picture. However, instead of working as exposure does, it somewhat creates contrast.
Pushing it too far will ruin the skin tones around the highlights areas. So, be very careful how far you push this slider. If you feel like the image is too dark and the tones start to crunch, maybe you need to use the exposure slider first.

Blacks
Even though it's harder to ruin the tones with the Blacks Slider, you’ll still need to be careful around the dark areas of the image, since it might add black specks. The most critical areas are around the eyes and the beginning of the hair line. Usually, there is a shadow that creates discoloration if pushed too hard.

Clarity
Clarity creates contrast in the mid tones only, meaning it acts as something between contrast and sharpening. Safe values are up to +30ish. Depending on the image you can go even further, but it is easy to overdo it and make it look like it went through a bad HDR filter.
Onto Editing Your Portrait In More Detail
Spot Removal
The Spot Removal Tool in Lightroom works in a manner that is between the Patch Tool and the Healing Brush Tool in Photoshop. It retains the brush features from the healing brush but has the ability to move the point of sampling similar to the patch tool. The advantage is that you can move the source and target area after the fact.
You can use this tool in various ways, but you can do even heavier lifting when compared to the healing brush tool, since you can control the opacity. For example, you can remove wrinkles without achieving an unrealistic look, since you can lower the opacity so the wrinkles aren’t completely removed, but rather just subdued.

Adjustment Brush
Probably the most powerful tool in Lightroom. It lets you do selective adjustments by painting with a brush. The adjustments use the RAW data therefore, you can do some quite powerful tweaks to your image with maximum quality possible.
You can use this to apply advanced dodging and burning, with the ability to change the amount. Plus, you can selectively recover or add highlights, shadows, clarity and so forth.
Using the Adjustment Brush with lowered clarity (something around -50) can be used to smoothen skin, but the value can vary depending on the portrait itself.
Let's Put What You've Learned Into Practice
For this example, I’ll be using a picture that basically breaks most of the stuff mentioned before. The photo is just a casual shoot, no makeup artist, no professional hair dresser – basically an everyday outfit for the model, nothing more.
The light itself is not dramatic, then again the idea was casual photography, not a cover for a magazine.
General Adjustments
Camera Profiles
In this case, I’ve used Landscape profile for a portrait (I do like to live dangerously). But this is due to the fact that Portrait profile looks kind of weird in the skin tones. Not sure why, but this is happening often with the 7D Mark 2.
Anyhow, it is not the name that matters, it's the result. I like the color rendition of the Landscape profile and that is that.

Lens Corrections
Since this photo was made with a vintage Zeiss 300mm f/4 lens (originally made for medium format) there is no lens profile available, and the fringing can’t be corrected sufficiently. Slightly, but not completely.

Sharpening & Noise Reduction
There isn’t much to be said here, other than the fact that this part is done purely by eye. I’ve increased the radius of the sharpening so it can catch the larger details as well (details bigger than 1 pixel, smaller than 2 pixels), other than that it is a standard sharpening setting.

In an effort to avoid some of the color inconsistency (due to overcast weather), I’ve ramped up the color noise reduction (this part of the noise reduction doesn’t hurt the details that much, so you can safely do larger amounts if necessary). One important thing about color noise reduction is to stop when the color noise is gone. It won’t reduce luminance noise,
One important thing about color noise reduction is to stop when the color noise is gone. It won’t reduce luminance noise therefore, there is no need for higher values. As soon the color noise is gone, that amount is sufficient.
Highlights, Shadows, Tone Curve, Clarity, And Blacks And Whites
Following the same principle as before, skin tone was a tad too bright and basically falling apart in the highlights, thus the recovery with the highlight slider. I wanted to bring back some of the shadows which were close to clipping too, so I’ve increased the Shadows Slider.
I've also used Blacks & Whites following the exact same principles as mentioned before, to adjust the black and white points.

Clarity is being pushed to +40 to add more depth to the image. Due to the overcast weather and a tad flatter look, we can push Clarity higher, otherwise +40 would be way too much.

Tone curve has some fade and mid tones compression to enhance the contours and give it a slightly more natural feel.
So, we've learned that improving your Portrait Photography requires some patience but eventually the results you're after will really shine through. This Guide on The Art of Portrait Photography will no doubt give you that boost you're after in mastering the essentials.
Retouching And Refining Your Portrait
Spot Removal
This next edit is fairly simple to use, and we will be removing the blemishes one by one. This is a sort of an extreme case for edits like these, with proper makeup and light there would significantly less edits to do.

After several dozen spot removals, you can notice that there are pins all over the place. This is due to the fact that Lightroom will treat each brush stroke separately, and you can adjust each and every one separately. Which is quite neat.
One issue with that, which can bother many photographers, is the resource requirement. I’ve done something like 50 spot removal actions (a rough approximation), and it seems like Lightroom cannot handle more.
Once I turn off the tool (basically select another tool) it stops lagging and it works quite better (but far from smooth). This is a 20 megapixel RAW file from the Canon 7D mark 2. Lightroom already uses 100% of my i5 3570K @ 4GHZ, and more than 11GB of RAM.
This is not having a rant against Lightroom, because the resource consumption is probably justified. However, it is something to consider according to the system you are working with.
Adjustment Brush
When using the Adjustment Brush it is imperative not to be messy with it. Use one or two pins (one brush setting) for dodging, one or two for burning, and one for the skin repairs. Don’t create 15 pins with dodging, 20 with burning. You won’t be able to keep track of them. Of course, you’ll need more sometimes but minimize it as much as possible. It saves PC resources, and it makes it easier to remember which is which as well.

The Clarity Brush is a tad tricky. Sometimes if you need a more hardcore skin smoothing, it will reduce the general contrast on the skin. Therefore, you’ll have to counter that with the Contrast Slider and the Dehaze Slider as well (dehaze works similarly to clarity but it doesn’t sharpen as much) so you are basically countering the contrast loss but keeping the details loss in the skin.
Of course, you’ll have to exclude some areas, like the eyes, eyebrows, mouth, and so forth, in order to keep the important details there.

Final Touches
Two graduated filters from the side to bring the attention towards the face of the model, and some slight tone curve adjustments to act as a color grade. Exposure is reduced as well to achieve a darker look.
I’ve also modified the White Balance towards the cooler side, and a slight hint of blue in the shadows, in order to simulate the time of the day. And that's everything.

To Summarize Everything
It may seem counter-intuitive, but Lightroom is capable of some heavy edits. It does it slightly differently than Photoshop, and some of the tools work quite a bit slower than Photoshop (however, they do grant you non-destructive workflow).
If you understand how Lightroom operates, you’ll be able to do quick portrait edits on the fly. Being able to do everything in one software solution (instead of bouncing around several applications) saves quite a lot of time (except, of course, if Lightroom starts to hang).
Any comments welcomed below.

Further Resources on Portrait Photography
By default, we are used to Photoshop doing the heavy lifting, with all sorts of techniques and tricks being used. However, Lightroom is a tool that can’t be underestimated in this field too. Ok, it doesn’t have the flexibility that Photoshop does, but it's certainly very capable at retouching portraits.
Get It Right In Camera to Speed Up Your Work Flow (Big Time)
This applies whether using Lightroom, Photoshop, Gimp, Snapseed, or any photo editing software. You should always be keen on getting the picture perfect in the camera. That will save you time in post processing later on, and the less post processing you do, the more natural the picture feels, no matter how good of a photo editor you are. Therefore, don’t avoid proper makeup and proper hairstyle. They do wonders in achieving a great shot.
If you are still working on your camera craft for portraits and how to “get it right in camera” when shooting them, then you should take a look at Kent Dufault's excellent guide to the subject here. It will take you through the elements of composition and lighting that get you to the point at which post processing can simply add the final touches – just as photography should be done.

How To Recognize General Issues And Correct Them
There is no right or wrong way to do this. You’ll edit the picture in any way you please. However, it is good to know where the common issues arise and how to avoid them.
Whites
The Whites Slider basically pushes the white point of the image towards the clipping point. This means that it will brighten the picture. However, instead of working as exposure does, it somewhat creates contrast.
Pushing it too far will ruin the skin tones around the highlights areas. So, be very careful how far you push this slider. If you feel like the image is too dark and the tones start to crunch, maybe you need to use the exposure slider first.

Blacks
Even though it's harder to ruin the tones with the Blacks Slider, you’ll still need to be careful around the dark areas of the image, since it might add black specks. The most critical areas are around the eyes and the beginning of the hair line. Usually, there is a shadow that creates discoloration if pushed too hard.

Clarity
Clarity creates contrast in the mid tones only, meaning it acts as something between contrast and sharpening. Safe values are up to +30ish. Depending on the image you can go even further, but it is easy to overdo it and make it look like it went through a bad HDR filter.
Onto Editing Your Portrait In More Detail
Spot Removal
The Spot Removal Tool in Lightroom works in a manner that is between the Patch Tool and the Healing Brush Tool in Photoshop. It retains the brush features from the healing brush but has the ability to move the point of sampling similar to the patch tool. The advantage is that you can move the source and target area after the fact.
You can use this tool in various ways, but you can do even heavier lifting when compared to the healing brush tool, since you can control the opacity. For example, you can remove wrinkles without achieving an unrealistic look, since you can lower the opacity so the wrinkles aren’t completely removed, but rather just subdued.

Adjustment Brush
Probably the most powerful tool in Lightroom. It lets you do selective adjustments by painting with a brush. The adjustments use the RAW data therefore, you can do some quite powerful tweaks to your image with maximum quality possible.
You can use this to apply advanced dodging and burning, with the ability to change the amount. Plus, you can selectively recover or add highlights, shadows, clarity and so forth.
Using the Adjustment Brush with lowered clarity (something around -50) can be used to smoothen skin, but the value can vary depending on the portrait itself.
Let's Put What You've Learned Into Practice
For this example, I’ll be using a picture that basically breaks most of the stuff mentioned before. The photo is just a casual shoot, no makeup artist, no professional hair dresser – basically an everyday outfit for the model, nothing more.
The light itself is not dramatic, then again the idea was casual photography, not a cover for a magazine.
General Adjustments
Camera Profiles
In this case, I’ve used Landscape profile for a portrait (I do like to live dangerously). But this is due to the fact that Portrait profile looks kind of weird in the skin tones. Not sure why, but this is happening often with the 7D Mark 2.
Anyhow, it is not the name that matters, it's the result. I like the color rendition of the Landscape profile and that is that.

Lens Corrections
Since this photo was made with a vintage Zeiss 300mm f/4 lens (originally made for medium format) there is no lens profile available, and the fringing can’t be corrected sufficiently. Slightly, but not completely.

Sharpening & Noise Reduction
There isn’t much to be said here, other than the fact that this part is done purely by eye. I’ve increased the radius of the sharpening so it can catch the larger details as well (details bigger than 1 pixel, smaller than 2 pixels), other than that it is a standard sharpening setting.

In an effort to avoid some of the color inconsistency (due to overcast weather), I’ve ramped up the color noise reduction (this part of the noise reduction doesn’t hurt the details that much, so you can safely do larger amounts if necessary). One important thing about color noise reduction is to stop when the color noise is gone. It won’t reduce luminance noise,
One important thing about color noise reduction is to stop when the color noise is gone. It won’t reduce luminance noise therefore, there is no need for higher values. As soon the color noise is gone, that amount is sufficient.
Highlights, Shadows, Tone Curve, Clarity, And Blacks And Whites
Following the same principle as before, skin tone was a tad too bright and basically falling apart in the highlights, thus the recovery with the highlight slider. I wanted to bring back some of the shadows which were close to clipping too, so I’ve increased the Shadows Slider.
I've also used Blacks & Whites following the exact same principles as mentioned before, to adjust the black and white points.

Clarity is being pushed to +40 to add more depth to the image. Due to the overcast weather and a tad flatter look, we can push Clarity higher, otherwise +40 would be way too much.

Tone curve has some fade and mid tones compression to enhance the contours and give it a slightly more natural feel.
So, we've learned that improving your Portrait Photography requires some patience but eventually the results you're after will really shine through. This Guide on The Art of Portrait Photography will no doubt give you that boost you're after in mastering the essentials.
Retouching And Refining Your Portrait
Spot Removal
This next edit is fairly simple to use, and we will be removing the blemishes one by one. This is a sort of an extreme case for edits like these, with proper makeup and light there would significantly less edits to do.

After several dozen spot removals, you can notice that there are pins all over the place. This is due to the fact that Lightroom will treat each brush stroke separately, and you can adjust each and every one separately. Which is quite neat.
One issue with that, which can bother many photographers, is the resource requirement. I’ve done something like 50 spot removal actions (a rough approximation), and it seems like Lightroom cannot handle more.
Once I turn off the tool (basically select another tool) it stops lagging and it works quite better (but far from smooth). This is a 20 megapixel RAW file from the Canon 7D mark 2. Lightroom already uses 100% of my i5 3570K @ 4GHZ, and more than 11GB of RAM.
This is not having a rant against Lightroom, because the resource consumption is probably justified. However, it is something to consider according to the system you are working with.
Adjustment Brush
When using the Adjustment Brush it is imperative not to be messy with it. Use one or two pins (one brush setting) for dodging, one or two for burning, and one for the skin repairs. Don’t create 15 pins with dodging, 20 with burning. You won’t be able to keep track of them. Of course, you’ll need more sometimes but minimize it as much as possible. It saves PC resources, and it makes it easier to remember which is which as well.

The Clarity Brush is a tad tricky. Sometimes if you need a more hardcore skin smoothing, it will reduce the general contrast on the skin. Therefore, you’ll have to counter that with the Contrast Slider and the Dehaze Slider as well (dehaze works similarly to clarity but it doesn’t sharpen as much) so you are basically countering the contrast loss but keeping the details loss in the skin.
Of course, you’ll have to exclude some areas, like the eyes, eyebrows, mouth, and so forth, in order to keep the important details there.

Final Touches
Two graduated filters from the side to bring the attention towards the face of the model, and some slight tone curve adjustments to act as a color grade. Exposure is reduced as well to achieve a darker look.
I’ve also modified the White Balance towards the cooler side, and a slight hint of blue in the shadows, in order to simulate the time of the day. And that's everything.

To Summarize Everything
It may seem counter-intuitive, but Lightroom is capable of some heavy edits. It does it slightly differently than Photoshop, and some of the tools work quite a bit slower than Photoshop (however, they do grant you non-destructive workflow).
If you understand how Lightroom operates, you’ll be able to do quick portrait edits on the fly. Being able to do everything in one software solution (instead of bouncing around several applications) saves quite a lot of time (except, of course, if Lightroom starts to hang).
Any comments welcomed below.

Further Resources on Portrait Photography
By default, we are used to Photoshop doing the heavy lifting, with all sorts of techniques and tricks being used. However, Lightroom is a tool that can’t be underestimated in this field too. Ok, it doesn’t have the flexibility that Photoshop does, but it's certainly very capable at retouching portraits.
Get It Right In Camera to Speed Up Your Work Flow (Big Time)
This applies whether using Lightroom, Photoshop, Gimp, Snapseed, or any photo editing software. You should always be keen on getting the picture perfect in the camera. That will save you time in post processing later on, and the less post processing you do, the more natural the picture feels, no matter how good of a photo editor you are. Therefore, don’t avoid proper makeup and proper hairstyle. They do wonders in achieving a great shot.
If you are still working on your camera craft for portraits and how to “get it right in camera” when shooting them, then you should take a look at Kent Dufault's excellent guide to the subject here. It will take you through the elements of composition and lighting that get you to the point at which post processing can simply add the final touches – just as photography should be done.

How To Recognize General Issues And Correct Them
There is no right or wrong way to do this. You’ll edit the picture in any way you please. However, it is good to know where the common issues arise and how to avoid them.
Whites
The Whites Slider basically pushes the white point of the image towards the clipping point. This means that it will brighten the picture. However, instead of working as exposure does, it somewhat creates contrast.
Pushing it too far will ruin the skin tones around the highlights areas. So, be very careful how far you push this slider. If you feel like the image is too dark and the tones start to crunch, maybe you need to use the exposure slider first.

Blacks
Even though it's harder to ruin the tones with the Blacks Slider, you’ll still need to be careful around the dark areas of the image, since it might add black specks. The most critical areas are around the eyes and the beginning of the hair line. Usually, there is a shadow that creates discoloration if pushed too hard.

Clarity
Clarity creates contrast in the mid tones only, meaning it acts as something between contrast and sharpening. Safe values are up to +30ish. Depending on the image you can go even further, but it is easy to overdo it and make it look like it went through a bad HDR filter.
Onto Editing Your Portrait In More Detail
Spot Removal
The Spot Removal Tool in Lightroom works in a manner that is between the Patch Tool and the Healing Brush Tool in Photoshop. It retains the brush features from the healing brush but has the ability to move the point of sampling similar to the patch tool. The advantage is that you can move the source and target area after the fact.
You can use this tool in various ways, but you can do even heavier lifting when compared to the healing brush tool, since you can control the opacity. For example, you can remove wrinkles without achieving an unrealistic look, since you can lower the opacity so the wrinkles aren’t completely removed, but rather just subdued.

Adjustment Brush
Probably the most powerful tool in Lightroom. It lets you do selective adjustments by painting with a brush. The adjustments use the RAW data therefore, you can do some quite powerful tweaks to your image with maximum quality possible.
You can use this to apply advanced dodging and burning, with the ability to change the amount. Plus, you can selectively recover or add highlights, shadows, clarity and so forth.
Using the Adjustment Brush with lowered clarity (something around -50) can be used to smoothen skin, but the value can vary depending on the portrait itself.
Let's Put What You've Learned Into Practice
For this example, I’ll be using a picture that basically breaks most of the stuff mentioned before. The photo is just a casual shoot, no makeup artist, no professional hair dresser – basically an everyday outfit for the model, nothing more.
The light itself is not dramatic, then again the idea was casual photography, not a cover for a magazine.
General Adjustments
Camera Profiles
In this case, I’ve used Landscape profile for a portrait (I do like to live dangerously). But this is due to the fact that Portrait profile looks kind of weird in the skin tones. Not sure why, but this is happening often with the 7D Mark 2.
Anyhow, it is not the name that matters, it's the result. I like the color rendition of the Landscape profile and that is that.

Lens Corrections
Since this photo was made with a vintage Zeiss 300mm f/4 lens (originally made for medium format) there is no lens profile available, and the fringing can’t be corrected sufficiently. Slightly, but not completely.

Sharpening & Noise Reduction
There isn’t much to be said here, other than the fact that this part is done purely by eye. I’ve increased the radius of the sharpening so it can catch the larger details as well (details bigger than 1 pixel, smaller than 2 pixels), other than that it is a standard sharpening setting.

In an effort to avoid some of the color inconsistency (due to overcast weather), I’ve ramped up the color noise reduction (this part of the noise reduction doesn’t hurt the details that much, so you can safely do larger amounts if necessary). One important thing about color noise reduction is to stop when the color noise is gone. It won’t reduce luminance noise,
One important thing about color noise reduction is to stop when the color noise is gone. It won’t reduce luminance noise therefore, there is no need for higher values. As soon the color noise is gone, that amount is sufficient.
Highlights, Shadows, Tone Curve, Clarity, And Blacks And Whites
Following the same principle as before, skin tone was a tad too bright and basically falling apart in the highlights, thus the recovery with the highlight slider. I wanted to bring back some of the shadows which were close to clipping too, so I’ve increased the Shadows Slider.
I've also used Blacks & Whites following the exact same principles as mentioned before, to adjust the black and white points.

Clarity is being pushed to +40 to add more depth to the image. Due to the overcast weather and a tad flatter look, we can push Clarity higher, otherwise +40 would be way too much.

Tone curve has some fade and mid tones compression to enhance the contours and give it a slightly more natural feel.
So, we've learned that improving your Portrait Photography requires some patience but eventually the results you're after will really shine through. This Guide on The Art of Portrait Photography will no doubt give you that boost you're after in mastering the essentials.
Retouching And Refining Your Portrait
Spot Removal
This next edit is fairly simple to use, and we will be removing the blemishes one by one. This is a sort of an extreme case for edits like these, with proper makeup and light there would significantly less edits to do.

After several dozen spot removals, you can notice that there are pins all over the place. This is due to the fact that Lightroom will treat each brush stroke separately, and you can adjust each and every one separately. Which is quite neat.
One issue with that, which can bother many photographers, is the resource requirement. I’ve done something like 50 spot removal actions (a rough approximation), and it seems like Lightroom cannot handle more.
Once I turn off the tool (basically select another tool) it stops lagging and it works quite better (but far from smooth). This is a 20 megapixel RAW file from the Canon 7D mark 2. Lightroom already uses 100% of my i5 3570K @ 4GHZ, and more than 11GB of RAM.
This is not having a rant against Lightroom, because the resource consumption is probably justified. However, it is something to consider according to the system you are working with.
Adjustment Brush
When using the Adjustment Brush it is imperative not to be messy with it. Use one or two pins (one brush setting) for dodging, one or two for burning, and one for the skin repairs. Don’t create 15 pins with dodging, 20 with burning. You won’t be able to keep track of them. Of course, you’ll need more sometimes but minimize it as much as possible. It saves PC resources, and it makes it easier to remember which is which as well.

The Clarity Brush is a tad tricky. Sometimes if you need a more hardcore skin smoothing, it will reduce the general contrast on the skin. Therefore, you’ll have to counter that with the Contrast Slider and the Dehaze Slider as well (dehaze works similarly to clarity but it doesn’t sharpen as much) so you are basically countering the contrast loss but keeping the details loss in the skin.
Of course, you’ll have to exclude some areas, like the eyes, eyebrows, mouth, and so forth, in order to keep the important details there.

Final Touches
Two graduated filters from the side to bring the attention towards the face of the model, and some slight tone curve adjustments to act as a color grade. Exposure is reduced as well to achieve a darker look.
I’ve also modified the White Balance towards the cooler side, and a slight hint of blue in the shadows, in order to simulate the time of the day. And that's everything.

To Summarize Everything
It may seem counter-intuitive, but Lightroom is capable of some heavy edits. It does it slightly differently than Photoshop, and some of the tools work quite a bit slower than Photoshop (however, they do grant you non-destructive workflow).
If you understand how Lightroom operates, you’ll be able to do quick portrait edits on the fly. Being able to do everything in one software solution (instead of bouncing around several applications) saves quite a lot of time (except, of course, if Lightroom starts to hang).
Any comments welcomed below.

Further Resources on Portrait Photography
 João Silas[/caption]
By default, we are used to Photoshop doing the heavy lifting, with all sorts of techniques and tricks being used. However, Lightroom is a tool that can’t be underestimated in this field too. Ok, it doesn’t have the flexibility that Photoshop does, but it's certainly very capable at retouching portraits.
Get It Right In Camera to Speed Up Your Work Flow (Big Time)
This applies whether using Lightroom, Photoshop, Gimp, Snapseed, or any photo editing software. You should always be keen on getting the picture perfect in the camera. That will save you time in post processing later on, and the less post processing you do, the more natural the picture feels, no matter how good of a photo editor you are. Therefore, don’t avoid proper makeup and proper hairstyle. They do wonders in achieving a great shot.
If you are still working on your camera craft for portraits and how to “get it right in camera” when shooting them, then you should take a look at Kent Dufault's excellent guide to the subject here. It will take you through the elements of composition and lighting that get you to the point at which post processing can simply add the final touches – just as photography should be done.

How To Recognize General Issues And Correct Them
There is no right or wrong way to do this. You’ll edit the picture in any way you please. However, it is good to know where the common issues arise and how to avoid them.
Whites
The Whites Slider basically pushes the white point of the image towards the clipping point. This means that it will brighten the picture. However, instead of working as exposure does, it somewhat creates contrast.
Pushing it too far will ruin the skin tones around the highlights areas. So, be very careful how far you push this slider. If you feel like the image is too dark and the tones start to crunch, maybe you need to use the exposure slider first.

Blacks
Even though it's harder to ruin the tones with the Blacks Slider, you’ll still need to be careful around the dark areas of the image, since it might add black specks. The most critical areas are around the eyes and the beginning of the hair line. Usually, there is a shadow that creates discoloration if pushed too hard.

Clarity
Clarity creates contrast in the mid tones only, meaning it acts as something between contrast and sharpening. Safe values are up to +30ish. Depending on the image you can go even further, but it is easy to overdo it and make it look like it went through a bad HDR filter.
Onto Editing Your Portrait In More Detail
Spot Removal
The Spot Removal Tool in Lightroom works in a manner that is between the Patch Tool and the Healing Brush Tool in Photoshop. It retains the brush features from the healing brush but has the ability to move the point of sampling similar to the patch tool. The advantage is that you can move the source and target area after the fact.
You can use this tool in various ways, but you can do even heavier lifting when compared to the healing brush tool, since you can control the opacity. For example, you can remove wrinkles without achieving an unrealistic look, since you can lower the opacity so the wrinkles aren’t completely removed, but rather just subdued.

Adjustment Brush
Probably the most powerful tool in Lightroom. It lets you do selective adjustments by painting with a brush. The adjustments use the RAW data therefore, you can do some quite powerful tweaks to your image with maximum quality possible.
You can use this to apply advanced dodging and burning, with the ability to change the amount. Plus, you can selectively recover or add highlights, shadows, clarity and so forth.
Using the Adjustment Brush with lowered clarity (something around -50) can be used to smoothen skin, but the value can vary depending on the portrait itself.
Let's Put What You've Learned Into Practice
For this example, I’ll be using a picture that basically breaks most of the stuff mentioned before. The photo is just a casual shoot, no makeup artist, no professional hair dresser – basically an everyday outfit for the model, nothing more.
The light itself is not dramatic, then again the idea was casual photography, not a cover for a magazine.
General Adjustments
Camera Profiles
In this case, I’ve used Landscape profile for a portrait (I do like to live dangerously). But this is due to the fact that Portrait profile looks kind of weird in the skin tones. Not sure why, but this is happening often with the 7D Mark 2.
Anyhow, it is not the name that matters, it's the result. I like the color rendition of the Landscape profile and that is that.

Lens Corrections
Since this photo was made with a vintage Zeiss 300mm f/4 lens (originally made for medium format) there is no lens profile available, and the fringing can’t be corrected sufficiently. Slightly, but not completely.

Sharpening & Noise Reduction
There isn’t much to be said here, other than the fact that this part is done purely by eye. I’ve increased the radius of the sharpening so it can catch the larger details as well (details bigger than 1 pixel, smaller than 2 pixels), other than that it is a standard sharpening setting.

In an effort to avoid some of the color inconsistency (due to overcast weather), I’ve ramped up the color noise reduction (this part of the noise reduction doesn’t hurt the details that much, so you can safely do larger amounts if necessary). One important thing about color noise reduction is to stop when the color noise is gone. It won’t reduce luminance noise,
One important thing about color noise reduction is to stop when the color noise is gone. It won’t reduce luminance noise therefore, there is no need for higher values. As soon the color noise is gone, that amount is sufficient.
Highlights, Shadows, Tone Curve, Clarity, And Blacks And Whites
Following the same principle as before, skin tone was a tad too bright and basically falling apart in the highlights, thus the recovery with the highlight slider. I wanted to bring back some of the shadows which were close to clipping too, so I’ve increased the Shadows Slider.
I've also used Blacks & Whites following the exact same principles as mentioned before, to adjust the black and white points.

Clarity is being pushed to +40 to add more depth to the image. Due to the overcast weather and a tad flatter look, we can push Clarity higher, otherwise +40 would be way too much.

Tone curve has some fade and mid tones compression to enhance the contours and give it a slightly more natural feel.
So, we've learned that improving your Portrait Photography requires some patience but eventually the results you're after will really shine through. This Guide on The Art of Portrait Photography will no doubt give you that boost you're after in mastering the essentials.
Retouching And Refining Your Portrait
Spot Removal
This next edit is fairly simple to use, and we will be removing the blemishes one by one. This is a sort of an extreme case for edits like these, with proper makeup and light there would significantly less edits to do.

After several dozen spot removals, you can notice that there are pins all over the place. This is due to the fact that Lightroom will treat each brush stroke separately, and you can adjust each and every one separately. Which is quite neat.
One issue with that, which can bother many photographers, is the resource requirement. I’ve done something like 50 spot removal actions (a rough approximation), and it seems like Lightroom cannot handle more.
Once I turn off the tool (basically select another tool) it stops lagging and it works quite better (but far from smooth). This is a 20 megapixel RAW file from the Canon 7D mark 2. Lightroom already uses 100% of my i5 3570K @ 4GHZ, and more than 11GB of RAM.
This is not having a rant against Lightroom, because the resource consumption is probably justified. However, it is something to consider according to the system you are working with.
Adjustment Brush
When using the Adjustment Brush it is imperative not to be messy with it. Use one or two pins (one brush setting) for dodging, one or two for burning, and one for the skin repairs. Don’t create 15 pins with dodging, 20 with burning. You won’t be able to keep track of them. Of course, you’ll need more sometimes but minimize it as much as possible. It saves PC resources, and it makes it easier to remember which is which as well.

The Clarity Brush is a tad tricky. Sometimes if you need a more hardcore skin smoothing, it will reduce the general contrast on the skin. Therefore, you’ll have to counter that with the Contrast Slider and the Dehaze Slider as well (dehaze works similarly to clarity but it doesn’t sharpen as much) so you are basically countering the contrast loss but keeping the details loss in the skin.
Of course, you’ll have to exclude some areas, like the eyes, eyebrows, mouth, and so forth, in order to keep the important details there.

Final Touches
Two graduated filters from the side to bring the attention towards the face of the model, and some slight tone curve adjustments to act as a color grade. Exposure is reduced as well to achieve a darker look.
I’ve also modified the White Balance towards the cooler side, and a slight hint of blue in the shadows, in order to simulate the time of the day. And that's everything.

To Summarize Everything
It may seem counter-intuitive, but Lightroom is capable of some heavy edits. It does it slightly differently than Photoshop, and some of the tools work quite a bit slower than Photoshop (however, they do grant you non-destructive workflow).
If you understand how Lightroom operates, you’ll be able to do quick portrait edits on the fly. Being able to do everything in one software solution (instead of bouncing around several applications) saves quite a lot of time (except, of course, if Lightroom starts to hang).
Any comments welcomed below.

Further Resources on Portrait Photography
By default, we are used to Photoshop doing the heavy lifting, with all sorts of techniques and tricks being used. However, Lightroom is a tool that can’t be underestimated in this field too. Ok, it doesn’t have the flexibility that Photoshop does, but it's certainly very capable at retouching portraits.
Get It Right In Camera to Speed Up Your Work Flow (Big Time)
This applies whether using Lightroom, Photoshop, Gimp, Snapseed, or any photo editing software. You should always be keen on getting the picture perfect in the camera. That will save you time in post processing later on, and the less post processing you do, the more natural the picture feels, no matter how good of a photo editor you are. Therefore, don’t avoid proper makeup and proper hairstyle. They do wonders in achieving a great shot.
If you are still working on your camera craft for portraits and how to “get it right in camera” when shooting them, then you should take a look at Kent Dufault's excellent guide to the subject here. It will take you through the elements of composition and lighting that get you to the point at which post processing can simply add the final touches – just as photography should be done.

How To Recognize General Issues And Correct Them
There is no right or wrong way to do this. You’ll edit the picture in any way you please. However, it is good to know where the common issues arise and how to avoid them.
Whites
The Whites Slider basically pushes the white point of the image towards the clipping point. This means that it will brighten the picture. However, instead of working as exposure does, it somewhat creates contrast.
Pushing it too far will ruin the skin tones around the highlights areas. So, be very careful how far you push this slider. If you feel like the image is too dark and the tones start to crunch, maybe you need to use the exposure slider first.

Blacks
Even though it's harder to ruin the tones with the Blacks Slider, you’ll still need to be careful around the dark areas of the image, since it might add black specks. The most critical areas are around the eyes and the beginning of the hair line. Usually, there is a shadow that creates discoloration if pushed too hard.

Clarity
Clarity creates contrast in the mid tones only, meaning it acts as something between contrast and sharpening. Safe values are up to +30ish. Depending on the image you can go even further, but it is easy to overdo it and make it look like it went through a bad HDR filter.
Onto Editing Your Portrait In More Detail
Spot Removal
The Spot Removal Tool in Lightroom works in a manner that is between the Patch Tool and the Healing Brush Tool in Photoshop. It retains the brush features from the healing brush but has the ability to move the point of sampling similar to the patch tool. The advantage is that you can move the source and target area after the fact.
You can use this tool in various ways, but you can do even heavier lifting when compared to the healing brush tool, since you can control the opacity. For example, you can remove wrinkles without achieving an unrealistic look, since you can lower the opacity so the wrinkles aren’t completely removed, but rather just subdued.

Adjustment Brush
Probably the most powerful tool in Lightroom. It lets you do selective adjustments by painting with a brush. The adjustments use the RAW data therefore, you can do some quite powerful tweaks to your image with maximum quality possible.
You can use this to apply advanced dodging and burning, with the ability to change the amount. Plus, you can selectively recover or add highlights, shadows, clarity and so forth.
Using the Adjustment Brush with lowered clarity (something around -50) can be used to smoothen skin, but the value can vary depending on the portrait itself.
Let's Put What You've Learned Into Practice
For this example, I’ll be using a picture that basically breaks most of the stuff mentioned before. The photo is just a casual shoot, no makeup artist, no professional hair dresser – basically an everyday outfit for the model, nothing more.
The light itself is not dramatic, then again the idea was casual photography, not a cover for a magazine.
General Adjustments
Camera Profiles
In this case, I’ve used Landscape profile for a portrait (I do like to live dangerously). But this is due to the fact that Portrait profile looks kind of weird in the skin tones. Not sure why, but this is happening often with the 7D Mark 2.
Anyhow, it is not the name that matters, it's the result. I like the color rendition of the Landscape profile and that is that.

Lens Corrections
Since this photo was made with a vintage Zeiss 300mm f/4 lens (originally made for medium format) there is no lens profile available, and the fringing can’t be corrected sufficiently. Slightly, but not completely.

Sharpening & Noise Reduction
There isn’t much to be said here, other than the fact that this part is done purely by eye. I’ve increased the radius of the sharpening so it can catch the larger details as well (details bigger than 1 pixel, smaller than 2 pixels), other than that it is a standard sharpening setting.

In an effort to avoid some of the color inconsistency (due to overcast weather), I’ve ramped up the color noise reduction (this part of the noise reduction doesn’t hurt the details that much, so you can safely do larger amounts if necessary). One important thing about color noise reduction is to stop when the color noise is gone. It won’t reduce luminance noise,
One important thing about color noise reduction is to stop when the color noise is gone. It won’t reduce luminance noise therefore, there is no need for higher values. As soon the color noise is gone, that amount is sufficient.
Highlights, Shadows, Tone Curve, Clarity, And Blacks And Whites
Following the same principle as before, skin tone was a tad too bright and basically falling apart in the highlights, thus the recovery with the highlight slider. I wanted to bring back some of the shadows which were close to clipping too, so I’ve increased the Shadows Slider.
I've also used Blacks & Whites following the exact same principles as mentioned before, to adjust the black and white points.

Clarity is being pushed to +40 to add more depth to the image. Due to the overcast weather and a tad flatter look, we can push Clarity higher, otherwise +40 would be way too much.

Tone curve has some fade and mid tones compression to enhance the contours and give it a slightly more natural feel.
So, we've learned that improving your Portrait Photography requires some patience but eventually the results you're after will really shine through. This Guide on The Art of Portrait Photography will no doubt give you that boost you're after in mastering the essentials.
Retouching And Refining Your Portrait
Spot Removal
This next edit is fairly simple to use, and we will be removing the blemishes one by one. This is a sort of an extreme case for edits like these, with proper makeup and light there would significantly less edits to do.

After several dozen spot removals, you can notice that there are pins all over the place. This is due to the fact that Lightroom will treat each brush stroke separately, and you can adjust each and every one separately. Which is quite neat.
One issue with that, which can bother many photographers, is the resource requirement. I’ve done something like 50 spot removal actions (a rough approximation), and it seems like Lightroom cannot handle more.
Once I turn off the tool (basically select another tool) it stops lagging and it works quite better (but far from smooth). This is a 20 megapixel RAW file from the Canon 7D mark 2. Lightroom already uses 100% of my i5 3570K @ 4GHZ, and more than 11GB of RAM.
This is not having a rant against Lightroom, because the resource consumption is probably justified. However, it is something to consider according to the system you are working with.
Adjustment Brush
When using the Adjustment Brush it is imperative not to be messy with it. Use one or two pins (one brush setting) for dodging, one or two for burning, and one for the skin repairs. Don’t create 15 pins with dodging, 20 with burning. You won’t be able to keep track of them. Of course, you’ll need more sometimes but minimize it as much as possible. It saves PC resources, and it makes it easier to remember which is which as well.

The Clarity Brush is a tad tricky. Sometimes if you need a more hardcore skin smoothing, it will reduce the general contrast on the skin. Therefore, you’ll have to counter that with the Contrast Slider and the Dehaze Slider as well (dehaze works similarly to clarity but it doesn’t sharpen as much) so you are basically countering the contrast loss but keeping the details loss in the skin.
Of course, you’ll have to exclude some areas, like the eyes, eyebrows, mouth, and so forth, in order to keep the important details there.

Final Touches
Two graduated filters from the side to bring the attention towards the face of the model, and some slight tone curve adjustments to act as a color grade. Exposure is reduced as well to achieve a darker look.
I’ve also modified the White Balance towards the cooler side, and a slight hint of blue in the shadows, in order to simulate the time of the day. And that's everything.

To Summarize Everything
It may seem counter-intuitive, but Lightroom is capable of some heavy edits. It does it slightly differently than Photoshop, and some of the tools work quite a bit slower than Photoshop (however, they do grant you non-destructive workflow).
If you understand how Lightroom operates, you’ll be able to do quick portrait edits on the fly. Being able to do everything in one software solution (instead of bouncing around several applications) saves quite a lot of time (except, of course, if Lightroom starts to hang).
Any comments welcomed below.

Further Resources on Portrait Photography
By default, we are used to Photoshop doing the heavy lifting, with all sorts of techniques and tricks being used. However, Lightroom is a tool that can’t be underestimated in this field too. Ok, it doesn’t have the flexibility that Photoshop does, but it's certainly very capable at retouching portraits.
Get It Right In Camera to Speed Up Your Work Flow (Big Time)
This applies whether using Lightroom, Photoshop, Gimp, Snapseed, or any photo editing software. You should always be keen on getting the picture perfect in the camera. That will save you time in post processing later on, and the less post processing you do, the more natural the picture feels, no matter how good of a photo editor you are. Therefore, don’t avoid proper makeup and proper hairstyle. They do wonders in achieving a great shot.
If you are still working on your camera craft for portraits and how to “get it right in camera” when shooting them, then you should take a look at Kent Dufault's excellent guide to the subject here. It will take you through the elements of composition and lighting that get you to the point at which post processing can simply add the final touches – just as photography should be done.

How To Recognize General Issues And Correct Them
There is no right or wrong way to do this. You’ll edit the picture in any way you please. However, it is good to know where the common issues arise and how to avoid them.
Whites
The Whites Slider basically pushes the white point of the image towards the clipping point. This means that it will brighten the picture. However, instead of working as exposure does, it somewhat creates contrast.
Pushing it too far will ruin the skin tones around the highlights areas. So, be very careful how far you push this slider. If you feel like the image is too dark and the tones start to crunch, maybe you need to use the exposure slider first.

Blacks
Even though it's harder to ruin the tones with the Blacks Slider, you’ll still need to be careful around the dark areas of the image, since it might add black specks. The most critical areas are around the eyes and the beginning of the hair line. Usually, there is a shadow that creates discoloration if pushed too hard.

Clarity
Clarity creates contrast in the mid tones only, meaning it acts as something between contrast and sharpening. Safe values are up to +30ish. Depending on the image you can go even further, but it is easy to overdo it and make it look like it went through a bad HDR filter.
Onto Editing Your Portrait In More Detail
Spot Removal
The Spot Removal Tool in Lightroom works in a manner that is between the Patch Tool and the Healing Brush Tool in Photoshop. It retains the brush features from the healing brush but has the ability to move the point of sampling similar to the patch tool. The advantage is that you can move the source and target area after the fact.
You can use this tool in various ways, but you can do even heavier lifting when compared to the healing brush tool, since you can control the opacity. For example, you can remove wrinkles without achieving an unrealistic look, since you can lower the opacity so the wrinkles aren’t completely removed, but rather just subdued.

Adjustment Brush
Probably the most powerful tool in Lightroom. It lets you do selective adjustments by painting with a brush. The adjustments use the RAW data therefore, you can do some quite powerful tweaks to your image with maximum quality possible.
You can use this to apply advanced dodging and burning, with the ability to change the amount. Plus, you can selectively recover or add highlights, shadows, clarity and so forth.
Using the Adjustment Brush with lowered clarity (something around -50) can be used to smoothen skin, but the value can vary depending on the portrait itself.
Let's Put What You've Learned Into Practice
For this example, I’ll be using a picture that basically breaks most of the stuff mentioned before. The photo is just a casual shoot, no makeup artist, no professional hair dresser – basically an everyday outfit for the model, nothing more.
The light itself is not dramatic, then again the idea was casual photography, not a cover for a magazine.
General Adjustments
Camera Profiles
In this case, I’ve used Landscape profile for a portrait (I do like to live dangerously). But this is due to the fact that Portrait profile looks kind of weird in the skin tones. Not sure why, but this is happening often with the 7D Mark 2.
Anyhow, it is not the name that matters, it's the result. I like the color rendition of the Landscape profile and that is that.

Lens Corrections
Since this photo was made with a vintage Zeiss 300mm f/4 lens (originally made for medium format) there is no lens profile available, and the fringing can’t be corrected sufficiently. Slightly, but not completely.

Sharpening & Noise Reduction
There isn’t much to be said here, other than the fact that this part is done purely by eye. I’ve increased the radius of the sharpening so it can catch the larger details as well (details bigger than 1 pixel, smaller than 2 pixels), other than that it is a standard sharpening setting.

In an effort to avoid some of the color inconsistency (due to overcast weather), I’ve ramped up the color noise reduction (this part of the noise reduction doesn’t hurt the details that much, so you can safely do larger amounts if necessary). One important thing about color noise reduction is to stop when the color noise is gone. It won’t reduce luminance noise,
One important thing about color noise reduction is to stop when the color noise is gone. It won’t reduce luminance noise therefore, there is no need for higher values. As soon the color noise is gone, that amount is sufficient.
Highlights, Shadows, Tone Curve, Clarity, And Blacks And Whites
Following the same principle as before, skin tone was a tad too bright and basically falling apart in the highlights, thus the recovery with the highlight slider. I wanted to bring back some of the shadows which were close to clipping too, so I’ve increased the Shadows Slider.
I've also used Blacks & Whites following the exact same principles as mentioned before, to adjust the black and white points.

Clarity is being pushed to +40 to add more depth to the image. Due to the overcast weather and a tad flatter look, we can push Clarity higher, otherwise +40 would be way too much.

Tone curve has some fade and mid tones compression to enhance the contours and give it a slightly more natural feel.
So, we've learned that improving your Portrait Photography requires some patience but eventually the results you're after will really shine through. This Guide on The Art of Portrait Photography will no doubt give you that boost you're after in mastering the essentials.
Retouching And Refining Your Portrait
Spot Removal
This next edit is fairly simple to use, and we will be removing the blemishes one by one. This is a sort of an extreme case for edits like these, with proper makeup and light there would significantly less edits to do.

After several dozen spot removals, you can notice that there are pins all over the place. This is due to the fact that Lightroom will treat each brush stroke separately, and you can adjust each and every one separately. Which is quite neat.
One issue with that, which can bother many photographers, is the resource requirement. I’ve done something like 50 spot removal actions (a rough approximation), and it seems like Lightroom cannot handle more.
Once I turn off the tool (basically select another tool) it stops lagging and it works quite better (but far from smooth). This is a 20 megapixel RAW file from the Canon 7D mark 2. Lightroom already uses 100% of my i5 3570K @ 4GHZ, and more than 11GB of RAM.
This is not having a rant against Lightroom, because the resource consumption is probably justified. However, it is something to consider according to the system you are working with.
Adjustment Brush
When using the Adjustment Brush it is imperative not to be messy with it. Use one or two pins (one brush setting) for dodging, one or two for burning, and one for the skin repairs. Don’t create 15 pins with dodging, 20 with burning. You won’t be able to keep track of them. Of course, you’ll need more sometimes but minimize it as much as possible. It saves PC resources, and it makes it easier to remember which is which as well.

The Clarity Brush is a tad tricky. Sometimes if you need a more hardcore skin smoothing, it will reduce the general contrast on the skin. Therefore, you’ll have to counter that with the Contrast Slider and the Dehaze Slider as well (dehaze works similarly to clarity but it doesn’t sharpen as much) so you are basically countering the contrast loss but keeping the details loss in the skin.
Of course, you’ll have to exclude some areas, like the eyes, eyebrows, mouth, and so forth, in order to keep the important details there.

Final Touches
Two graduated filters from the side to bring the attention towards the face of the model, and some slight tone curve adjustments to act as a color grade. Exposure is reduced as well to achieve a darker look.
I’ve also modified the White Balance towards the cooler side, and a slight hint of blue in the shadows, in order to simulate the time of the day. And that's everything.

To Summarize Everything
It may seem counter-intuitive, but Lightroom is capable of some heavy edits. It does it slightly differently than Photoshop, and some of the tools work quite a bit slower than Photoshop (however, they do grant you non-destructive workflow).
If you understand how Lightroom operates, you’ll be able to do quick portrait edits on the fly. Being able to do everything in one software solution (instead of bouncing around several applications) saves quite a lot of time (except, of course, if Lightroom starts to hang).
Any comments welcomed below.

Further Resources on Portrait Photography
By default, we are used to Photoshop doing the heavy lifting, with all sorts of techniques and tricks being used. However, Lightroom is a tool that can’t be underestimated in this field too. Ok, it doesn’t have the flexibility that Photoshop does, but it's certainly very capable at retouching portraits.
Get It Right In Camera to Speed Up Your Work Flow (Big Time)
This applies whether using Lightroom, Photoshop, Gimp, Snapseed, or any photo editing software. You should always be keen on getting the picture perfect in the camera. That will save you time in post processing later on, and the less post processing you do, the more natural the picture feels, no matter how good of a photo editor you are. Therefore, don’t avoid proper makeup and proper hairstyle. They do wonders in achieving a great shot.
If you are still working on your camera craft for portraits and how to “get it right in camera” when shooting them, then you should take a look at Kent Dufault's excellent guide to the subject here. It will take you through the elements of composition and lighting that get you to the point at which post processing can simply add the final touches – just as photography should be done.

How To Recognize General Issues And Correct Them
There is no right or wrong way to do this. You’ll edit the picture in any way you please. However, it is good to know where the common issues arise and how to avoid them.
Whites
The Whites Slider basically pushes the white point of the image towards the clipping point. This means that it will brighten the picture. However, instead of working as exposure does, it somewhat creates contrast.
Pushing it too far will ruin the skin tones around the highlights areas. So, be very careful how far you push this slider. If you feel like the image is too dark and the tones start to crunch, maybe you need to use the exposure slider first.

Blacks
Even though it's harder to ruin the tones with the Blacks Slider, you’ll still need to be careful around the dark areas of the image, since it might add black specks. The most critical areas are around the eyes and the beginning of the hair line. Usually, there is a shadow that creates discoloration if pushed too hard.

Clarity
Clarity creates contrast in the mid tones only, meaning it acts as something between contrast and sharpening. Safe values are up to +30ish. Depending on the image you can go even further, but it is easy to overdo it and make it look like it went through a bad HDR filter.
Onto Editing Your Portrait In More Detail
Spot Removal
The Spot Removal Tool in Lightroom works in a manner that is between the Patch Tool and the Healing Brush Tool in Photoshop. It retains the brush features from the healing brush but has the ability to move the point of sampling similar to the patch tool. The advantage is that you can move the source and target area after the fact.
You can use this tool in various ways, but you can do even heavier lifting when compared to the healing brush tool, since you can control the opacity. For example, you can remove wrinkles without achieving an unrealistic look, since you can lower the opacity so the wrinkles aren’t completely removed, but rather just subdued.

Adjustment Brush
Probably the most powerful tool in Lightroom. It lets you do selective adjustments by painting with a brush. The adjustments use the RAW data therefore, you can do some quite powerful tweaks to your image with maximum quality possible.
You can use this to apply advanced dodging and burning, with the ability to change the amount. Plus, you can selectively recover or add highlights, shadows, clarity and so forth.
Using the Adjustment Brush with lowered clarity (something around -50) can be used to smoothen skin, but the value can vary depending on the portrait itself.
Let's Put What You've Learned Into Practice
For this example, I’ll be using a picture that basically breaks most of the stuff mentioned before. The photo is just a casual shoot, no makeup artist, no professional hair dresser – basically an everyday outfit for the model, nothing more.
The light itself is not dramatic, then again the idea was casual photography, not a cover for a magazine.
General Adjustments
Camera Profiles
In this case, I’ve used Landscape profile for a portrait (I do like to live dangerously). But this is due to the fact that Portrait profile looks kind of weird in the skin tones. Not sure why, but this is happening often with the 7D Mark 2.
Anyhow, it is not the name that matters, it's the result. I like the color rendition of the Landscape profile and that is that.

Lens Corrections
Since this photo was made with a vintage Zeiss 300mm f/4 lens (originally made for medium format) there is no lens profile available, and the fringing can’t be corrected sufficiently. Slightly, but not completely.

Sharpening & Noise Reduction
There isn’t much to be said here, other than the fact that this part is done purely by eye. I’ve increased the radius of the sharpening so it can catch the larger details as well (details bigger than 1 pixel, smaller than 2 pixels), other than that it is a standard sharpening setting.

In an effort to avoid some of the color inconsistency (due to overcast weather), I’ve ramped up the color noise reduction (this part of the noise reduction doesn’t hurt the details that much, so you can safely do larger amounts if necessary). One important thing about color noise reduction is to stop when the color noise is gone. It won’t reduce luminance noise,
One important thing about color noise reduction is to stop when the color noise is gone. It won’t reduce luminance noise therefore, there is no need for higher values. As soon the color noise is gone, that amount is sufficient.
Highlights, Shadows, Tone Curve, Clarity, And Blacks And Whites
Following the same principle as before, skin tone was a tad too bright and basically falling apart in the highlights, thus the recovery with the highlight slider. I wanted to bring back some of the shadows which were close to clipping too, so I’ve increased the Shadows Slider.
I've also used Blacks & Whites following the exact same principles as mentioned before, to adjust the black and white points.

Clarity is being pushed to +40 to add more depth to the image. Due to the overcast weather and a tad flatter look, we can push Clarity higher, otherwise +40 would be way too much.

Tone curve has some fade and mid tones compression to enhance the contours and give it a slightly more natural feel.
So, we've learned that improving your Portrait Photography requires some patience but eventually the results you're after will really shine through. This Guide on The Art of Portrait Photography will no doubt give you that boost you're after in mastering the essentials.
Retouching And Refining Your Portrait
Spot Removal
This next edit is fairly simple to use, and we will be removing the blemishes one by one. This is a sort of an extreme case for edits like these, with proper makeup and light there would significantly less edits to do.

After several dozen spot removals, you can notice that there are pins all over the place. This is due to the fact that Lightroom will treat each brush stroke separately, and you can adjust each and every one separately. Which is quite neat.
One issue with that, which can bother many photographers, is the resource requirement. I’ve done something like 50 spot removal actions (a rough approximation), and it seems like Lightroom cannot handle more.
Once I turn off the tool (basically select another tool) it stops lagging and it works quite better (but far from smooth). This is a 20 megapixel RAW file from the Canon 7D mark 2. Lightroom already uses 100% of my i5 3570K @ 4GHZ, and more than 11GB of RAM.
This is not having a rant against Lightroom, because the resource consumption is probably justified. However, it is something to consider according to the system you are working with.
Adjustment Brush
When using the Adjustment Brush it is imperative not to be messy with it. Use one or two pins (one brush setting) for dodging, one or two for burning, and one for the skin repairs. Don’t create 15 pins with dodging, 20 with burning. You won’t be able to keep track of them. Of course, you’ll need more sometimes but minimize it as much as possible. It saves PC resources, and it makes it easier to remember which is which as well.

The Clarity Brush is a tad tricky. Sometimes if you need a more hardcore skin smoothing, it will reduce the general contrast on the skin. Therefore, you’ll have to counter that with the Contrast Slider and the Dehaze Slider as well (dehaze works similarly to clarity but it doesn’t sharpen as much) so you are basically countering the contrast loss but keeping the details loss in the skin.
Of course, you’ll have to exclude some areas, like the eyes, eyebrows, mouth, and so forth, in order to keep the important details there.

Final Touches
Two graduated filters from the side to bring the attention towards the face of the model, and some slight tone curve adjustments to act as a color grade. Exposure is reduced as well to achieve a darker look.
I’ve also modified the White Balance towards the cooler side, and a slight hint of blue in the shadows, in order to simulate the time of the day. And that's everything.

To Summarize Everything
It may seem counter-intuitive, but Lightroom is capable of some heavy edits. It does it slightly differently than Photoshop, and some of the tools work quite a bit slower than Photoshop (however, they do grant you non-destructive workflow).
If you understand how Lightroom operates, you’ll be able to do quick portrait edits on the fly. Being able to do everything in one software solution (instead of bouncing around several applications) saves quite a lot of time (except, of course, if Lightroom starts to hang).
Any comments welcomed below.
