If you have ever gotten blurred streaks when you shoot the stars and are wondering how to get tack-sharp images of the heavens, then your first stop should be to take a look at the NPF rule for night sky photography. When we capture landscape photography, we do not worry much about these factors, but in night sky photography, we want the stars to be point sharp.
When you look at the stars in the night sky, you see them as sharp pinpoint lights and so when you photograph them, you will want to record them as sharp points. Due to the rotation of the earth, the stars seem to move across the night sky (although the stars have their own movement around the centre of the galaxy) and during very long exposures, we see those star trails recorded in our images.
Online NPF Calculator For Shutter Speed
Updated with fade animations. Paste into WordPress. “`htmlAstro Shutter Calculator · Use The NPF Rule
Why Are Sharp Stars Required In Your Photos Every Time?
Photographing star trails is a completely different thing and is done by choice, but when you want to photograph sharp point stars or even the Milky Way, you need to expose your camera’s sensor for the correct period of time, so even when you zoom in to the image or print them large, you will not be able to notice any trails in there.
Sharp Stars Require:
- Perfect focus
- Perfect exposure
How Do You Get Sharp Stars In Your Photos Without Star Trail?
In order to achieve this, you will need to calculate the correct exposure time based on the type of camera (full frame or APS-C or micro four thirds, etc.), lens combination and use that value as your maximum shutter speed in order to avoid star trails.
Note: To record stars as bright beautiful spots, you will need to record as much light as possible as well, but then you also want to avoid the trails created by the stars by controlling the exposure time. Longer shutter speed than what is required will introduce star trails.
Rules For Calculating Exposure Time For Night Sky Photography: (500 Rule, 600 Rule and NPF Rule)
There are various rules out there to calculate the exposure time for capturing pinpoint stars when photographing the night sky. You may have heard about the classic 500 rule and the 600 rule for star photography and they have been discussed before in our articles and in a few forum topics as well.
- What is the 500 rule in Photography? – Divide 500 by the focal length (35mm equivalent, take into account the crop factor). This is easy to remember.
Depending on whether photographers notice star trails after following the above rules, they have also used the 400 and 200 rules to get the results they are looking for. Shorter focal lengths allow for longer exposure times and longer focal lengths means, shorter exposure times.
The PhotoPills App – Avoid Star Trails Or Motion Blur
On the PhotoPills website, you can calculate the exposure times for various cameras and focal lengths using the Spot Stars Calculator.
However, the above rules can fail by providing larger exposure times than required and this can cause slight star trails – remember, these rules and calculators were devised with the classical 35mm film in mind.
With the recent high-resolution digital cameras, in order to get the best or more accurate results, you need to have a more accurate exposure time and it is necessary to take into account the camera sensor size (if using a crop sensor or a micro four third camera), resolution, and aperture beside the focal length.
The NPF Rule – Pixel Density, Declination And More
A formula was devised by Frédéric Michaud for the Société Astronòmique du Havre called the NPF rule which is quite complex or much more complicated compared to the other rules, where
- N stands for aperture, the letter N is used to represent aperture in optics.
- P for photosites or pixel density or pixel pitch (distance between two pixels)
- F for focal length
This rule takes into account pixel pitch and the diffraction from your chosen aperture. So, according to the NPF Rule…
Exposure time or shutter speed in seconds is approximately equal to {(35 x Aperture) + (30 x pixel pitch)} ÷ focal length and this is the simplified NPF formula.
Pixel Pitch is not a straightforward number and you will need to calculate it as follows:
Pixel Pitch P = (Physical width of camera’s sensor ÷ number of pixels in width) x 1000 micrometer (µm)
So, for example, for a Nikon D750 camera,
- The sensor size is 35.9 x 24.0 mm
- Maximum Image size is 6016 x 4016 pixels
So Pixel Pitch P = (35.9 ÷ 6016) x 1000 µm = 5.967 ≈ 5.97 µm
So for example,
If you will be using a 24mm f/2.8 lens on a Nikon D750 camera, then using the above NPF rule, you will need to use a shutter speed that will be approximately equal to {(35 x 2.8) + (30 x 5.97)} ÷ 24 in seconds ≈ {98 + 179} ÷ 24 seconds ≈ 11.54 ≈ 12 seconds
If we had calculated the exposure time using the 500 rule, it would have been 500 ÷ 24 = 20.8 ≈ 21 seconds. An image printed really large with this setting would show up some trails instead of point stars.
The NPF rule can be quite a hectic thing to calculate but use this rule to get the best shutter speed for star photography. If you are looking for a free calculator, there is a qDslrDashboard app, where you tap on the “Rule 600” and then it will let you choose the sensor size, input the sensor width and height, aperture value, focal length, image width and height and then it will calculate the shutter speed for you according to the NPF rule.

Also, the calculation does not just stop there if you are looking for the most accurate exposure time.
If you have not thought about this before, the speed of Earth’s rotation at the equator is higher compared to other latitudes. It decreases by the cosine of latitude and in this regards, you will have to take the declination from the celestial equator (declination will be 90 degrees at the celestial poles, for example the Polaris in the Northern Hemisphere and Zero at the equator) into account as well when calculating the exposure time for sharpness in stars.
Why Do These Factors Need To Be Taken Into Account? Both For Stars And The Milky Way
Here is a quick read that will be of some help.
Resolution of camera sensor – as the resolution of the sensor increases, star trails become more evident at the pixel level because of the increased pixel density. So, as the resolution increases, the exposure time needs to be decreased to eliminate star trails.
Declination from the celestial equator – Declination is nothing but the angular distance of any point in the sky that is north or south of the celestial equator. At the celestial equator, the speed of earth’s rotation is the highest, causing the most amount of star trails. The further you move away from the equator, the increase in declination which means a decrease in the speed of rotation as discussed above and hence fewer star trails will be seen at the pixel level. The equatorial declination is 0o at the celestial equator.

To calculate declination accurately, you need to know where you are and at which direction you are pointing the camera at the night sky. The best way to find this is using a smartphone app like PhotoPills or Planit.
You can find the apps here:
Leave declination at the default value of zero, if you are not very sure about it.
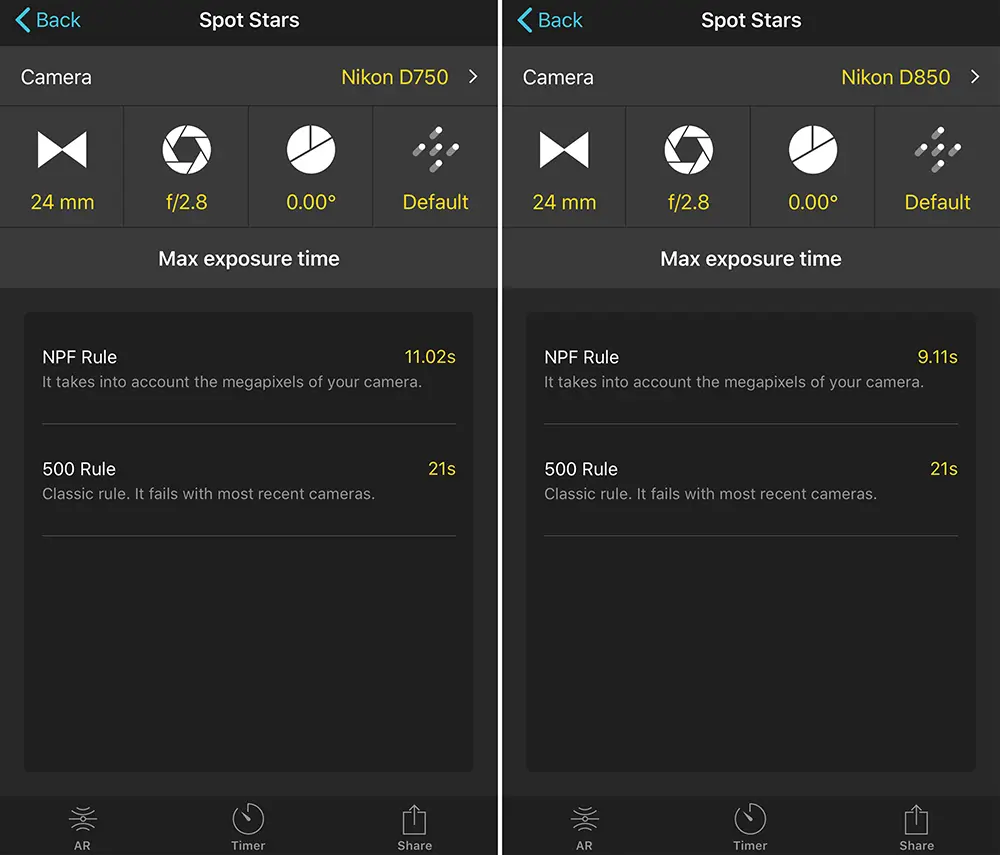
Now, if you are someone who has the PhotoPills app, then the shutter speed can be calculated according to the detailed NPF rule easily, using the app. Once you open the app, choose the “Spot Stars” pill.

The app takes you to an area where you can choose your camera, input the focal length, aperture, declination and calculate the default exposure time according to NPF and 500 rule.
In the screenshot below, you can notice the difference in shutter speed for the Nikon D750 and D850 cameras because it takes into account the megapixels of your camera as well.
If you do not know the declination for the location where you are, just tap on AR at the bottom of the app screen and point your smartphone towards the direction and angle you are planning to shoot and that should display the declination at the bottom of the screen for you. It also shows the shutter speed for the particular camera, focal length and aperture combination in this screen, so you do not have to manually input the values for calculation.
You can see that the app takes the declination into account when calculating the shutter speed using the NPF rule. For different declination, the shutter speed is different.

In the PhotoPills app, you can see that there is a default setting that may have barely noticeable trails. If you are going for really large prints, like more than 24 inches wide and if you need very high accuracy in point sharp stars, you may choose “Accurate settings” in the app. This will, however, decrease the exposure time by half which you may have to compensate by increasing the iso.


For anyone interested in an advanced astrophotography shutter time calculator, the article here at Lonely Speck goes into various factors on calculating the exposure time for astrophotography.
Don't forget to get a wider perspective on this with our guide on How to Photograph the Milky Way and remember that moon photography is quite different to either!


11 Comments
Thank you Dahlia for your very instructive article !
Fred
Thank you Fred. Glad that you found it useful 🙂
Hello, I found this to be a very good learning tool. However I didn’t see where you took into account for the crop cameras. Does it not fit into this equation?
Hi, we just used two full frame cameras for comparison as an example for demonstration in this article. You can by all means use this for a crop sensor camera. If you go to the “Spot Stars” option in the Photopills app, they also have the crop sensor cameras on the list. Hope this helps 🙂
Newbie to astro, so really appreciate your article. You don’t mention ISO with the NPF rule. I’ve read with the rule of 500 to use ISO 3200. Would that be the same for NPF?
Equipment: Canon R6/Rokinon 14mm SP 2.8
Hi, ISO really depends on the camera that you are using and the sky conditions. Since 500 rule gives longer exposure time compared to NPF rule, the ISO values you use will definitely be different for both the rules. ISO 3200 for 500 rule is not a standard setting. It is just a suggestion for a start and then to adjust from there.
The Canon R6 that you have mentioned is a full frame camera. If you have clear dark skies, ISO between 500 to 1600 should be perfectly fine. I have shot at ISO 640 on full frame cameras and ISO 1200 in APS-C cameras and got very good results. Now this also depends on the focal length you are using because you do not want the stars to trail.
For you camera-lens combination, I checked exposure time using NPF rule in the PhotoPills app and the default exposure time comes up to 11.68s. So, if you are shooting under clear dark skies, start with ISO 1600 and depending on what you get, increase or decrease the iso for correct exposure. Hope this helps 🙂
How do you set 11.02 seconds or 11.68 seconds using any intervalometer ? Do you round the seconds? in this case 11 seconds or 12 seconds?
Hi Amit, yes, round it off to the nearest value like you’ve mentioned. 11 or 12 seconds.
Declination has nothing to do with your location, but rather which way you are pointing your camera. If you point your camera straight at the North Star and make an exposure that’s long enough to create start trails, you’ll see that the North Star itself has little to no trail, while nearby stars have short trails and stars further away have longer trails. This is the case whether you are in Ecuador or Alaska when you take the picture. The declination value should be set for the stars in your picture that are farthest from the celestial north pole, since they will have the longest tails.
It’s true that your location(in particular, your latitude, or distance from the equator) affects the speed that you travel around the earth, that is, your linear velocity. At the equator you travel more than a thousand miles per hour, while at the poles, if you’re standing directly on the pole, you travel zero miles per hour, effectively just spinning in one spot.
However, the trails from stars are not a result of your linear velocity, but rather your angular velocity, how fast the earth is spinning. Your angular velocity is the same no matter your location on earth, about 360 degrees per day, or 15 degrees per hour.
A star 1 light-year away on the plane of the celestial equator has an apparent linear velocity of about 1.5 trillion miles per hour. This is the kind of speed it takes to make star trails in a 30 second exposure. The 1000 miles/hr we’re doing on the surface of our planet isn’t nearly enough to cause any discernible difference in the length of star trails.
Using the NPF rule, lenses with larger maximum apertures will have lower maximum shutter speeds, all else being equal. Why is this?
Why increasing the apeture, increses the maximum time of the shutter open? with all the other variables staying the same.
should be the opposite?!