Since its initial release, Aperture has evolved from an image management program to a powerful catalogue and image manipulation program for Mac users. It’s obvious rival is Lightroom and like the Adobe product it has a range of powerful tools for creative image adjustment. In this article, we will take a look at some of the most powerful of these tools.
Aperture’s adjustments can be found on the left of the Aperture window, it is the third of the three tabs at the top. The first thing to note, is that not all the adjustments are shown below this tab. There is a default set that can be added too. Below the histogram there is a drop down box called Add Adjustment. Clicking on this reveals all the tools, ones with a small black dot to the left are already included. Clicking one of the others will add it to the bottom of the tool list.
To the right of any adjustment tool you will see a small cog icon. Clicking this allows you to Add to the Default Set. If you do not add it, you will have to manually open it every time you open Aperture. So lets have a look at the main adjustment tools.
White Balance – There are three options from the drop down box depending on what type of image you are working on. Neutral Gray and Skin Tone tools provide a slider that adjusts only the warmth of the image. The Temperature and Tint allows you to change the color temperature and the tint between green and magenta. To the left of the drop down box allows you to set a white balance by clicking the eye dropper on a neutral gray part of the image.
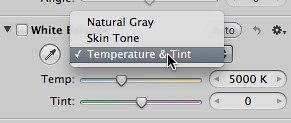
White Balance by Jason Row Photography, on Flickr
Exposure – This adjustment consists of four sliders and an auto button. Exposure allow you to adjust the image in fractions of a stop intervals. Recovery is used to recover blown highlights on over exposed images. Black point does the same for shadows, helping recover details in the blacks. Brightness raises or lowers the overall brightness of the image.
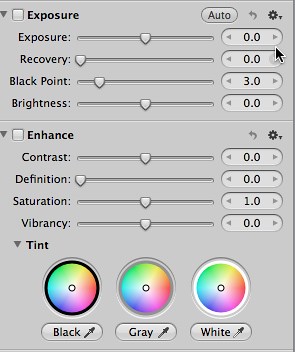
Exposure and Enhance by Jason Row Photography, on Flickr
Enhance – The enhance controls also have four main sliders. Contrast, Definition (this uses an increase in edge contrast to improve apparent sharpness), Saturation and Vibrancy (which increase the color levels in the image).
Below this. clicking the small triangle reveals the Tint controls. These allow you to adjust the image coloring in the blacks, mid tones and highlights as well as eye droppers for selecting the maximum black, mid tone and purest white in the image.
Curves – These work in a very similar fashion to Photoshop’s curve function, allowing you to manipulate the exposure curve for RGB combined and for individual color channels. There are also two Auto buttons, one one to correct only the luminance, the other to correct the color.

Curves by Jason Row Photography, on Flickr
Levels – Again, very similar to its Photoshop equivalent, you can adjust the shadows, highlights and mid-tones. Like curves there are auto buttons for luminance and color. To the upper right of the histogram, the small graph icon allows you further adjustments to between the shadows, highlights and mid-tones.
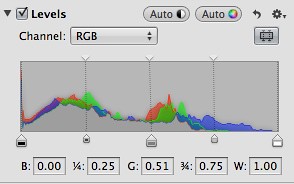
Levels by Jason Row Photography, on Flickr
Color – This tool allows you to adjust the hue, saturation, luminance and range for the six primary and secondary colors. You can also change one of the presets to a color of your choice, by selecting it and using the eye dropper tool on the required color in the image.
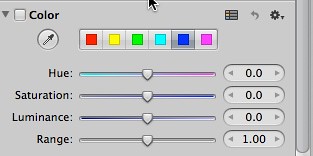
Color by Jason Row Photography, on Flickr
Amongst the tools that you may not see in the default set are:
Black and White – This is a fairly simple tool that converts the image to monochrome with the added option of being able to adjust the individual color channels to achieve the look that you require.
Spot and Patch – Again, similar to the Photoshop equivalents, you can use these tools to remove blemishes from within an image. There are multiple options to adjust the radius, softness, opacity and detail. Using multiple spots or patches on a large RAW file can significantly slow down your computer.
Sharpen and Edge Sharpen – These two tools are self explanatory and both are fairly limited in their scope. I often find it better to sharpen the final image in Photoshop or to use a third party sharpening plugin.
There are several more adjustment tools available in the list, some more useful than others. To the right of the adjustment tools the Effects drop down offers Quick Fixes, a set of tools to adjust exposure, highlights and shadows. Below this are a number of preset tools for Color, Black and White and White Balance. At the bottom of the drop down is an option to edit any of the effects tools to your own taste.
Whilst Aperture, at the moment, is not a replacement for Photoshop, with it’s adjustment tools, it does contain a large library of useful image manipulators that, for 90% of the time, will be more than enough for image editing.


1 Comment
Thanks for this! I purchased this app last year and I am still learning how to use it. I am glad to see that it is more than enough for now.