The appeal of macro photography should be obvious to most, whether you’ve ever made a macro photograph or not — it’s all about the wonder and fascination of being able to capture in fine, “life-size” proportion the details of things otherwise beyond the scope of what the naked eye is capable of discerning.
Macro photography can also prove to be a formidable challenge for many shooters, as the levels of precision, persistence, and patience needed to produce a satisfactory image are arguable of greater importance than some other genres of photography. When starting out in macro photography, too many photographers spend an inordinate amount of time researching which lens to buy. The lens isn’t unimportant, but it is not the only, or even most important, factor in your macro setup.

Photo by Steve Corey
Lighting is as vital to successful macro photography as it is to portraiture. In fact, one could make the case that lighting matters even more than in portraiture; low-light portrait photography is a thing. Low light macro photography isn’t. In short, lighting will be the make or break factor in determining the viability of your work.
It doesn’t matter if you’re using natural light, a ring flash, or a pop-up flash, you need light. Read further and you will learn that lighting for macro is as accessible as macro photography itself. As is so often the case, it’s more about knowing how to use what you have rather than having specialized gear.
Natural Lighting
Natural light (the sun) seems like a logical choice for the perfect light source for outdoor macro photography, and sometimes it is. Natural light is generally simple to work with. All you need is your camera and lens and a subject. You don’t need to worry about carrying any sort of separate lighting apparatus; you don’t need to worry about fiddling with settings. You’re free to concentrate on things like focus and composition. If you’re thinking that it couldn’t really be that simple, you’re sort of right. There are some things you need to remain aware of when doing natural light macro photography.
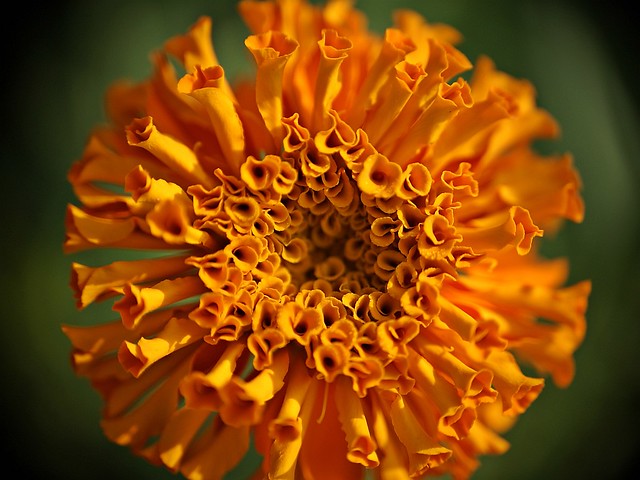
Photo by Pranav Yaddanapudi
- Natural light throughout the day. Yes, the sun is always there but the quality and quantity of light emanating from the sun are not constants. Midday sun, when the sun is highest in the sky, tends to be harsh and creates hard, odd shadows. This isn’t flattering for portraits nor is it flattering for macro subjects. It follows, then, that when the sun is lower in the sky the light will be softer, more flattering. You will want to take advantage of the warmth of the golden hour. The golden hour is loosely referred to as the hour (give or take a few minutes) just after sunrise and just before sunset. If you’re not a morning person, you can do your macro shooting in the evening. In either case, you will be thoroughly pleased with the impact this softened directional lighting has on your subjects.
- Natural light and atmospheric/weather conditions. Cloud cover isn’t always a bad thing; a few clouds might actually work to your advantage during the middle of the day when the sun is high in the sky, softening up the light a bit. And don’t let rain thwart your plans; raindrops can serve as beautiful adornments for flowers and insects.
- A couple more points about natural light. Obviously, you can’t move the sun, so you’ll have to position yourself so that your body or lens won’t block the light. Furthermore, just like you might do with portrait photography, you can use a reflector to modify the sunlight.
Flash
In most instances, relying on natural light simply won’t be a feasible option; the sun can be unpredictable and uncooperative, and you may find yourself shooting in places where not enough sunlight is reaching your intended subjects. Be prepared to use a flash unit.
-
- Pop-up flash. This certainly shouldn't be your first choice but if a time ever arises when it’s your only choice, don’t despair. A pop-up flash can work for you. One of the inadequacies of pop-up flashes is that they don’t have much reach, but if you've got a subject very close to the front of your lens, it’s possible your pop-up flash will have just enough distance to get the job done. If the lens you’re using is long enough to cause shadows when the flash fires, you can use a reflector to redirect the light so that it hits the subject.
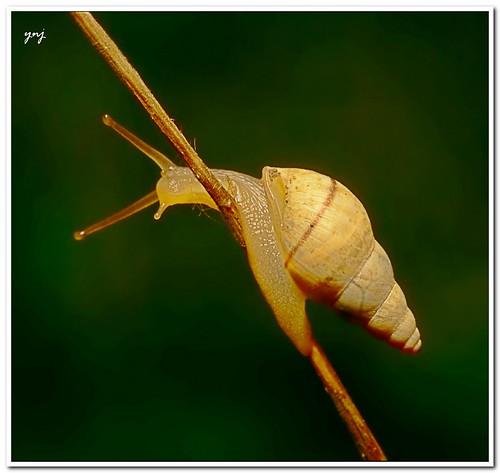
Photo by Yogendra Joshi
- Standard flash unit. A standard flash unit, for the sake of this discussion, refers to the shoe-mount flash everyone is familiar with, such as the Nikon SB -700 or Canon Speedlite 430EX II. There are two ways to use this type of flash for macro photography.
-
- On-camera – In this instance the flash sits atop the camera via the hot shoe. While this still isn’t the optimal solution, shoe-mount flash is vastly superior to pop-up flash since it sits higher up on the camera and is unlikely to create shadows even when using a longer lens. The head of a flash unit can swivel and tilt, making the use of a reflector or the light box (to soften the light) that much more effective.
- Off-camera – Just as you have likely heard in the context of portrait photography, getting that flash off the camera can make a dramatic difference in the quality of your shot. To do this, you can use a flash sync cable or remote triggering. Once you get the flash off the camera you are free to position the lighting so that it creates precisely the effect you desire.
- Ring flash. A ring flash is a circular flash that fits around the front end of a lens. The obvious advantage of such a device is that it puts the light right up close to the subject without any obstructions. If you use a ring flash, you will need to be particularly attentive to exposure/light level; given the proximity of the flash to the subject, the light can be harsh if used at full strength. Also, if you are photographing anything reflective, a lizard’s eyes, for example, you will be able to see the circular reflection of the ring flash; yes, your lizards will have catchlights in their eyes. Most reflections can be cloned out during post processing.

Photo by Rob
Final Thoughts
Simply stated, lighting is critical to macro photography. If you want good results, you will need to make the right call when it comes to lighting; as you’ve seen, you have options and you don’t necessarily need to spend a lot of money on a fancy setup. What matters most is that you use your light source, whatever it may be, creatively and skillfully, in such a way that it flatters your subject.


1 Comment
Or, you can use the pringles cans diffuser 😉
In fact, I consider it as the best, especially if you use the Extension Tubes!