One of the most interesting astronomical phenomenon that we can photograph is the solar eclipse. A solar eclipse is when the moon passes between the Earth and the Sun. A partial or total solar eclipse offers interesting photographic opportunities, so if you are an umbraphile, here is how to photograph a solar eclipse.
The Solar Eclipse – 21 August 2017
If you happen to be in the USA this coming weekend – 21st of August 2017, you will want to understand how to photograph a solar eclipse, as a large part of the country is going to be in the path of a total solar eclipse. This means millions of people across the continent will be able to witness this rare event.
As many as twelve states in the US will be in the path of the total eclipse. The eclipse path is a narrow one starting from Salem in Oregon (the shadow enters the U.S. near Lincoln city, in Oregon) to Charleston in South Carolina making this one of the most widely viewed and photographed solar eclipses in history…provided the weather is right!
The next total solar eclipse in the region is in July 2019 and will be visible in South America, but for the US, it will be in 2024. This means that if you are looking to get that all important shot, you should be getting ready now.

Image By NASA [Public domain], via Wikimedia Commons
Quick Tip on How to Photograph a Solar Eclipse : In order to witness the total solar eclipse, you must be in the path of totality to photograph all the phenomena like Baily’s beads, diamond ring, chromosphere and corona. If you are even just outside of the path, you will only see a partial eclipse.
What is the time of the next eclipse?
The time to shoot the eclipse will be early morning on the west coast and early afternoon on the east coast. The duration of the total event from start to finish will be less than two hours and the duration of the total eclipse will be from under two minutes to two and a half minutes depending on where in the path of the eclipse you stand.
More information regarding times for this particular eclipse, look here and here for more information. Here is also an interactive eclipse map from NASA and some free downloadables with safety viewing information.
So What is a Solar Eclipse?
A solar eclipse occurs when the moon passes between the Sun and the Earth casting its shadow on the Earth. This shadow is called the Umbra. If you are interested in how to photograph a solar eclipse, you will need to be within this shadow region.

Image By Sagredo (Own work) [Public domain], via Wikimedia Commons
How to Watch a Solar Eclipse?
An eclipse event takes about one to one and a half hours in total, and starts as a small notch along one edge of the Sun. The Moon gradually shifts between the Earth and the Sun until complete darkness when only the solar corona is visible. This is one of the most incredible natural thing that you can photograph.
Just note, you should never view an eclipse with the naked eye. You need proper solar safety glasses to view the eclipse and a solar filter to photograph the eclipse. Never look through the view finder, but use live view mode for focus your shot.

Image By Eclipse Glasses [CC BY-SA 3.0 ], via Wikimedia Commons
Quick Tip on How To Photograph a Solar Eclipse: The only time you can view the eclipse without protective gear is during totality. This is the only time you can photograph the eclipse without a solar filter. Make sure you use the filters and safety glasses as soon as totality ends and the Sun reappears.
What Are the Phenomena to Watch Out For?
The equipment required to photograph the eclipse depends on what you wish to shoot during the entire event. Watch out for the minute details like Baily’s beads effect, diamond ring effect, solar prominence, corona. If you wish to know what these are, here is a real quick note about these.

Image by Kelvinsong (Own work) [CC BY-SA 3.0], via Wikimedia Commons
Baily’s Beads Effect:
Named after the English astronomer Francis Baily, this is a feature of a total solar eclipse that happens when the rugged lunar surface (mountains, craters, valleys) lets the Sun shine through during totality.

Image by James West, All rights reserved, used with permission.

Image by James West, Some rights reserved, used with permission.
Diamond Ring:
The diamond ring effect is seen only when one bead is visible. This marks the beginning of totality. This can be seen twice during the eclipse. One before and one after totality. Both these phenomena last only a few seconds.

Image by James West, All rights reserved, used with permission.
Prominences:
A solar prominence is a large, bright, gaseous feature extending outward from the Sun's surface, often in a loop shape.

Image by James West, All rights reserved, used with permission.
Chromosphere:
This literally means “sphere of color.” This is the second of the Sun’s three main layers of atmosphere. The chromosphere emits a reddish glow as super-heated hydrogen burns off. This red glow can only be seen during a total solar eclipse as it is invisible during other times due to the very bright photosphere.

Image by Luc Viatour, via Wikimedia Commons
Corona:
A corona (Latin, ‘crown') is an aura of plasma that surrounds the Sun and other stars and is easily seen during a total solar eclipse as otherwise it is invisible due to the bright photosphere that is like a million times brighter than the corona.

Image by James West, All rights reserved, used with permission.

Image by James West, All rights reserved, used with permission.
Photographing the solar eclipse can be difficult, so some valuable tips to keep in mind are….
- Planning ahead of the event including noting all the elements you want to capture, selecting your equipment and confirming your location.
- Make a note of the exposures that you wish to shoot, ensuring you have a checklist of everything, so that you do not miss out on the day.
- Rehearse / practice to avoid missing your opportunity.
How to Photograph a Solar Eclipse, Ensuring the Corona is in Frame
The Sun's corona, which is normally invisible (due to the Sun's extreme brightness), will become visible during a total solar eclipse.
The corona is best photographed when shot close.
- In order to get a close up view of the above phenomena, and fill the frame, you will need to shoot through a telephoto lens or telescope of at least 500mm or more to see some visible details. Here is a guide of what you can expect for various focal lengths.
- For a full frame sensor, it is ideal to use 500mm and above, up to 800mm to fill the frame. But be very careful. The longer the focal length, the more chances there are for the movement of Sun to be recorded during totality especially when using a long exposure.
- Most photographers may not have a lens with focal length more than 400mm or maximum 600mm. In that case, use a crop sensor camera if possible or use a teleconverter or shoot by selecting the full frame camera’s “Crop Mode”.
- If you have only a wide angle lens, just use it, do not worry about it! Get creative with what you have or see if you can rent a lens for the event.
- Either way, make best use of the gear that you have in hand. Just remember you won't be holding the camera, as the exposures are longer during totality (a few seconds)
Quick Note on How To Photograph a Solar Eclipse: Practice test shots well ahead of the eclipse using the solar filter and your equipment. That will give you an idea of the best exposure settings to use with that filter during the solar eclipse.

Image by Luc Viatour, via Wikimedia Commons
Exposure Settings for the Various Phenomena
Here are some guidelines on how to photograph a solar eclipse, particularly for exposure settings for you to try, as these can work differently for different camera and lens combinations. On a clear day before the eclipse, at lower ISOs like 100 or 200, with aperture between f8 and f11 and with the solar filter ON, try different exposures with shutter speed ranging from 1/8000 or 1/4000 (depending on your camera) to 1/30 of a second.
Compare the images and choose the one that gives you the best output. Use those settings to photograph all the partial stages of the eclipse as the Sun's brightness remains almost the same during the partial phases.
Quick tip on How To Photograph a Solar Eclipse: You can always bracket exposures to get a proper exposure. It's totally up to you.
The challenging part to be photographed during the event is the totality and the most beautiful phenomena occur during these few seconds or minutes.
This is the only time the Sun's corona is visible as the corona is a million times fainter compared to the Sun's visible bright disk. Choose an aperture and try various shutter speeds from 1/1000 up till 2 to 4 seconds, depending on f value. Rehearse this process a day or two before the eclipse, so that you're comfortable doing these exposures faster while at the same time viewing the eclipse in between shots.
Here is a guide from Mr.Eclipse that can be of help!
Always shoot RAW and bracket exposures as much as possible to have the flexibility in post processing. Do not use very wide apertures like f2.8 or f4 as they may not give you very sharp images and do not go above f16 as these can create some strange light effects.
Safety Requirements During a Solar Eclipse
Please remember
- Never look directly at the Sun without eye protection. Wear solar viewing glasses to protect your eyes and failure to do so may result in permanent eye damage or blindness. Ordinary Sunglasses are NOT safe and should not be used.
- As for your camera, use a certified solar filter or Mylar films to photograph the eclipse or it can damage the camera’s sensor.
- Do not use the regular filters like UV, ND or polarising filters that are used for day to day photography as these are NOT safe to photograph the eclipse.

Solar Filter
Some quick tips on How To Photograph a Solar Eclipse:
- Set your camera to Manual mode so that you have full control over the settings. You can manually set the focus to infinity, but it is always recommended to check for sharp focus. Note that, during the eclipse and during totality, your camera will not be able to auto focus or set correct exposure automatically.
- Turn off any flash all through the event; this is very important!
- Remember to put your camera on a sturdy tripod as you do not want to get a blurry image due to camera movement. And turn off vibration reduction on your lens.
- Be careful with the focus as you do not want to make an error letting poor focus ruin your precious image.
- Use live view to focus your camera for the eclipse. Magnify live view to get the focus right. Turn off auto focus. Pre-focus your camera on a distant light or star the night before, or on the morning of the eclipse, focus through a solar filter on the edge of the Sun to get the focus sharp. Put on a tape or something else to prevent the focus ring from rotating by accident.
- Do not stop with the above, but, during the eclipse, make sure the focus is right on live view mode as inserting and removing the filter can cause the focus to change.
- Shoot RAW.
- If possible, use the mirror lock-up feature to avoid camera shake or vibrations that can lead to blurry images, but be mindful that this can cause a slight delay in taking shots.
- Use a cable release to release the shutter so that you avoid all possible camera shake.
- If you are in a windy area, choose a location where you can keep away from the winds or hang a bag of sand, on the tripod to avoid camera shake. Wind can develop during the eclipse due to sudden drop in temperature caused by the eclipse itself.
- Keep your ISO low and exposure right to avoid noise. If exposures are very long with very low ISO, try increasing the ISO a bit. Long exposures can cause blurry images due to the Earth’s rotation.
- To make up for the dynamic range in brightness levels of the Sun’s corona during totality, try bracketing exposures with varying shutter speeds. This will help you have a series of images from which you can choose a the best ones. You can also stack images to capture the varying brightness of the corona.
- Most importantly, since you're going to be out in the hot Sun, drink plenty of water to keep you hydrated.
Note: The corona is made up of the brighter inner corona and fainter outer corona. So in order to capture the brighter and fainter details, use shorter exposures exposing for the inner corona and longer shutter speed to expose for the fainter outer corona. Shutter speeds depend on your focal length, aperture and ISO. Stack them later to get all the coronal details. Here are some beautiful images of the corona during totality.

Image by Nicholas Jones, Some rights reserved, used with permission
- Charge your batteries to full as using live view can drain batteries quickly compared with normal use. And, have one or two backup batteries.
- Have a high speed memory card and have one or two backup memory cards.
- In case you are travelling to the eclipse location, create a checklist of gear / equipment / accessories needed and pack them carefully. Keep a check on the weather forecast, arrive at the location early and keep offline maps in hand.
Here is an image that shows you how to photograph a solar eclipse in the entire solar eclipse sequence.

Image by James West, Some rights reserved, used with permission.
What Gear to Use to Photograph a Solar Eclipse?
- You will need a tripod as you will be using an exposure time of a few seconds to capture totality. Mounting your camera on a tripod will also allow you to enjoy the eclipse using solar viewing glasses in between shots.
- Use a sturdy tripod that can support your system. When on a tripod, turn off vibration reduction if your lens has it on.
- Use a cable release to avoid all possible camera shakes.
- You will need a good quality solar filter.
- Use a camera that creates less noise and has a more dynamic range.
- Use a DSLR or a mirrorless system that lets you use interchangeable lenses. Bridge cameras with longer zooms may not always give you the very sharp results that you expect, but, if that is the only camera you have, go ahead and use it.
- If you are planning on using a compact camera or a mobile phone to photograph the solar eclipse, put the solar viewing glasses or use a piece of Mylar film in front of the lens and take the shot.
- If you are shooting wide, your kit lens is more than enough and this is the easiest way to photograph the eclipse.
- If you need a close up shot of the event along with more details of the corona and the whole phenomena that occur during the eclipse (as mentioned above), then go for a longer focal length. Preferably above 500mm, but don’t go too long if you want to capture a good amount of the corona.
- Focusing, stability, and exposures can become a little complex as you increase the focal length of the lens, as the Sun will be moving out of the frame and you will have to keep track of it. And….you will need a rock solid tripod with a ball head to keep track of the Sun and avoid any camera movement.
- Practice well ahead of the event. In the days before the event, go out with your equipment and practice photographing the Sun with your solar filter on. Practice focusing using live view, bracket exposure, and find the best exposure settings that will not blow out the Sun and can reveal details on the Sun (eg Sun spots). This will ensure that you are ready for the event.
- Exposures are particularly long during totality and you may experience blur at longer focal lengths, especially above 400mm, if you do not get the settings right. You may need to use an equatorial tracking mount for very sharp images or play around with the ISO for shorter exposures. Shorter exposures may not record much of the corona, but you can do various exposures at different shutter speeds and stack them to get a decent image of the corona.
Quick tip on How To Photograph a Solar Eclipse: Use only a solar filter and not any other like UV filter or ND filter or polarising filter as they are no way near as effective as the solar filter. Why? Because solar filters filter out the invisible and harmful UV and IR rays to a huge extent that ND filters do not. These UV and IR rays are very harmful for your equipment and eyes.

Image By Skoch3 [CC0], via Wikimedia Commons
Did you know? You can even create a beautiful composite image of the entire eclipse that shows various partial phases of the eclipse and totality. For this shot, use a second camera with a wider lens and set it up to record the environment and the eclipse within the landscape. This shot takes a lot of planning though, as you need to know the positions of the Sun during the entire event.
Make sure that you have frames exposed correctly for the landscape too!
For this shot, you can use auto exposure at f4, ISO 200 and use a remote release. Or you can just use the intervalometer to take an image every few seconds (maybe 15 seconds) or minutes (an image every 4 or 5 minutes should work fine too). Make sure you have the second camera closer to you in order to remove the solar filter during totality in addition to removing the solar filter from the long lens on your first camera.
Quick tip on How To Photograph a Solar Eclipse : If not the above, you can have a spare camera fixed to a small tripod to capture video footage of the event. You not only get to see the entire event over again, but you’ll be able to capture the crowd’s excitement if you are in an area with a group of people.

Image by Skeeze, via Pixabay
The Process Summarised
- Have your camera pre-focussed the day before or on the morning of the eclipse
- Attach the solar filter and recheck focus, just in case
- Put the camera on a sturdy tripod and turn off vibration reduction if your lens has one.
- Adjust the ISO to 100 or 200 to avoid noise. Do not be worried to increase it if necessary.
- Choose your desired focal length.
- Use a cable release
- Start by shooting the full Sun and then continue to shoot as the moon obscures the Sun, all the way tracking the Sun as it moves across the sky.
- Towards totality look for phenomena like Baily's beads and diamond ring
- When the Sun is totally obscured, remove the filter. This is when the real excitement happens.
- Bracket as many shots possible with different exposures to get the corona, chromosphere and all possible phenomena. DO NOT forget to witness this beautiful event with your own eyes through recommended solar viewing glasses.
- After totality, replace the filter in front of the lens and continue shooting the various stages as the moon moves past the Sun.
- If you are shooting wide angle, make a good composition, but make calculations as to how many degrees the Sun will move across the sky and adjust the frame accordingly. You do not want to let the Sun go out of the frame during the entire event. Also, do not let other elements in the frame dominate the Sun as the Sun is your focus here!
Note: A diamond ring appears just before and just after totality. The time between these two ring effects is when you are safe to view the eclipse with the naked eye and you can use your camera without the solar filter.
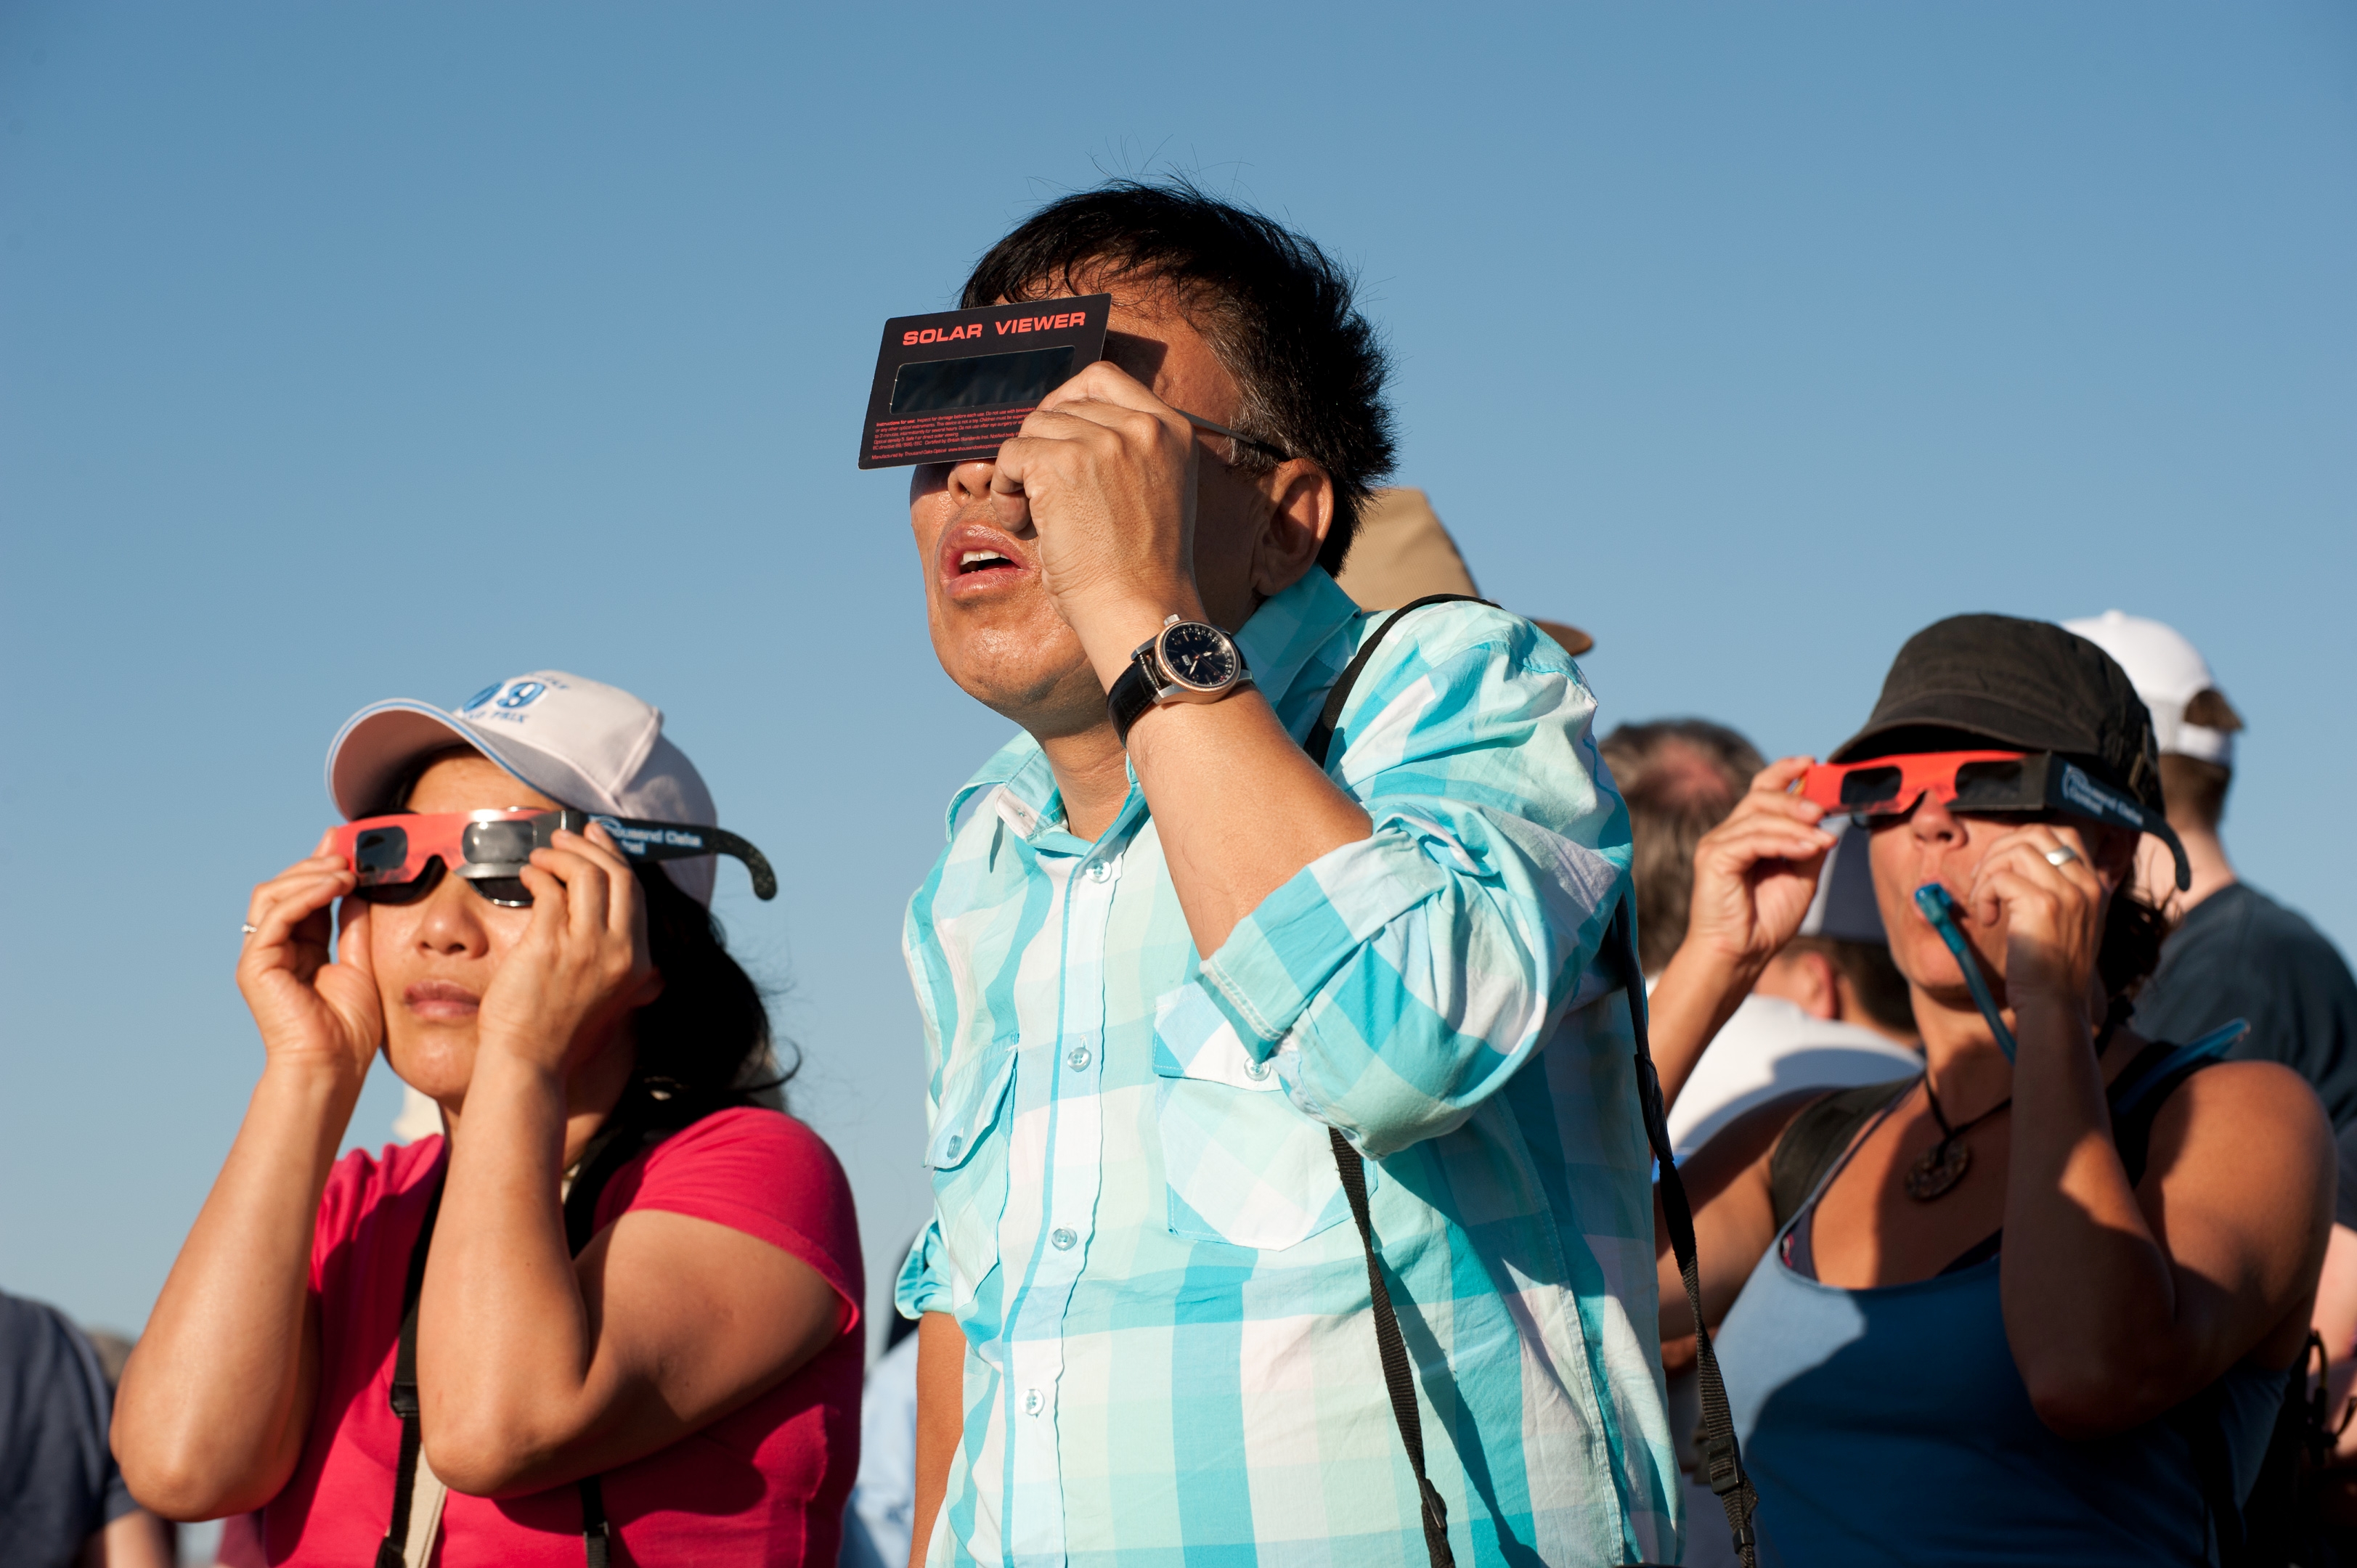
Image by Neal Herbert, used with permission
What to Do After the Eclipse?
- Back up all the image files and footage and edit only copies of the files. You cannot afford to lose them.
- Use a post processing software like Adobe Photoshop or Adobe Lightroom to enhance your images.
- You can stack the bracketed images to create a composite image
- If you shot wide, you can create a composite image with all the phases of the eclipse in one image.
- You can use the frames to even create a GIF animation of the eclipse.
How about photographing other astronomical phenomena. If photographing a solar eclipse has you hooked or if you aren't in the path of the next solar eclipse, there are plenty of other wonderful astronomical phenomena to photograph. Check out these Light Stalking tutorials:
Have you witnessed and / or photographed a solar eclipse before? If yes, please share your experiences and tips for other readers here in the comments section below.
If you are in the U.S. or will be travelling to the U.S. to view / photograph the total solar eclipse, please come back here and share some of your images. We would love to see them!


6 Comments
Thank you!!!
Fascinating and informative – thanks!
This post was extremely useful for shooting the eclipse. Considering that this was my first time attempting this, it was cloudy and poured down rain before and just after totality, and that there was a strong wind that kicked up while I was shooting, I’m fairly pleased with my results. Thanks again!
Hi Jody, thanks for that and glad that you found this helpful. Amazing to hear that you managed to get some shots of the eclipse at its totality besides the strong wind and the rain. Did you use anything to keep the tripod firm? We would like to see some of your shots and it would be great if you don’t mind sharing with us here 🙂
Hello Dahlia,
Thanks for great post. We are witnessing a solar eclipse on Dec 26th in India. I don’t have large telephoto lens / solar filters so I don’t intend to do close up eclipse photography, however if I want to take a wide angle picture, with a monument in foreground and eclipsed sun in background (without really focusing on the sun per se), is it safe to do so for camera?
Thanks,
GT
Hi GT, thank you for reading. As mentioned in the article, I personally would not recommend shooting into the sun during a solar eclipse or otherwise, without a solar filter. All the best for photographing the eclipse 🙂