The sun is not a common subject that is photographed all the time, except for it to being a part of a grand scene or landscape. It the only natural source of light available to use humans during the day but it emits intense radiations that can be damaging to the eyes. With the right gear or accessories, it is easy to photograph the sun up close and it can be very exciting and rewarding.

When it comes to astrophotography, we do not think about photographing the sun often, but it can be quite an easy target as it is up in the sky all day when the skies are clear. It can be photographed from where you are and you do not have to go to a particular place like nighttime astrophotography (unless you are photographing eclipses and transits) where you will be looking for dark skies away from the cities.
There are times when there are interesting features that can be observed and photographed on the surface of the sun called the sunspots. In this article, we will look at how to safely photograph and process sunspots.
Sunspots are interesting to observe and learn once you understand what they are and start following space weather. Let us quickly take a look at what sunspots are and then go into the details about how to observe and photograph them.
What Are Sunspots?
Sunspots are comparatively cooler areas on the surface of the sun which means they are not really cool but are a few hundred degrees cooler than the surrounding areas. The reason why they are cooler is that they emit less radiation and hence look black on the surface of the sun. The reason why sunspots are formed is still not clear but it is related to electromagnetic energy.
Sunspots are active regions (AR) on the surface of the sun and can send strong coronal mass ejections (CME) into space. If during such an activity, the CME is directed towards Earth, then it increases the geomagnetic activity causing intense auroras and very strong interference can affect electrical and communication networks.

The Sun roughly goes through an 11-year cycle of activity with peaks and troughs. Solar astronomers have informed us that Solar Cycle 25 has officially begun and the Sun's activity has been increasing since December 2019 marking the beginning of a new Solar Cycle. It is predicted that the peak of this solar activity will be sometime between late 2024 and early 2026 with a large number of sunspots, solar flares, etc., that can be observed and photographed.
Since the Sun is already active, we thought this would be the best time to share how these sunspots can be observed and photographed.
How Can You Check For Sunspots
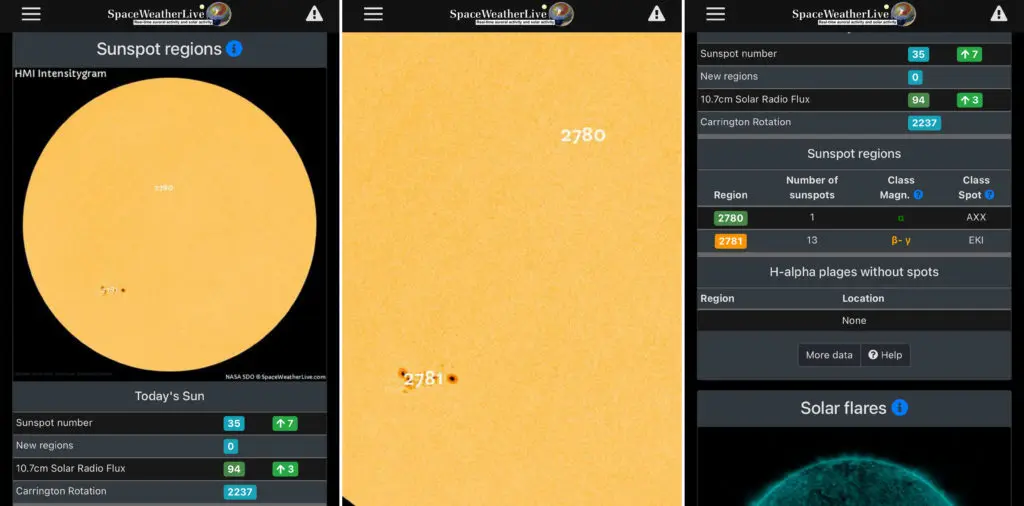
Some sunspots are clearly visible when viewed through eclipse glasses or solar filters. For example, the active regions, AR2781, AR2785, AR2786 from November last year, were visible to the eyes when seen through eclipse glasses without the need for any magnification.
One of the best ways to keep track of sunspots is to follow Spaceweatherlive.com and follow the Solar Activity there. They also have a free app that can be downloaded from the app store. It is available for both iOS and Android. This is a very handy one as you can check for active regions quickly and photograph them.
Here is a screenshot from the SpaceWeatherLive App from the 29th of November, 2020. The app will show you the sunspot regions and the number of sunspots in each region. If the sky conditions are good and you wish to photograph the sunspots, then you can go ahead and do that.
Besides, this app also gives more details of solar activities and auroral activities if anyone is interested.

This is the stacked image from imaging for the sunspots on that day. Shot on 26th November 2020 with a solar filter. Seen in the image are active regions 2783 (3 sunspots), 2785 (1 sunspot), and 2786 (6 sunspots) with sunspots, and region 2784 has no sunspots.
Shot on the Fujifilm X-T2, 600mm (900mm equivalent), 1/250s, f/11, ISO 250. Stacked 120 frames, pre and post-processing done in PIPP, Autostakkert, Registax, and Photoshop.

Safety Guidelines
Looking at the Sun and photographing it requires special equipment and precautions. Here is what you need to keep in mind:
- You should never look directly at the Sun without proper protection to the eyes as this can cause serious damage to the eyes and even blindness. Wear certified solar viewing glasses or eclipse glasses to protect your eyes from the intense and harmful radiations of the Sun. Ordinary sunglasses will not protect you from harmful radiation and should NOT be used to look at the sun. Small spots are not easily visible when viewed through these glasses and only big spots will be seen.
- If you are viewing the sunspots with the help of a telescope or a pair of binoculars, they need to have a solar filter in front of the front element for safe viewing.
- For photographing the Sun, you will need to use a certified Solar filter if not, it can cause damage to the camera's sensor and other internal parts.
- Filters like ND filters, UV filters, and polarising filters will not protect your camera from harmful radiation when photographing the sun.
- Do not keep the camera aimed at the sun for a long time. Every few minutes, you will need to put the lens cap on and point it in a different direction.
How To Photograph Sunspots
Gear Required
Photographing sunspots requires very minimal gear. Here is what you need:
- A camera that can shoot in manual mode.
- The longest lens that you have. A focal length greater than 300mm is recommended. The longer the better.
- A solar filter
- A stable tripod
- A cable release
About The Solar Filter
With regards to the filter that you need for shooting the Sun, you do not need expensive glass filters, but a solar viewing film from a certified company like Thousand Oaks Optical or Baader Planetarium is more than enough. These solar films are made from polymer films and they block most of the harmful light and radiation making it safe for you to look through and photograph the Sun.
You can buy one of the sheets sometimes cut to size or even an A4-sized one that can be used to cut out filters for your camera, binoculars, solar viewing glasses, etc. Mount this cut sheet onto cut cardboard or something similar.
There are optical companies that make filters to fit the size of your lens, for example, I got mine done for the Sigma 150-600mm lens from a company that sells telescopes and other optics. You just need to give them the measurements they ask for a particular lens and they get the solar film mounted on a plastic rim with screws so you can fit them in front of the lens.
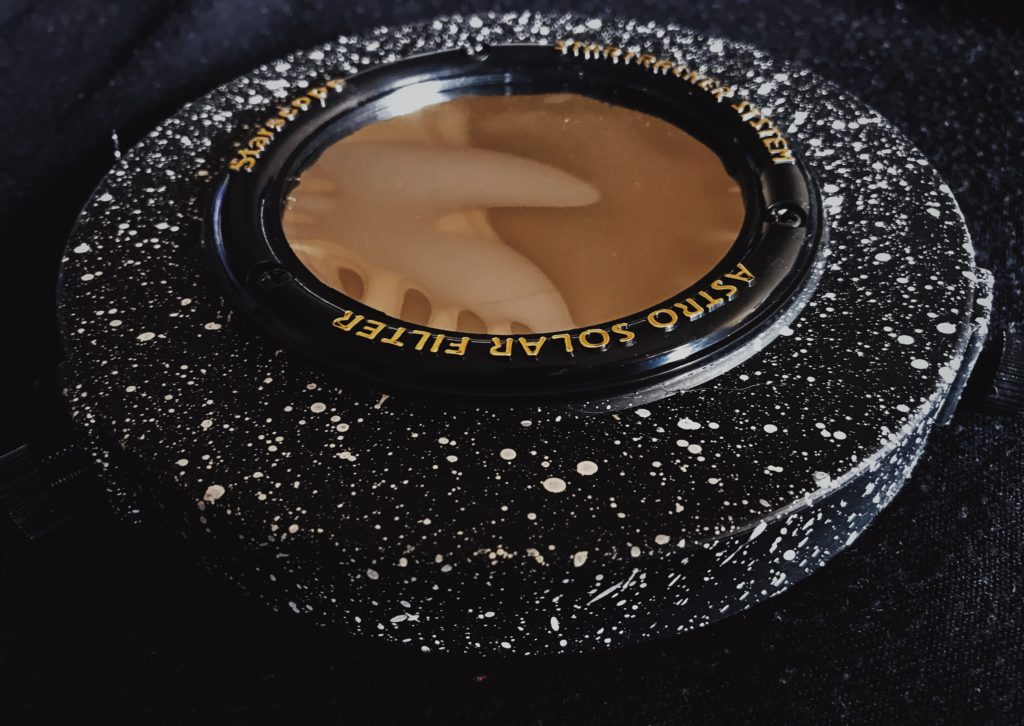
Whichever way you choose to fix the filter to the lens, it is important to use a certified one so you do not damage your eyes and the camera gear.
There are also suggestions in using a Mylar film for photographing the Sun and from experience, I found that you need a few layers of the film depending on the thickness they come in. I personally would not recommend using a Mylar film as it is not recommended by professionals to shoot the sun.
The Setup
Photographing the sun and the sunspots is a very simple process. You need to take the safety measures and then shoot away!
- The first step is to put the filter on the lens. Remember to have the filter in front of the lens before aiming your camera at the Sun.

- Mount your camera with the lens on a tripod.
- Set the lens to the maximum zoom.
- Set the lens and camera to manual focus.
- Point your camera at the Sun on live-view. Zoom in and focus manually till you get a sharp image. Make use of the focus peaking feature if you have one.
Camera Settings
The camera settings are pretty simple. Here is a quick run of the settings that you will need to use:
- Put the camera in manual mode.
- Turn off image stabilization.
- Set the white balance to daylight or leave it on auto.
- Set the aperture to between f/11 and f/16, so you get sharper details of the sun and the sunspots.
- Keep the shutter speed to about 1/100 to 1/250 of a second.
- Set the iso between 100 and 400 depending on what gives you the right exposure.
- Set the metering mode to spot metering because, except for the Sun, the rest of the frame is going to be completely dark.
- Check for accuracy in focus and use a cable release to release the shutter button so you can avoid all camera shake.
- If you do not have a cable or remote release, use the inbuilt timer delay to release the shutter.
Best Time To Photograph The Sunspots
The best time to photograph sunspots is around midday because this is when the Sun is high up in the sky and helps in capturing the sunspots in good quality without much atmospheric interference. Sometimes on very hot days, the atmosphere can get heated up and cause instability in the image captured. From personal experience, I have shot the sun on very hot summer days at noon and got the details right without a problem since we will be stacking the images.
You can shoot early morning or late afternoon when the sun is slightly low in the sky (about 45 to 60 degrees inclination) if the atmospheric conditions are great and there isn't distortion. Rising and setting sun can be difficult for stacking as the light from the sun travels through the atmosphere more and there can be evident distortions that will hinder the stacking process. If you are looking to capture single exposures, then it should be fine.
Single exposures are not too bad but a stacked image has more details. Here is a single exposure post-processed in Adobe Camera Raw. There is slight distortion on the edges and the sky was clear on this day. If there is more atmospheric haze, then the distortion will be very evident.


You also need to make sure that there are no clouds and that the sky is not hazy. These factors are important because, in this article, we will be looking at stacking the images to get crisp details of the sunspots.
Shooting Process
Once you have the sun focused and somewhere in the frame, not towards the edge, but slightly in, you can start shooting. Depending on the movement of the Sun in the frame, position the Sun in a particular part so the sun does not quickly move out of the frame. You will need to take a few shots between a minimum of 60 and 150.
Take the required number of shots and if the sun moves towards the edge or out of the frame, reposition the camera to bring the sun into the frame.
Once you have the frames of the Sun, you can move on to pre-process and post-process the Sun images to get clear details of the sunspots.
Pre-Processing For Sunspots
Pre-processing is the first step towards creating your stacked image for the Sun and the sunspots. During the pre-processing steps, the images are prepared so they are aligned and cropped ready for stacking. Any issues with brightness are also adjusted during this process.
Software For Pre-Processing
The software required for pre-processing is pretty simple to use and it is free for Windows. The applications used were:
- PIPP for aligning the images and cropping
- Autostakkert for stacking
- and Registax for wavelet adjustments
- For colour grading, Adobe CameraRaw was used.
You can post-process in any software that you have because you only need to make changes to colors and/or white balance, and a few basic adjustments as required.
Aligning And Cropping The Images
Before registering and stacking the images, we need to align the images in the frame so that they are ready for stacking. For this process, PIPP is a very good software that is designed to preprocess planetary, moon, and sun images. It helps to crop each image, center them in the frame, and also discards frames that are not useable, for example, too over or underexposed and blurry frames.
The software also orders the output images based on image quality and you can also instruct PIPP to choose a percentage of the best images if you are worried there are a few bad frames.
Here are the pre-processing steps involved in PIPP:
- Open PIPP.

- Select the best images discarding the over/underexposed and blurry images if you have any in the set.
- In the File menu, click “Open Source Files“, or click “Add Image Files” button at the bottom of the window, locate the images, select them all (ctrl + A), and press open.

- Or, you can drag the selected images into PIPP.
- You will get a pop-up mentioning the Join mode – click OK.

- This will open up a preview of the output frame. You can just close that window.

- Check the box for “Solar-Lunar Full Disc” at the bottom of the window because we are processing the full disc of the Sun and not a closeup of the Sun's surface.

- Move to the “Processing Options” tab. You now want a color image of the Sun. So uncheck the “Convert Color To Monochrome” box. If you want a monochrome image, then leave this option checked.

- You now need to select a “Cropping” option. There will be a default value in there usually 1200 x 1200. Click “Test Options” (top right) this will open up a cropped preview of the output frame.

- If you are happy with the crop, leave it as it is. If the crop is tighter or wider than what you are looking for, then change the values in “Cropping” options till you get the desired crop. In the image above, you can see that the disc of the Sun has been cropped. So I changed the values to 1500 x 1500 to include the full disc of the Sun.
- In this step, you can go for either a square crop or another desired crop of your liking. I have shown screenshots below for both.


- Once you have chosen the desired crop and you are happy with it, click “Test Detect Threshold”

- This value is by default set to “5” with the “Auto Object Detection Threshold” checked.

- This is to detect the object pixels (in this case, the Sun) in the current frame. Pixels that are detected are colored in “Red” and the undetected areas are colored monochrome. For “Auto Object Detection Threshold” set to 5, PIPP has detected areas away from the Sun as you can see in the screenshot below.

- So uncheck “Auto Object Detection Threshold” and change the default value from 5 to a higher value till the application detects the area of the Sun. Depending on what is detected when you pre-process, you will need to choose a value here between 1 and 255.

- In this case, I had to use a value of “50”


- If the Sun area is not completely colored red, which means, not detected completely, you will need to choose a value till the whole Sun area is detected.
- I have tried leaving this option as “Auto” in the past and it has given me good results. If you find that the images are quite dim, then you will need to amend the values there.
- Move to the “Quality Options” tab and in the “Quality Limiting” section, check the box for “Only Keep The Best Quality Frames“.
- You have two options here:
- Number of frames to keep
- Percentage of frames to keep
- This will instruct PIPP to arrange your images based on their quality. You also have the option to keep the maximum number of photos and that way PIPP will choose the best quality photos depending on the number you input.

- I chose to keep 90% of the best frames. You can choose to keep all the frames if you know they are all perfect or choose a lower percentage depending on the images in the set.

- Now move to the “Output Options” tab and select the output file format as “AVI” and also choose the directory for the output folder. You can leave it in the default output folder as well.

- Now move to “Do Processing” tab and click “Start Processing”

- This will process the images based on the instructions that you provided.
- The app then does the quality processing and sorts the images based on quality.


- PIPP will also sort the frames by total brightness.

- The process took 234.2 seconds.

- Once processed, the video file will be put in the chosen output folder if you chose one, or in the default folder.

We now have the aligned and cropped frames, positioned in the same part of the frame, in the form of an AVI file. The next part is stacking and we will be using an application called AutoStakkert for this process.
Stacking
The next step involved after aligning and picking the best images is to register and stack the images.
Here is the process for stacking the images with AutoStakkert:
- Open AutoStakkert.
- Click “Open” and find the folder containing the centered and cropped video of the Sun frames from PIPP. You can also alternatively drag and drop the file into AutoStakkert window.

- The file will open in AutoStakkert.

- Adjust the “Zoom” value to see the full disc of the Sun. I have set it to 50%

- Now choose the Option “Surface” and check “Improved Tracking” under “Image Stabilization“
- Under “Quality Estimator” choose the option “Global“
- Now click “Analyze“

- Set the frame percentage to stack. By default, it is set to 50. We already chose the best 90 percent of images when pre-processing in PIPP. So I have chosen 95 percent of the frames to be stacked. Also, click “Place AP Grid” and this will place Align Points on the Sun.

- You can now stack the frames. Click “Stack” and you can see the stacking process plus the progress bar.

- Once the stacking process is complete, you can see the stacked image.

- The stacked TIFF file will be automatically saved in a folder along with the aligned, centered, and cropped AVI file from PIPP.

Now if you look at the stacked TIFF file, it looks dull without many details. You can see the sunspots, but they are not sharp.

In order to bring out the details, we can use the wavelet processing area of Registax, that will help to reveal a lot of the hidden data in the stacked file. So here is the process in detail.
Wavelet Adjustments In Registax
Registax which is a very powerful software and free for Windows can be used for wavelet adjustments.
- Open Registax.

- Import the stacked TIFF file into Registax by clicking “Select” or by just dragging and dropping the file.

- Click “Show full image” to see the full disc of the Sun.

- Click on a point on the Sun where you want to see a preview of the changes happening as you drag the different sliders – preferably an area where there is a prominent sunspot. That is where the app will put a preview box. Click “Show Processing Area” to see the preview box where the app will be making the changes initially as a preview.
- In the “Functions” menu on the right if you click “View Zoomed” you can see the preview area zoomed on the screen so you can clearly see the changes happening when adjusting wavelets. I usually click on the area where the sunspots are, so I can see when enough details are revealed.
- Or, press “Ctrl” and move the mouse around to see the area that you want to see zoomed in the “Zoom Panel“


- If you look at the Wavelets section on the left, you can see six layers. The top layers are for bringing out the fine details and the bottom ones for larger details. You can play around by adjusting the wavelet values individually for both denoise (if you need to reduce noise) and sharpen.
- Any changes you make, you will see them happening inside the preview box.
- Now gently drag each slider to see the details appearing on the sunspots. You need to be very careful as it is easy to overdo this and it can lead to unwanted noise and artifacts in the image. Make adjustments till you see a desired look in the preview box and it depends on personal preference. There are no set values that you need to use to get the details right.
- In the screenshot below, you can see that I have set each slider to about 40 and in the “Zoom Panel” you can see that the details on the sunspot are quite good. Once you have made the right adjustments, click “Do All” and this will apply the wavelet adjustments to the entire Sun image.

- In case you are not happy with the results, you can “Reset Wavelets” (button below “Do All”) and start over again.
- Here is another screenshot where I have set each slider to about 10 or 11 and in the “Zoom Panel” you can see that the details on the sunspot are not very sharp, but not too bad either.

- It is all personal preference. Once you are happy with the results and the process is complete, if you wish, you can make contrast and brightness adjustments here itself and then save the image in TIFF format.
- The current version of Registax is quite stable, but if you come across any errors during the above process or if Registax crashes/hangs, restart the app and try again. You can always refer to the documentation on Registax's website for specific troubleshooting help.


When looking at the images above, you can see that when making slight wavelet adjustments, the sunspots become more detailed than it was before making wavelet adjustments. When more wavelet adjustments were made, about 40 in each slider, you can see that the sunspots look detailed but the edges of the sun's disc start to have weird artifacts.
Work your way around what setting suit the image you are processing. Do not go overboard. Make adjustments in steps of 2 till you get the desired effect.
Post Processing Sunspots
The image of the sun looks good as it is after adjusting wavelets, but the colors look a bit dull. So you can import the TIFF file after Wavelet adjustments, into Photoshop, Lightroom, or any other post-processing software and then make some adjustments to get the desired color and contrast.
Here is the process:
- Import the image into camera RAW, you can also do the same in Lightroom. I have imported the image where I kept the wavelet adjustments to about 11 for each layer.
- Adjust the white balance – Increase the temperature and tint according to your preference.
- Make changes to exposure, contrast, blacks, textures, clarity, dehaze.
- I also made some adjustments to the tone curve.
- In the HSL panel, a few adjustments were made to the Hue, Saturation, and Luminance sliders for the “Orange” color.
- Finally, slight amount of sharpening was applied.

Here is a comparison of the sun image before and after post-processing:

Here is a zoomed in look at the sunspots.

The frames used in this image were shot on the 7th of November 2020, and the active region with sunspots that you see here is AR 2781. There were 13 sunspots in that region on that day.


Here are screenshots from the SpaceWeather App for that Day, in case you are interested!
Have you photographed and post-processed for sunspots before? What apps did you use and what processes did you follow? Share your experience with us in the comments section below!


