Have you noticed the colour of the moon when high up in the sky? We all know that depending on the position of the moon in the sky, the colour of the moon changes from reddish orange when rising to yellow a bit after moonrise, and then a greyish white when up in the sky. The colour varies due to atmospheric conditions and these are some of the most common observations.
Did you know that the moon is not just white but has colours? If yes, were you able to see the colours when shooting the moon?
Grab your Milky Way Photography Blueprint for free right here.
On a very clear night, the next time when you photograph the moon, switch to live view, zoom in and observe the surface of the moon. You can see the colours on the surface of the moon ever so lightly, without the aid of anything else.
The name mineral moon for this article is because we are going to bring out some colours of the mineral deposits on the surface of the moon. We will look at the steps involved in photographing and the pre/post processing techniques involved.
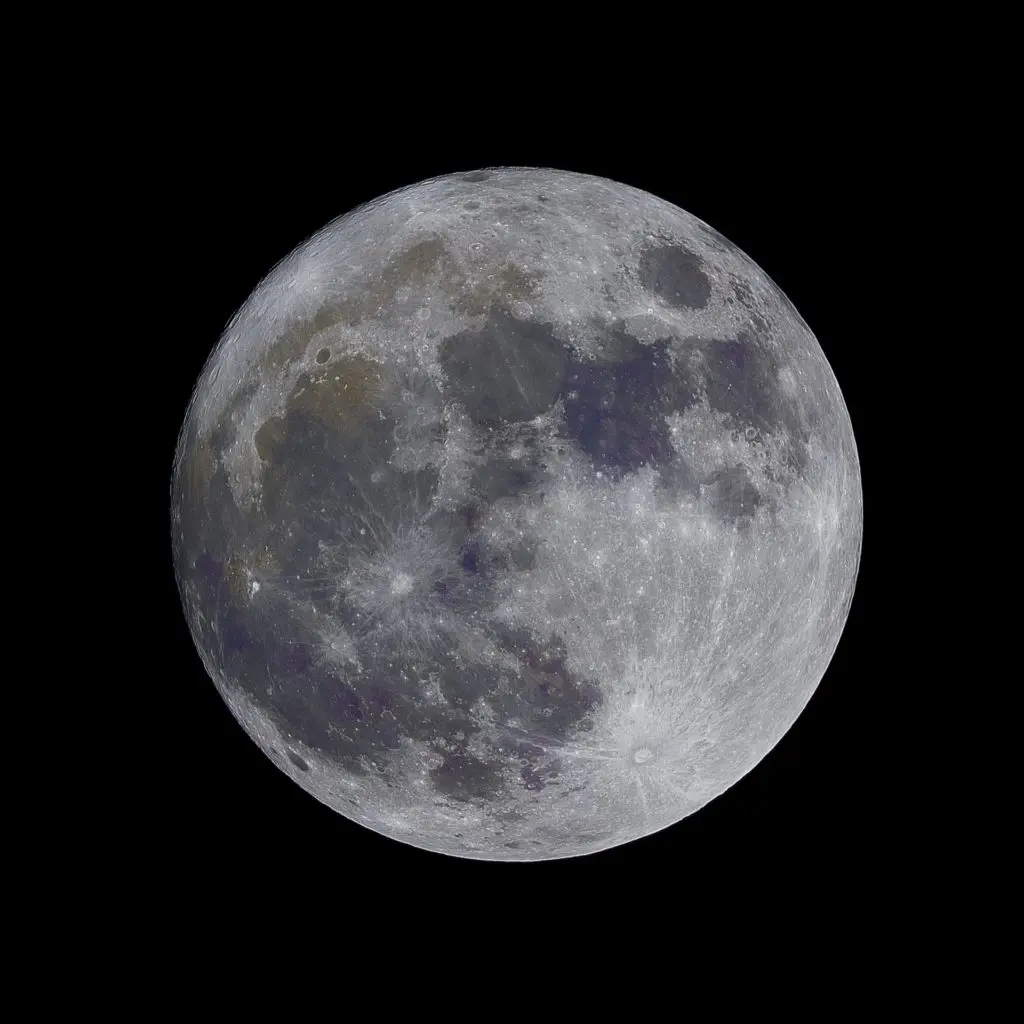
What Is A Mineral Moon?
The mineral moon is nothing but our moon with edited colours on its surface to reveal the mineral deposits. You can see some brownish orange and blue colours on the moon's surface. These are due to various mineral deposits found in the lunar soil.
Where Does The Moon Get Its Colours From?
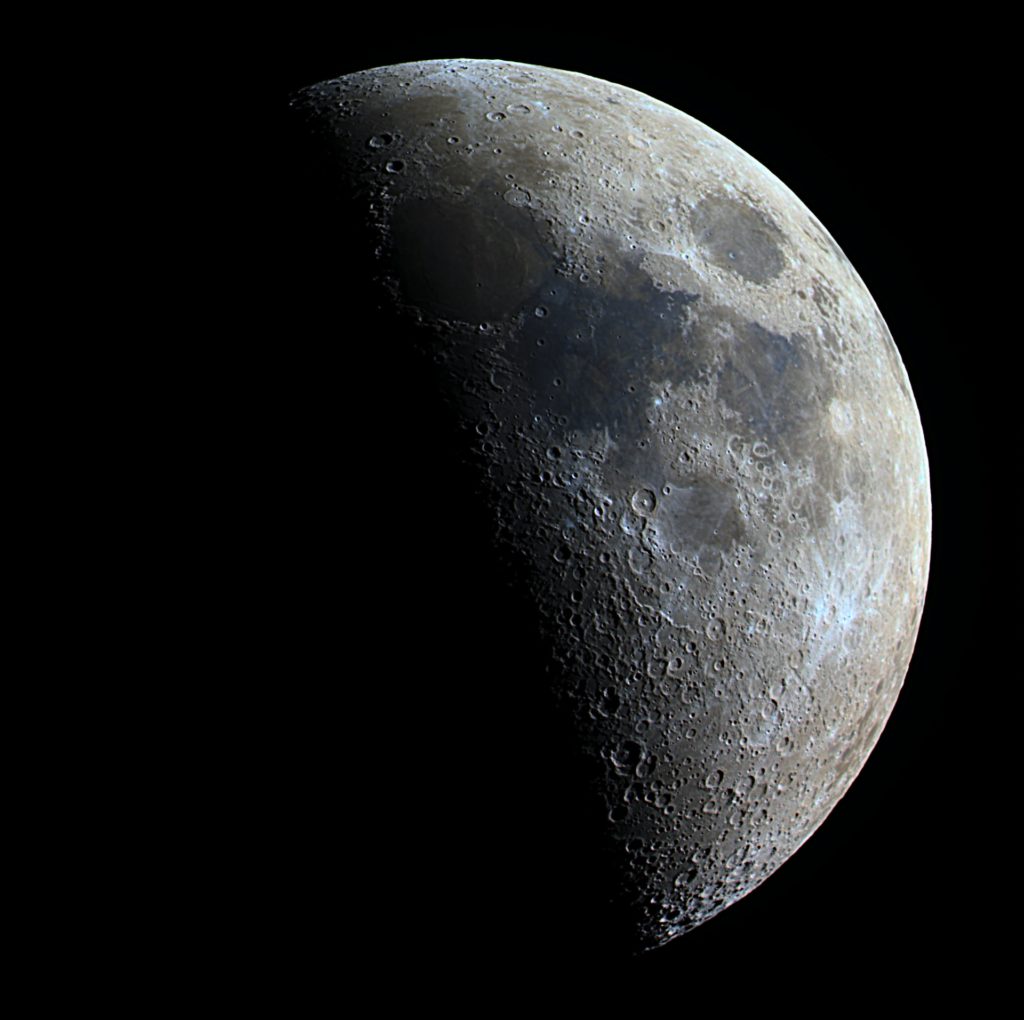
We all like to know where the moon gets its colours from – so we thought it would be a good idea to give a brief and quick overview of what gives our moon its colours.
The Lunar landscape is characterised by the Maria and the Highlands apart from other lava channels, domes, ridges, tectonic features, etc.
- The Maria are the large darker areas that we are able to see on the moon's surface and these are formed as a result of ancient volcanic eruptions. Maria (singular is mare) in latin translates for seas and the reason behind this is the early astronomers mistaking these areas for actual seas and hence they are named that way.
- The Highlands are the lighter areas and have a lot of craters.
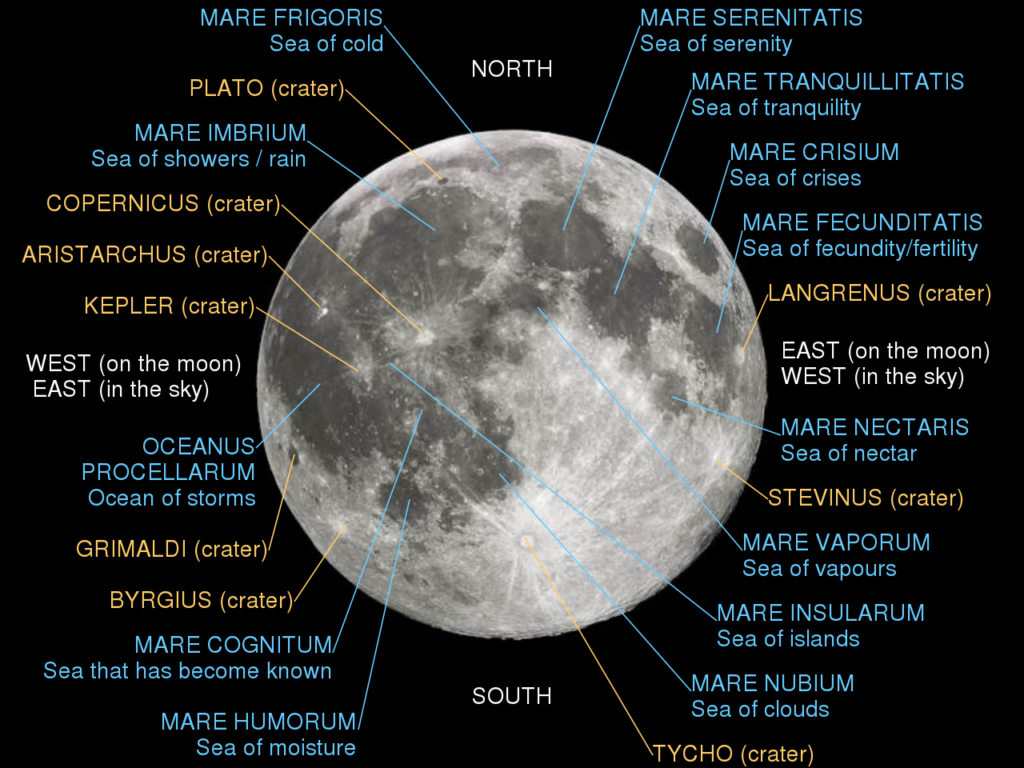
There are various metal and mineral deposits on the moon's surface in the form of compounds. Some of the compounds on the lunar surface are iron oxide, titanium dioxide, magnesium oxide, aluminum oxide, silicon dioxide, sodium oxide, calcium oxide, etc. These compounds are found in the form of minerals, for example, the mineral ilmenite is found on the surface of the moon and it is a compound that contains iron, titanium, and oxygen, olivine contains iron, magnesium, silicon, and oxygen, etc.
What We See Versus The Colours On The Moon
When we photograph the moon, depending on atmospheric conditions or the position of the moon in the sky, we get a “white or off-white” looking moon or an orange red tint if we photograph it during moonrise or moonset. The moon looks almost flat on a full moon day because of the lack of shadows that usually enhance the surface details of the lunar surface.
In addition to what we usually see, there are subtle blue, orange, and other colors on the surface of the moon. The blue color is caused by the higher amount of titanium on the lunar soil, the orange red color due to iron, and the other colors are caused by other minerals and where titanium is found in a lesser percentage.
If you want to learn more about the colors of the moon, go and have a read here on Universe Today for more information on the minerals read the Lunar Resources on Wikipedia.
Now, the colors are not deep but subtle and we need to gently enhance those colors and make the moon look natural. Going extreme on saturation will make the colors look awkward and the moon look fake.
Here is an image that was shot of a 93% waxing gibbous moon:
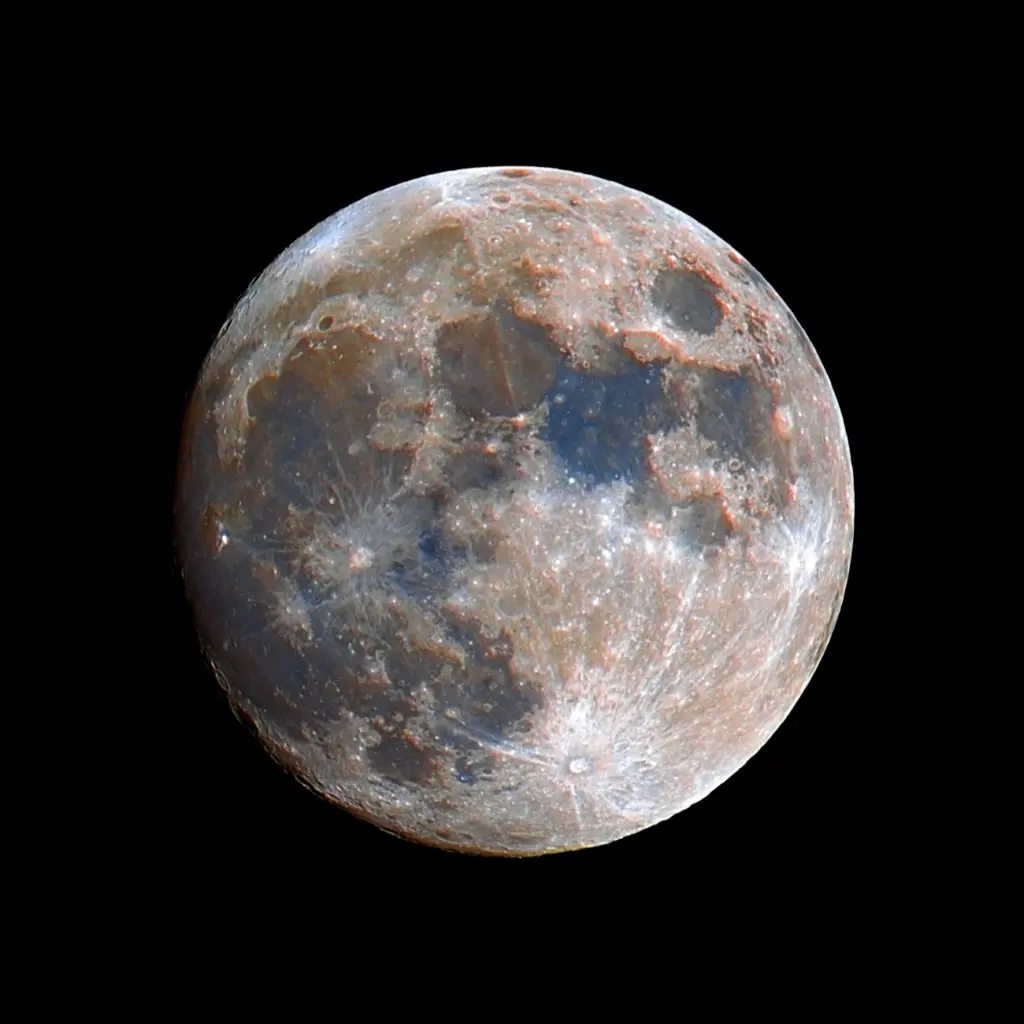
In this article, we will cover the process of photographing and editing the mineral moon. I have used my own image to show the various steps, so you get to see and learn the entire process.
First Step: Photograph The Mineral Moon
To edit the mineral moon, we first need to photograph it. Shooting the moon is simple and you may have already done it many times in the past. Make sure you shoot when the sky is very clear and not hazy in order to avoid turbulence in the image that can render the moon image distorted or sometimes blurry.
Here is a very detailed article by Mike Panic on How to Photograph the Moon!
Note: While most of us are focused on photographing the moon when it is a full moon, if you are someone who wants to photograph the textures, shapes and contrasting details on the moon's surface, it is better to photograph the moon when it is not full. It is during the phases other than the full moon that the details on the moon are accentuated by the shadows and therefore show a lot of contrast.
For a mineral moon, instead of a single shot, we will look at taking a few shots so we can stack them for bringing out the colours in the final image. The best phases would be right from the 25% illumination to about 80% illumination. Three to four days before or after the full moon should be fine too.
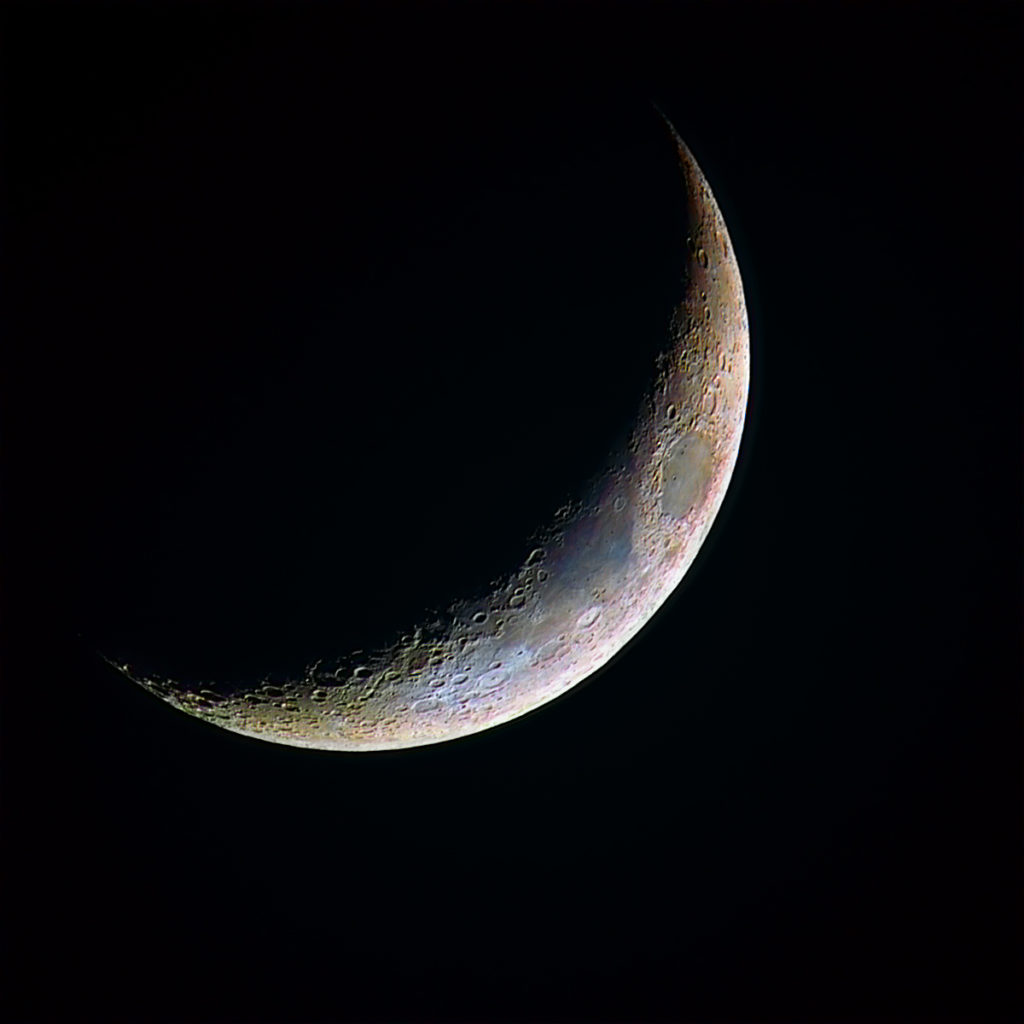
Here is an image of a 28% waxing crescent moon. You can see that the details look great on the moon's surface!
Important Tips For Photographing The Mineral Moon
Before photographing the moon, there are a few points that you need to keep in mind. If you are someone who photographs the moon often, you may have already noticed the difference in quality of the moon images if you do not take the following factors into consideration.
- When photographing the moon, there are certain factors that may affect the sharpness. One of the main factors is atmospheric conditions (atmospheric turbulence) at the time of shooting which is really important as it can cause blurry images. Sometimes, you may be using the right settings, perfect focus and the sky may look clear, but atmospheric haze can really interfere and render the moon images too soft. Photograph on a very clear night.
- Photograph the moon when it is high up in the sky. Why? That is the time when the moon is really clear because when the moon is lower in the sky, the light it reflects has to pass through a lot more air than when it is high up in the sky.
- The next point to keep in mind is to mount your camera on a tripod which I think is a must for moon photography (handholding is fine but you need to have a relatively fast shutter speed based on the focal length you are shooting with, which means increasing iso leading to noisy images). Remember to use a sturdy tripod that can withstand windy or conditions.
- Do not rely on autofocus when photographing the moon although autofocus will work fine in most cases. Zooming in on live view and manual focusing will give perfectly sharp moon images.
Equipment:
- A camera that can shoot in manual mode
- A zoom lens, the longer the better, above 300mm (full frame equivalent) – the reason behind this is, if the moon is shot at a smaller focal length and you then crop to fill the frame, the image quality will greatly deteriorate
- A sturdy tripod that can withstand any wind
- A cable or remote release to avoid camera shake
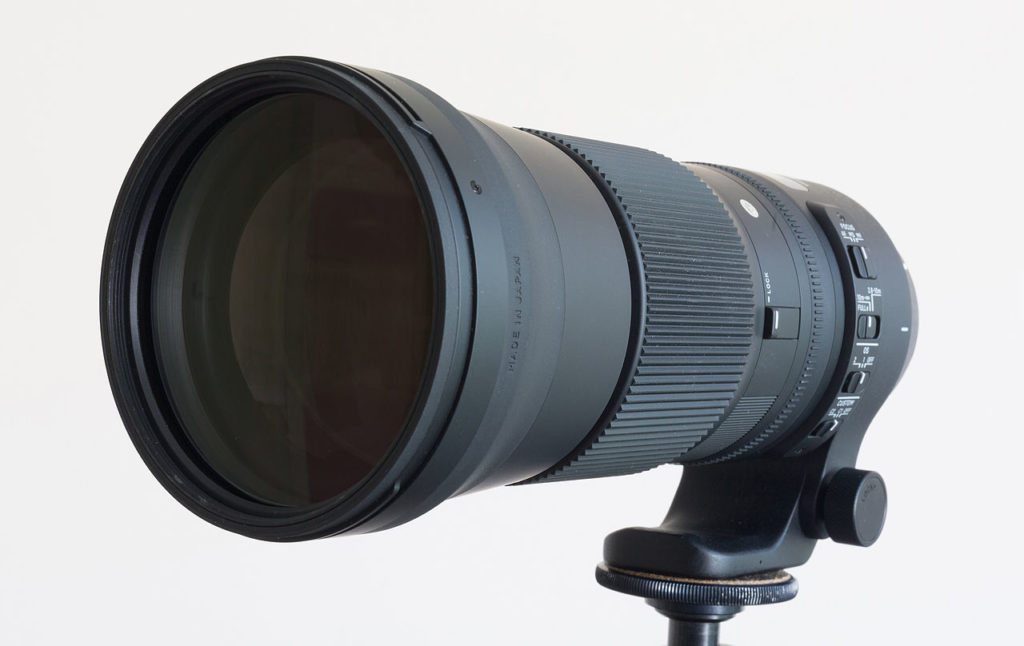
Note: I used a full frame DSLR and the 150-600mm lens at 600mm focal length, mounted on a tripod and released the shutter using a cable release.
Camera Settings:
- Make sure that you always shoot raw.
- Mount the camera along with the lens on a sturdy tripod.
- Turn off image stabilisation on the lens and on the camera body if it has that feature.
- Set the white balance manually (should be around 5000K) or daylight preset. If unsure, leave it on auto and make adjustments while post processing.
- Make sure you set the lens to manual focus. Although the moon is bright enough to autofocus, zooming in on live-view and manually focusing can give accurate results. Moreover, you do not want the camera to change the focus in between shots as you will be taking many shots.
- If you are using a DSLR, use the mirror lockup feature.
- Switch to live-view and point your camera at the moon. Zoom in the moon image on the screen and manually focus till you see the moon's surface details sharp on the screen. If you have focus peaking feature on the camera, make sure you use it.
- Since the moon is moving across the sky, for a 600mm effective focal length, you will need to set the shutter speed to faster than 1/60s for a full frame camera and faster than 1/125s for a crop sensor. Slower values may work, but I usually have it a bit faster to be on the safer side.
Note: Remember, these settings also vary depending on the moon phases. On a full moon night, you can shoot at very low iso values, fast shutter speed and still get good bright images of the moon whereas for a crescent moon, the settings will greatly vary.
- Set the aperture value to about f/11. This usually helps with sharper images.
- Depending on the above values, set the iso for correct exposure.
- Position the moon in the live view screen so that it does not move out of the frame quickly.
- Take a shot and look at it on the screen by zooming all the way in to make sure that the moon image is sharp and that the exposure is right. You do not want blurry or overexposed moon images.
- Now using the cable or remote release, take a series of shots.
Note: It is advisable to release the shutter manually for each shot or set the intervalometer to take a shot every second, as sometimes continuous shots without a break can cause blur.
- You can take anything from 60 to 100 which is the minimum required or take even more shots for stacking moon images. The more, the better.
Note: Make sure that you take the images of the moon in succession and do not let the moon move across the sky by a huge degree as this can make aligning the images during stacking quite difficult. As you know, the moon is orbiting the earth and rotates by a small degree every day and the earth is spinning! All these factors will contribute to blurry images.
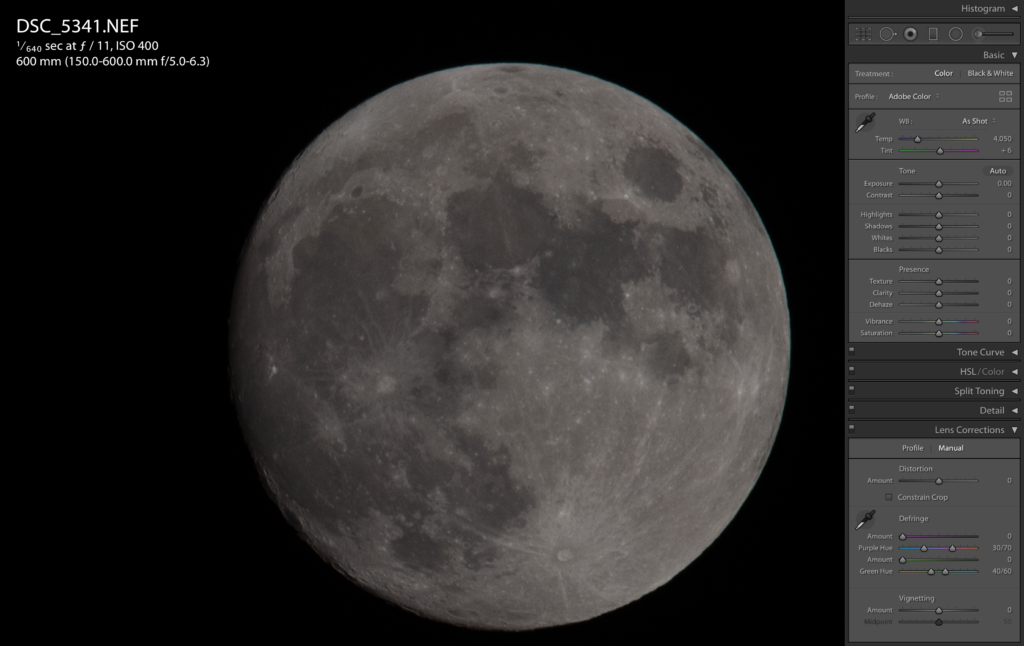
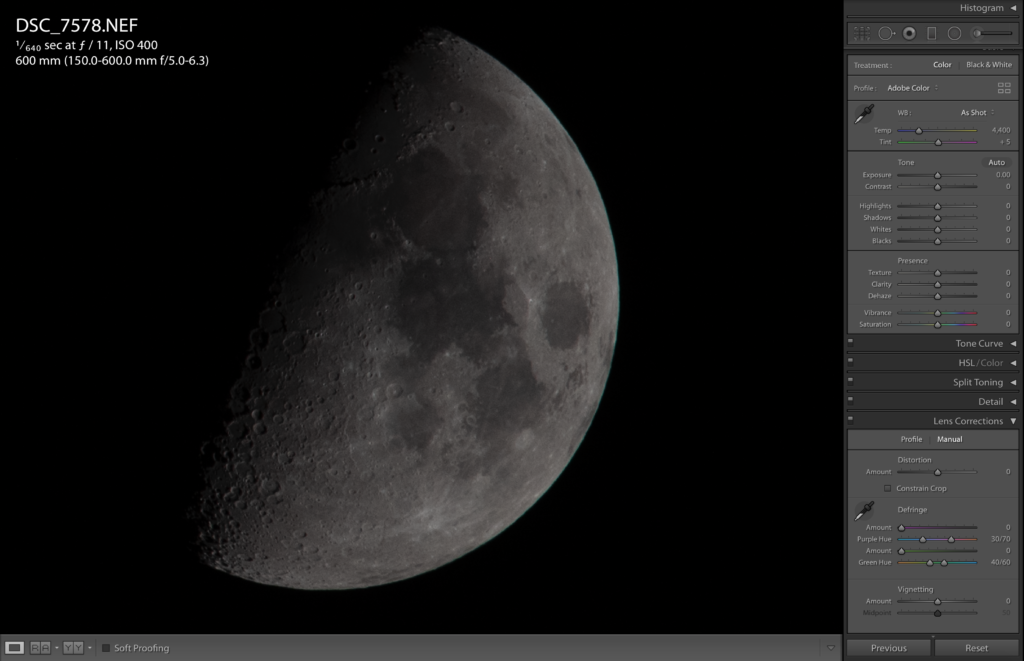
Here are three sample images that I photographed on three different days under different atmospheric conditions. There was quite a lot of atmospheric haze which was amplified by the lights from the stadium next door.
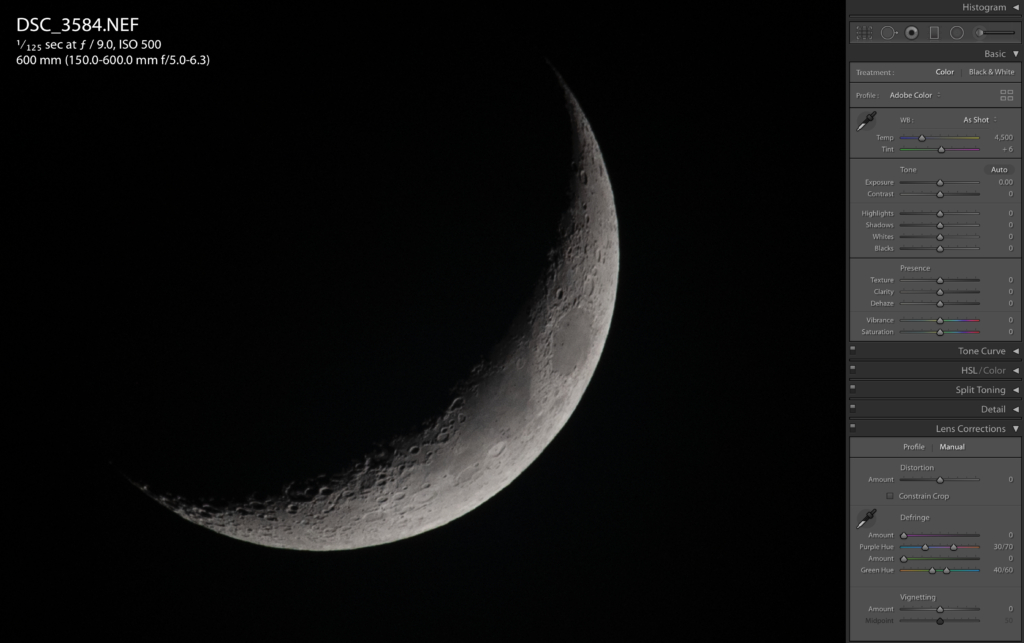
Second Step: Pre-Processing (Prepare The Moon Images For Stacking)
What Is Pre-Processing?
The first step in creating your stacked image is to pre-process the images and get them ready for stacking. In this process, the images are prepared in a way that the frames are aligned and cropped to a particular size and the brightness is adjusted to a normal value.
Software Used:
For pre-processing, PIPP is a very good software and it is free.
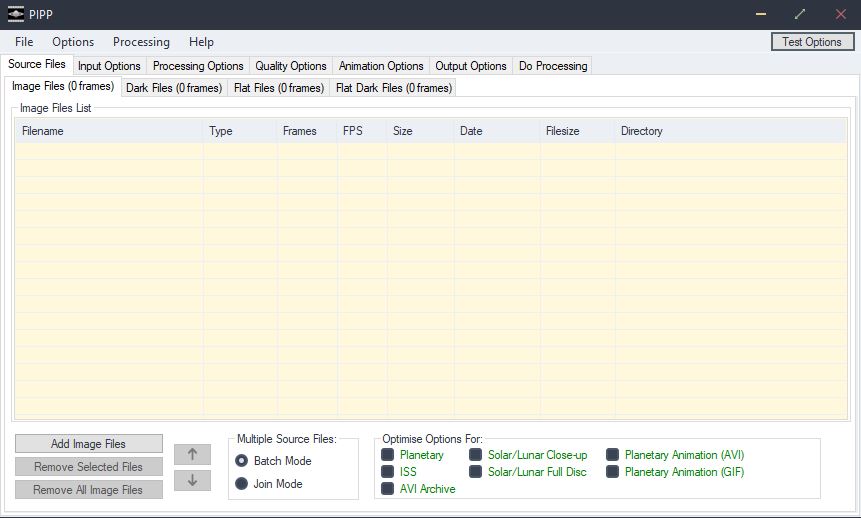
PIPP (Planetary Imaging Pre-Processor)
PIPP is a Windows application that is designed to preprocess planetary or moon images before stacking them with other applications like Registax. It is easy to use and great for anyone who is looking into stacking planetary and other solar system objects.
The advantage of using PIPP is that it helps to crop each image and centre them in the frame. It also selects the best frames in terms of image quality (discards overexposed or too underexposed, blurry frames).
The output frames are ordered based on image quality and if you are worried that a number of images are low quality, you can instruct PIPP to select only best quality frames. You need to save the processed frames as TIFF files to be used for stacking.
Note: If you have the patience to centre each image and crop and discard low quality images one by one, then you can do the above process in any post-processing application.
Here are the pre-processing steps in PIPP:
- Open PIPP.
- Select the best images discarding the over/underexposed and blurry images.
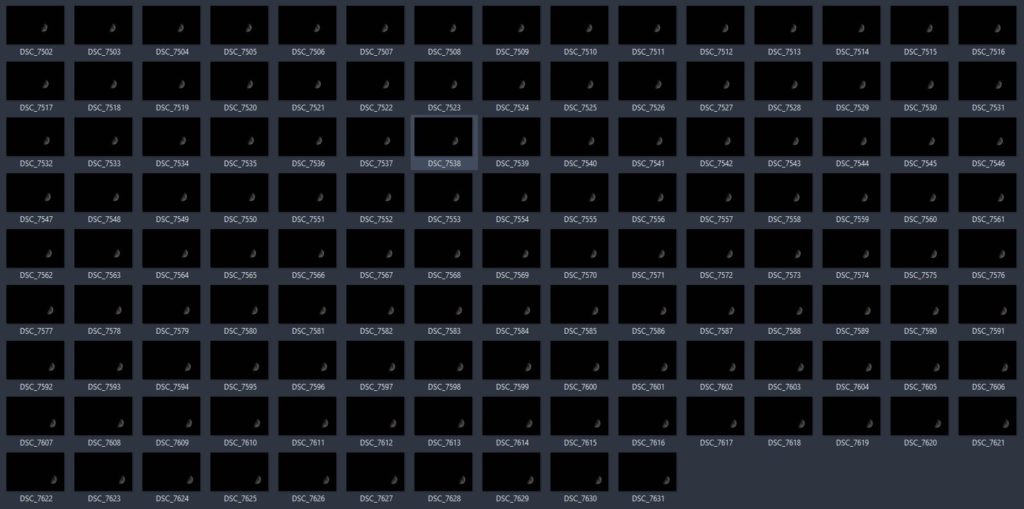
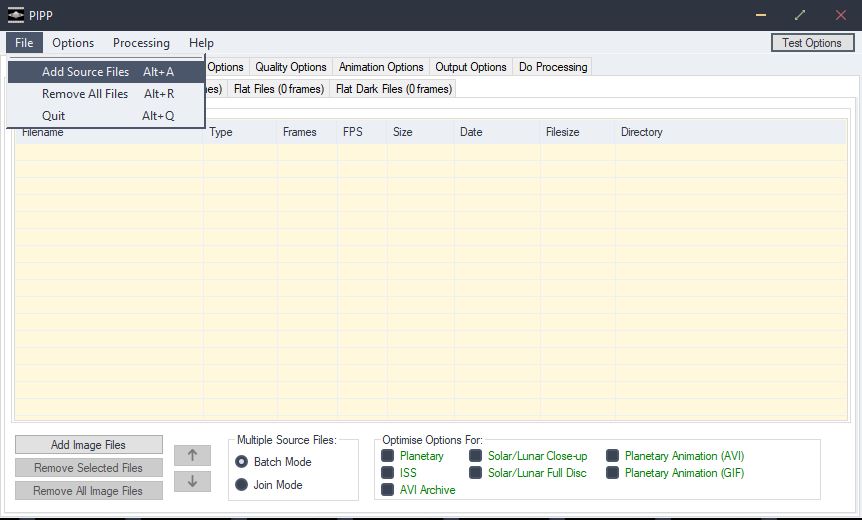
- In the File menu, click “Open Source Files“, locate the images, select them all (ctrl + A) and press open. Or, you can drag the selected images into PIPP.
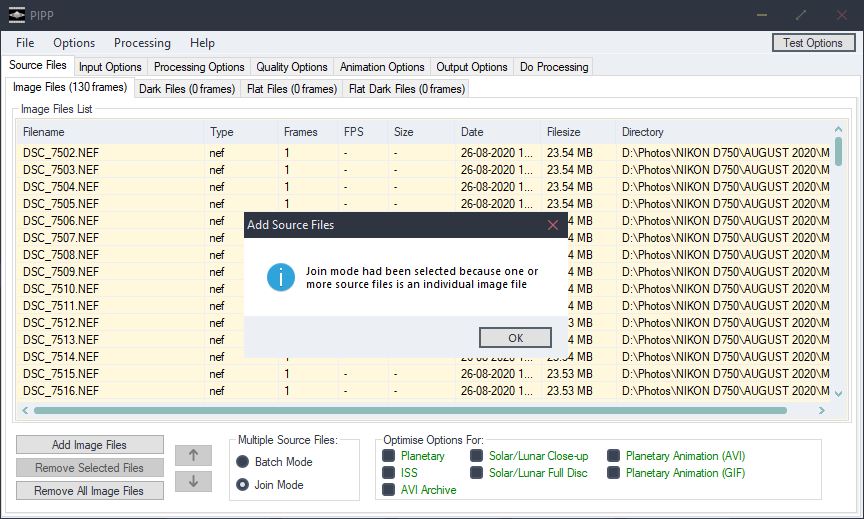
- You will get a pop up mentioning about the join mode – click ok.
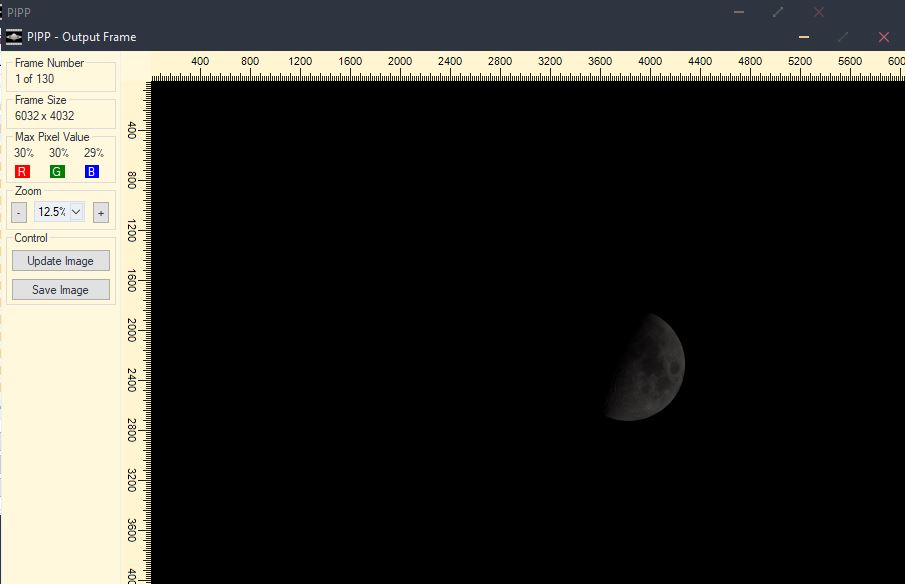
- This will open up a preview of the output frame. You can just close that window.
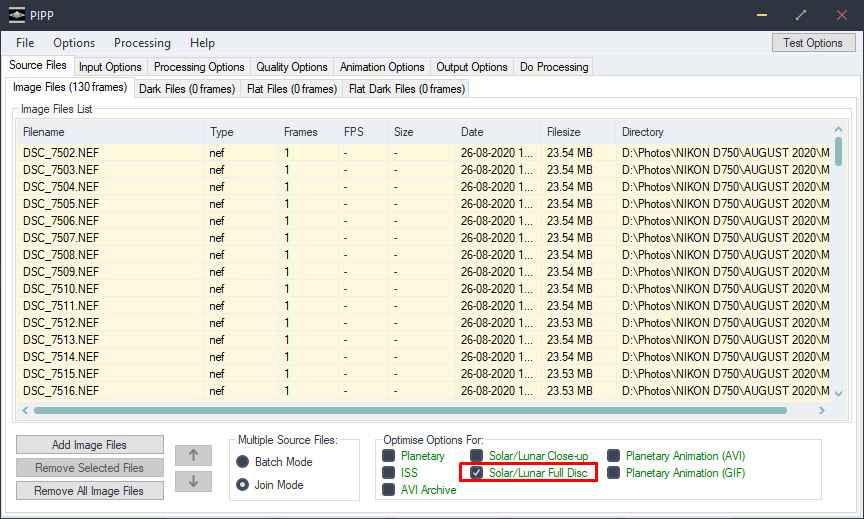
- Check the box for “Solar-Lunar Full Disc” because we are processing the full disc of the moon and not a closeup of the lunar terrain.
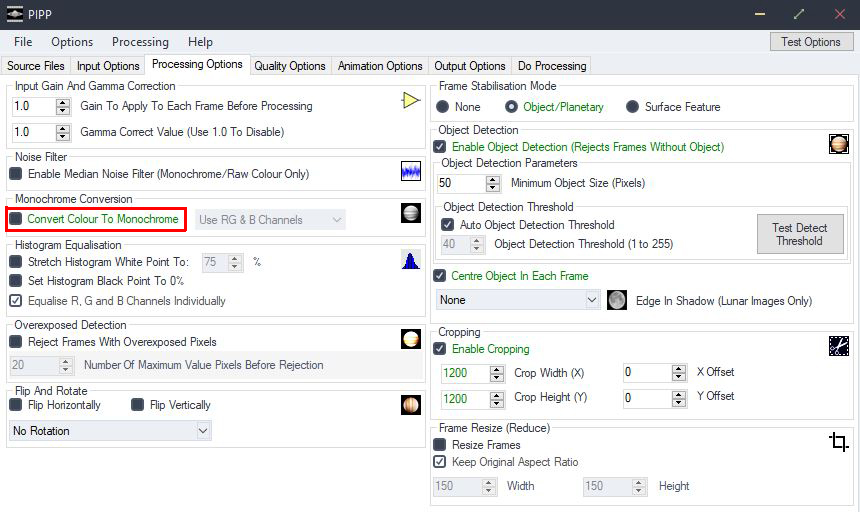
- Move to the “Processing Options” tab. You now want a colour image because you will be editing for the mineral colours on the moon. So uncheck the “Convert Color To Monochrome” box.
- You now need to select a “Cropping” option. There will be a default value in there. Click “Test Options” (top right) this will open up a cropped preview of the output frame.
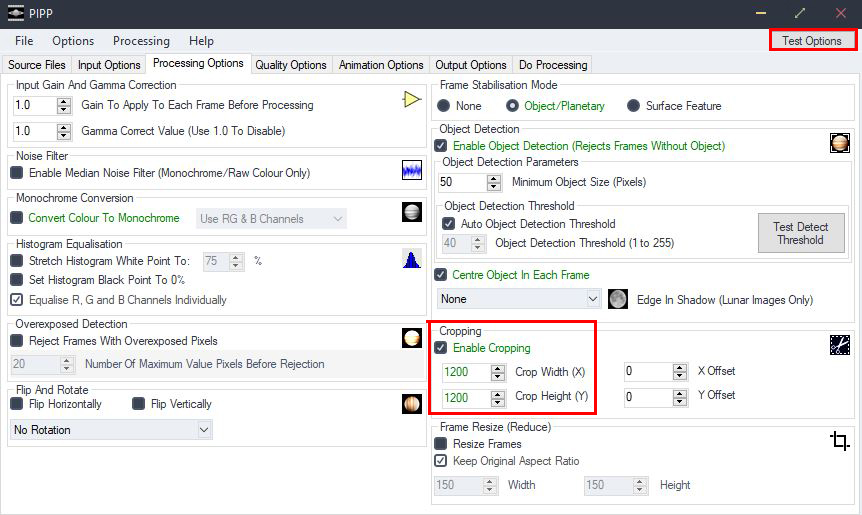
- If you are happy with the crop, leave it as it is. If the crop is tighter or wider than what you are looking for, then change the values in “Cropping” options till you get the desired crop.
- In this step you can go for either a square crop or a desired crop of your liking. I have shown screenshots below for both options.
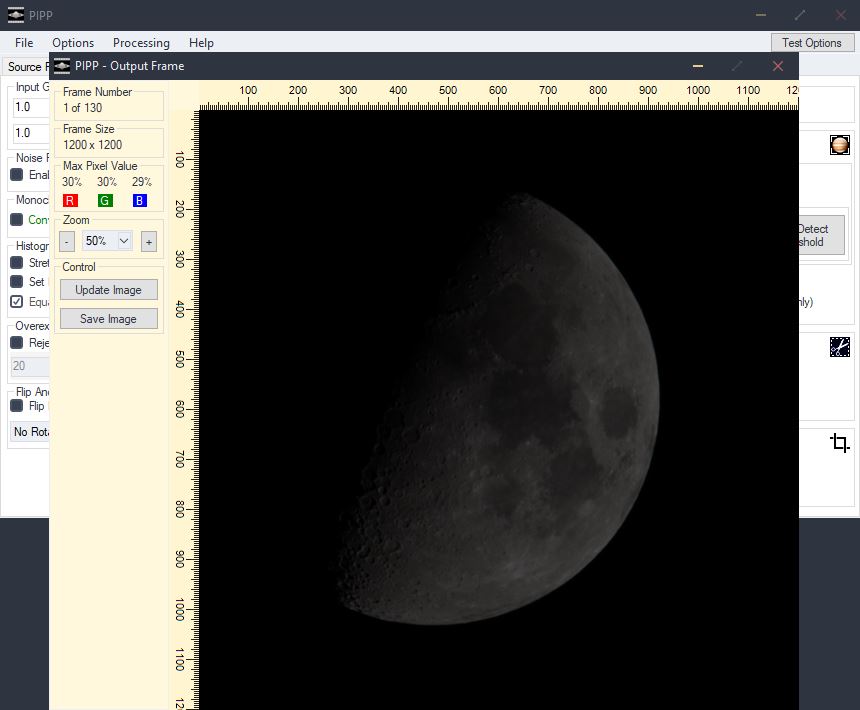
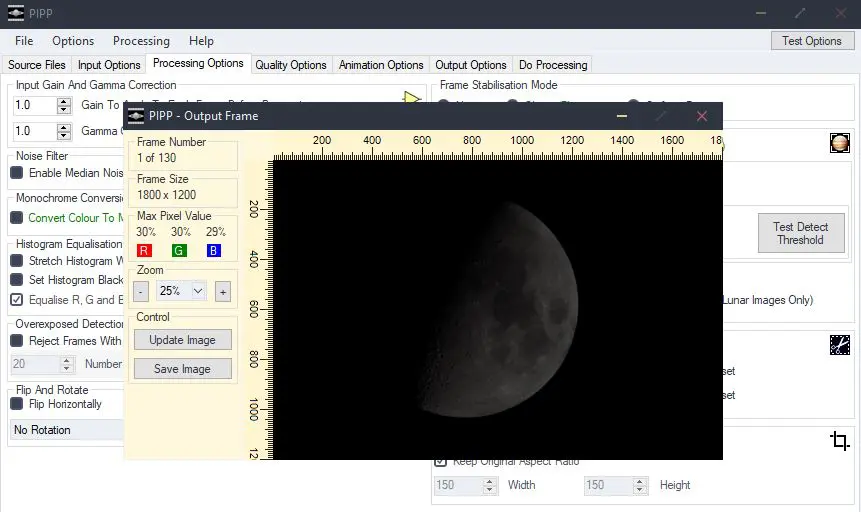
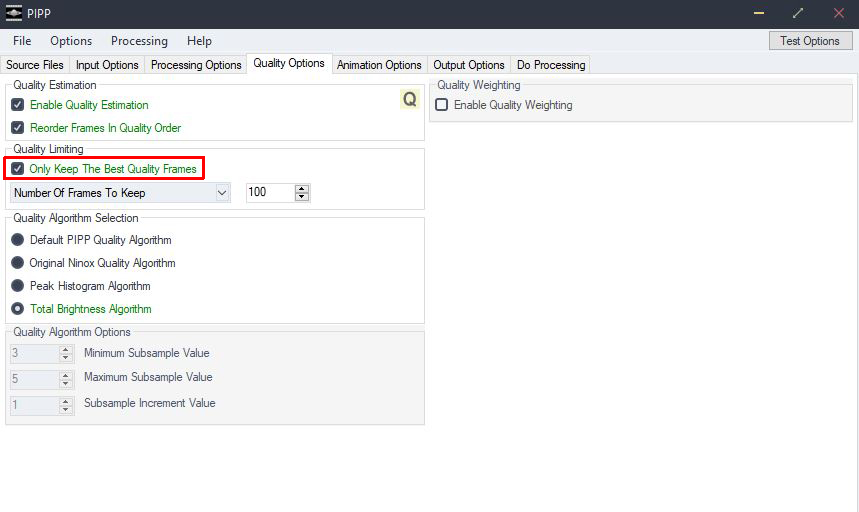
- Move to the “Quality Options” tab and check the box for “Only Keep The Best Quality Frames“. This will instruct PIPP to arrange your images based on their quality. You also have the option to keep the maximum number of photos and that way PIPP will choose the best quality photos depending on the number you input.
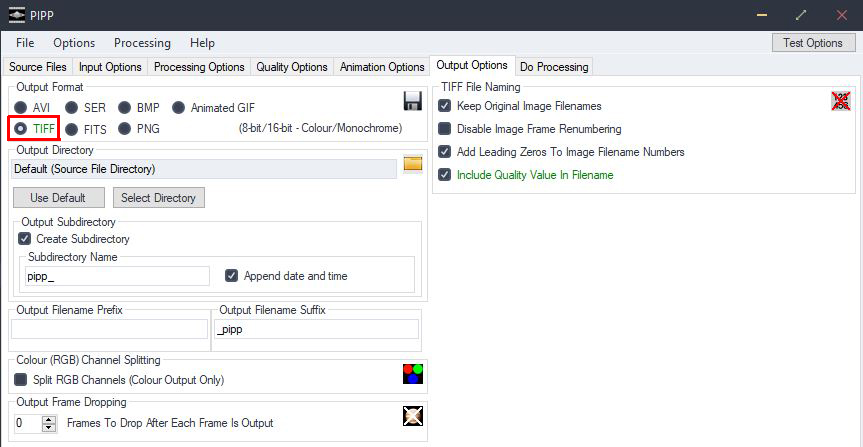
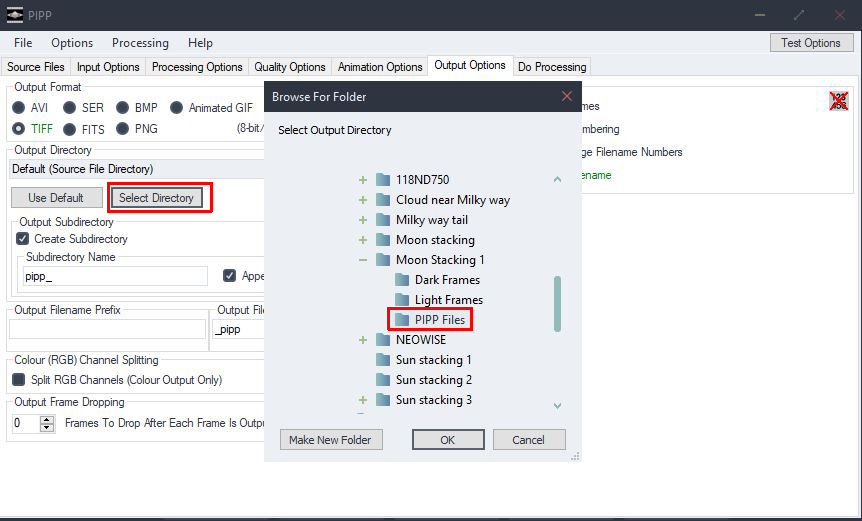
- Now move to the “Output Options” tab and select the output file format as “TIFF” and also choose the directory for output folder.
- Now move to “Do Processing” tab and click “Start Processing”
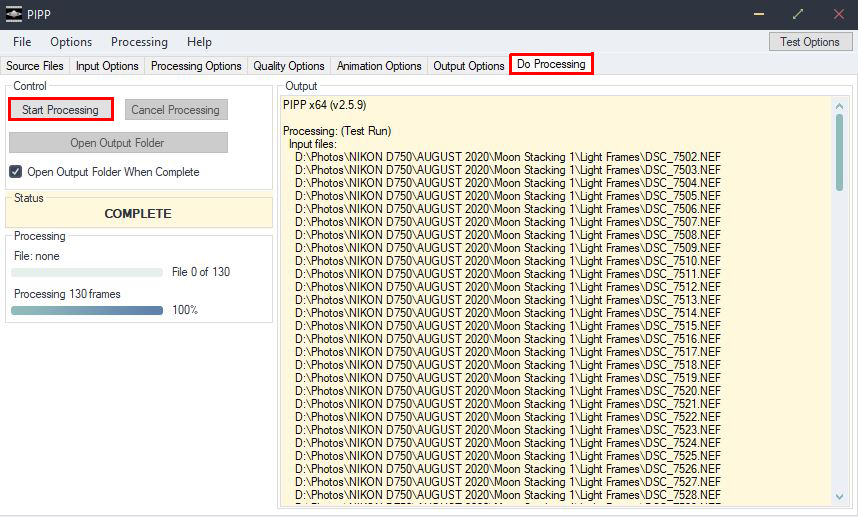
- This will process the images based on the instructions that you provided.
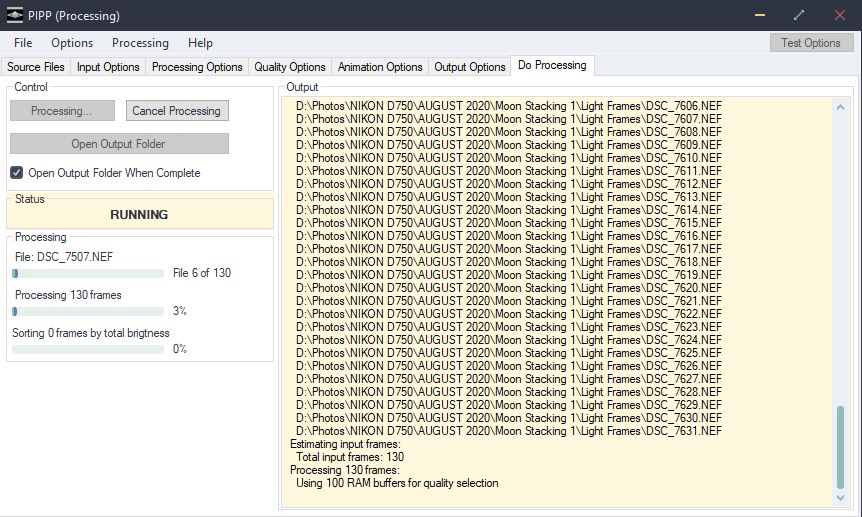
- The app then does the quality processing and sorts the images based on quality.
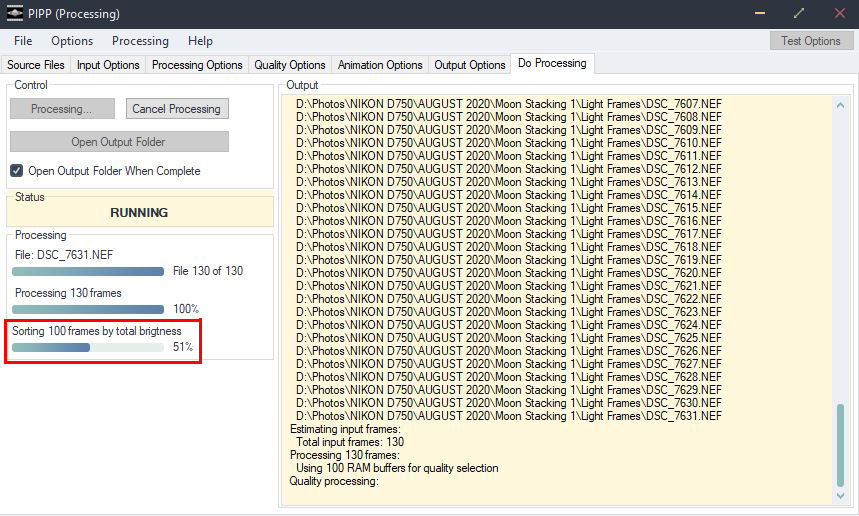
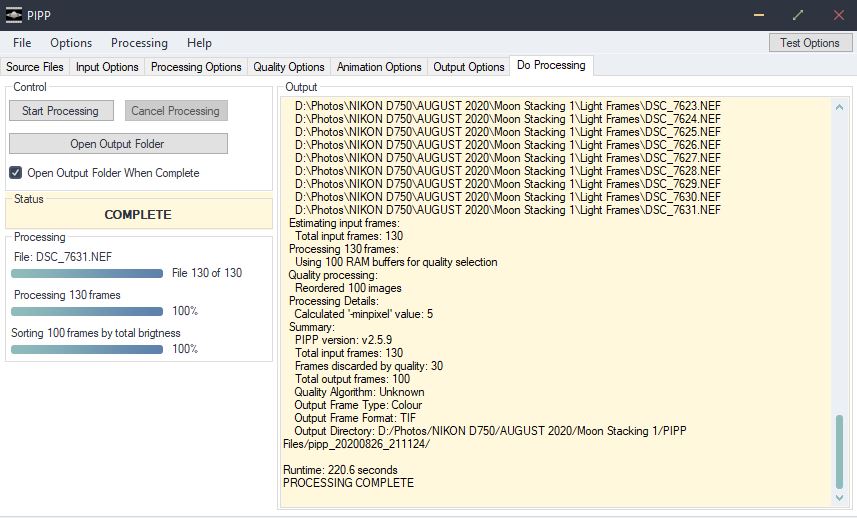
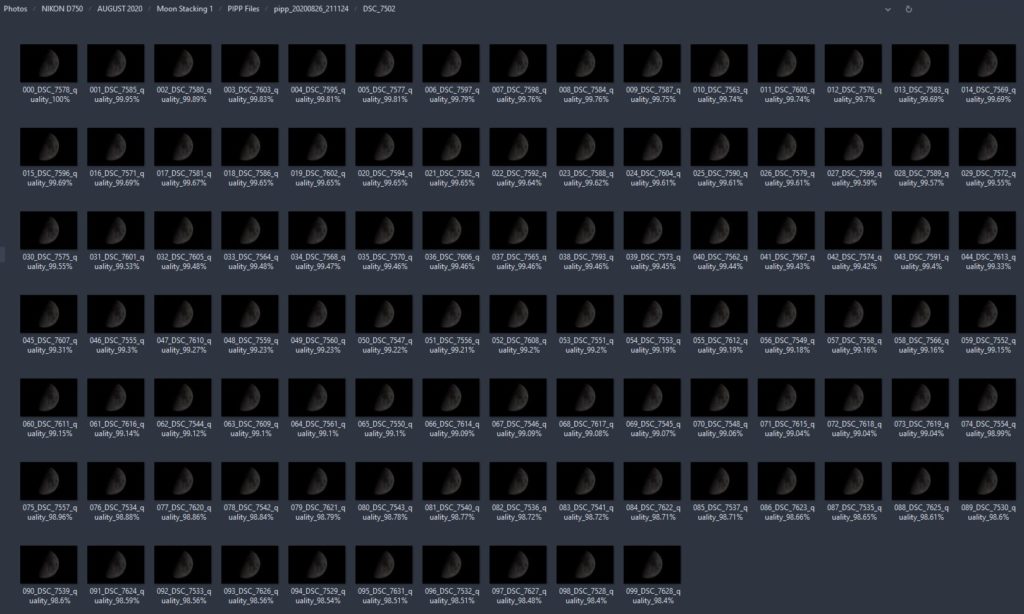
- Once processed, the images will be put in the chosen output folder. If you look into that folder, you will see that the files are all arranged by quality and not name.
Third Step: Stacking The Moon Images
Software Used:
In order to stack the pre-processed moon images, I used Registax.
Registax
Registax can be downloaded here from their website. It is a very powerful software that is free to use and is available for Windows only. We will only be covering the moon stacking part here, but when you get time play around with the software to see what else can you do with it.
Here is the process for stacking moon images with Registax:
- Open Registax.
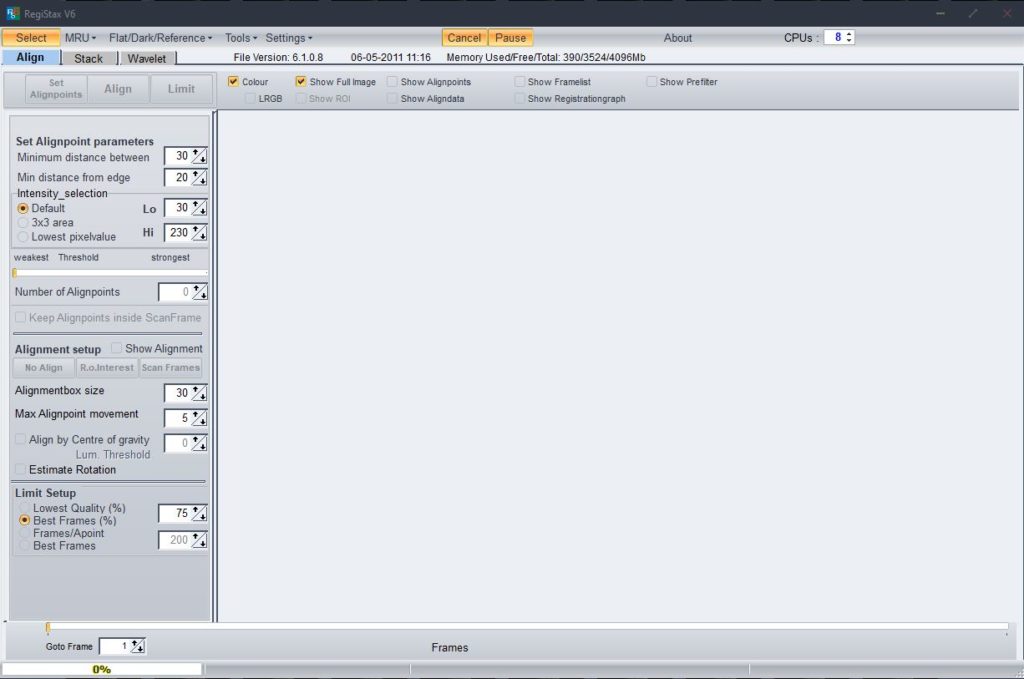
- Click “Select” and find the folder containing the centred and cropped images from PIPP. You can also alternatively select all the images, drag and drop them into Registax window.
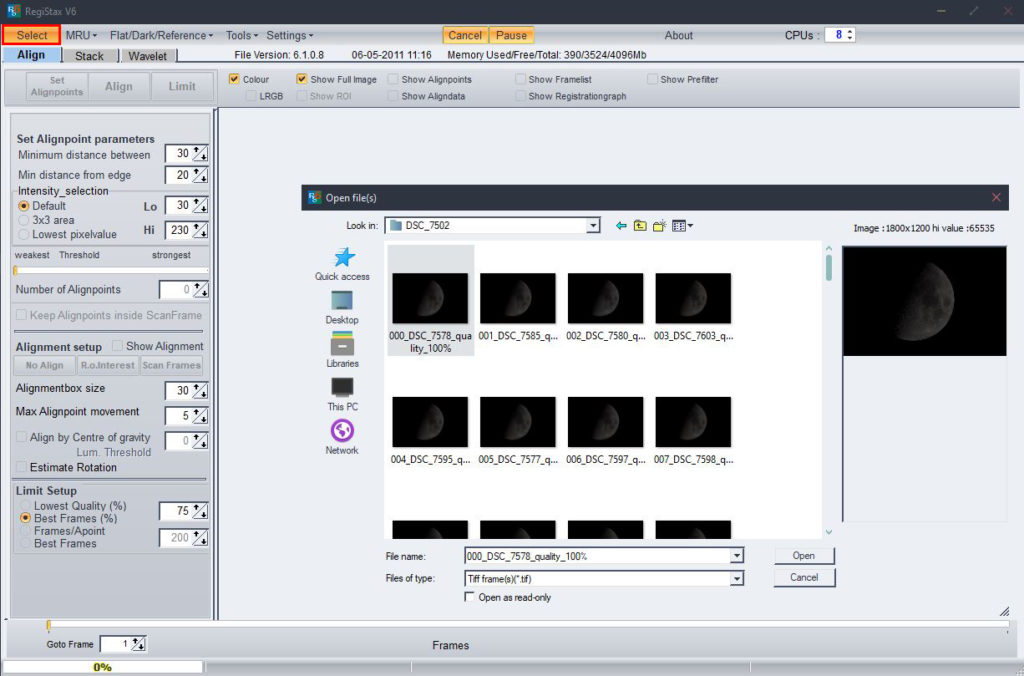
- A small window will open for “Stretch intensity levels” Click “Yes“
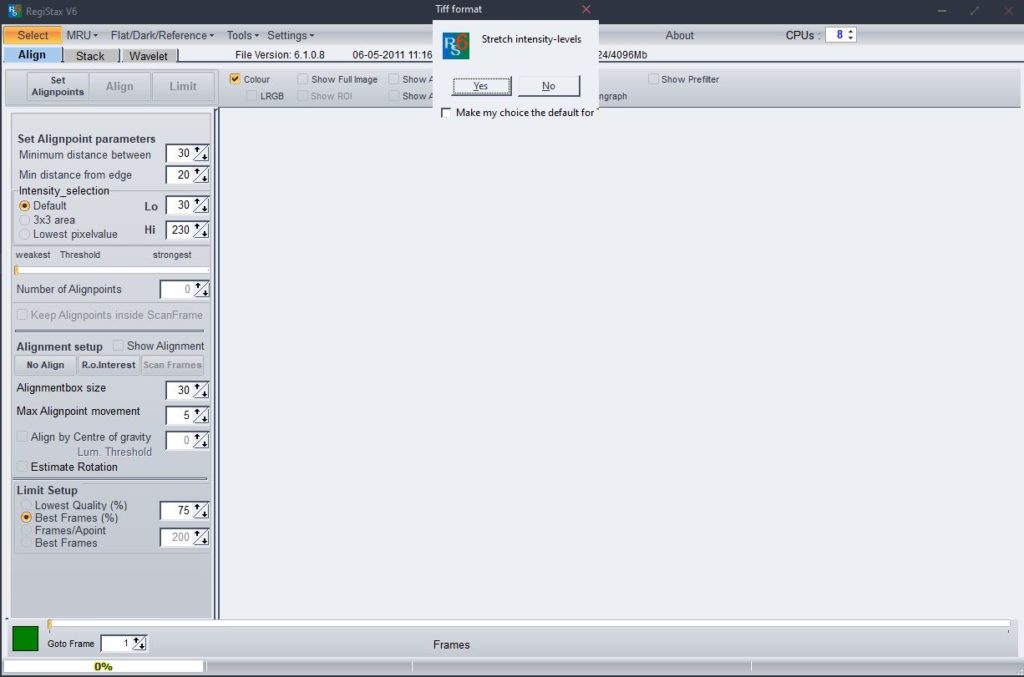
- Your moon images are now imported into Registax.
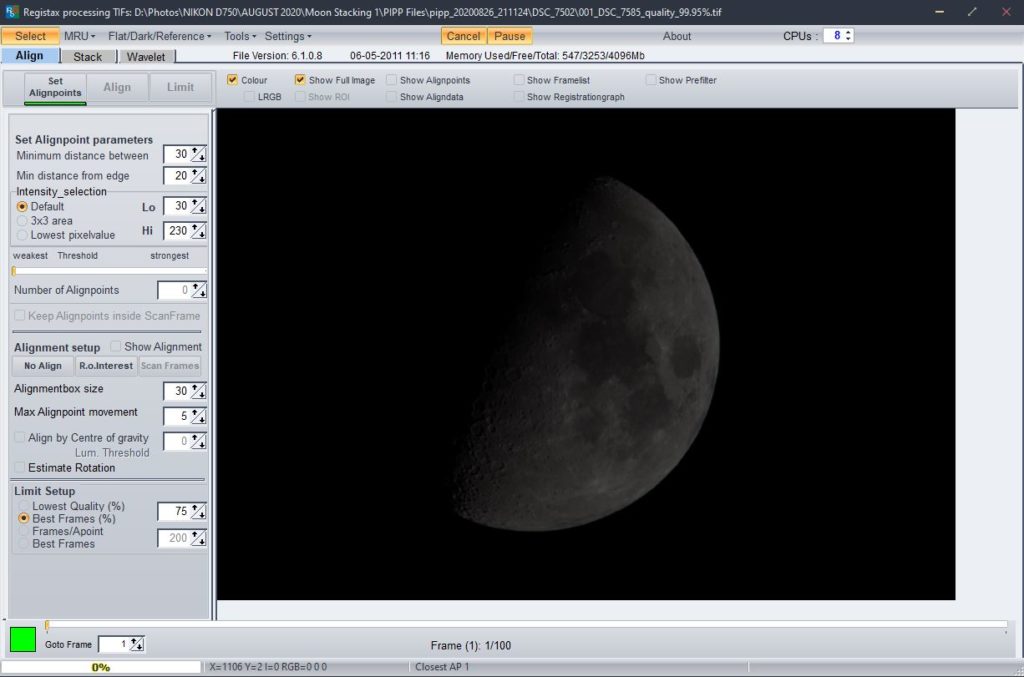
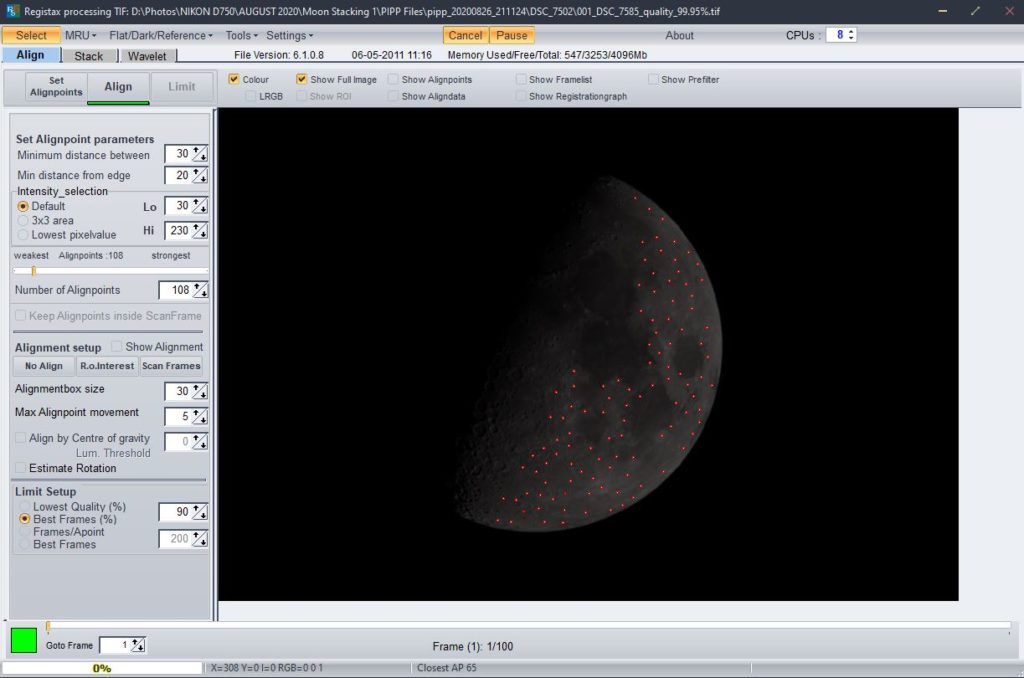
- Click “Set Alignpoints” and this process will set the align points on your moon photo. It will appear as red dots as shown in the screenshot below.
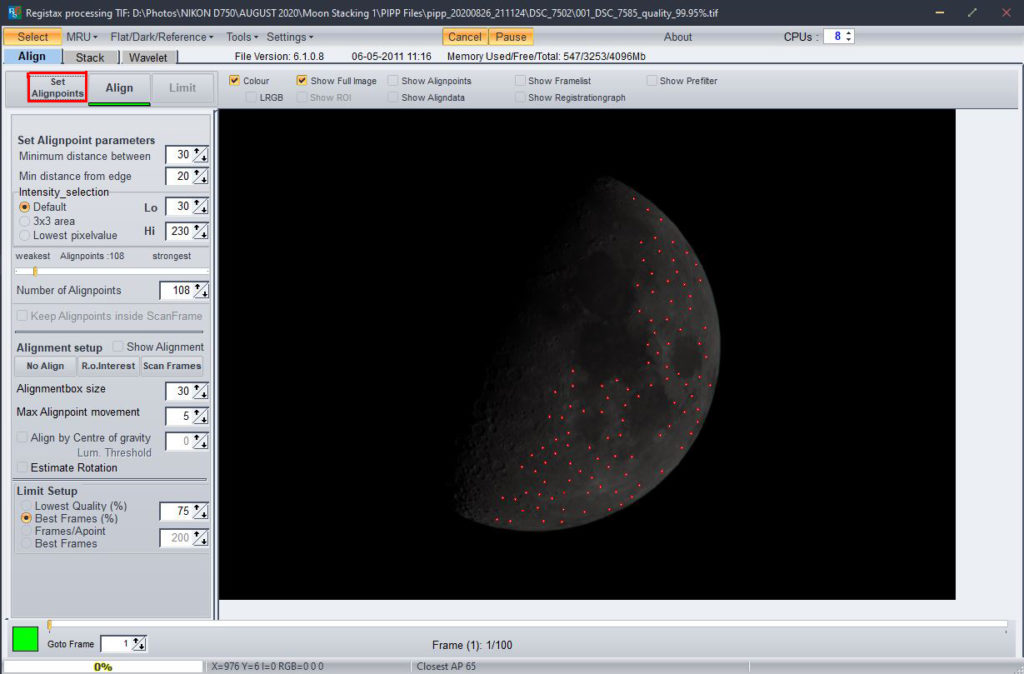
- If you think there are too many alignpoints, you can reduce it by dragging the slider on the left, that is just above “Number of Alignpoints”
- Now click “Align” and this process should align all the moon photos that you have imported into Registax, based on the align points. This process will move or slightly rotate any images so that they are aligned with each other ready for stacking.
- To see the full image of the moon, make sure “Show full image” is checked.
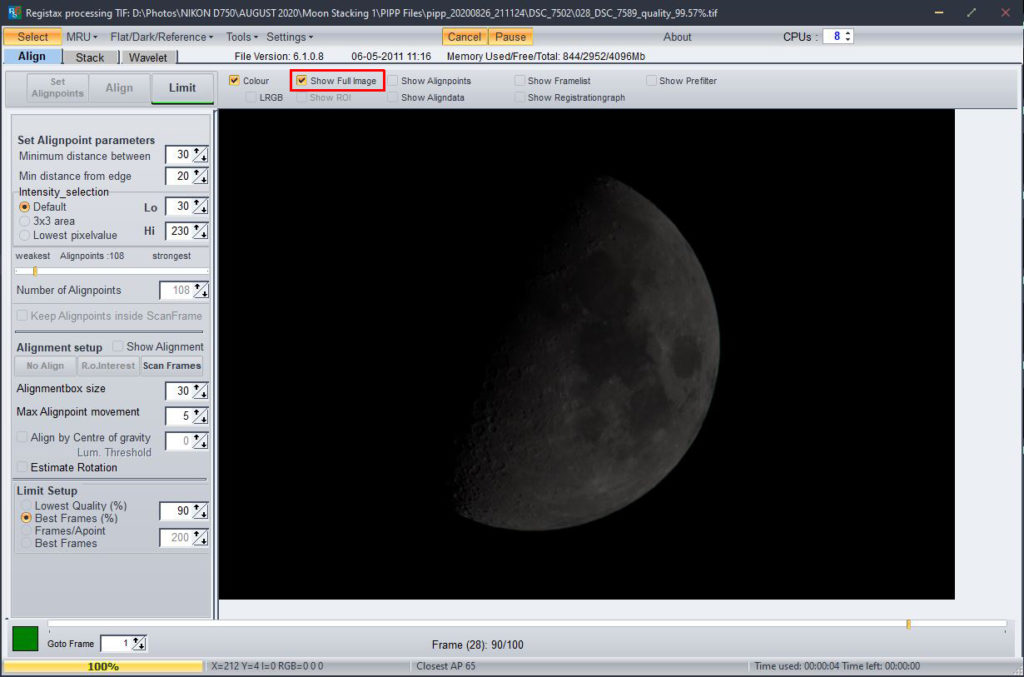
- Once the above process is complete, click “Limit“.
- This is where you go to the “Limit Setup” area and limit the best percentage of frames.
- In the screenshot below, I have changed it to 90%. You can choose any percentage. It is always good to choose a smaller percentage from a huge number of images – for example, choosing 100 out of 1000 images is better than choosing 100 out of 200 images. I have chosen 90% for this tutorial so we have a bunch of images to stack.
- Then click the “Stack” tab. You will see a set of yellow circles sometimes with green lines.
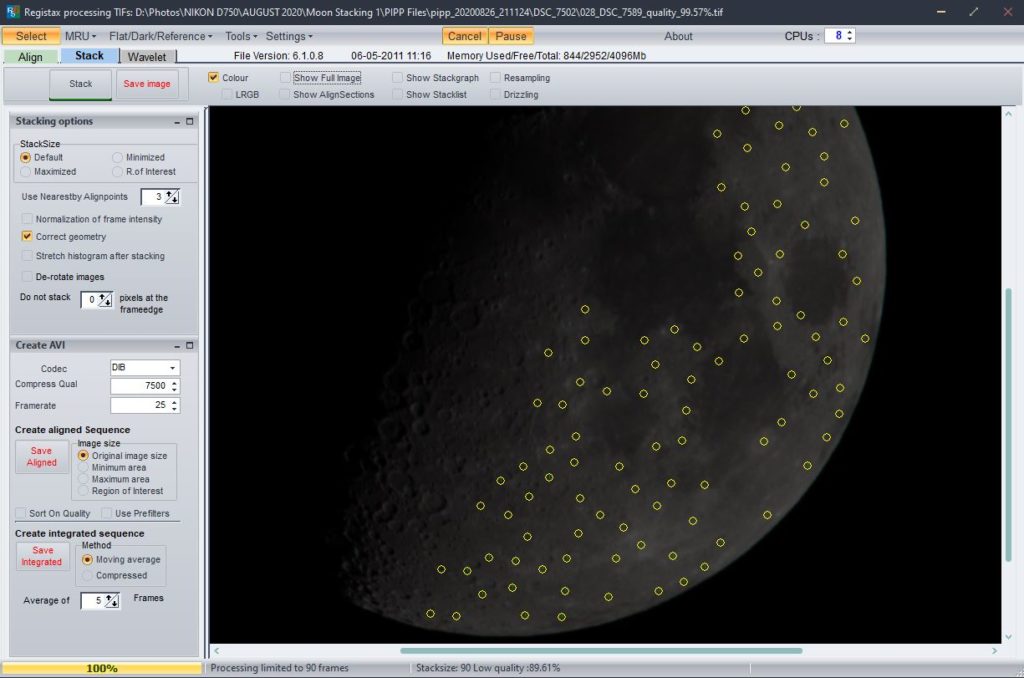
- If you want to see the full image, click “Show full image.”
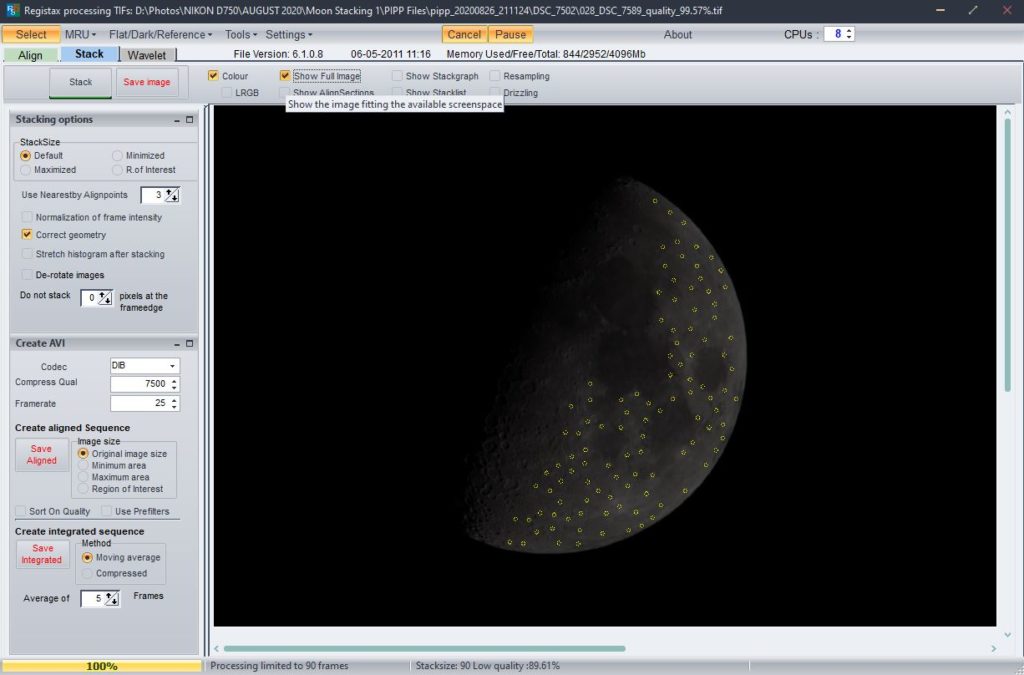
- Click the “Stack” button. The screen may go blank during this process but you can see the progress bar at the bottom. So wait for a few seconds or minutes depending on the number of images you have imported and the configuration of your machine. Do not click or press any keys during this process. In this case, the process took a few seconds for 100 photos.
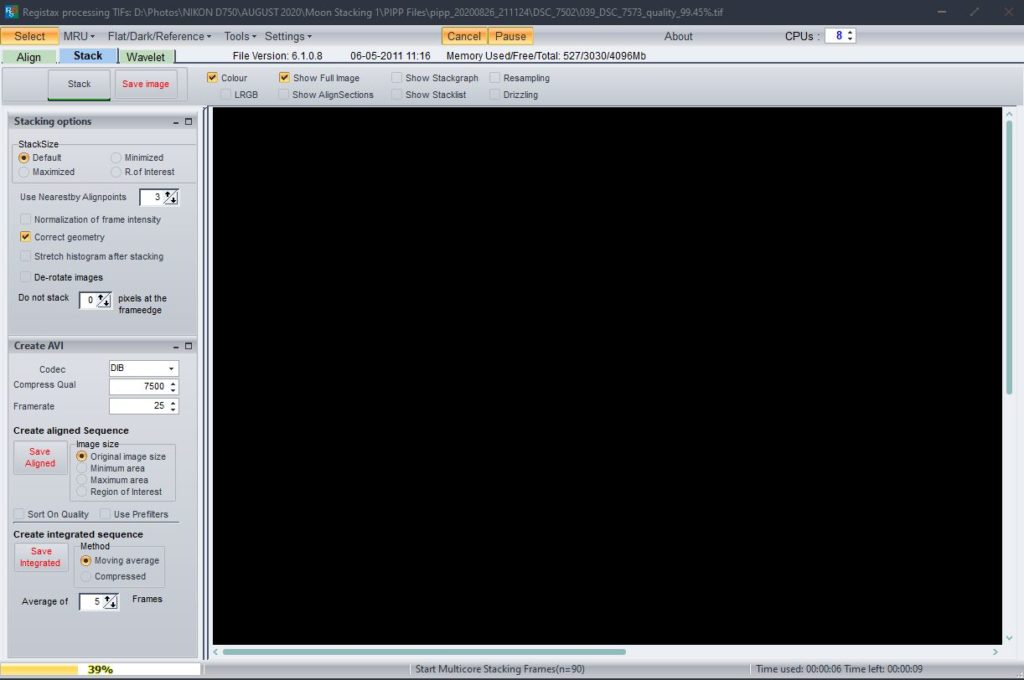
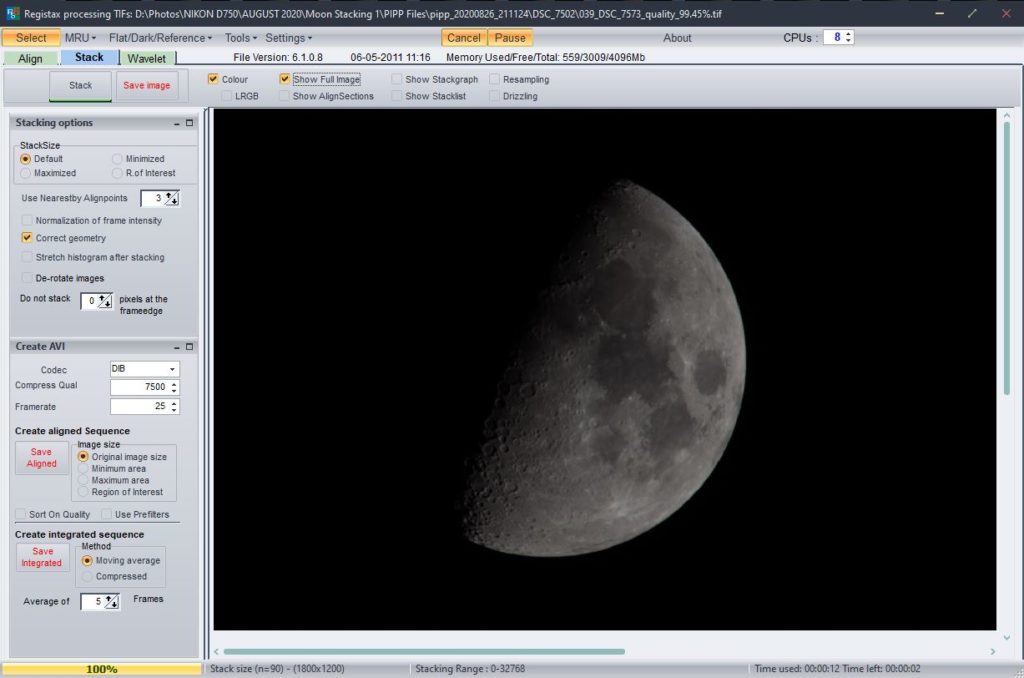
- Once stacking is complete, click “Wavelet” and this is where we will be bringing out the details from the stacked image.
- Click on a point on the moon where you want to see a preview of the changes happening as you drag the different sliders. That is where the app will put a preview box. Click “Show Processing Area” to see the preview box where the app will be making the changes initially as a preview.
- In the “Functions” menu on the right if you click “View Zoomed” you can see the preview area zoomed on the screen.
- Or, press “Ctrl” and move the mouse around to see the area that you want to see zoomed in the “Zoom Panel“
- If you look at the Wavelets section on the left, you can see six layers. The top layers are for bringing out the fine details and the bottom ones for larger details.
- You can play around by adjusting the wavelet values individually for both denoise (if you need to reduce noise) and sharpen.
- Any changes you make, you will see them happening inside the preview box.
- Make adjustments till you see a desired look in the preview box and it depends on personal preference.
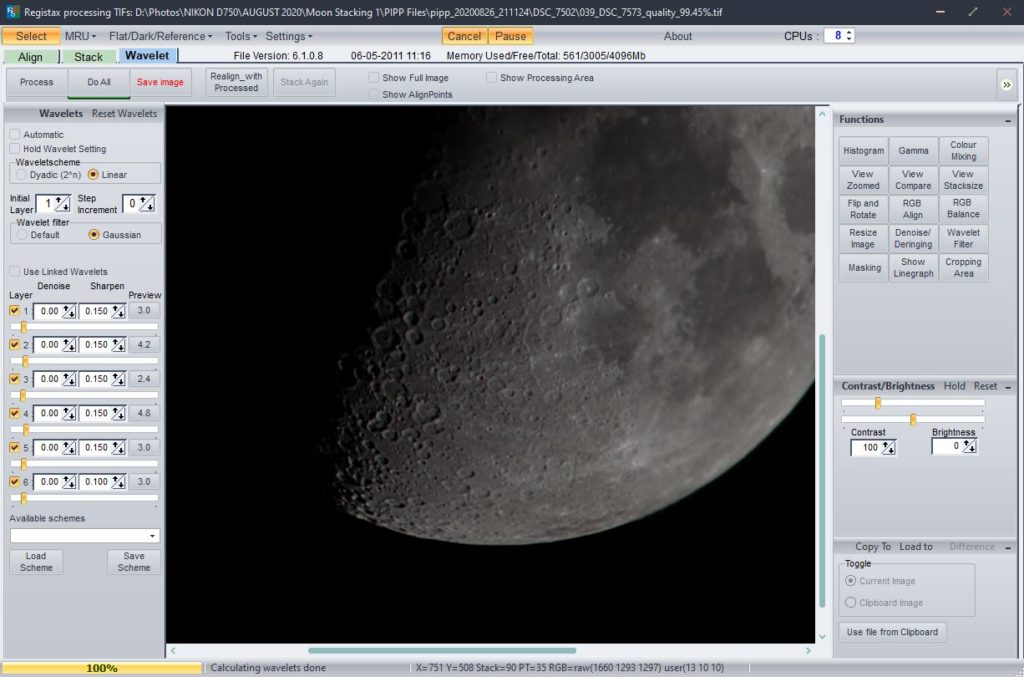
- Once you have made the right adjustments, click “Do All” and this will apply the wavelet adjustments to the entire moon image.
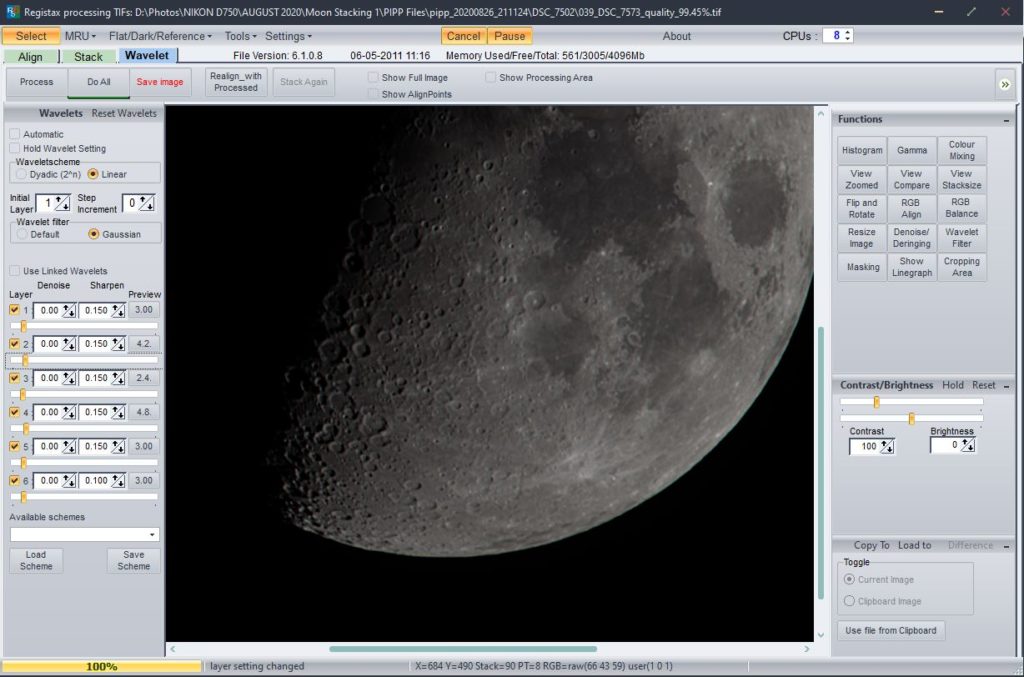
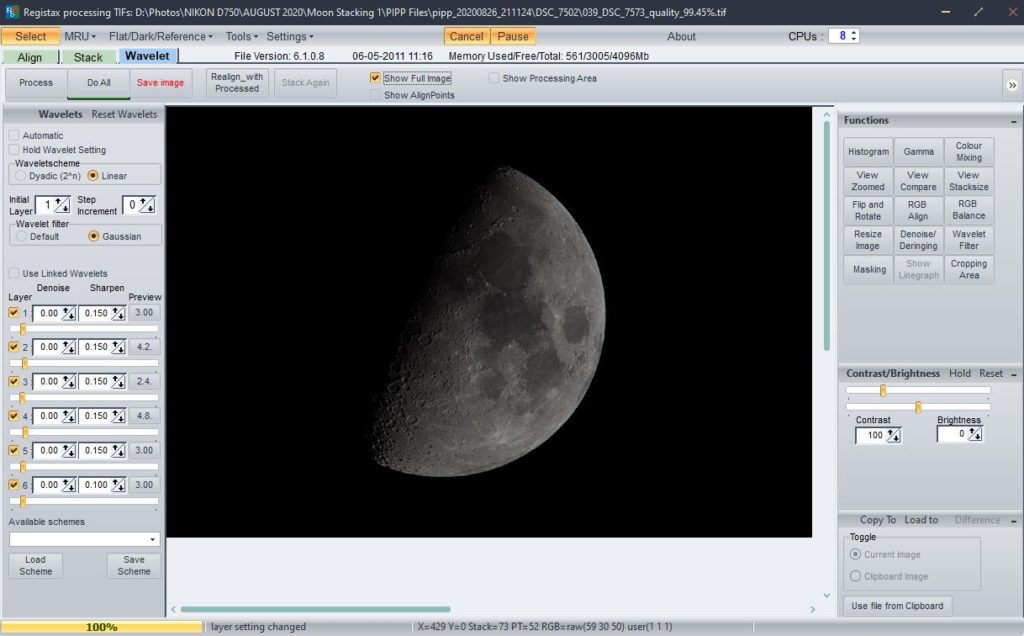
- In case you need are not happy with the results, you can “Reset Wavelets” (button below “Do All”) and start over again.
- Once you are happy with the results and the process is complete, if you wish, you can make contrast and brightness adjustments on the right and then save the image in TIFF format.
Note: If you have a scheme with settings that you are happy with, it can be saved as a preset using the “Save Scheme” button in Registax. The next time you need to use this scheme, press “Load Scheme” and use the previously saved scheme which will get applied to the image.
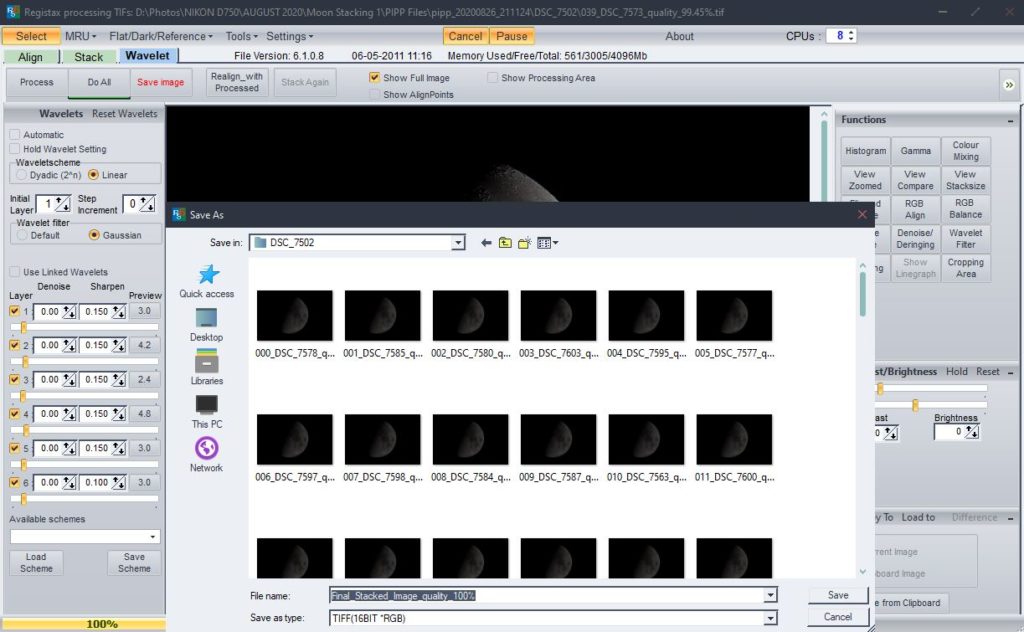
- The current version of Registax is quite stable, but if you come across any errors during the above process or if Registax crashes/hangs, restart the app and try again. If the same thing continues, you may want to choose less number of align points or less number of images to stack. You can always refer to the documentation on Registax's website for specific troubleshooting help.
Note: If you find that Registax crashes frequently (which it shouldn't) during the stacking process, you can use AutoStakkert (free for Windows) for stacking and then use Registax for wavelet sharpening.
Why Should You Stack The Images?
Depending on various atmospheric conditions, we may shoot the moon at different settings. Sometimes we may have to slightly increase the iso to get the shot. In this case, when you increase the vibrance and/or saturation to get the colours, the noise gets amplified and shows up as weird patches of colours which can look really bad.
In order to avoid this, we go through the stacking process which will increase the signal to noise ratio (noise is reduced). This way, you can increase the saturation of the moon or sharpen it, without amplifying the iso or thermal noise. So with a stacked image, you can really push it hard to get the colours and details out of it without ruining the image.
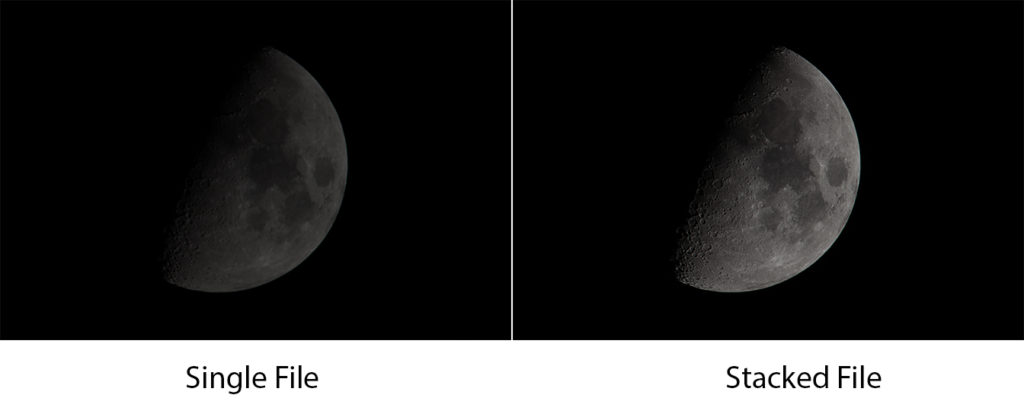
Also, the difference between data from a single frame and multiple frames is that, when using multiple images, you are extracting more information compared to what is available in a single frame.
In the images below, you can see how much more details are available in the stacked file compared to a single frame:
Can You Post Process For Colours Using A Single Moon Image?
You can of course do the processing using a single file, but it will not look as vibrant as stacked images.
Fourth Step: Post Processing
This is the final part of the process where we bring out the colours of the minerals on the moon. I used Photoshop for this process as you can gradually increase the saturation using layers. I tried Lightroom but the results were not satisfactory.
Here are the steps that I followed:
Note: There is no “one method” for bringing out colours in moon images. You may have a similar or easier workflow for noise reduction and saturation adjustments in Photoshop.
- Import the image into Photoshop.
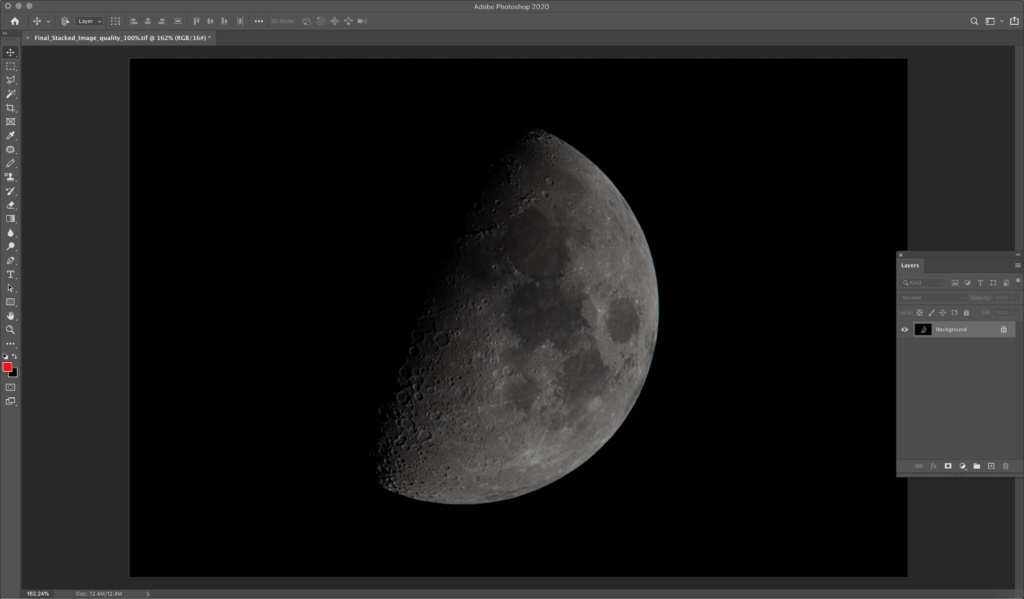
- Duplicate the background layer and turn off layer visibility for the background layer by clicking on the eye icon on the left.
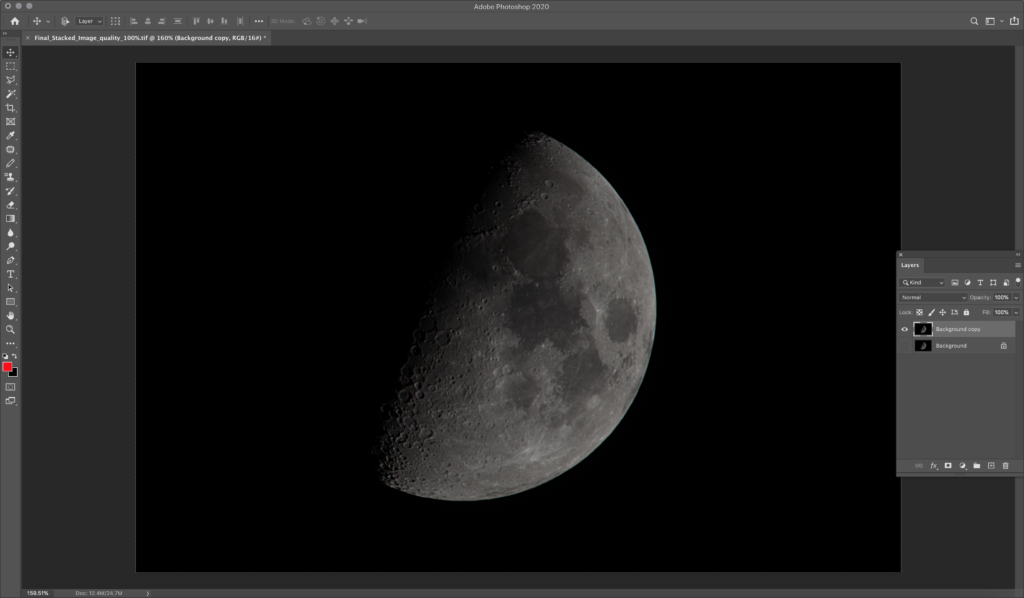
- Now press Ctrl + A, Ctrl + Shift + C , Ctrl + V (select, copy and paste). This will create a new layer (do not duplicate by pressing Ctrl + J).
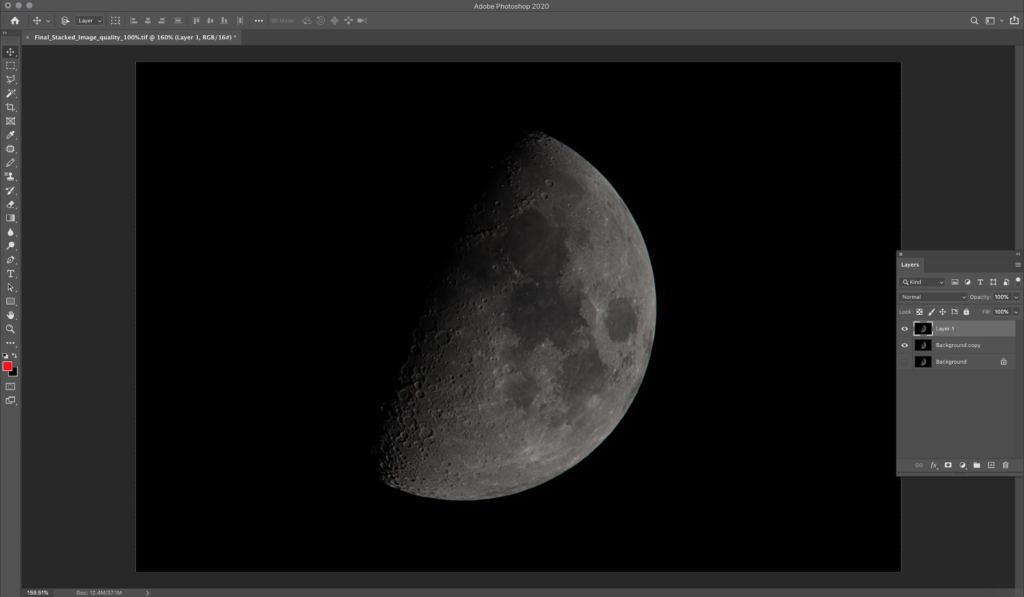
- Delete the duplicate background layer now.
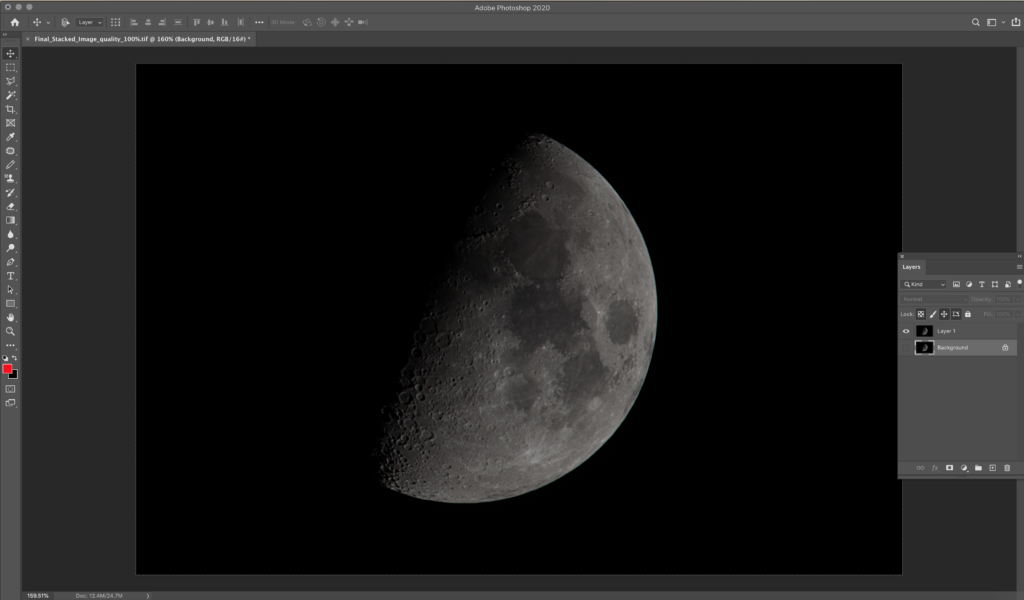
- Select the new Layer 1 and in Image Menu click “Auto Color.” This does not change the image to greyscale but fixes the colours in the image.
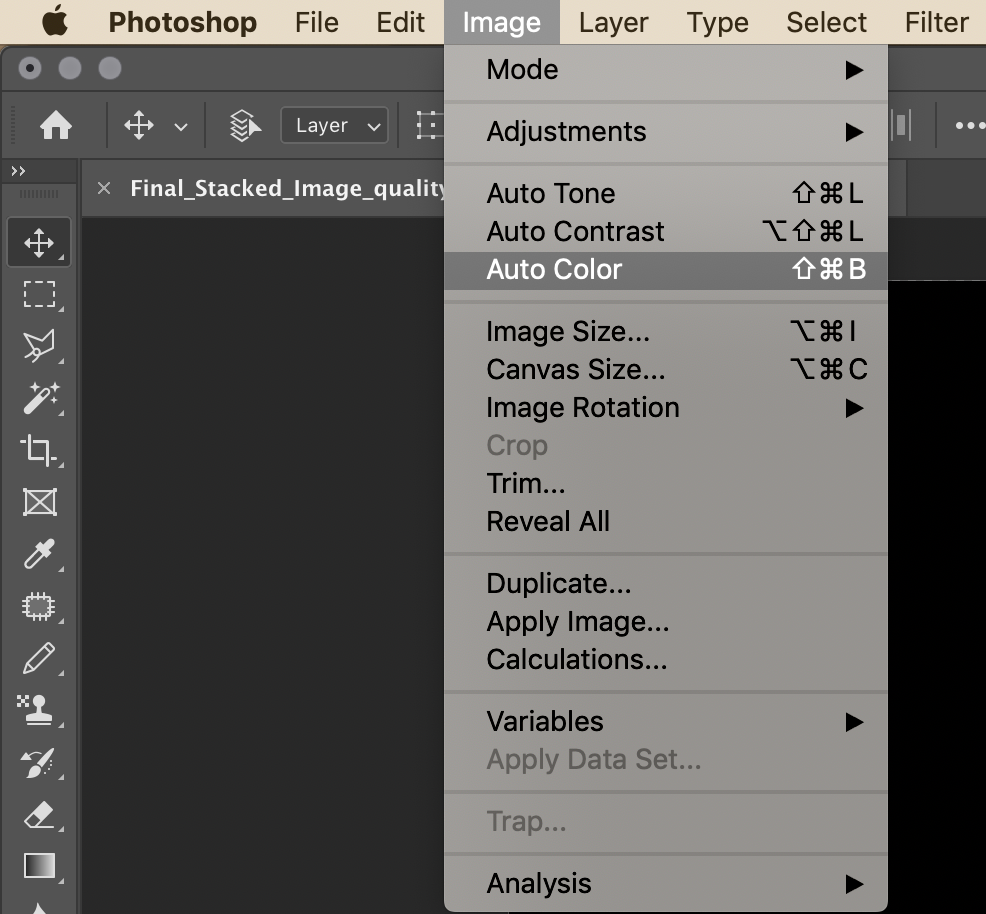
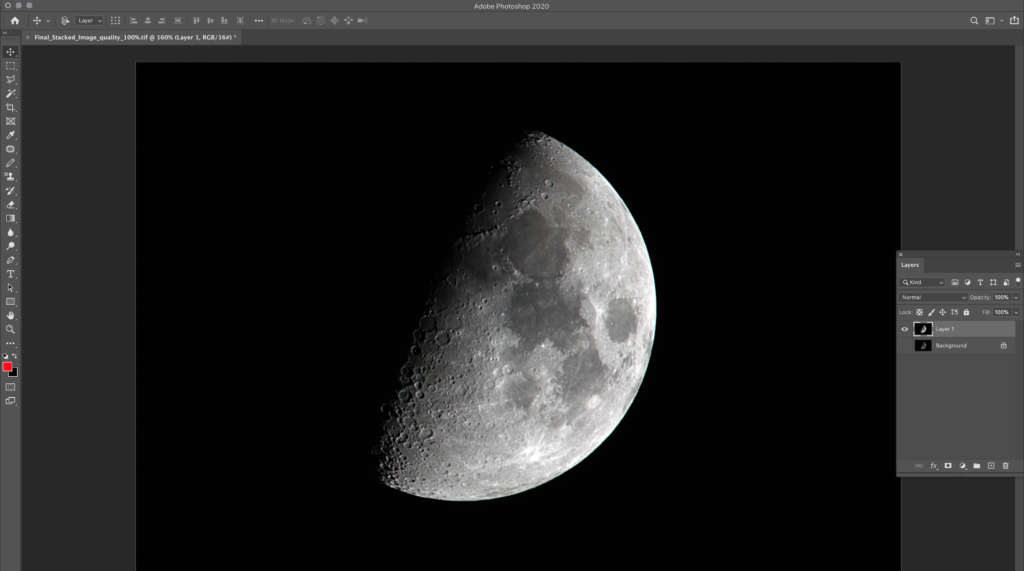
- Now go to Image Menu -> Adjustments -> Brightness/Contrast.
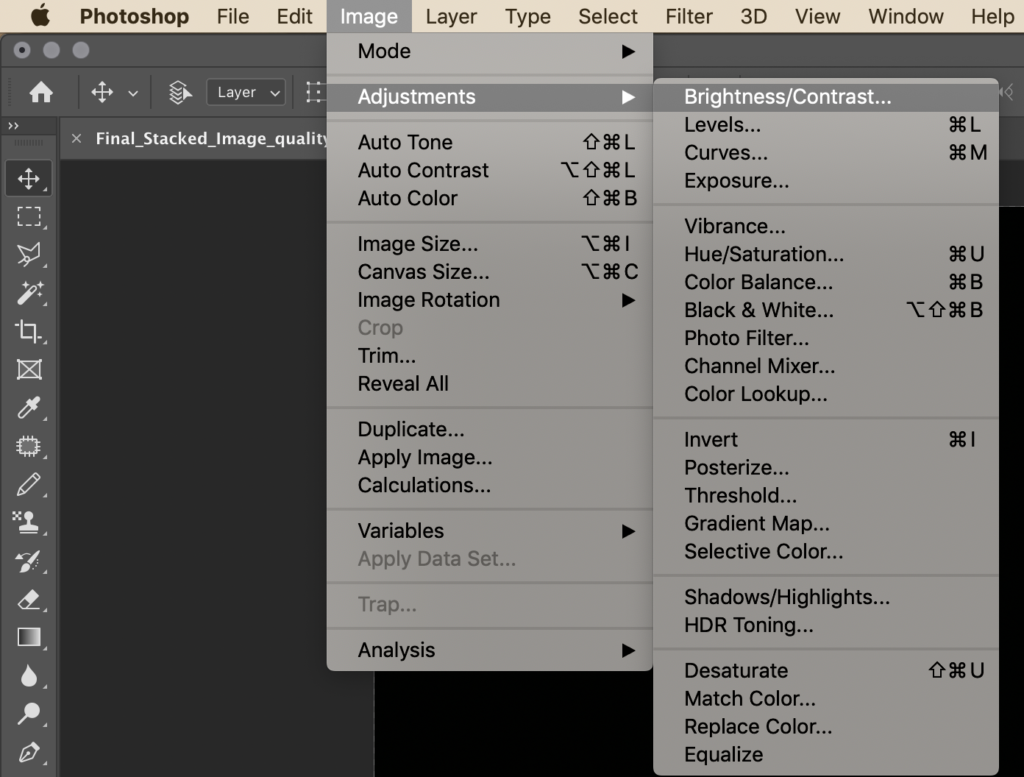
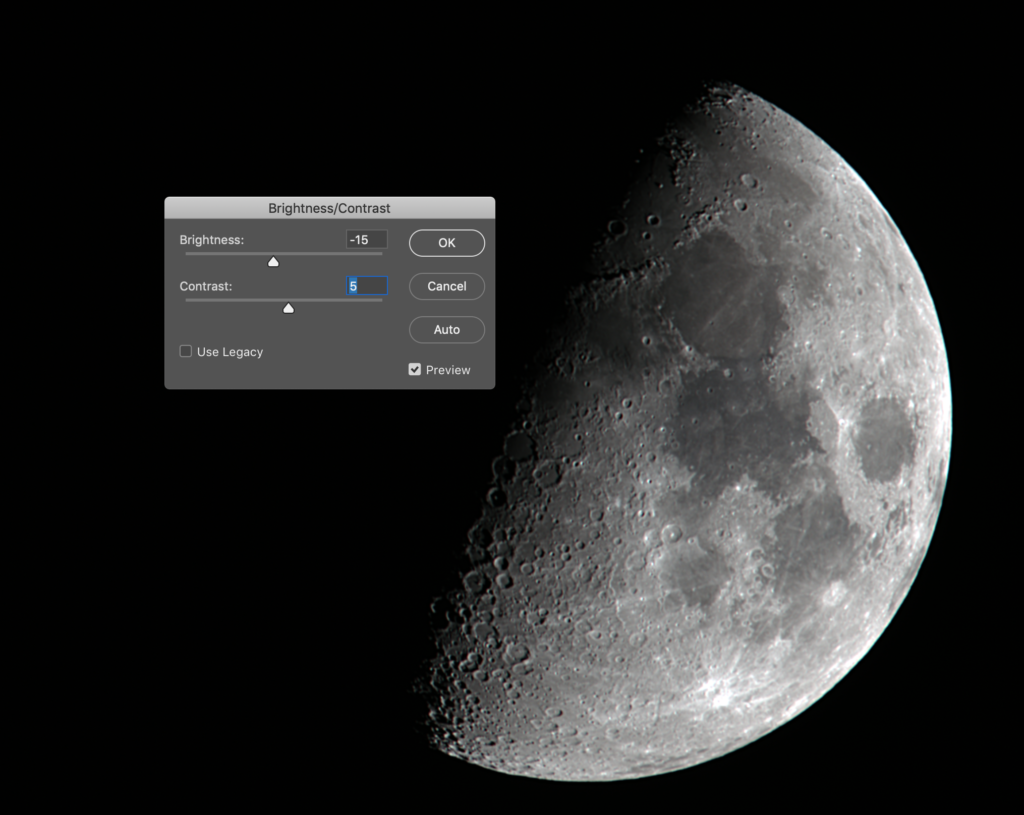
- Adjust brightness and contrast value according to your preference. I decreased the brightness by 15 and increased the contrast by 5.
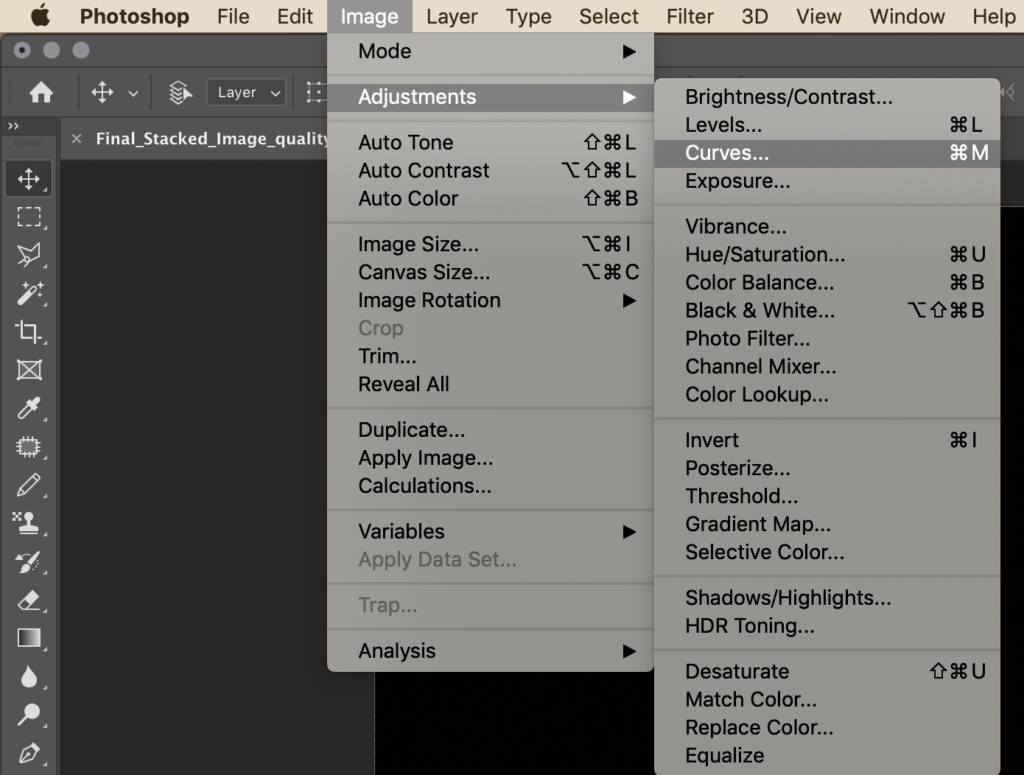
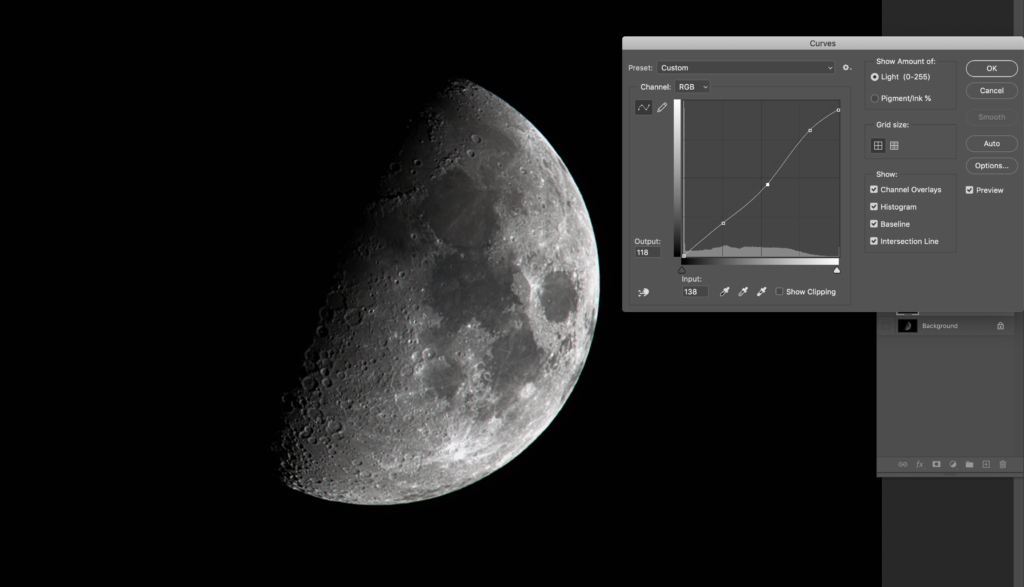
- Then got to Image -> Adjustments -> Curves – make curve adjustments according to personal preference.
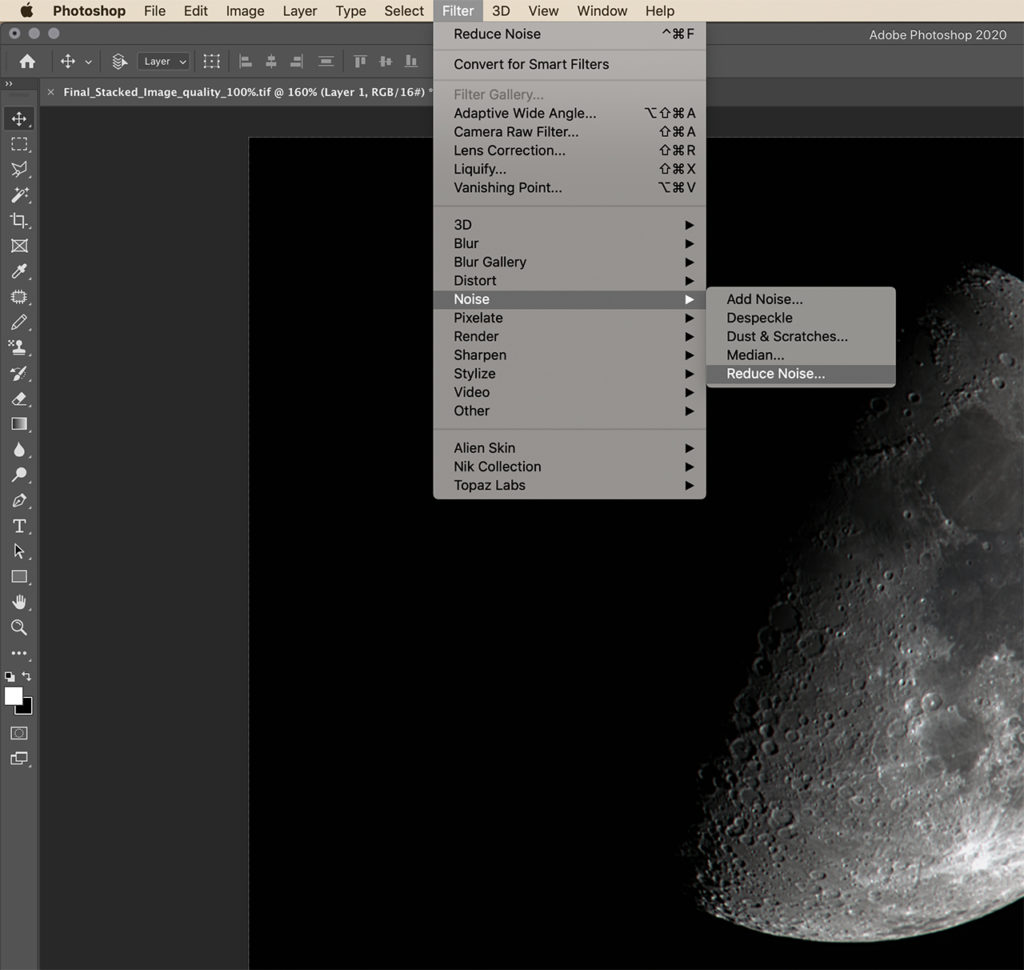
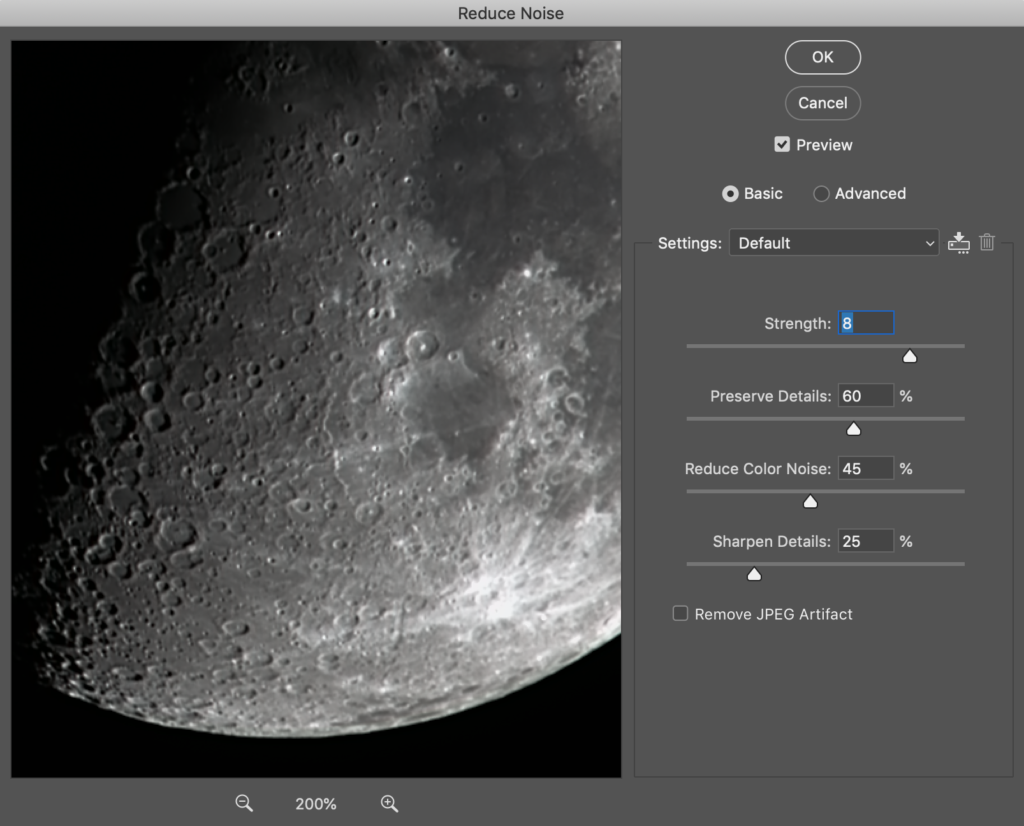
- Go to Filter -> Noise -> Reduce Noise – this will help reduce any noise that is left on the image and will let you work on a clean image. I chose a strength of 8.
- Now duplicate “Layer 1” and rename “Layer 1” as “Noise Reduction Layer” so you know on which layer noise reduction was applied.
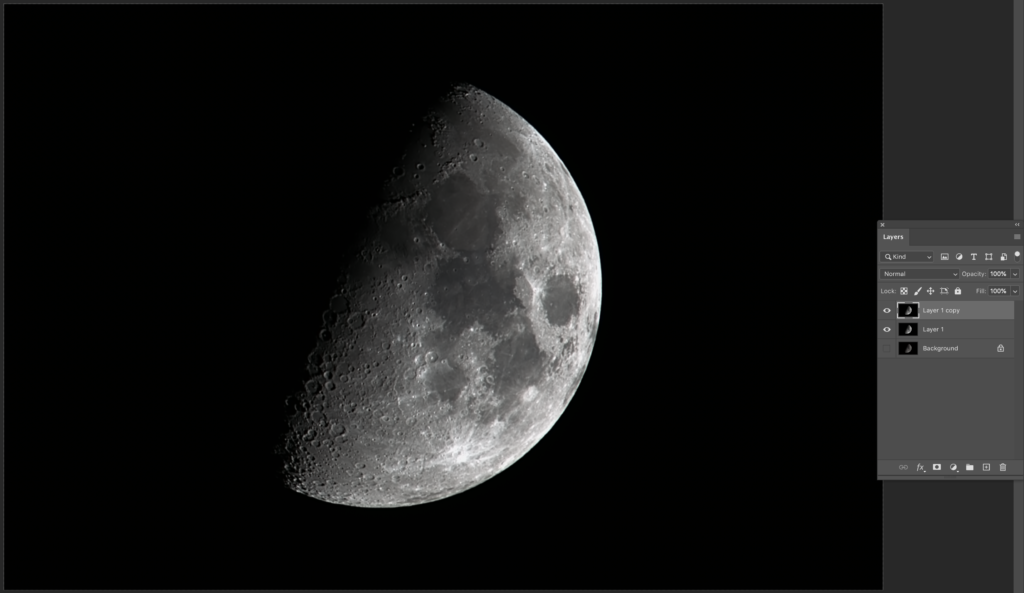
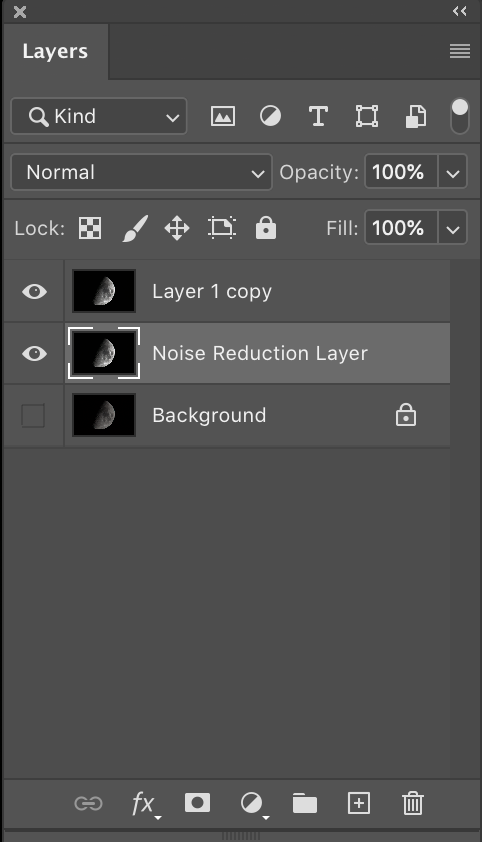
- Add “Layer 1 copy” to a group.
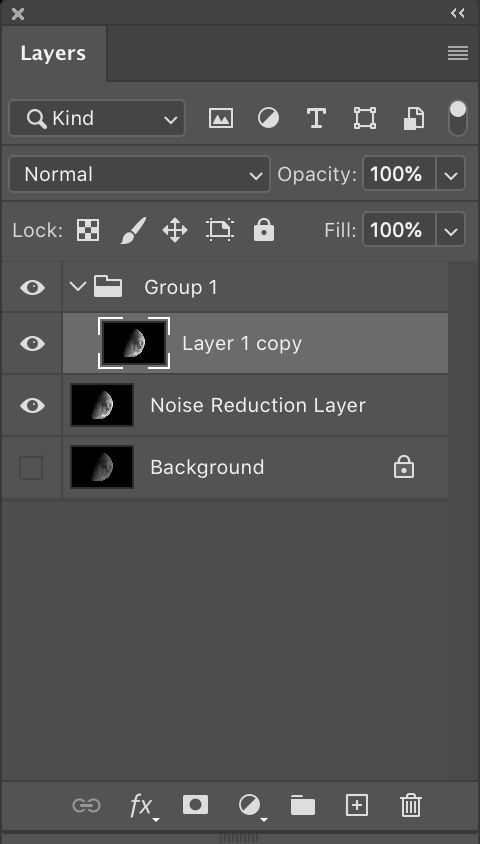
- Rename the group to Saturation group.
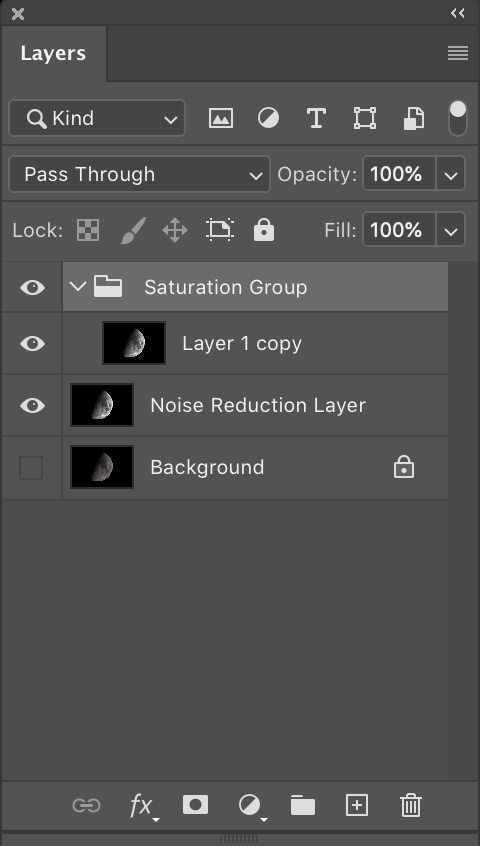
- Add a “Hue/Saturation” adjustment layer to “Layer 1 copy” and adjust saturation value to about 15
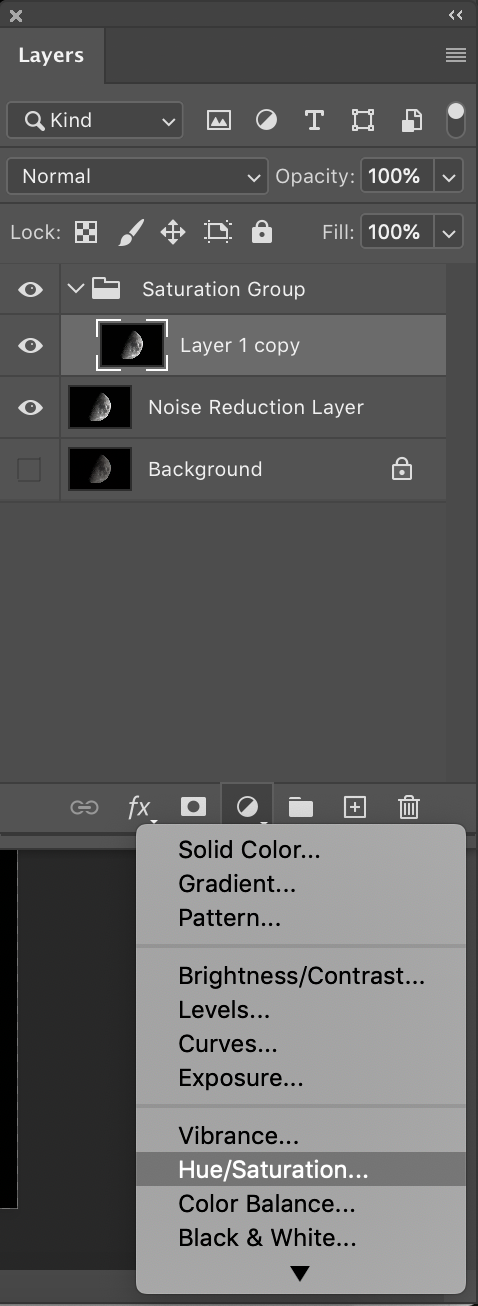
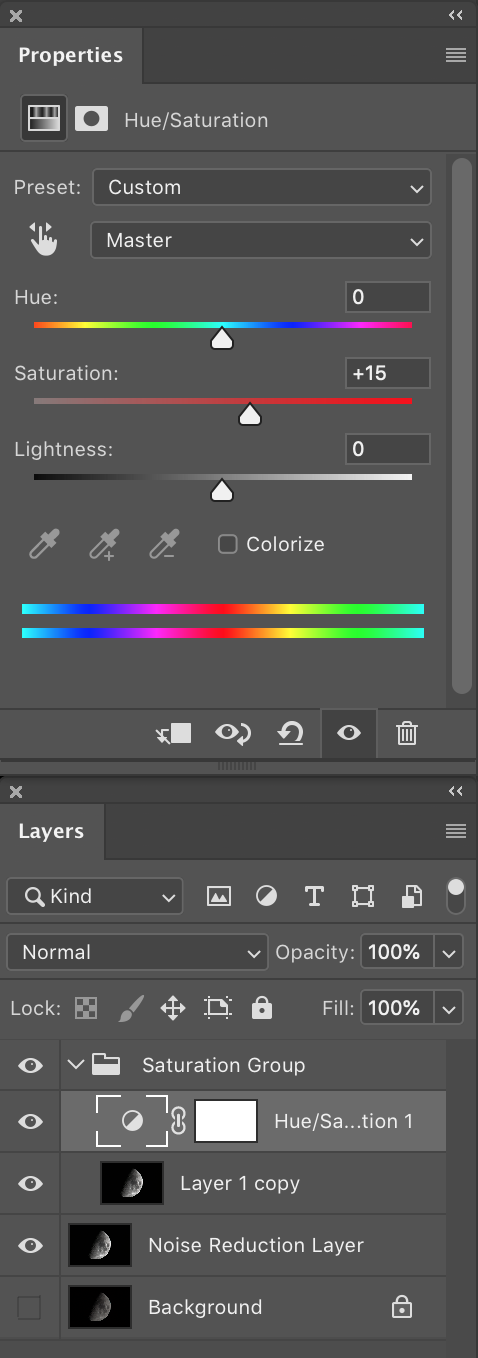
- Duplicate this layer repeatedly till you see desirable colours on the moon.

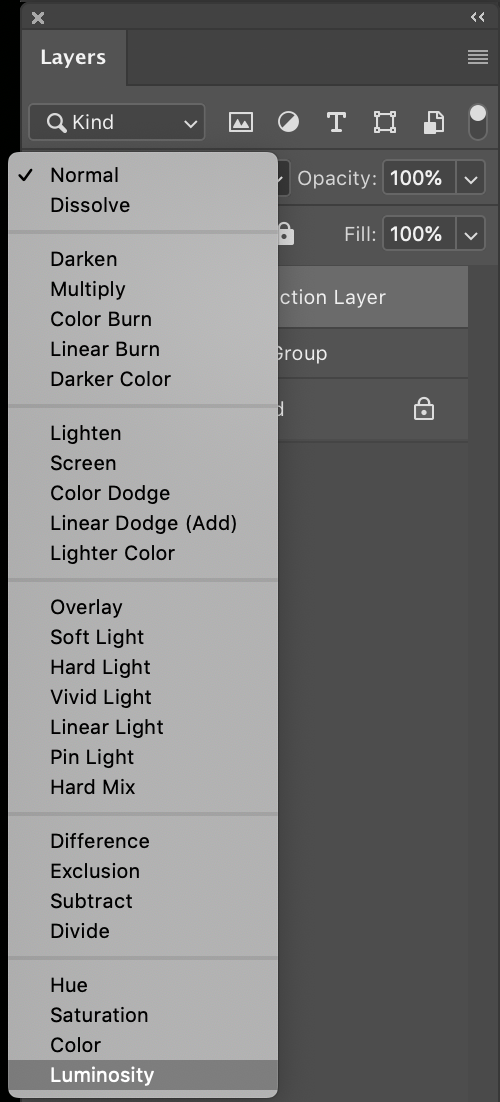
- Now collapse the group and move the Noise Reduction Layer to the top of the group. Change “Blend Mode” to “Luminosity”.
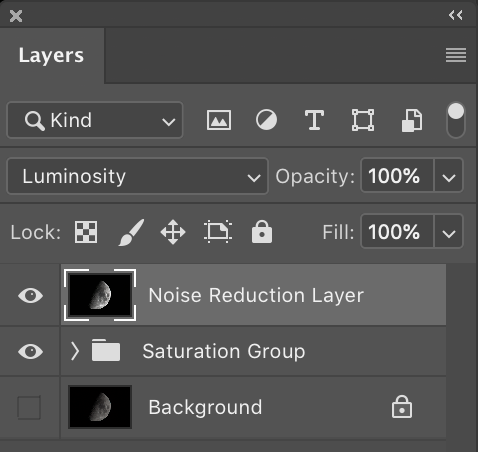
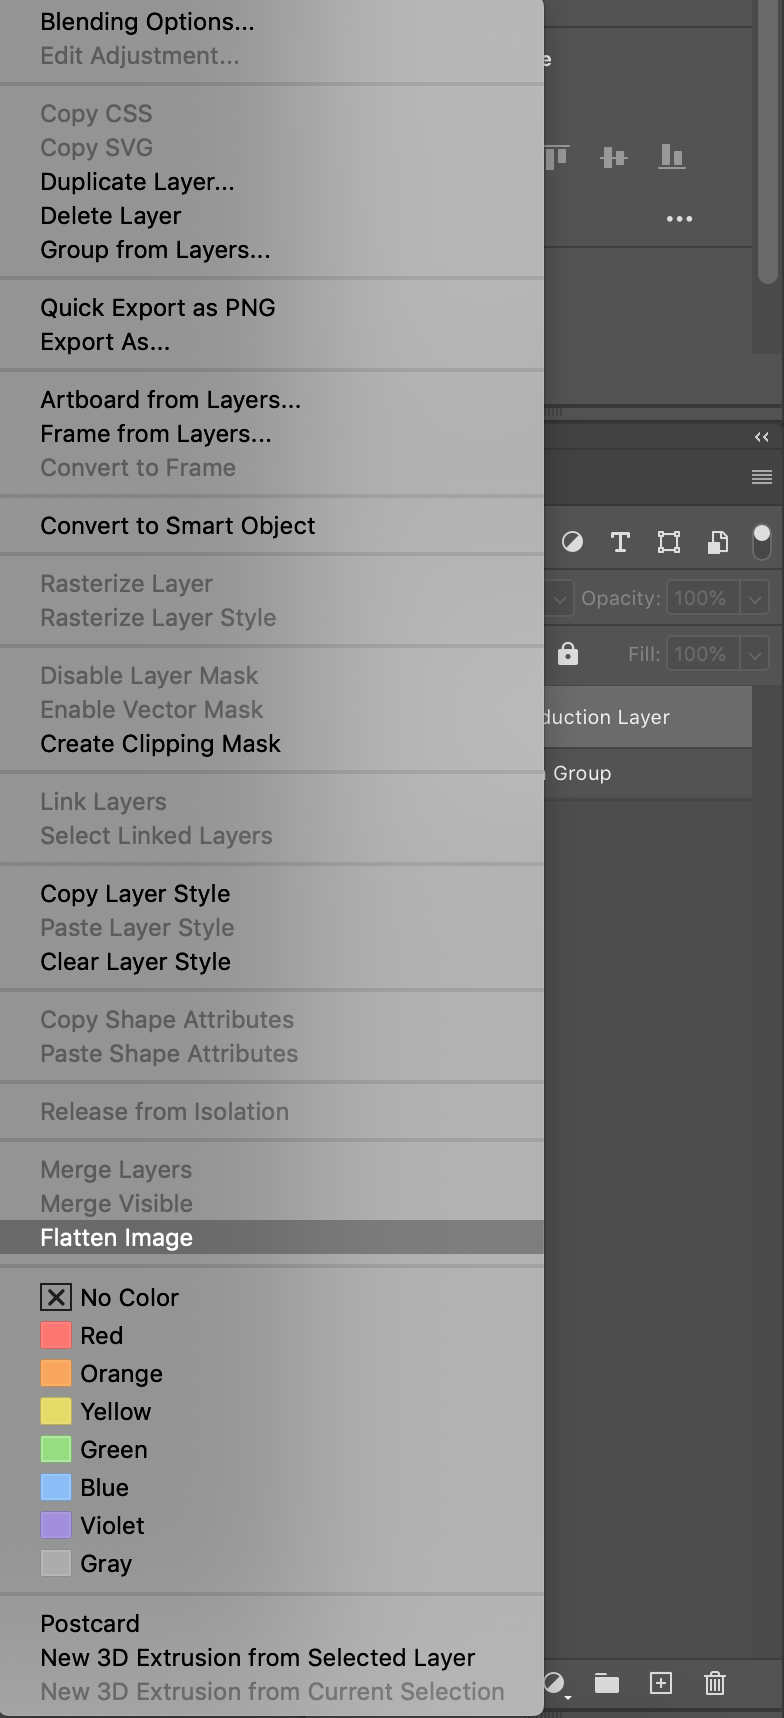
- Delete the background layer and flatten image.
- Now you can see the final image with mineral colours on the moon.
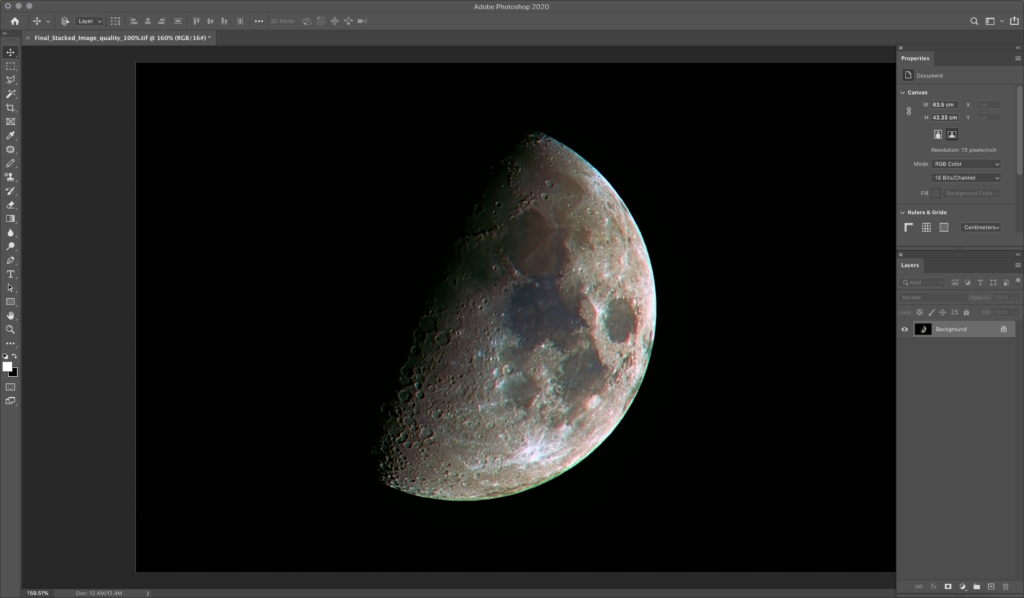
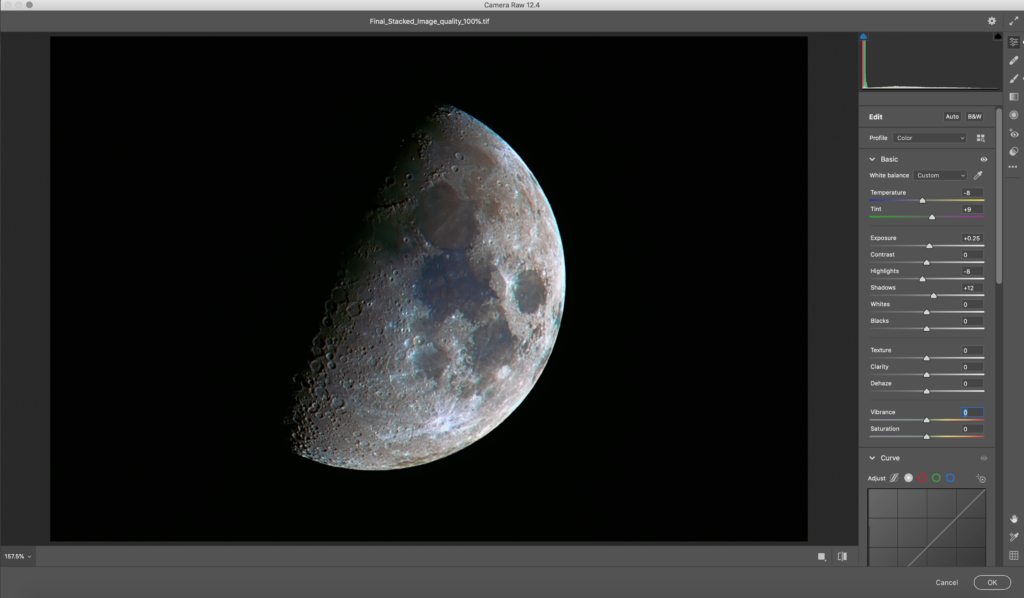
- I thought that the moon image had some colour fringing and so took the image to “Camera Raw” and made slight adjustments to temperature and chromatic aberration.
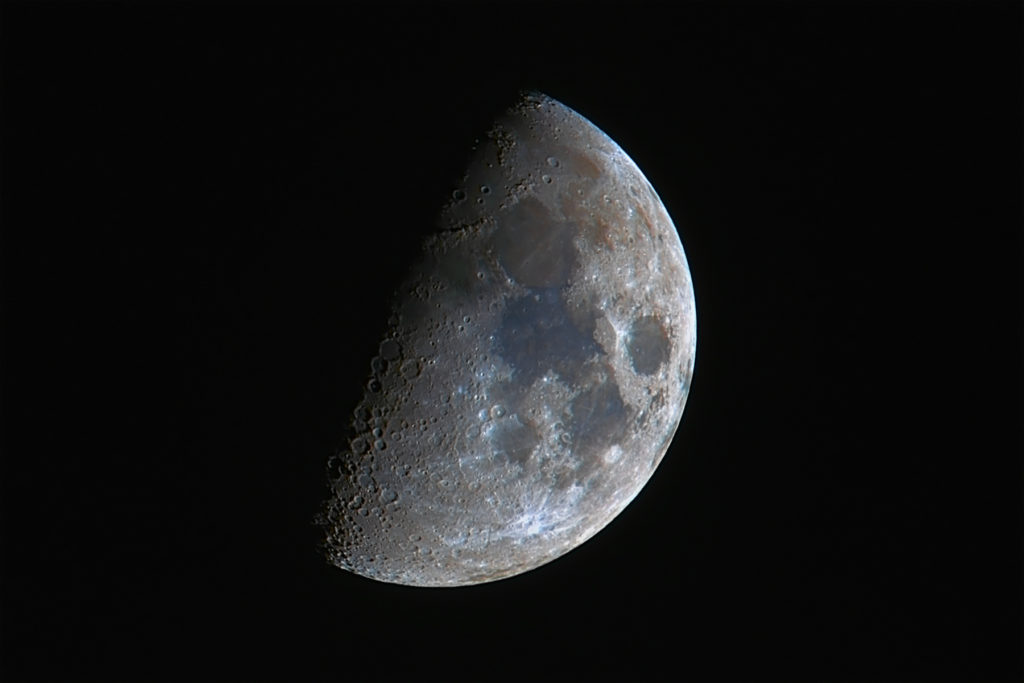
Here is the final moon image after all the adjustments have been made.
Here is a collage of mineral moons taken at different phases of the moon.

Have you edited the mineral moon before? What process did you use for stacking and post processing? If you have any tips, please share them in the comments section below.
If you follow this tutorial and get some good results, feel free to share them with us. We would love to see your work!

15 Comments
Impressive tutorial Dahlia, well done.
Thank you Elin 🙂
Thanks Dahlia, another great job! I’m running a MAC so I’m looking for some stacking options.
Hi Beaky, thank you. Sadly these free programs are for Windows so I had to borrow a friend’s computer to do the stacking.
I have been looking for free stacking apps for the Mac and found three which I am yet to try. SiriL, Regim and the other is Lynkeos.
SiriL is a stacking app for astrophotography, that is continuously being developed.
Lynkeos from what I read does stacking for planetary and lunar images. So it should probably do what Registax does.
Regim runs on Java and so it needs to be called via the terminal in Mac. I think Regim is for Deep sky stacking.
Looks like we can use Wine which is a compatibility layer capable of running Windows applications on a Mac. Wine had DSS, Registax, etc. on its compatible list when I last checked. I am not able to tell anything about this as I have to try this myself and if it works, it would be great to have some of the stacking apps that work for Windows as they work great for me for the time being.
Besides the above, if you are looking for paid apps, the best app would be PixInsight which is a complete astrophotography package for planetary and deep sky processing. It is a great app from what other users have mentioned. Another paid app for deep sky images is Nebulosity. Both these are compatible with Mac OS.
Starry Landscape Stacker for Mac is for stacking images that have the sky and the foreground. So it allows to stack and align the sky and the foreground independently. I have not tried any of the paid apps.
Yet to see if there are other apps for stacking planetary/moon images that work well for the Mac. I will update the article if I find anything that works well on the Mac 🙂
This article was so informative! Thank you. I am wondering if photoshop can be used for the stacking?
Hi Trycia, thank you. You can use Photoshop, but stacking so many images may take a lot of time. Not sure how accurate it will be for moon images. The applications mentioned in the article are specifically for this purpose 🙂
This is probably the most detailed step wise description of an editing process of this level of complication (for a first timer using PPIP and RegiStax). Very impressive. Thank you so much for your efforts.
Hi Mohit, thank you. Glad that you found this helpful! 🙂
That’s a very detailed process !
Just adding that even a single shot, if not optimum, can give you good results.
I use a D850 + 200-500 @ 500mm and usually shoot at 1/100, f/10, iso64, of course when the moon is high up in the sky to avoid as much atmospheric pollution, and I get some decent results so even if the process seems complicated for some, start with a single exposure and try to edit it, you might want to push further afterwards.
Here you can see the output : https://www.dropbox.com/s/5w5c7vywl69famk/_DSC9288.jpg?dl=0
Great job 👏🏻 hope it helps people out there who think mineral moon shots are fake ! 🙏🏻
Hi Xavier, thank you. Yes it is possible to get the colours out of a single exposure if the skies are really clear. Sometimes, some colour is noticeable when viewing zoomed in on live view. Thank you for sharing your thoughts and the results. That’s a beautiful photo of the moon 🙂
Thanks for a great article! Here’s an autostakkert image that I processed from a 10 second video. You might look into that, it’s much easier than taking individual photos and you don’t need a tracking mount. Thanks again!!
https://scontent-sjc3-1.xx.fbcdn.net/v/t39.30808-6/334936559_6054565554599112_5723975312925364679_n.jpg?_nc_cat=107&ccb=1-7&_nc_sid=730e14&_nc_ohc=Fu_LQWYaY5EAX8VTy7n&_nc_ht=scontent-sjc3-1.xx&oh=00_AfAgPD0PmXz2gklQqd8qaJmEvT0eNuyDDj7cuyF87g5C2g&oe=640A7942
Hi Jim, I have not tried video yet. Your photo looks great and thank you for sharing. I will look into this process and try it soon. Thank you! 🙂
Thy for yor effort to bring this articles to everyone.
Thank you Zijad. Glad it was useful! 🙂
Wow, very impressive and exactly what I’ve been looking for. Thank you so much for providing such a comprehensive guide. I’m looking forward to trying it out this weekend 😀