Lights. Camera. Mirror.
Pause.
Before you flip the clapboard and say “action”, you may want to ask yourself—Do I want this to be an everyday picture? Or an amazing picture?
If it's the former, then you may start shooting.
But if it's the latter, let's get you prepped. Because you'll be needing more than lights, cameras, and mirrors to enhance your photoshoot.
Today, we've simplified the essentials of mirror photography into simple tips that you can execute at home. Even if it's just you, your reflection, and uhm… some more reflection.
Amazing, right? Well, what can we say? We love superb photography. And we believe everyone can achieve it—with the right tips, lessons, and practice.

The Truth About Mirror & Reflection Photography
Budding photographers often wonder what the difference is between mirror and reflection photography.
Well, here’s some breaking news—they're the same. It’s like a parent-subsidiary relationship.
Reflection photography is the parent. It comprises images taken with any reflective surface, such as mirrors, puddles, and glasses.
But our focus today will be on one aspect of it—mirror images.
Tip Set 1: Props/Setting
Take The Mirror Outdoors
Is there any rule that a mirror photograph must be taken indoors?
Definitely not.
In fact, before mirror images became a thing, most reflective surfaces were natural elements. The ocean, puddles, rivers. And they are still very much in use.
So why don’t you enhance your creativity as well? Take a small mirror outside, perhaps to your garden or the front porch. It'll surprise you how natural elements add a striking effect to your portrait.

You could also use your car mirrors. Because who says you have to be on the move to achieve ecstatic car photography?
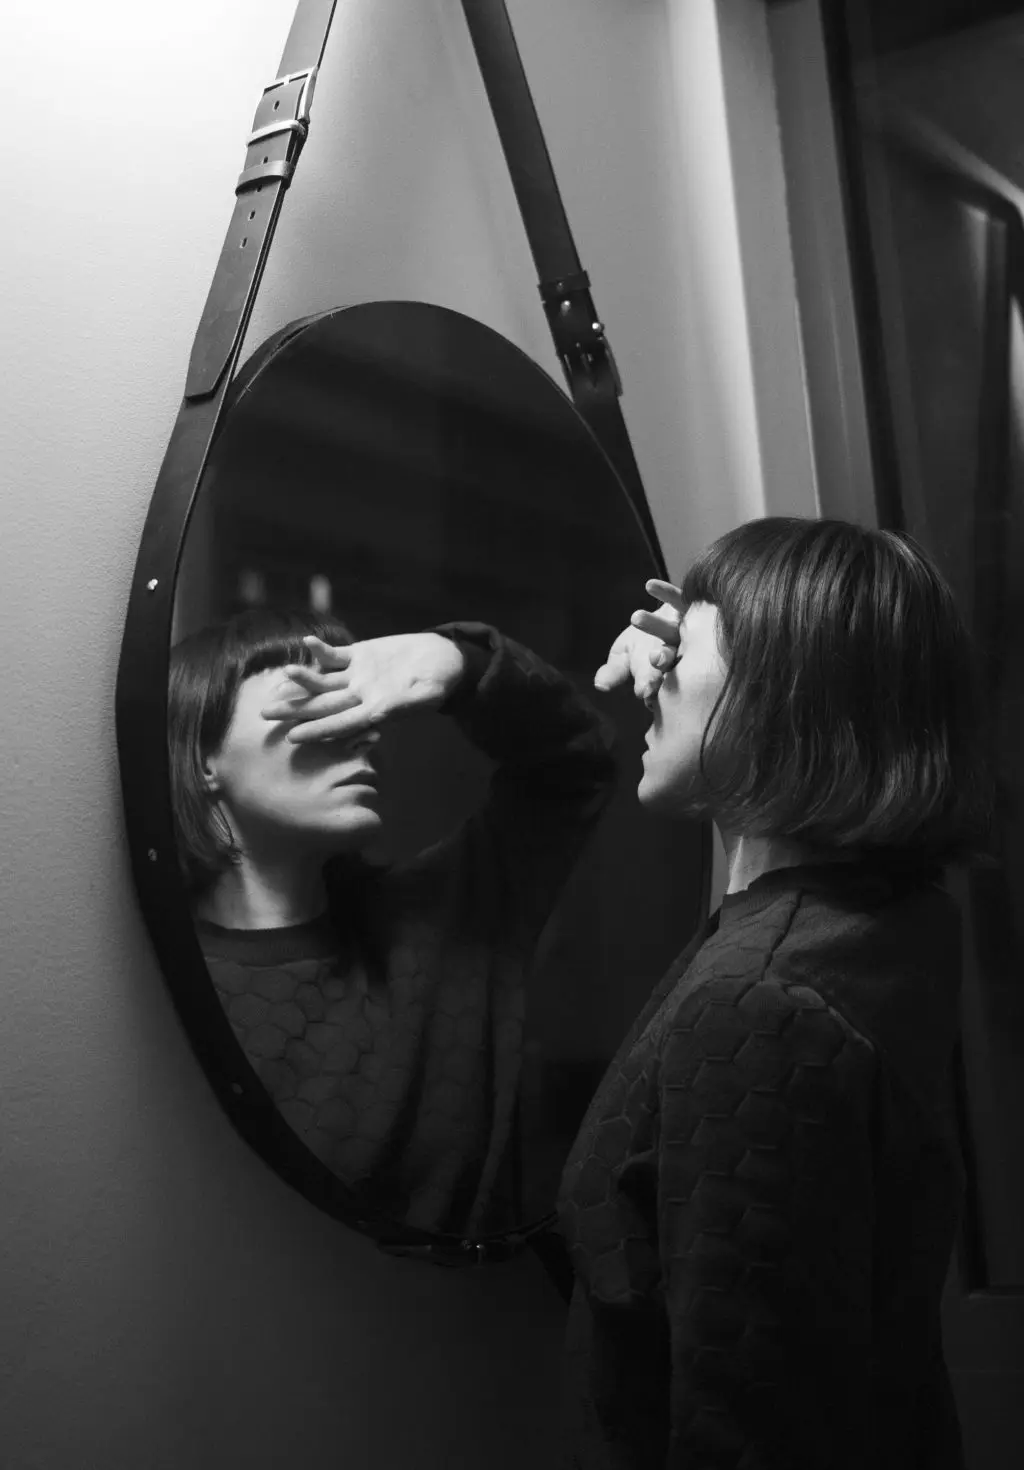
Play With The Mirrors
Looking for something surreal? Let’s give you some ideas.
Since mirror shots have a high tendency of being casual and repetitive, telling a story with yours would be quite creative.
So how can you tell a photographic story?
Try using shattered glass.
Capture the reflection of your subject along with those broken pieces, and you’ll be creating something interesting.

See how the above portrait looks like the hand of the subject was amputated along with the mirrors?
Imagine shooting a reel of pictures from when the hand was still in one piece, to when it got “scattered”, to how it got fixed. It's like a tale that subtly interprets life.
Generally, using many mirrors at once, broken or not, takes photographs to the next level, as you get to capture multiple reflections of the subject at a go. Lastly, how about putting the mirrors behind you? Yes, you read that right. This way, you'll be shooting your front and back view at the same time.
So really, you mustn't have professional editing skills to achieve creative pictures that give off an illusion.
Tip Set 2: Improvising
The Backdrop
You want a white background.
But home is, well, home. You don’t have it all and spending heavily might not be an option for you.
We come bearing good news, dear photographer—you may not need to break the bank. Your tablecloth or the wrong side of your bedspread could make a perfect white backdrop.
If there's nothing to hang it on, you could drape it over your curtain rods. Alternatively, create a backdrop stand following the tutorial below:
The Frames
Sometimes, you want to add a touch to your mirrors. Especially if you want the whole of it to appear in your picture.
Below is a DIY guide on how to build a frame for your mirror:
There is also the exciting option of turning regular items at home into cute frames.
Wondering how? Click here.
Tip Set 3: The Camera
Be In Charge Of Your Light Settings
It’s important to learn how to navigate the light setting of your camera. Even if you’re using a cell phone.
This way, you’d be able to determine when to follow the hard-and-fast rules, and when to go rogue with them. And whatever path you choose, you’ll still end up with a fantastic shot because you broke the rules like an artist, not like a novice.
So what's the best setting for mirror photography?
There's no “best” for any kind of photography. It all changes, depending on:
- Time of day
- How much artificial lighting you’re employing.
The general rule is, the darker your setup, the higher your ISO should be. Meaning if you're outside on a bright day, you'll need less ISO, usually between 100 –200. And on days when the sun is asleep, you'll need to turn it up a bit.
If you're indoors and your natural/artificial light is on fire, you'll need less ISO and vice versa.
But this rule could vary. For example, some shots require high ISO, even though the environment is well lit.
Also, mirrors reflect light. So even in a semi-dark setup where a higher ISO is expected, this may not be necessary if the mirror is angled to the direction of the lighting.
ISO could also be determined by what level your aperture and shutter speed are.
We've written detailed articles on how to determine the best ISO, shutter speed, and aperture per time.

Shoot From Different Angles
Don’t dull your shot with a view from one angle.
Spin, capture how the reflections look from afar off, close up, the side, and even from the top. By placing the mirror on the ground, you could achieve that view-from-top-angle.
In some shots, focus on the reflection, and in others, focus on your subject.
The point is, regular images are no longer interesting. There are many angles you could explore, particularly if you're looking to tell a story with your pictures.
Black & White
Classic.
Different.
Amazing.
That's what black and white photographs are. And yes, it works well with mirror photography.
Tip Set 4: General Insights
Prepare & Practice
We’ll let you in on a secret—being at home doesn’t mean everything will be easily accessible.
To prevent looking for equipment in between your shots, your best bet is to prepare before you start. You’ll need to know:
- What kind of shot you want
- Do you want to tell a story, or do you want random images
- Does your idea require a human/product model, or will it be good to go as a selfie
- Will your shot be better with a camera or good to go with a cell phone
- Is your equipment and background scene ready
- What time of the day do you want to shoot

In addition, the old saying that practice makes perfect isn't lost in photography. Take as many shots as possible before the real deal.
- Practice your angles
- Try the light at different levels
- Get style inspirations – for self portrait inspirations, click here


