Photographers have taken up an art form that requires them to be creative and at the same time systematic, as this process involves different techniques to perfect it. Most of the photographers may have some experience at some point capturing portraits.

There are certain skills that portraiture demands and creating the right background is one of these. Although the focus is on the foreground and the subject, having the right background sets the scene and provides the perfect contrast.
How To Use Backgrounds For Portraits
Most portraits show a subject relatively close-up, but also include some background that can provide context or complement the subject’s appearance. There are no restrictions on what you can use as a backdrop for portraits.
The many sub-genres of portraits can involve a wide variety of backgrounds, from the busyness of a street to a solid, colored backdrop.
Using a plain backdrop makes your subject stand out and emphasizes their features while having an environmental background can give the portrait context and add to the viewer’s understanding of the subject.
For maximum impact, a black backdrop is a way to go, but it’s not as simple as just having a black background you can shoot against.
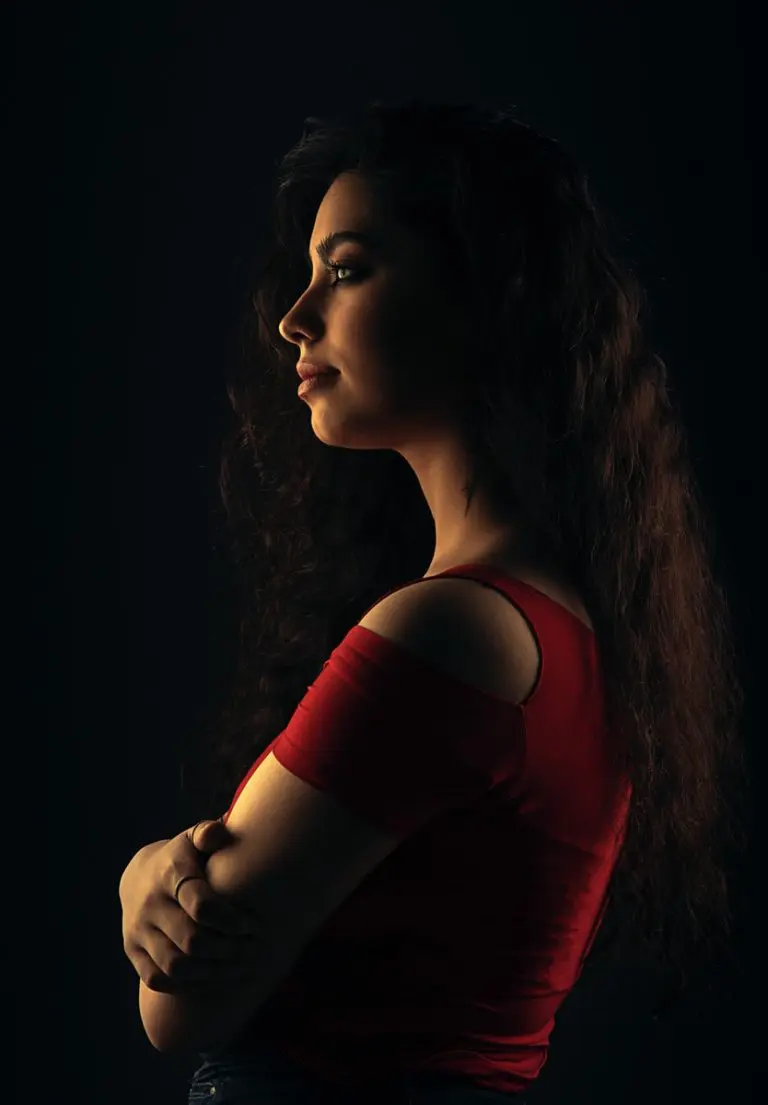
What Kind Of Black Backdrop Should You Use?
Using backdrops in photography can get tricky. There are simply so many options to choose from. Pieces of fabric are often used because they don’t reflect light, ensuring a smooth and professional appearance.
The background paper is another good choice and there are many different sizes, including portable backdrops that can be used outside a studio. Using a black background for portraiture can be extremely effective in allowing the viewer to focus on the subject’s features and the emotions they’re communicating.
Using fabrics such as velvet or velour is advisable if you want as dark a black background as possible, as they absorb light rather than reflect it. While you can fix contrast and color balance in Photoshop or Lightroom, minimizing the need for post-processing is always preferable.
Using A Black Backdrop Effectively
All types of portraiture require a range of skills and knowledge, including the ability to adapt to different backdrops while maintaining focus on your subject.
1. Maintain a good distance between subject and background
Just because you have a black backdrop it doesn’t follow that you’ll achieve a solid black background in your final images. The light you use to illuminate your subject also bounces off other surfaces nearby, including the material you’re using as a backdrop.
One way around this is to keep a decent distance between your subject and the background, as this diminishes the amount of light reaching the backdrop. Backdrops made of paper and similar materials are more reflective than fabric.
It’s worth reading up about the Inverse Square Law—an explanation of how increasing distance between lighting and backdrop (or subject) affects brightness and shadow.
The intricacies can be hard to understand if you’re not mathematically inclined. But the principle can help with calculating the optimal distance between your light source and subject/background.
2. Angle lighting effectively
Maintaining space between your subject and backdrop isn’t the only method of keeping light where you want it.
There are many different ways of using lighting equipment. Angling lighting effectively can keep your subject illuminated while minimizing the light spilling onto the background.

With portraiture, the light should fall almost exclusively on your subject if you want a true black background.
While having your subject positioned further away from your backdrop helps, having lights facing the subject and backdrop head-on will still result in light bouncing off it.
There are many ways of positioning lighting equipment that minimizes light spilling onto backdrops, including:
- Place lights at a 45 degree angle and not facing the subject or backdrop head on. This can take some experimenting to find the “sweet spot”, but going through the process improves your skills in all areas of photography.
- Use rim lighting to illuminate a subject from the back and side, while directing light away from the backdrop. Rim lighting, also known as edge lighting, can help keep a background as dark as possible while illuminating the subject better.
This technique requires at least two lights placed slightly to the side and behind the subject, which direct light away from your backdrop.
3. The importance of contrast
Understanding contrast is essential for every photographer.
While 35mm film negatives used to be developed by hand in a dark room, digital photos only reach that stage—processing outside of the camera—when they’re on your laptop, tablet, or other devices.
Achieving the desired contrast in your portraits requires a combination of camera settings and post-processing.
When aiming for a pure black background, having high contrast can be very helpful, as it makes all shadowed areas darker and light areas brighter. Be careful when increasing contrast though—bumping it up can blow out highlights and result in lost detail.

4. Using the right camera settings
Being well-versed in your camera’s settings allows you to get the shots you want and avoids hours spent on editing sub-par images.
As we’ve mentioned, one of the central elements of having a black background is achieving the best level of contrast. It’s always advisable to use manual settings. But for the less experienced photographer, it’s perfectly fine to use aperture or shutter priority.
Using the right settings will ensure the best balance between light and shadow. Setting your ISO to the lowest level—100 is good—makes your camera less sensitive to light. This does mean you’ll have to decrease your shutter speed to allow enough light, but using a tripod solves that problem.
At the same time, increasing your shutter speed also results in less light reaching the sensor.
5. Post-processing
Using Photoshop, Lightroom, or a similar program, you can adjust the contrast of photos to dial down the brightness of your background and boost the highlights. This involves using shadows and levels to concentrate on the intensity of the blacks in your image in comparison to other areas.

Mastering Portraiture Is A Continuous Process
Improving your photography skills isn’t something that’s measurable. Every moment spent learning and experimenting is valuable. If you want to chart your progress, create an online portfolio and update it regularly. You’ll soon see a visible difference between your early shots and your latest ones.
Don’t be hard on yourself when perfecting the relationship between your model and the background. Learning is not finite, and there will always be new methods to explore. Once you're comfortable shooting portraits against all black, you can branch out and experiment. In time, you’ll find the style that suits you and your subjects best.
Further Resources:
- 10 Tutorials On Powerful Black And White Portrait Photography
- Female Poses For Portraits That Every Photographer Should Know
- How A Little Clarity In Lightroom Can Improve A Portrait
- Tips for Achieving Winning Portrait Photography With Speedlights
- 6 Fundamental Composition Techniques That Will Improve Your Portraits
- How To Get A Black Background In Photographs


