
This is a fact that you may, or may not, be aware of- At this point in time, a digital photograph “REQUIRES” a number of Fundamental Editing Steps to become the gorgeous photograph that you intended it to be. The Fundamental Editing List, discussed in this article, includes the most important steps in digital photography.
Why? Read on.
Let me begin by stating, “There is a caveat to the above statement…”
If you’re still in the digital “Stone Age” and shooting only in the .JPEG format- well there’s little that I can do for you here.
By shooting .JPEG, you’re letting the camera decide how great your image processing is going to be. Yes… When a digital camera creates a .JPEG image file, it is “processing” the file inside the camera.
You’ve undoubtedly heard the term, “post-processing”?
With a .JPEG, I guess you can call it, “pre-processing”.
Okay! I concede that you can make “selections” on your camera to skew how the camera will record the scene.
“YES”, I know that you can still alter the image in post-processing after downloading the file from the camera.
However, you are starting out with a tainted original- (Tainted? Is that a nasty word in this circumstance?) The camera bias is already locked into your image file.
Why paint a picture on a canvas that already has paint splattered on it? (This is a metaphor for you visual learners.)
Why not begin with a clean canvas?
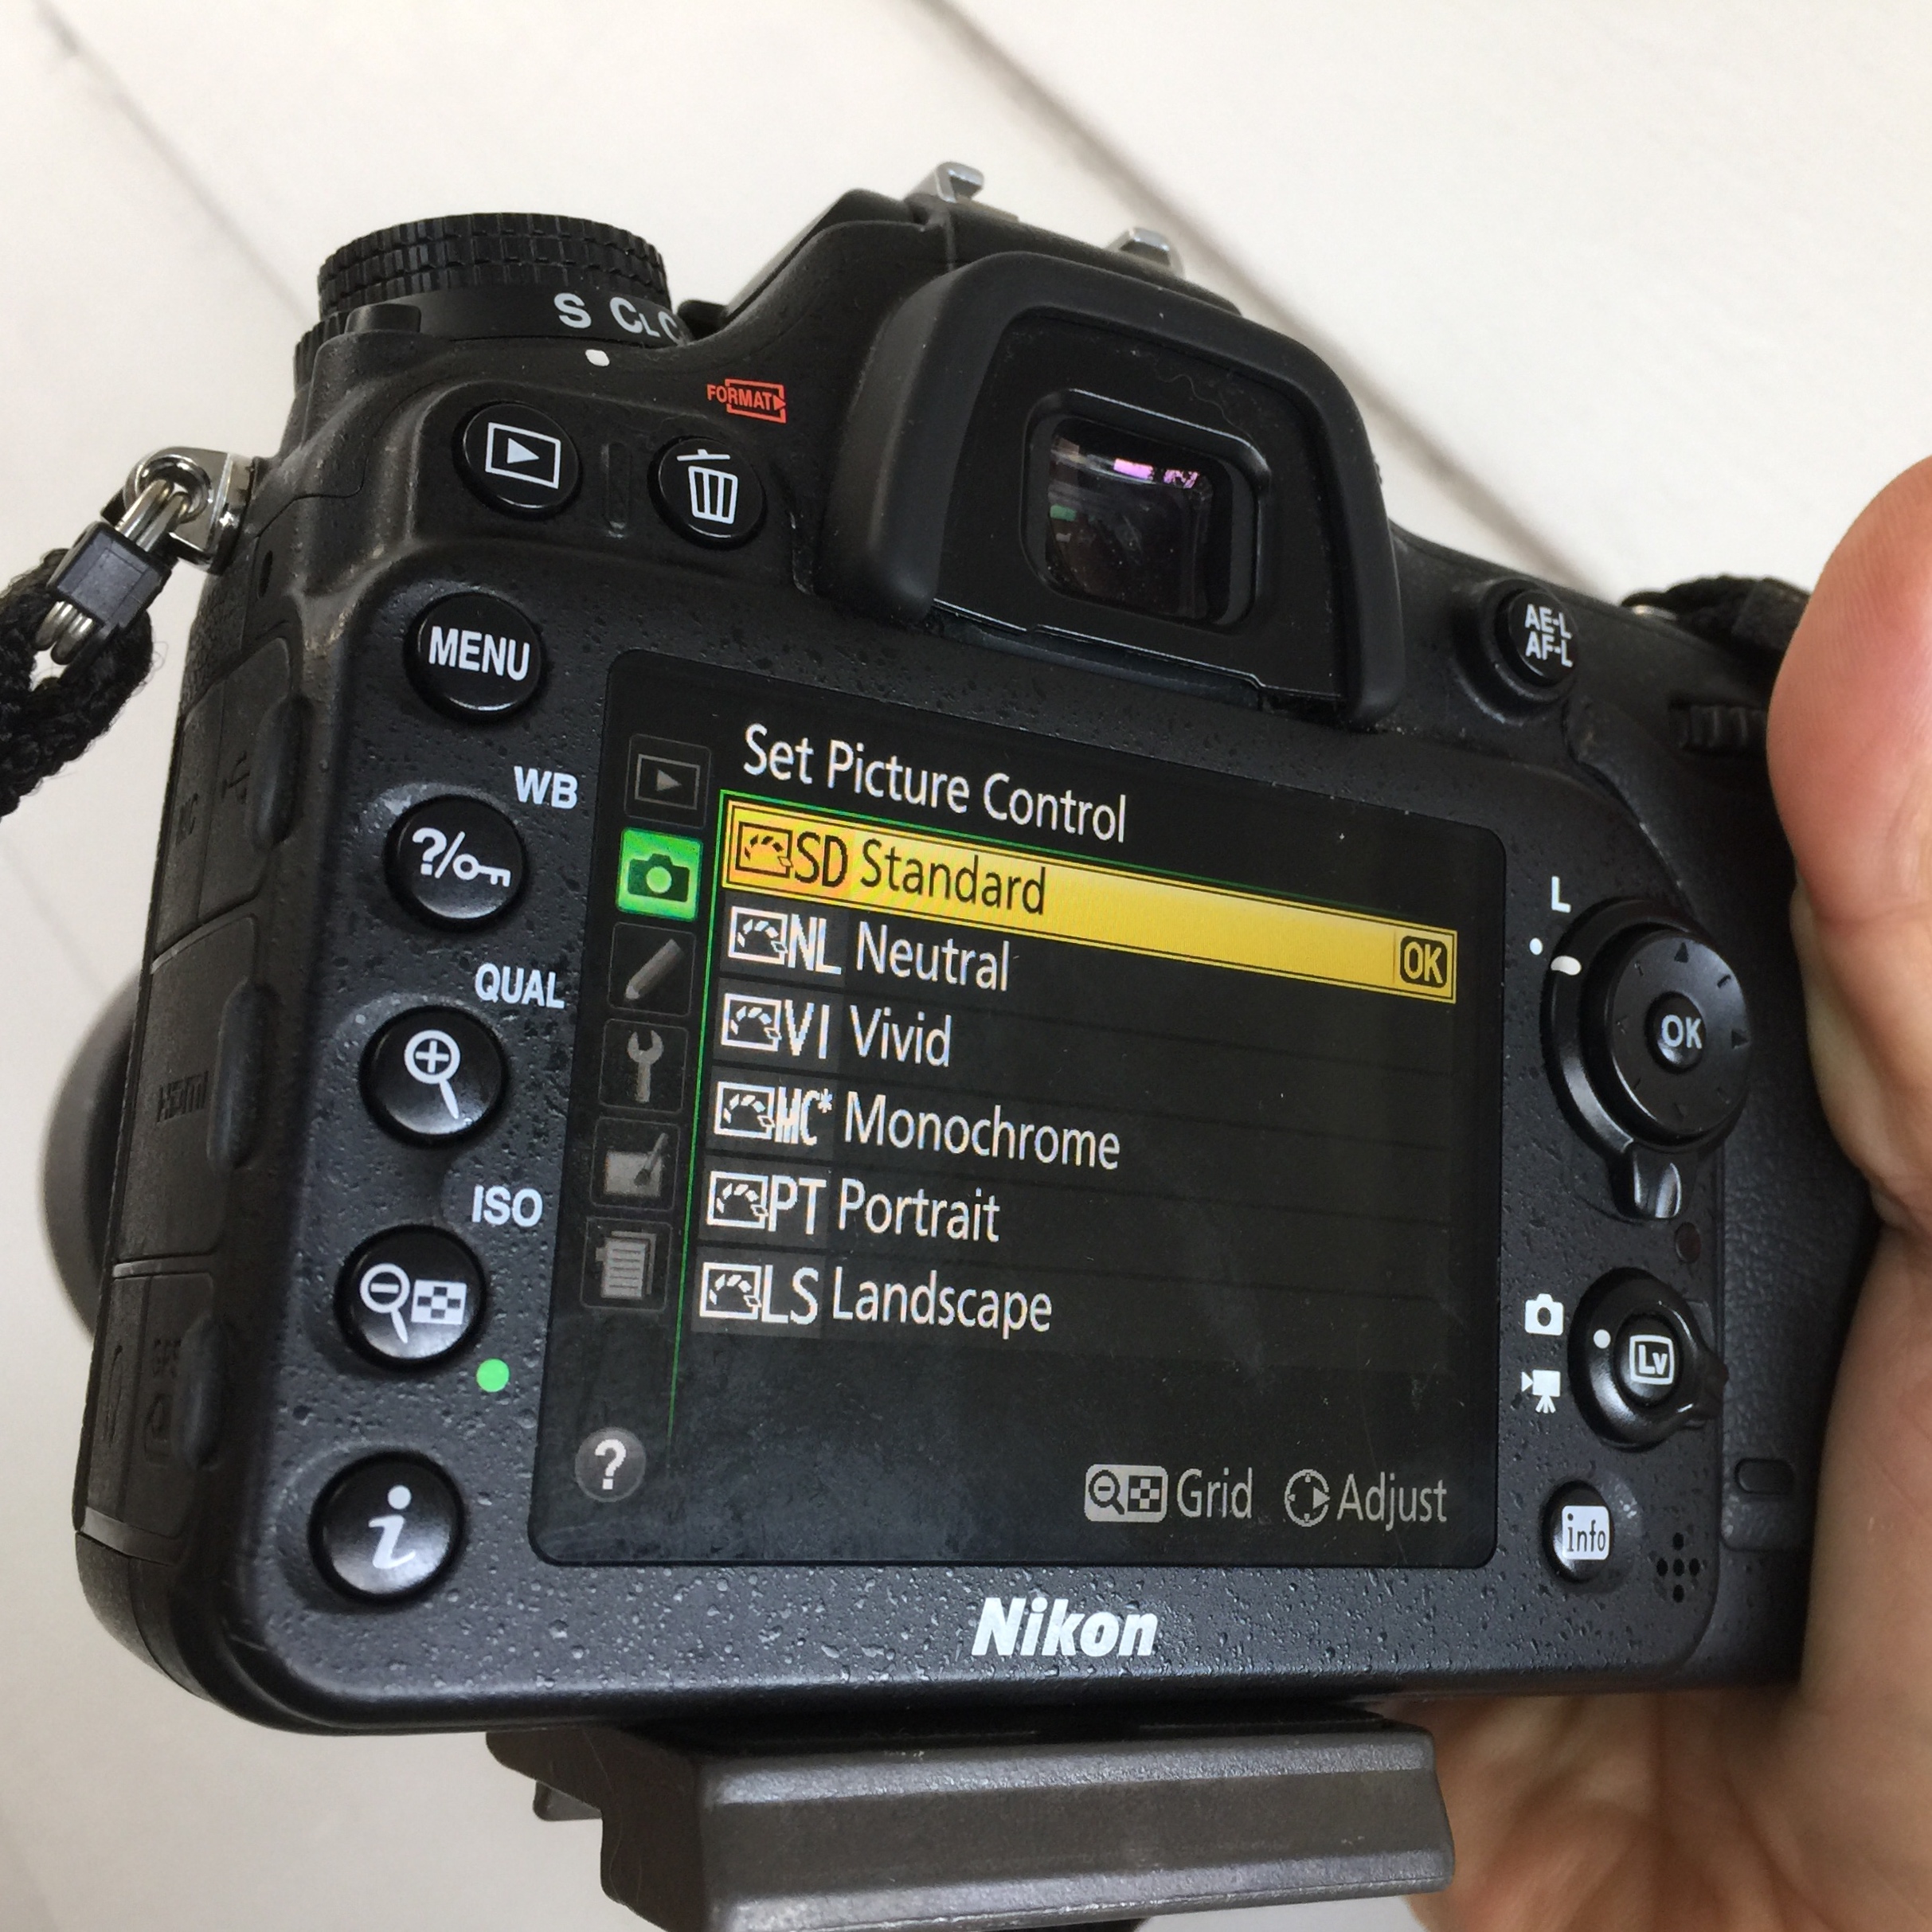
This is the important point to grasp; the camera settings, for creating a .JPEG image file, have no truly measurable system for the photographer to control what is happening to their image output. The camera software is taking over. These settings might include such terms as: Standard, Neutral, Vivid, Faithful, Landscape, Portrait, or Monochrome.
Photograph by Kent DuFault
I’m not saying that you should never shoot a .JPEG image or use these settings. (Although personally, I never use these settings. I leave them as neutral as possible.)
I always shoot .JPEG images. There is a place for them in the photography world. I shoot them for those moments when I need an image quickly: to send a sample to a client or upload to social media.
But my important work… that’s all coming from the raw file format.
I set my camera to shoot both raw and .JPEG.
Why does my important work always come from the raw file format? Because the raw file format is a clean canvas; it’s a digital negative. The camera created a neutral image with the full recording power available to it, and now (similar to film- where a color printing technician must pull the visual energy from a piece of film), you must post-process the beauty of the original scene back into your image file.
Why do cameras still have the .JPEG option? It is still the file format of choice for many applications. Photo labs use that format. The Internet is primarily set up to use the .JPEG format.
Important Point: Shoot and post-process in the raw file format, and then convert to .JPEG for distribution. Set your camera to shoot raw & .JPEG simultaneously if quick turnaround is a factor. Set your camera to the raw file format only if trying to conserve memory card space.
There are 14 primary post-processing steps that virtually every raw file should receive and 2 “semi-optional” steps.
I believe the 2 “semi-optional” steps are mandatory as well. However, that is my personal preference, and those 2 steps are included in my “workflow”, or what I call my “Fundamental Edits List”.
I don’t know about you- but that word “workflow” has always been kind of scary to me. Or maybe scary isn’t the right word? Useless? I came from the film days where the idea of workflow hadn’t been created yet.
Before, we get further into this idea of workflow in post-processing. (Because as it turns out, workflow is super-important.) I would like to share a couple of excerpts with you.
One is from Nikon, and the other is from Canon.
NIKON: “Nikon’s unique RAW (NEF/NRW) formats let you get the complete Nikon image creation experience, while fully exploiting the high level of image quality produced by Nikon cameras and NIKKOR lenses.”
CANON: “If you consider your RAW images files as digital negatives, then like traditional negatives, they need to be processed in order to reveal their true colors and tones.”
BINGO! (Those two above quotes were for the naysayers out there.)

Photograph by Pixabay
This article is not going to spew forth on the wonders of the raw format (any more than it already has).
If you’ve read this far- there are two things that I hope you truly understand. (Soon, you will discover the MOST important steps in digital photography!)
- You should be shooting the raw file format for maximum quality, and control, over your photographic product (pictures).
- All raw format image files require at least 14 post-processing steps to reveal their fullest potential.
YAY! YOU GET IT!

Photograph by Pixabay
Let’s talk about the 14 post-processing steps. (I’m going to leave out the 2 optional steps due to article length.)
I call them, “The Fundamental Edits List”.
Side note– If you want to get a complete breakdown of my Fundamental Edits list. Including step-by-step ‘how-to’ instruction in Lightroom, Photoshop and Elements. I’ve published an eBook on the topic over at Photzy called the Ultimate Guide to Fundamental Editing » Go here now to take a look.
There is a story behind my writing about my Fundamental Edits List.
This topic came to mind when I remembered a conversation that I had with a newer photographer several months ago.
She’d been into digital photography for about 3 years.
She was telling me about her frustration with her photography.
She said that she had studied the guides on composition, exposure, ISO, lenses- yada yada- but her photos still didn’t spark like all the others that she saw on Flickr and 500px.
I asked her, “What kind of editing are you doing?”
Her response stunned me.
She said, “Oh. I don’t do that editing thing. I’m a purist. I like shooting landscapes and capturing the beauty of nature just the way it was presented to me. I like light…”
I must have had a strange look on my face because she asked me, “What?!”
I asked her, “What do you think editing is?”
She got a little indignant.
“It’s like when you change the color, or add texture, or remove something that you don’t like… or put something in that wasn’t there-”
“Whoa!” I said. “Look me in the eyes. It’s virtually impossible to have a great shot in digital photography without doing some fundamental editing, or what people refer to it as post-processing.”
“That’s not what my uncle says, and he’s a retired professional photographer,” she responded.
“He is? Does he shoot digital photographs now?”
“No. After he retired, he took up fishing.”
(Folks, don’t take photography advice from someone who hasn’t been active in the industry it for at least the last 3 to 5 years. The industry is changing that fast.)
I believe that in fundamental editing there are three goals.
- Fundamental edits should take your original concept, as designed in-camera, and bring them to life within the digital realm. Fundamental editing restores depth, color, saturation, and contrast etc. to something closer to what your original vision was when you snapped the camera’s shutter release button.
- Fundamental edits should make your file as “printable” as possible. If you were to go to a photo printer and have a print made from your original digital file, as it emerged from the camera (raw format), chances are the print would not look very good. The fundamental edits whip your file into shape so that you get the best possible photographic print.
- Fundamental edits should be used to fine-tune your composition.
What is the Bottom line? Fundamental Editing, (or post-processing if you prefer that language), isn’t about big changes. It’s about the subtle changes that mold your image file into what you originally intended it to be.
Here’s an example-
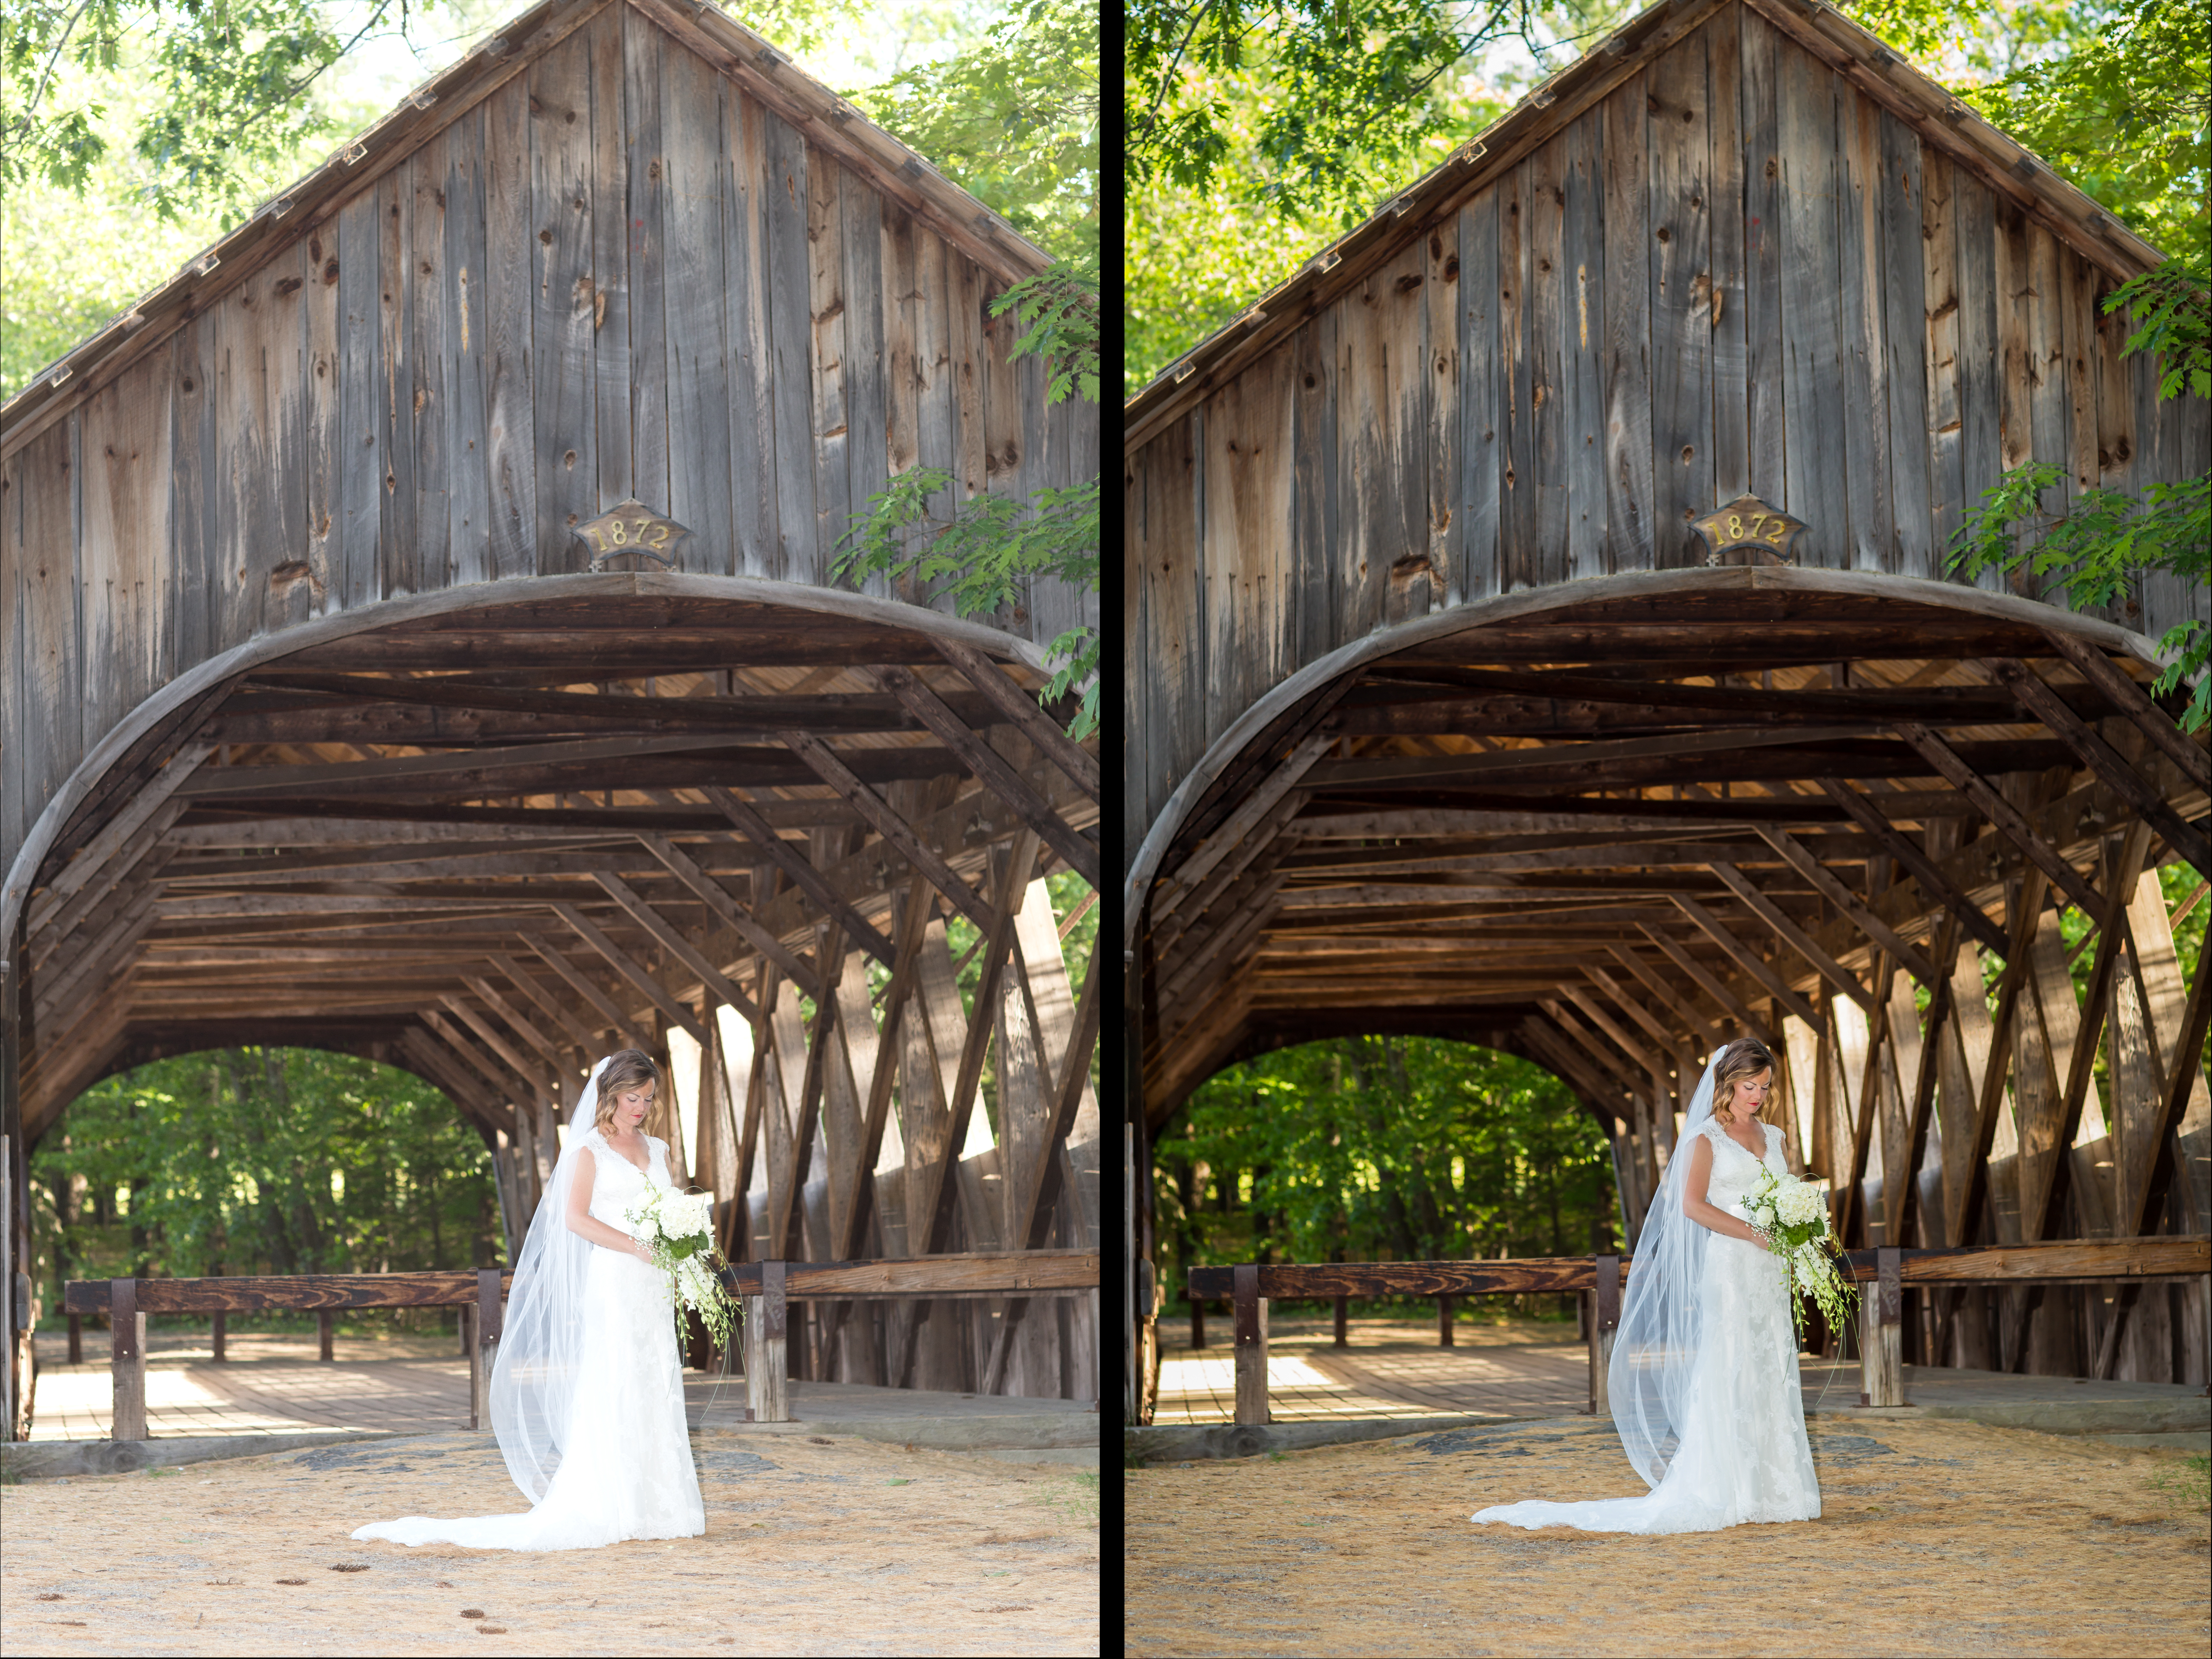
The image on the left is the raw file that came out of a Canon 6D camera. The image on the right is my final shot, as I pre-visualized it, when I snapped the shutter, and after conducting my Fundamental Edits List.
As you can see- the basic tenor of the photograph has remained the same.
It seems logical, at this point, to mention some examples of what Fundamental Editing IS NOT- (in my opinion anyway)
- It isn’t HDR
- It isn’t converting to black and white (or any monochrome tone)
- It isn’t high contrast
- It isn’t super-saturated color
- It isn’t muted color
- It isn’t selective color
- It isn’t adding textures
- It isn’t applying any funky filters or apps
It’s about restoring the raw file to a digital photograph that more closely resembles what your eyes saw and your memory recalls.
Now, let’s go back to workflow.
Having a Fundamental Editing List really requires a “workflow” to have predictable results.
If you’re an aspiring pro, or just have the desire to create the best possible images that you’re capable of- then you must take post-processing workflow seriously.
Completing a Fundamental Editing List in an established pattern will create predictable results.
What can happen if you go about applying fundamental post-processing steps in a willy-nilly manner?
- You can increase the noise
- You can create destructive edits that can’t be reversed
- You can blow out your highlights
- You can turn your black tones into inky blobs or grayish muck
- You can throw your color off
- You can over-sharpen and create ugly artifacts
- Etc.
Let’s take a peek at the items on my Fundamental Edits List:
- Opening the image (How- you open the image can have significance)
- Crop
- Noise Reduction
- Global Exposure Adjustment
- Clipping on the Shadow End – Black Point
- Clipping on the Highlight End – White Point
- Color Temperature
- Color Tint
- Clarity
- Vibrancy
- Saturation
- Efex – Vignette (optional)
- Efex – DeHaze (optional)
- Localized Exposure Adjustments with the Adjustment Brush
- Localized Sharpening with the Adjustment Brush
- Global Sharpening (always- last)
I can’t cover the “how to” on each of these edits here. Quite frankly, it’s too much information to fit into a blog post. (Which is why I wrote a whole book about it)
However, let me give you some highlights.
Opening the image can have a significant impact on how you’re going to work on the file. It can also have an impact on how you will find the image at a later date. Depending on which program you’re using, it can affect images that you open up “after” a particular image. A key phrase here is workflow. Develop a pattern as to how you’re going to open your images. Complete the same steps every time. Those steps may vary depending on the editing software that you’re using. The steps for Photoshop won’t be the same as they are for Lightroom or Adobe Elements.
Crop in a non-destructive manner, this means in the ACR camera raw window or directly in Lightroom.
Do noise reduction early in the Fundamental Edits List. I do it right after my cropping. The reason for this is that the noise reduction process might affect some of the other steps. My noise reduction policy is to try and get it done outside of Photoshop or Elements (in the ACR camera raw processing window).
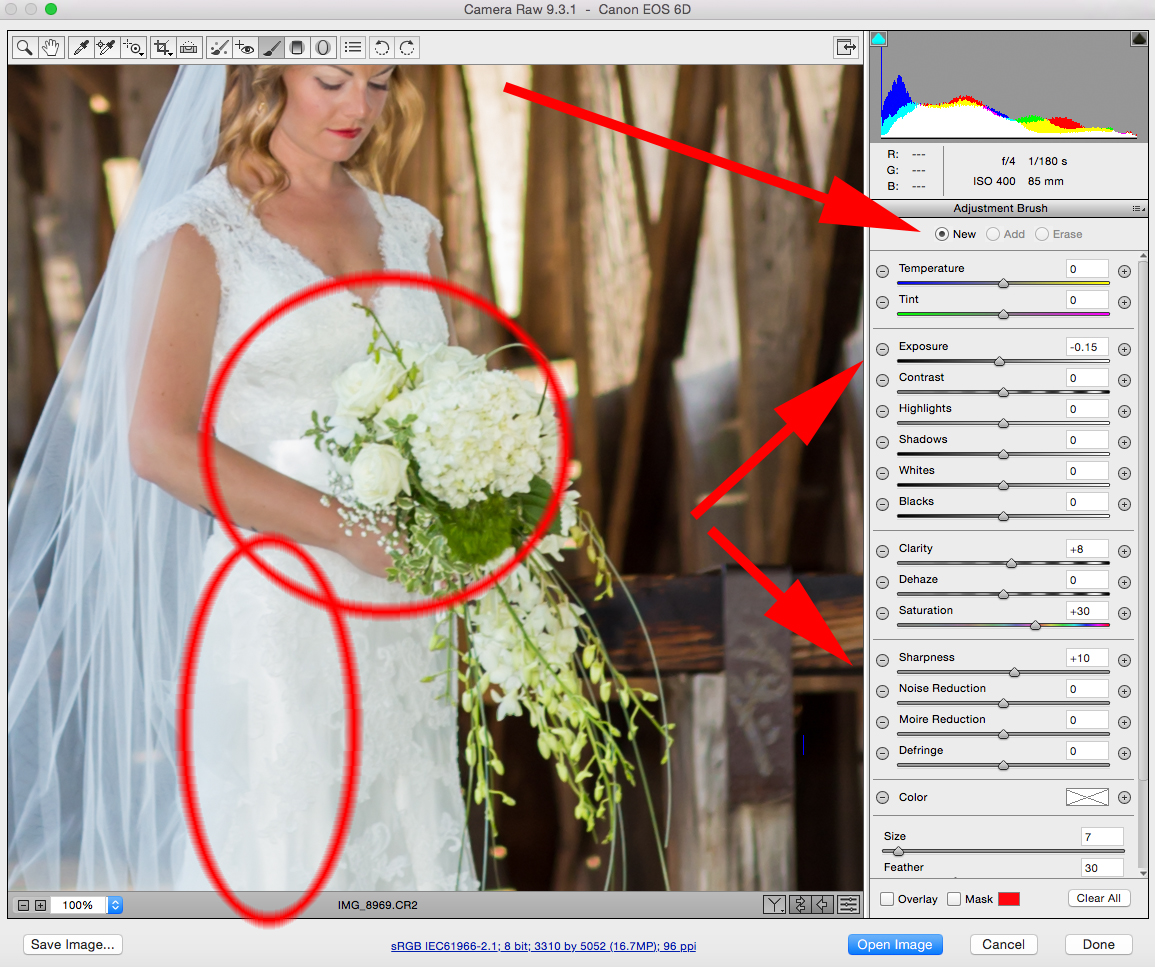
Use a very light hand in any global exposure adjustment. If you wish to become a real pro at post-processing, you need to master the Adjustment Brush. Professional use of the Adjustment brush will help you to eliminate sweeping global changes across your images that are the hallmark of amateur photography.
Clipping is a term that Adobe adopted to indicate lost image detail. In order to understand clipping, you need to have a working knowledge of the Histogram. It would also help you to study up on the Zone System. Clipping on the shadow end means that you’ve lost details in your black areas. If you look at your photographs, and the deep black areas tend to look like black blobs (with no detail); you’re likely clipping the shadows. On the reverse end is highlight clipping. If your highlight areas look like white blobs (with no visible detail) this means you’re likely clipping the highlights.
Clipping is a problem that I see all the time with photographs on the Internet.
Many of you digital photographers probably don’t remember Dean Collins. Dean was one of the original Photography Instructor Gurus. He was a true master of the photographic medium.
I took one of his workshops many years ago.
It was there, that I first truly learned that in a photograph there is “white” and then there is “WHITE”. The perception of “white” varies widely. When a bride is wearing a white dress, the dress should look “white” but not “WHITE”.
Do you get what I’m saying?
There should be texture and tone to the white dress. If it looks “WHITE”, (if it’s a white blob), then your highlights are clipped.
The reverse is true with shadows. A black cat on a black silk scarf should look “black” not “BLACK”. There should be tonal variations in the shadows. Those tonal variations should include texture and detail. If you can’t see that in your photograph, you have shadow clipping.
I’m not going to delve deeply into the Histogram and the concept of tonal range. However, it might help you to know this…
The number 255 on the Histogram is “WHITE”. Any number from 254 to approximately 230 is somewhere on the scale of “white” (with tone and texture).
The number 0 on the Histogram is “BLACK”. Any number from 1 to approximately 30 is somewhere on the scale of “black” (with tone and texture).
Photograph by Kent DuFault
The photograph of the bride shows you “white” (with texture and detail), there’s no clipping.
Color temperature and Tint represent the Wild West of post-processing. Why? We all see color differently. But, (and this is a big “but”), if you’re creating photographs for a customer, someone who isn’t going to see the world through your eyeballs, then an expectation of accurate color is pretty mandatory. This is a huge “workflow” step. Managing accurate color. Develop a system for color adjustment, and stick to it for predictable results.
Clarity is your friend. Use it wisely. Clarity helps to give your photograph the impression of sharpness without adding noise. Caution though- don’t go too far with the Clarity setting.
Vibrancy and Saturation are the most abused Fundamental Edits outside of Sharpening. If you’re shooting strictly for yourself, then you have free reign over these bad boys. However, if you’re taking on assignments, or wish to move in that direction, you must learn how to “accurately” set these two Fundamental Edits.
In order to do that, you must be able to accurately read and understand a Histogram. You must also develop the skill of evaluating “what is happening to the Histogram” as you make changes throughout your Fundamental Edits List.
This is important.
You must learn how to read a Histogram, and develop the skill of judging how the Histogram is changing as you make Fundamental Edits.
Vignette, DeHaze, and the Adjustment Brush aid in the altering of the composition in post-processing; I’m only going to discuss the Adjustment Brush here in this article.
In my opinion, the Adjustment Brush is the single most powerful Adobe tool in post-processing.
It doesn’t matter if you’re using Lightroom, Photoshop, or Elements (known as the Smart Brush in Elements). This tool allows you to completely change the composition and mood of a photograph. If you don’t know how to use this tool, learn it. I’ve written about it extensively.
Finally, we have Global Sharpening. This step is always last in my workflow, and I believe it should be in yours as well. If you’ve done a good job with the Clarity setting and with localized sharpening using the Adjustment Brush you likely will have to barely use this setting at all. That’s a huge advantage for you, because so many photographers abuse this setting and create obvious artifacts in their images.
Proper fundamental editing, with an established workflow, will push your efforts above your competitors!
If you’re unsure about your Fundamental Editing, or you would like some guidance from me on how to apply a Fundamental Edits List properly. I have written a comprehensive guide on the subject. It’s available over at Photzy. It’s inexpensive, and it covers all three Adobe products: Photoshop, Lightroom, and Elements. » Go here now to check it out


3 Comments
There’s some great information here but you almost lost me with the patronising tone and mis-information at the beginning 🙂
I shoot Nikon and Hasselblad digital cameras. In my Nikons, I am using their Picture Controls all the time. In fact, I have made many that emulate film aesthetics I liked when I was shooting film. The misconception that one MUST be shooting JPEG to utilise these picture controls is a common one.
Despite using the Picture Controls, I shoot RAW in my Nikons the whole time. Until my Mac decided not to run or re-install Nikon’s ViewNX, I used that as the first part of my workflow. I now use Capture NX-D: not as good as ViewNX but fine for the very basic adjustments I do before making TIFFs and getting them into Photoshop for the rest of the post-pro.
The key thing that Capture NX-D does for my RAW files is to show me them EXACTLY AS I SHOT THEM, whether monochrome or whether shot in any of the other Picture Controls I regularly use. Lightroom turns all RAW files a standard colour, as it is not able to read the film emulation data… be it from Nikon, Canon or Fuji files.
I see the files as they were shot and I also have a dropdown to put the RAW into any of the other Picture Controls I like.
Your article mentioned the concept of JPEGs being ‘pre-processed’. Correct. You alluded to the JPEG being ‘tainted’ or being like a print as opposed to the negative that is RAW. I agree with the negative-print analogy and will take that a step further, with what I am doing using the Picture Controls, to say that my shots taken using them are a little like a transparency.
The main reason for my shooting in styles I choose in-camera is that it allows me to get an idea, on location, on the job, of how the scene will look in a specific aesthetic. This is part of my pre-visualisation of the world, something that is an essential skill to develop as a photographer. We all did it in the old days, getting to know the aesthetics of specific films [Fuji for greens, Kodak for reds, oranges and skin-tines, Agfa for blues, Fuji Neopan for those crushed blacks etc etc] and it’s a good skill to develop now.
My post-production workflow is part of my shooting. But as opposed to thinking ‘I’ll fix that later’, I see all of my post-pro workflow as ‘I’ll finish that later’. I’m not rescuing files in post, I’m finishing them. I’m seeing the finished file through the viewfinder when I shoot it and working towards achieving that with every operation. Part of that is shooting in a specific style, specific Picture Control.
Just as I may use the Live View and the ‘K’ setting in WB, on site, to dial in a specific WB that suits the subject…. my use of Picture Controls is to shoot in a way that suits the subject best, that I can see when I am taking the shot.. as opposed to sitting at my computer afterwards, away from the scene I shot, trying to remember what it looked like.
With the Hasselblad? Well, the colour from my CCD-chipped H4D is so spot-on that WB changes only get my pretty much everything I need. If I am tethering, I can create a style in their software that means the files I shoot are rendered instantly in that aesthetic when they rez-up on the screen.
Sure, RAW is awesome… non-destructuve editing that allows us to easily fix or change many parameters. It’s the fantasy I had as a very young child come true: 1000 shots on a roll, mono, colour, any WB you like, non-destructive editing, easy to fix and edit… etc etc.
But, please don’t diss the power of shooting in pre-defined aesthetics just because you choose to shoot ‘as neutral as possible’. That’s your choice. But there is much to be got from shooting using the Picture Controls of Nikon, Picture Styles of Canon or the film emulation presets of Fuji. It allows us as photographers to nail an aesthetic on-site, at the time of shooting, just as we used to do with film. It allows our clients to see on the screen what looks very much like ‘a finished shot’. My clients love that. ‘Wow, that looks like a finished, graded shot….’ is very often the comment from clients when, for example, they see me shoot in my ‘Kodak Ektachrome P’ picture control with a custom Kelvin white balance. The crushed blacks, the saturated colour…. yes, it’s RAW so we can tweak it afterwards. But the vision I have had for that scene is perhaps 95% finished in-camera.
One other reason I work like this is that I don’t want to spend hours at the computer editing. I like post-pro and in the ld days the darkroom was a unique place which I loved working in: quiet, contemplative, dark, peaceful. It was only a place I used for photography. The computer, in contrast, is used for everything these days…. and I don’t want to spend extra hours sat in front of it for my photography.
I developed my workflow long before Lightroom existed. I do wish Adobe would get together with manufacturers to try and figure out how to read the Picture Control part of RAW files. I also wish Nikon would do a bit more to update their Picture Control Utility software.
Being part of the feedback and development of the new Hasselblad X1D, I have been encouraging the company to incorporate film emulation into the camera. I hope they will. It seems like they might. It’s not just a way to shoot your photos like they have novel, Instagram-like filters on… it’s an essential part of the pre-visualisation and production of the renderings we as photographers make of the world in front of us.
…it’s not the ‘digital stone-age’.
Plus, I often get my students to shoot straight to JPEG. Shooting with more pre-defined parameters, less safety-net, is a great way to learn exactly how to meter your scene better, compose it better. I don’t miss much from the film days but I do miss contact sheets: one, un-interrupted stream of visual consciousness with no deletes. Having students shot JPEG, 36 shots and not deleting can be a great way of sharpening up their skills and getting them away from the whole (and I think damaging) mindset of
“F**k it, I’ll fix that in post….”
You talk here of Fundamental Edits. More important than that, everything I have said is really part of Fundamental Shooting. Editing has always been a part of the process of making a photograph. But learning how best to shoot is the first thing to learn. RAW, JPEG, pre-defined colour or monochrome.. they all have their part to play in this process.
Totally respect your right to your opinions. None of this was meant as a preaching rant. But, your original article came across as bit patronising and dismissive of anyone who might shoot another way to the way you do.
Peace.
Point taken. Wasn’t my intent. The primary audience that reads my articles are beginners to semi-experienced. I try to lead them down the path of least resistance, (at least as I see it), as it is less confusing to someone new to the medium. Thanks for commenting.
I would very much like to learn and possibly use your workflow ideas. However, I do not use any of the Adobe products nor do I , at this time, intend to do so. So what benefits would I receive by buying and studying the ideas expressed in your book? Thank you for your time.