Learning how to capture star trails is a fulfilling experience and a great one to start with astrophotography. Capturing the apparent movement of stars across the sky as the Earth rotates can give you surreal and compelling images, and star trail photography is highly rewarding if you have a bit of patience.
Interestingly, the Milky Way Galaxy is home to billions of stars out of which we are able to see only a fraction in the night sky from where we live (around 2,500 to 5,000 stars at any given time).
Indeed, if you do have the patience, (particularly if you are going to take a 2-hour long single exposure) you can turn an otherwise mundane shot into an otherworldly image.
Grab your Milky Way Photography Blueprint for free right here.
Understanding The Basics For Photographing Star Trails:
Before you photograph star trails, you need to get the basics right. Just pointing the camera towards any location or point in the night sky will not help you get the star trails images that you desire. Sometimes you may be looking to create circumpolar star trails, which means you will need to point your camera in a specific direction depending on where you live.
Here are some basic things that you need to learn before photographing star trails.
For Circular Star Trails Locate The Polaris or Southern Cross:
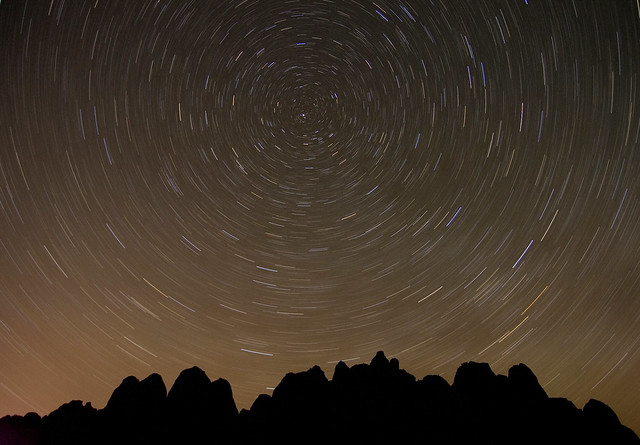
As you may have noticed, several of the example images used here have a circular pattern.
If you are looking for circular star trails images, you will need to locate the North and South Celestial poles (depending on where you live), which is the pole along which the earth rotates.
Note: A celestial sphere is a dome that you see when you look up in the sky and this is what astronomers use to project stars, planets, and other objects in the sky. The poles on the celestial sphere are called the celestial poles and the equator is called the celestial equator.

If you live in the Northern Hemisphere, look for the Polaris (The North Star) which is the last star in the small dipper.


If you live in the Southern Hemisphere, Sigma Octantis is the star you should be looking for to locate the South Celestial Pole, but it is very faint and cannot be seen with naked eyes.
Instead, look for The Pointers and the Southern Cross. Draw imaginary lines, one along the Southern cross stars and another perpendicular to the line joining the pointers.
The point of intersection of these two lines is the South Celestial Pole (see illustrations below for reference).


Of Course, There Is An App For That!
If you are a beginner and find it difficult to locate these stars in the night sky, use an app to locate The Polaris for the North Celestial Pole and the Sigma Octantis for the South Celestial Pole.
These apps can accurately show you the location of the stars at any time or tell you what time the stars rise and set.
- The Sky Guide app for iOS that we usually use gives an accurate location of the stars and alerts you of astronomical events.
- If you are looking for a free app for the iOS, we have tried the Sky View Lite that is a good enough app to locate the stars. The Sky View is free for Android.
- For Android users looking for a good app Star Walk 2 is the one to go for and it is free. We have personally found these apps to be accurate and have tried them ourselves.


How Are We Able To Photograph Star Trails?
Star trails are nothing but recording the movement of stars and in star trails photography, we capture the movement of stars that are caused by the rotation of earth. Longer exposure times give longer star trails.
Truly, stars do not rotate or revolve around the earth, but it is the earth that rotates along its axis helping us record movements that are recorded as star trails. If you want to visualise your results as to how much exposure time you will need for a certain length of Star Trails, you can use the Star Trails Simulator in the PhotoPills App.


PhotoPills App is available for both iOS and Android.
Here Is The Ultimate Guide Explaining How To Photograph Star Trails:

First Up – Understand The Location You Need For Star Trail Photography And Keep An Eye On The Weather
When thinking about how to photograph star trails, your goal is to allow your camera to pick up light it wouldn’t normally (i.e. the stars) by using extra long exposures.
So to achieve this you will need to first look for a location that is free from light pollution and a long way from the city lights.
Whether from a nearby city or the street lamp at the end of your driveway, light pollution can greatly affect long exposures. This isn't necessarily a bad thing though – in fact, it may add to the ambiance of your photo, such as a star trail image that begins during the blue hours (shoot after the astronomical twilight ends).
Note: If you are unsure of the astronomical times, use apps like PhotoPills, Magic Hour, Golden Hour, Solar Watch to find out the times. These give information for both the sun and the moon.
Experimenting with atmospheric light can be a creative way to shoot star trail photos that are unique – just be aware that the lighter your sky is, the less contrast your star trails will have.
You will also need to make sure the moon isn't shining brightly. However, if you are looking for little ambient light to illuminate the landscape, a quarter moon is fine – but make sure it is out of the frame that you are composing.
Keep an eye on the weather and make sure that you go out to shoot on a day when the skies are clear. Obviously, you don't want to shoot star trails images under a cloudy sky, but other atmospheric filters can interfere with your night photography – air pollution and humidity being the top annoyances.
The very best locations for a clear sky would be high up and away from any congested cities, and take on a night with very low humidity.

Gear Required To Capture Dazzling Star Trails
- Any camera with a manual mode, bulb mode and lens combination can be used for star trails photography. Yes, your kit lens is more than enough!
- So, you will need a camera that can shoot manual mode and if it has an inbuilt intervalometer, you can make use of it to take photos continuously. Please note that cameras with better low light performance and high iso performance are preferred to capture night sky images.
- An intervalometer if you camera does not have an inbuilt one.
- A wide angle lens (14mm to 24mm, the wider the better) with a wide aperture of at least f2.8 for better images (But kit lenses are good for a start till you upgrade. Shoot at the widest aperture possible for a given focal length). If you have a fisheye lens, go for it as they can include a lot of the sky and foreground in the frame and this can lead to impressive images.
- Do not hesitate to experiment with longer lenses like the 50mm, 85mm or the 135mm as they can tell a different story.
- A sturdy tripod that can hold the camera-lens combination and withstand windy conditions. Even slight movements can ruin your images (break your star trails or cause blurry images)
- Spare memory cards, charged spare batteries to get you through the whole shoot (a few hours). Have memory cards that have a higher red/write speed so they save the files quicker without causing delay between shots. Also make sure you have larger ones like 64GB in order to have enough space for storing all photos from a sequence.
- Protection for your gear under very cold conditions to prevent lens fogging up
- Have a headlamp to find your way around in the dark and to help you look at what you are doing. Make sure you do not disturb other photographers around you if any with the light from your headlamp.
- Have flashlights or other lights to illuminate the foreground when necessary. Again make sure you are not hindering the works of any other photographers around you. Sometimes a quarter or half moon low in the sky behind you can help illuminate your foreground.
- Keep yourself warm as well and have warm drinks to get you through the shoot
NOTE: It’s very important to utilize proper long exposure techniques and avoid camera shake: locking your mirror, mounting your camera on a secure tripod, and using a remote cable release for your shutter.
A Common Aperture Misconception Explained For Sharp Star Trails: Wide Open or Narrow?
A common question – or rather a misconception – with star trail photography is why wouldn’t you use a small aperture (say f/8 or above) for a sharper image rather than shoot wide open? You’re already shooting hour-long exposures so the timing isn’t a concern….surely it’s better to have a sharper photo, especially if you have other focal points (foreground interest, etc).
The issue with photographing stars is that they move – this is why we want to photograph their trails in the first place. With that in mind, there is a delicate balance to find with your exposure that’s more than just how long your shutter is open.
Wider apertures allow for shorter exposure times because they let more light in than narrow apertures. Focus on that last part – they let more light in.
Considering that stars are constantly moving, you need to make sure that they’re registered on your sensor before they move – otherwise, your star trails will be very dim, perhaps even non-existent depending on your chosen f/stop. Imagine doing a two-hour shoot where your foreground is lit nicely, but your star trails look no more than a slight variation in tones on the night sky.
So it's a good idea to have a lens that’s capable of very wide apertures – such as f/2.8 or even wider. The wider your aperture, the brighter your star trails will be.
Some Common Camera Settings To Take Care Of:
Exposure Time:
Depending on your chosen aperture value and iso, choose a shutter speed. For example, you could start with aperture value f/2.8 or f/4 or f/5.6 depending on the lens that you are using. Set the iso to between 640 to 3200 depending on the camera that you use (stay within iso 1600 if possible to preserve the colours of the stars). Start with an exposure time of 20 to 30 seconds for a start and depending on what is recorded, you can increase or decrease the iso and/or exposure times.
Note: Since you are creating star trails images while stacking the final images, you do not need trails in the individual images. So make use of the 500 rule, 600 rule or NPF rule to calculate exposure times for spot stars – whichever works best for you. You can also use the “spot stars” feature in the PhotoPills app.
Some Apps for Spot Stars are:
- Pin Point Stars for Android- helps to calculate the best exposure times to capture star and milky way images
- Sharp Stars for Android – helps to determine the longest exposure time that will produce sharp stars when printed
Some high end cameras and lens combination can record bright stars at lower iso values and shorter exposures. So you will need to play around with the settings to find out what works best for your camera / lens combination. A good understanding of the exposure triangle and reciprocity law will come in handy.

Histogram:
Although the histograms may not always be the best place to look for best exposures all the time, it is good to keep an eye on the histogram to make sure it is neutral and there are not too much spikes towards both ends. This way, you do not lose details as blown out highlights in the brighter areas or as very dark shadows in very dark areas.
For example, if you are using foreground elements, you will need acceptable exposure and not want it very overexposed or too much underexposed. This is because it is near to impossible to recover lost details from blown out areas or dark shadow areas. Checking the histogram will help avoid these scenarios.
Thermal Noise:
Before the actual shoot, check your cameras response to long exposures. This is mainly important when you go for single long exposure star trail photograph or when you shoot for longer hours like more than an hour or 2 or when the outside temperature is warm. Some sensors can heat up and thermal noise can show up in the resulting images as hot pixels. So depending on this you will need to reduce your exposure times.
Level The Camera:
Before the shoot, always make sure that you level the camera with the help of a bubble level. It can be a hectic job straightening it later while post processing.
How To Photograph Star Trails By 2 Different Methods
So you've chosen a location and you have the gear, so the next step…how do you get those fantastic lines of light?

There are two methods popular with star photographers:
- Using one very long exposure (long enough to register some noticeable star movement; at least 30 minutes) OR
- Taking many shorter exposures and stacking those images in a way that shows sequential movement.
Here are the two methods explained
1. Using One Very Long Exposure
To capture star trails using one long exposure, there are a couple of important things to consider. You need to let as much light into your lens as possible for those stars to register (the why's of this are explained below) – this means using a fast lens, preferably in the f/2.8 range.
When photographing stars under one exposure, you need to do it during a new moon night – meaning that the moon is nowhere to be seen. If you have anything more than a crescent, your exposure will be limited to the 10-minute range because of the ambient light, which won’t do much for star trails. For this kind of photography, darkness is your best friend.
Ultimately, you’re aiming for your environment to be illuminated by the stars themselves – yes it’s possible! However, this entirely depends on the length of your exposure. The image below is the result of an 80-minute exposure taken under a new moon – you can see that the foreground is exposed nicely and the star trails are outstanding.
When calculating your exposure, it would be best to do a shortened test shot so you’re not waiting a ridiculous amount of time just to see if your settings are correct. Many night photographers will jack up their ISO as far as it’ll go and shoot wide open – you’ll rarely find an instance where you’ll be taking a photo shorter than 30 seconds here. Of course, the test shot will be entirely unusable due to noise and lack of trails, but it will give you a base to calculate what settings are needed with an ISO of 100.
Here it is step-by-step
- Make sure that the moon is nowhere in the sky
- Base your exposure time on your test shots. If you have an f2.8 lens, shoot at ISO 100 and if you are using a narrow aperture like f4 or f5.6, use ISO 200 or 320
- Keep your ISO really low to reduce noise. Start with a moderate aperture of f4 and make changes later.
- Do a test shot first for 20 or 30 seconds to see if stars get recorded in the frame. If the test shot does not go well, widen the aperture or increase the ISO, whichever is possible or do both and take test shots till you get a good image.
- Once you are happy with your test shot, increase the shutter speed to around 10 or 15 minutes. Take the shot and see how much trails you get and how bright the trails are. Do a few test shots by doubling the exposure time to get the star trail camera settings right.
- Do not turn on noise reduction as that process can consume a huge amount of time after each exposure.
- Now depending on what you observe from the test shots, calculate how much exposure you will need to get decent star trails in your image. You will definitely need a minimum of 60 minutes exposure, but a 90 minutes exposure can get you some brilliant trails in your images.
- Bear in mind, total darkness is your friend for this very long exposure photography, so make sure there is no moon in the sky. Look for new moon nights or shoot before moonrise or after moonset.
- Make sure you have your battery fully charged to last through the entire exposure.

Disadvantages of Shooting One Long Exposure:
- The camera sensor heats up badly during this very long exposure leading to noise/hot pixels in the resulting image. This is highly evident in low and mid range cameras.
- You need to be careful about unexpected clouds entering the frame or even cloud cover for a shorter period of time.
- You will need to worry about other unexpected elements entering the frame
- You need to make sure your battery has enough charge to go through the entire exposure.
- Many a time, the foreground can become very overexposed making the image unusable.
- At the end of the shoot, you are left with only one image that may or may not be usable.
2. Image Stacking Shorter Exposures
An alternative to waiting for an hour or more for your exposure to finish is to take sequential images and stack them together in the post process to get your star trails.
In short, your exposure should be just long enough to register your stars as bright objects in the sky before moving on to the next one. It’s not uncommon to have several hundred images to stack took over the course of a few hours.
Here it is step-by-step:
Camera Settings:
- Have your aperture set to the widest, ISO around 320 to 640, and shutter speed 20 seconds. Manually focus on a bright star in the sky (do this by zooming in on live view). Take a test shot and review your image.
- Make sure you turn off in-camera noise reduction like long exposure noise reduction, high iso noise reduction, low light noise reduction (anything that is in the shooting menu of your camera) as this can cause a huge delay in time between long exposure shots
- Make a test shot and depending on how the stars get recorded in the image, you may need to increase ISO and/or shutter speed. Do not increase the ISO above 3200 as the image quality will start to degrade.

Getting The Shot:
- Set up the intervalometer in your camera or if you do not have an inbuilt one, make use of an external intervalometer to take the number of shots that you are looking to take at the specified interval (if you camera doesn't have an inbuilt intervalometer, if possible pick up a remote shutter release that has an intervalometer on it).
- The number of shots depends on how long trails you need in the final image. I’d suggest to have a minimum of at least 50 exposures (short star trails) and more if you are able to. You should shoot up to 200 or even 300 shots to get a decent star trails.
- Make sure there is no delay between shots (less than one second) because this can cause a break in the star trails rather than a smooth one.
- Set the right white balance and this should be roughly around 3000K to 4000K depending on the level of light pollution. If you are doubtful, set the white balance to Auto and then make adjustments when post processing. For this reason, always shoot raw.
Note: If your exposure time is 20 seconds and you need 100 shots, you will need to set the shutter speed to 20s and set the intervalometer to take 100 shots continuously at an interval of less than 1 second (maybe 30ms) to avoid breaks between trails.

Advantages Of Shooting Multiple Exposure Images:
- Since you are shooting several short exposures, that is multiple images, you have control over sensor heat, which means less noise/hot pixels.
- You can easily remove unwanted objects entering the frame or discard the frame itself wherever possible.
- You can make several short exposures for as many hours and get the longest trails that you desire.
- If you set up the exposure times right, you will get well exposed images and correctly lit foreground elements.
- You can use these images to create a stunning timelapse video!
Post Processing And Stacking Your Star Trails
Once you have your images done, do some basic adjustments to your images and use your favorite application to stack/combine the images.
There are many different post-processing applications available such as Star Trails for Windows and Mac, ImageStacker and DeepSkyStacker – these will automatically throw all your images together and produce a stunning star trail.
I normally use Adobe Lightroom for basic adjustments and use Adobe Photoshop to combine/stack the images to get the star trails.
Some of the basic adjustments that need to be made are:
- White Balance adjustments if required
- Exposure and Contrast adjustments
- Highlights and Shadows adjustments
- Whites and Blacks adjustments
- Clarity and Dehaze where necessary
- Sharpness and Noise Reduction Adjustments if required
If you think it is very time consuming doing it in photoshop or if you do not have photoshop, we've had a look at a free application called StarStax which is available for Windows and Mac.
We've downloaded and tried StarStax and honestly, it is a very quick process. 43 photos of size 2000px on the longer side, took just 5.40 seconds to be processed.
Take a look at the .gif of the process below.
Starstax also comes with a great gap filling blending mode which when chosen will fill any gap in your star trail image.
Bonus: Why Not Make A Time Lapse Video?
Another benefit of image stacking is that now you have all the necessary photos to make a time lapse video.
Here's a short video of what you can accomplish with this method of star trail photography: both the time lapse video and the composite trail image are shown here.

Some Tips For Better Star Trail Images:
Here are some star trails photography tips for better photographs of star trails:
- If using a DSLR, make use of the mirror lockup feature as this can reduce camera shake.
- Turn off image stabilisation on both lens and camera body.
- Remove any filters off the lens.
- If including foreground elements in the frame, you can focus at the hyperfocal distance or one third into the scene to have all the elements in the scene and the stars (up to infinity) in focus.
- You can also focus on the brightest star in the sky by zooming in on liveview. Sometimes this can render your foreground elements slightly out of focus.
- Always use manual focus for star trail photography so your focus does not change in between shots.
- Instead of just photographing the star trails, make sure to include a beautiful foreground or another subject in the frame for a meaningful and engaging star trail photo.
- Look for locations with the least amount of light pollution as this can help record more stars and their colours. All stars are not white and some have their own colours like blue, red, orange, yellow.
Note: Use these apps and websites to find dark locations near you.
- Dark Site Finder – helps to find dark skies or a dark location near you
- Light Pollution Map – helps to locate areas with less light pollution
- Dark Sky website – helps to find a dark location near you.
- International Dark Sky Places website – you can find areas that are the darkest for the best night skies possible.
- Location scouting during the day and looking for compositions will help you get your way through in the night easily when framing for powerful images.
- Look for stunning subjects and make use of compositional guidelines to create engaging images of star trails. Some subjects to look out for are abandoned buildings, architectural structures, lighthouses, bridges, lonely trees, windmills, roads, etc.
- During cold weather, using the lens hood can sometimes delay any condensation processes.
- Look for inspiration online. Look though works of successful photographers and learn from their experience.
Here Are Some Creative Ideas That You Should Try!
Circumpolar Star Trails:

In order to photograph circumpolar star trails, you will need to point your camera towards the circumpolar stars – Polaris (North Star) that is close to the the North celestial pole or the Octans, Southern Cross that are close to the South Celestial pole. This way, you will get circular star trails because the earth rotates about the celestial pole.
As discussed earlier in this article, if you have difficulty locating the Polaris or Octans and Southern Cross, use one of the recommended apps like Sky Guide, Sky View or Star Walk, as it is very easy that way.
Celestial Equatorial Star Trails:
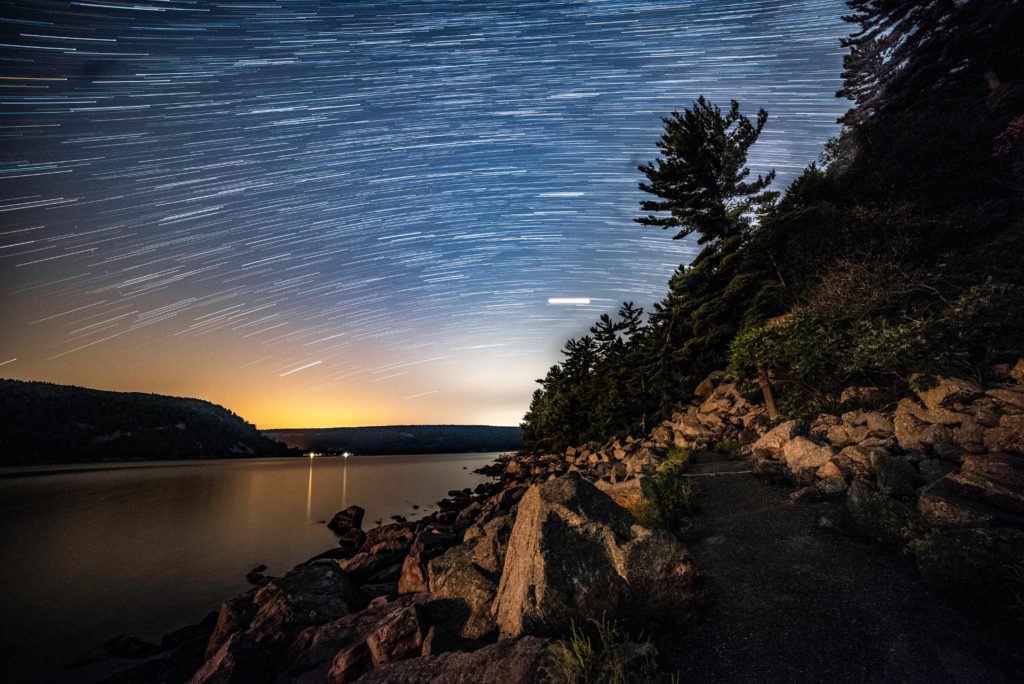
If you point your camera towards the celestial equator, you will be able to see the star trails follow three paths. Straight lines are traced towards the celestial equator and then they curve away on either side of the straight lines towards the celestial poles.
In order to photograph the celestial equatorial star trails, point your camera towards the East or West. Next time you go out to shoot some star trails, do not forget to try this!

Here Are Some Creative Compositions To Try When Photographing Star Trails?
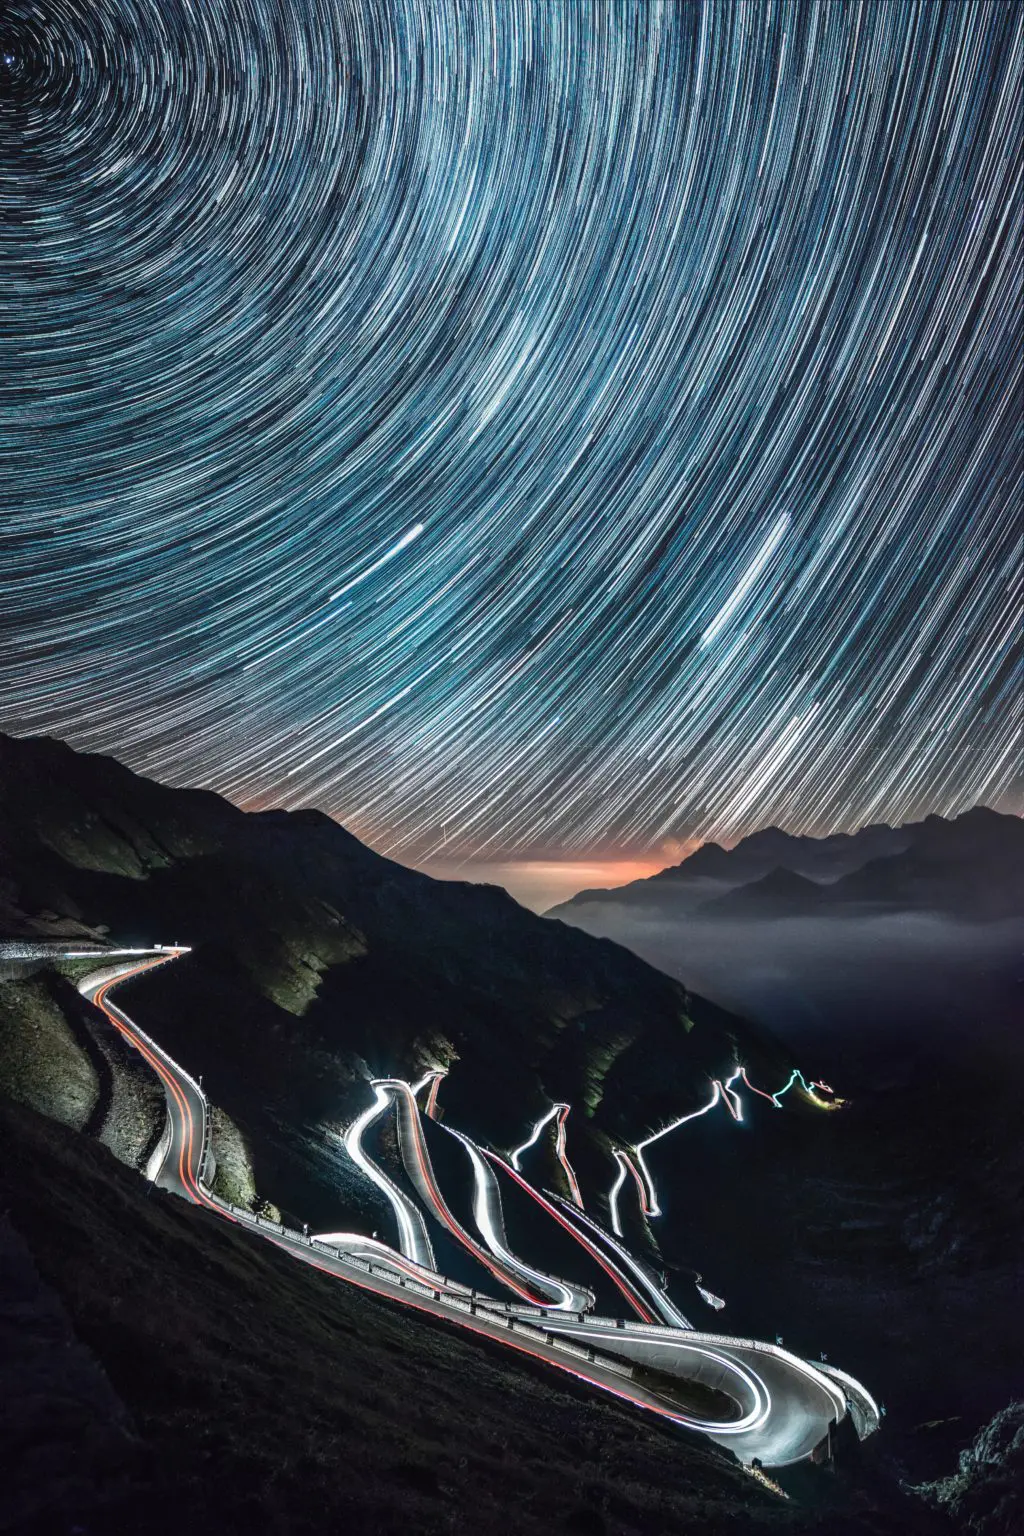
Combine Star Trails With Traffic Lights:
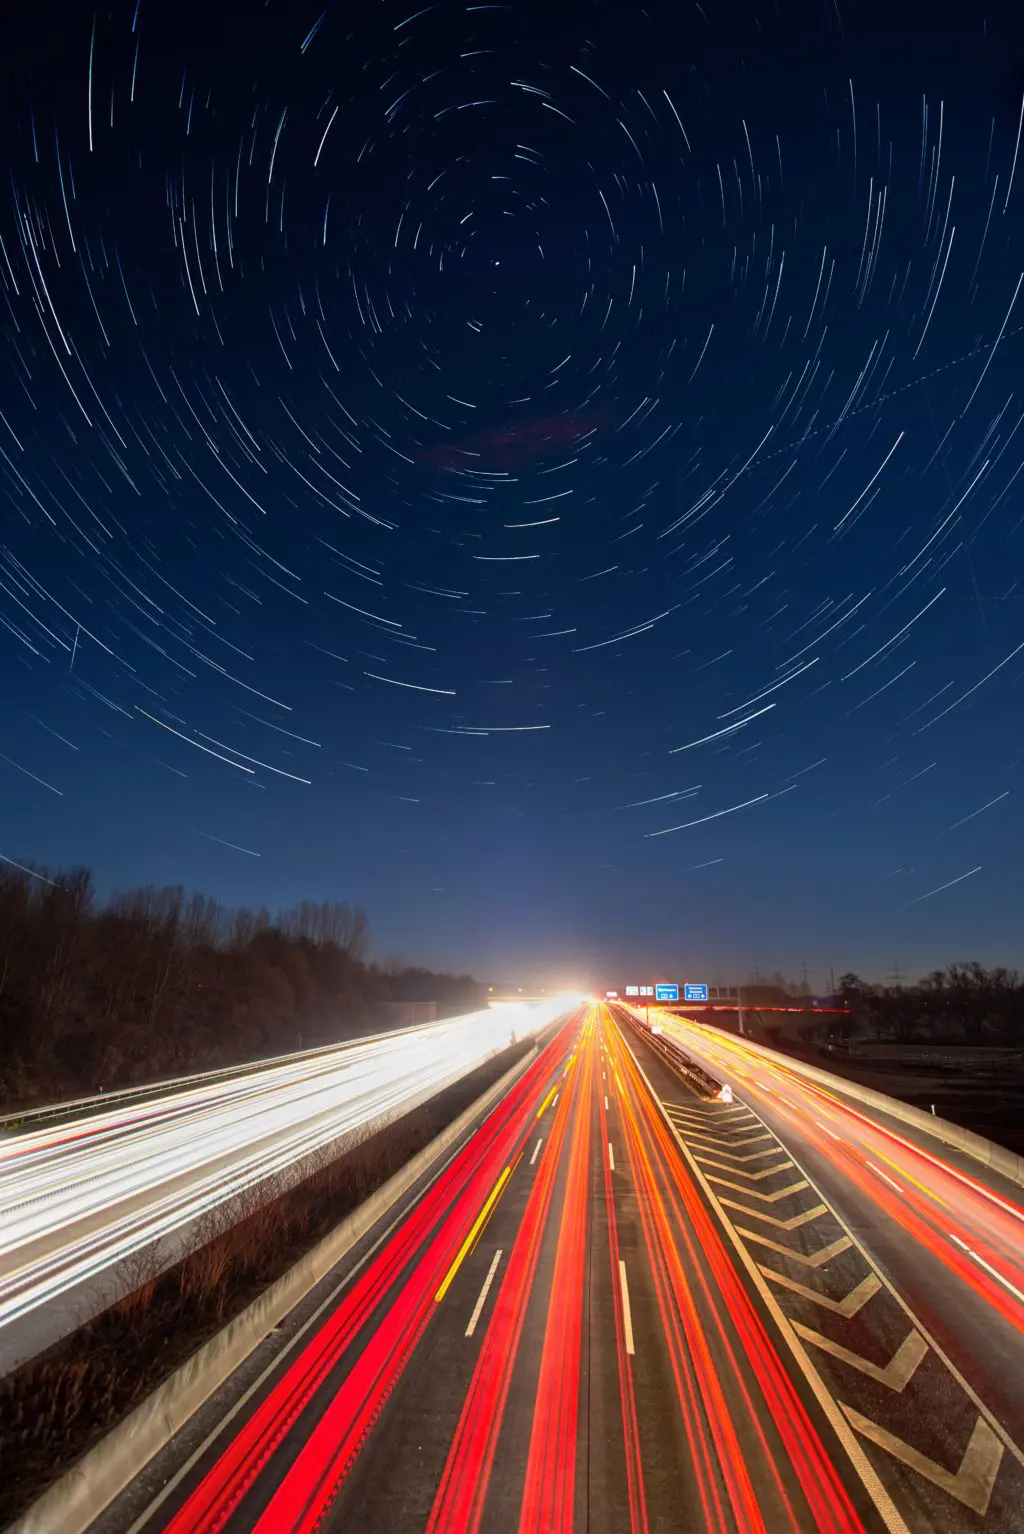
Look for a dark location where you can photograph the star trails, but still a location that has some traffic that you can include as part of your composition. Countryside roads should be a better location if you are looking to compose star trails along with traffic lights!
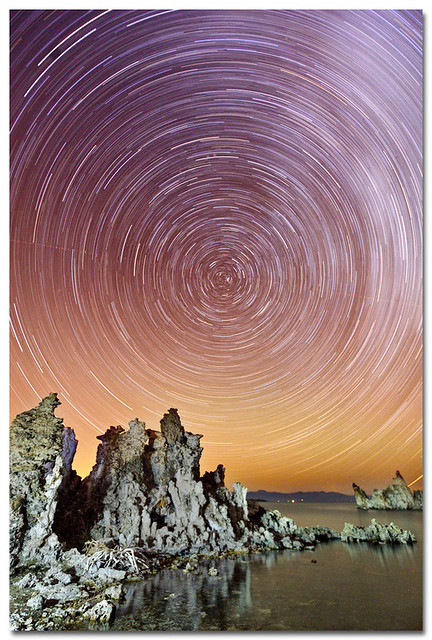
Photograph Star Trail Reflections:
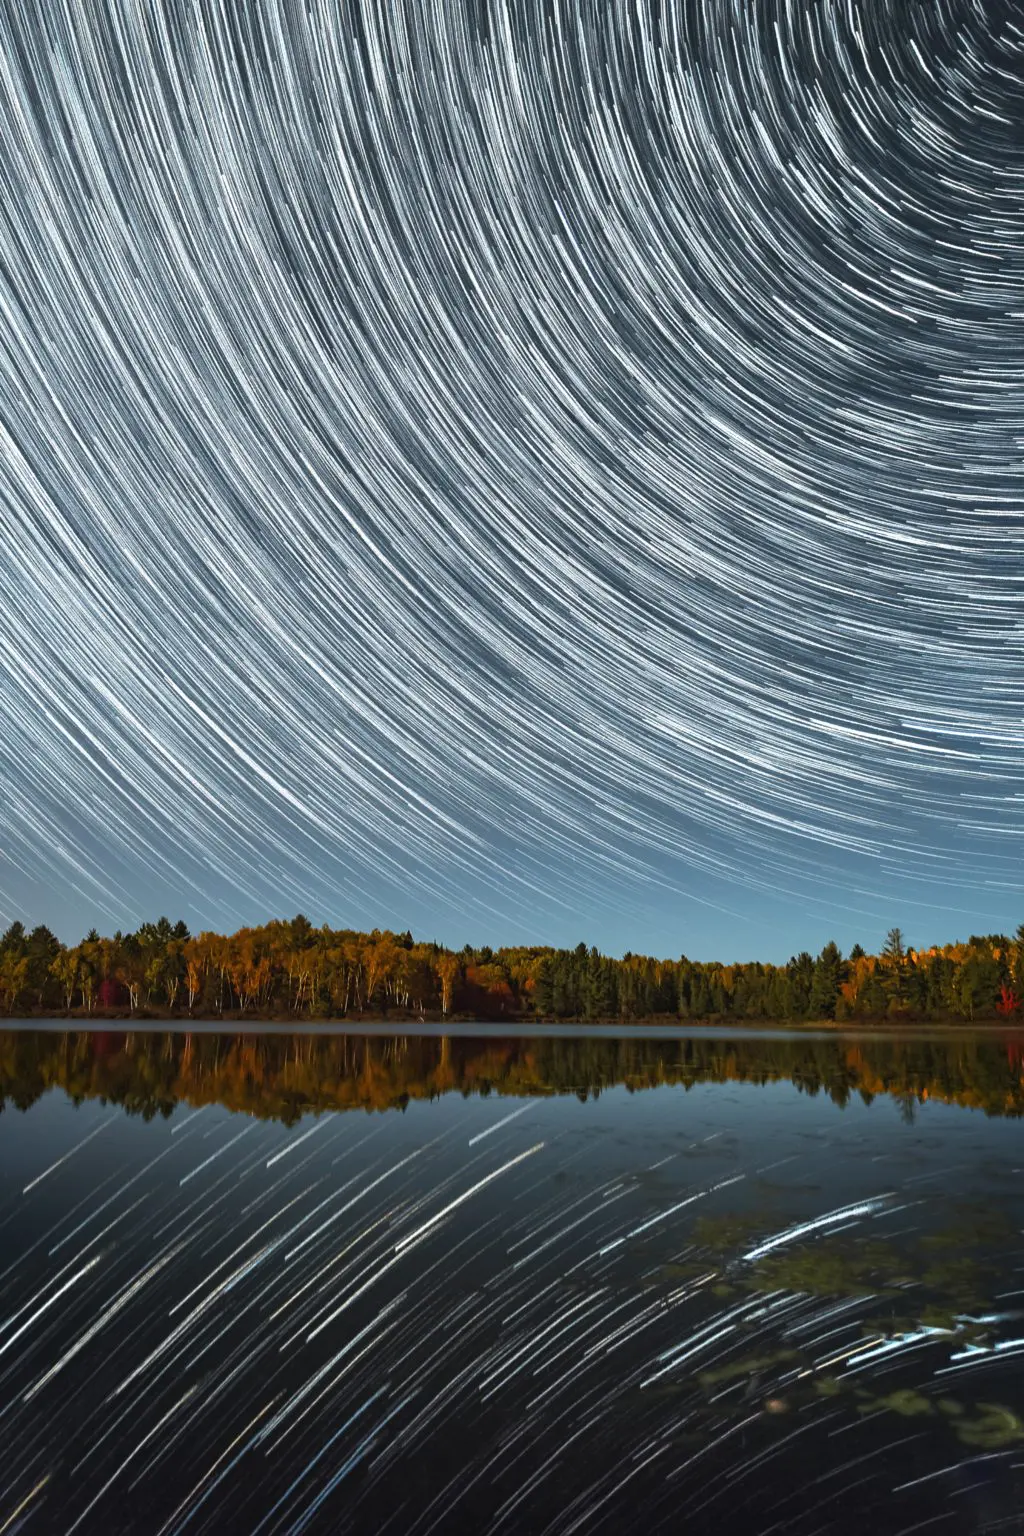
Look for still water features where you can also include the reflections of star trails in your images. Depending on the landscape around, you can shoot some spectacular star trail images along with their reflections.
Frame Your Subject Creatively With Star Trails:
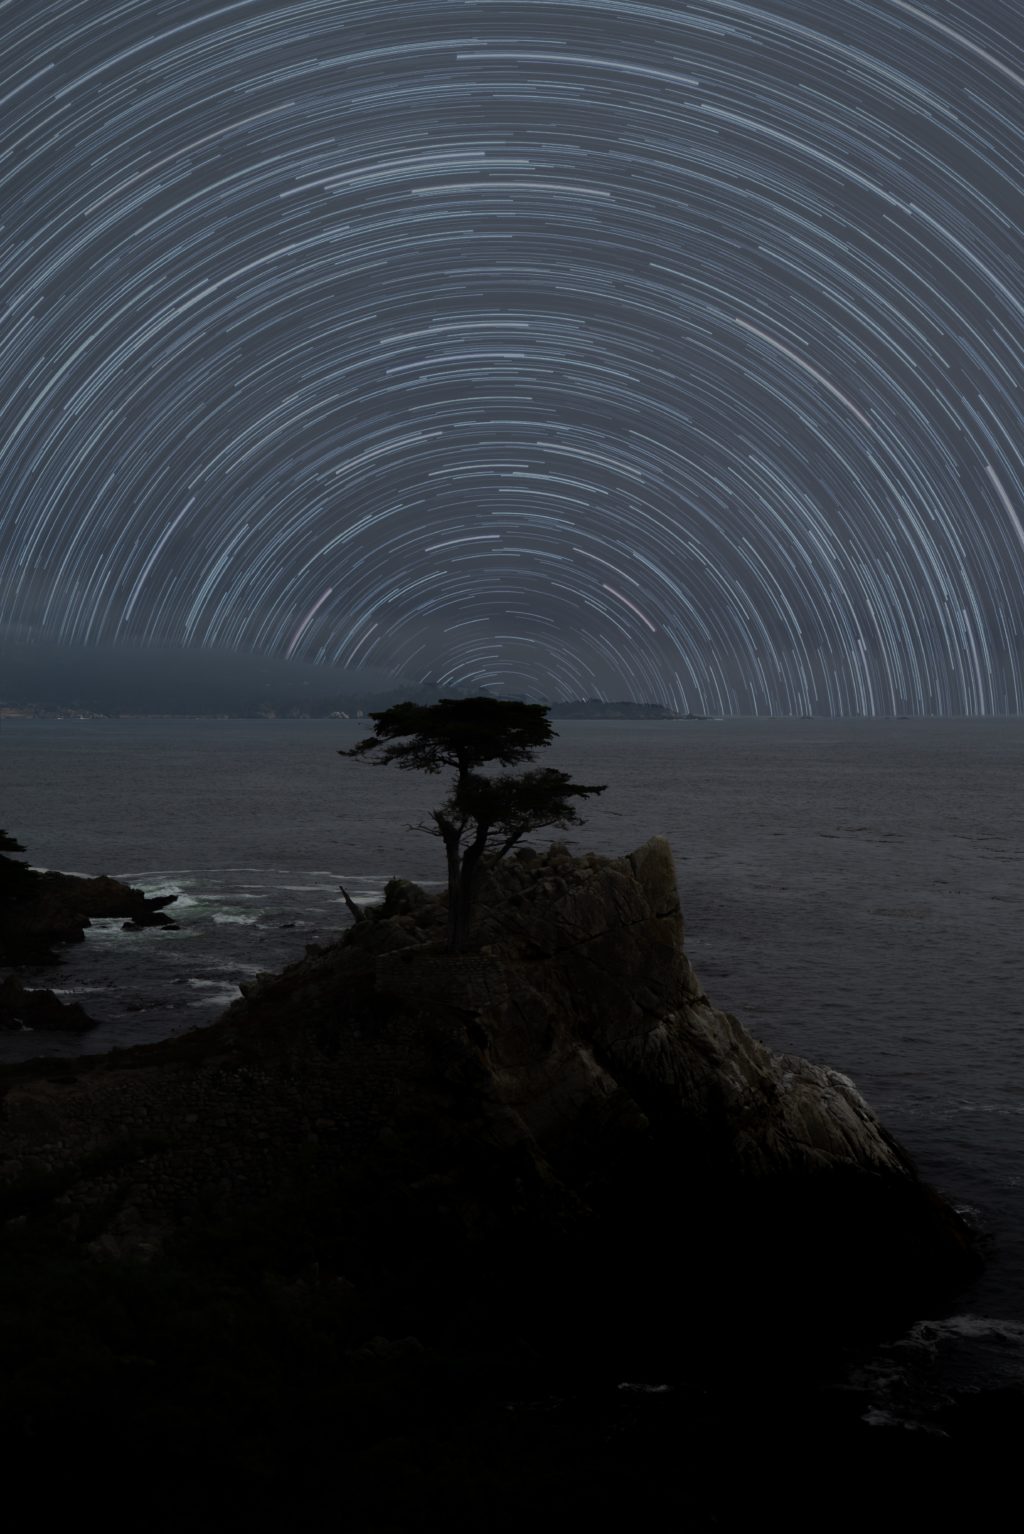
Frame your foreground subject creatively with the star trails. Especially when you are photographing circumpolar star trails, you can frame your subject in the middle of the circle.
Like in the image above, if you want to frame your subject underneath an arch of star trails, then point your camera towards the south celestial pole if you live in the Northern Hemisphere and towards the north celestial pole if you live in the Southern Hemisphere.
Final Thoughts On How To Photograph Star Trails
Photographing star trails is challenging but the results are amazing. The movement captured in our images can represent the vastness of the universe and our small place in it.
========================
This ultimate guide to star trails has been updated by Dahlia Ambrose.
Dahlia is a stock photographer and full time educator at Light Stalking. You can find her on Gurushots and see some of her more popular articles at The American Society of Media Photographers. Get to know her better here.
Further Resources
- Star Trails Photography Tutorial
- Photographing The Night Sky: Star Trails
- Star Trail Examples
- Shooting Star Photos


51 Comments
Some good stuff here, but my main question still remains: How do you successfully get the foreground in focus as well as the stars when using wide apertures? Does it all come down to knowing hyperfocal distance?
Pretty much Matt – there’s not much you can do to get your foreground in tack-sharp focus when you’re shooting at f/2.8 and aiming towards the sky. A good amount of distance between your camera and foreground will help. You can also trying experimenting with focusing on your foreground and seeing how your stars appear…..this will all depend on your focal length, distances between subjects, etc…but as long as you’re happy with the results that’s all that matters.
There is also the option of blending two exposures together….one focused on the sky and another focused on your foreground….might be tricky blending but I’ve seen great results using this method. Bring along a flashlight to help you focus on the foreground.
having a wider angle lens will also help with this
Great article, can’t wait to try it!
Great article, however the section on finding the poles incorrectly identifies the North Star as the last star on the handle of the Big Dipper. The North Star is the last star on the handle of the Little Dipper. The last two stars of the Big Dipper’s cup point to the North Star.
https://www.onr.navy.mil/focus/spacesciences/observingsky/constellations3.htm
Hi Scott….thanks for putting down what I meant to say 🙂
Good article, but do update it and correct that error!
Many people may not read the comments and will pick the wrong star! Plus, it simply propagates misinformation!
On southern hemisphere there’s the Crux constellation. It is a quite recognizable ‘spacemark’ from here.
https://en.wikipedia.org/wiki/Crux
I was about to mention the southern cross, but its one and the same 🙂 every Australian child knows this one 🙂 its on our flag, to find the southern pole, locate the SC, imagine the t shape and draw a line down the centre of that t, aprox 3xSC lengths along that line past the bottom star is the pole 🙂 you can use the 2 bright southern pointers of to the side to help you get a more accurate position
Very good article, I read many but this is one of the best. The aperture consideration is a really good tip, I shot a star trail last saturday and wished I had read this before, it explains why the star trails are not as bright as I thought, I am not a big fan of the 30 second and stacking method due to the amount of post editing and processing but it has merits, there nothing more annoying than having a jumbo jet cross the sky duting an hour long exposure.
I use an Iphone app called starwalk to spot Polaris in the sky, and point my camera around there. another good tip you don’t always have to shoot at a new moon there are plenty of nights when the moon sets quite early and it is dark enough afterwards.
Thanks Francois…and GREAT point about the moon set….there’s always plenty of time where the moon is below the horizon line.
Another great tip from Mike on the Light Stalking facebook page:
“Another tip: Turn off VR/IS (Vibration Reduction/Image Stabilization) on your lenses. The lens will try to counter normal earth movement and can actually add blur to the images.”
beautiful photos nice work. thank you for the share !
80 min long single exposure ? What about the sensor heating up and messing up the image – “amp glow” , maybe sensor chilling must be mentioned here.
great Article Chris. extremely helpful, perfect for new beginners to photographing the night sky, and capturing star trails
Really nice article.
A good tip to add is to use a light pollution map, just to find a good dark spot.
Here in Spain i use this one:
But in the states this will be more useful:
By the way, nobody has mentioned to use an intervalometer (indispensable IMHO). I’ve used last night this one, which works on my Android cell!!
great article and very helpful tips. may I ask how you deal with noise? thanks.
Just read this and noticed you are in Maine….I’ll be in Brooksville this weekend and that’s when I was hoping to do this. Cheers!
Very helpful. I’ve unsuccessfully tried this before. I’ll definitely try again. You are close on Polaris, but not quite, FYI. Good enough for finding the pole, though.
https://en.m.wikipedia.org/wiki/Polaris
The North Star is the last star on the handle of the LITTLE Dipper… Careful!
i am just starting out as well . ok so the lowest f stop( mine is 4 ) . i want to include the foreground and ill start by going a distance away. im using 70mm but my camera has a tough time focusing – should i try manual focus? i really want to do this again but want to get foreground. thanks for the help
Definitely Manual Focus Christa. I just set mine to infinity
Great article but i have come across a lot of people talking about sensor heating and reducing the sensor life and also the battery drain…Any takes chris?
Polaris is the last star of Ursa Minor, the Little Bear (Little Dipper). You can locate it using the Big Bear (BD). Beautifuls shots! Thanks for the info!!!
hi chris,
i used your article leading up to my recent trip to phillip island, australia. check out the results of blended southern hemisphere star trails.
https://www.flickr.com/photos/tarcherphotos/8533064097/in/photostream/page2/
cheers for your help!
Beautiful shot. It reminded me of Starry Night by Van Gogh
Thanks for the informative article! I cannot wait to try this! Come on sun, set already! I have a Tokina 11-16mm f/2.8 which I think will be perfect for this project. I just captured 30 seconds of the International Space Station passing overhead and did notice the short star trails around it. Fascinating! Thanks again!
So if the aperture is 2.8 at ISO 100 what will be the sutter speed?
hi chris,
i am interested in shooting star trails but my only wide angle lens is a 12-24 f4… i am currently using a nikon dx body.
is the maximum aperture of f4 sufficient if i were to use the 30-second stacking method? or should i procure another wide-angle? the only 2.8 lens i have is a 70-200, hardly a suitable focal length.
Would appreciate your help 🙂
As far as using the one long exposure method, when you take the test using a high iso, how do you do the calculations to find your new exposure using an iso of 100?
Nived,
Put the setting on bulb and use a remote cable shouter release, lock it open and youmcan have a shutter speed as long as you wish.
Ps I have a 550d
Thanks for all the tips. Does anyone know of a settings manual online, where it gives EXIF data and then show the photo taken?
Dude if I do an exposure shot of 2hrs wont my sensor burn up ??
I did everything you said, had a cup of tea whilst i waited, feeling very excited. Nothing on my camera at all. Any ideas?
it’s happened to me lots of times and found out that if you set the focus on auto and if you’re doing it with a remote shutter/timer, you are not giving enough delay time for the camera to focus and start shooting.
to avoid it, i set the focus manually (not the best in my case, still rookie) but worked 🙂
Great article. Concise and to the point.
You mention “Considering that stars are constantly moving, don’t you mean that the earth is constantly moving?
The visible motion of the stars is due to the motion of the Earth; the stars remain in the same position relative to each other, but seem to move across our sky because the Earth itself is moving around the Sun.
thanks. goods tips. will try it tonight!
Hi. Great article. I just wanted to correct one little thing. The north Star is actually the last star in the tail of the little dipper. It can be found by drawing a straight line through the 2 outside stars of the big dipper. That will point towards Polaris. Thanks for the great article!!
In Tasmania, Australia, there are plenty of opportunities for star trail photography. once you go south from Hobart which is the last city, it is easy to find a place with little light pollution. Plus the long winter nights and clean air help. Clifftop Cabin at Huon Bush Retreats has a great south facing view. We want to encourage photographers so if you mention this artcle and pay full price for your first night, Sunday to Thursday nights between May and September, we will give you your second night free. We would appreciate a couple of nice photos but it is not a condition.
https://www.huonbushretreats.com/two-bedroom-conference-cabins/
ive done the image stacking process a few times, but never 1 long exposure. What kind of ISO do you use for the 80 minute exposure?
1000 -1250 iso
Can you shoot star trails with a canon 5d mark II? I cant seem to get more than 30 second exposures.
For longer than 30seconds you need remote cable shouter release
use time mode, it will be a single shot util you click the shutter button again
rty going to manual mode a oing to bulb, if that doesn’t wok then get a shutter release cable, there usually 20 bucks.
I have a cannon 1200D , what would you recommend me for getting a remote so I can leave it for an hour or so
I started to shooting star trails last year with some success. I have a Nikon D7200 which has a nice feature for taking star trail pictures…..the interval timer. My lens is a Tamron 18 – 270 mm lens.
Here are the settings I use;
Aperture: f 3.5 @ 18mm
Focus: Manual on camera and lens
ISO: 1000
Exposure: Manual 30 seconds
Interval timer settings:
Interval value: 00:00:32
Number of intervals: 0120×1=00120
Exposure smoothing: off
Those settings will give you 120 exposures while the camera is unattended. Hope this helps some body
Did you mea ISO of 100?
no, iso of 1000 is necessary because it will make sensor more sensitive to light and will show you more stars as stars are very dim and sensor needs to be very sensitive to see them
Loved the article
Excellent article and work. Just made my first few star trail shots in the last couple weeks and used StarStaX, it works as stated above.
Sony RX10 IV
Velo Shutter Boss
dummy battery pack with huge Li battery pack
I am ready!
Thank You.