Learning how to photograph the moon has long been one of the greatest joys of a photographer's journey in learning. For centuries the moon has captivated people, given direction, and provided hours of enjoyment and wonderment. Being the brightest object in the night sky, it's something photographers of all levels can shoot however, it does take planning and preparation to accomplish. In this article, we will look at how to photograph the moon along with some amazing moon images for inspiration.
If you have previously attempted to photograph the Moon and it came out too small or looked like a plain white spot, don’t be overly frustrated! Every photographer has to go through similar difficulties when shooting the moon for the first time. This sub-genre of astrophotography can be very challenging and frustrating.
Quick Start Moon Photography Settings:
| No Time? | Here Are the Quick Settings |
|---|---|
| Mode: | Manual |
| ISO: | ISO 100 |
| Aperture: | f/11 |
| Shutter Speed: | 1/100 |
| Focus: | Manual Focus (use Live View) |
Moon photography or Lunar photography is an amazing learning experience, especially if you are willing to experiment a little. You can learn various useful techniques along the way – reducing camera shake in low-light conditions, manually setting your camera (using manual mode), using the Looney 11 rule, stacking photographs in Photoshop, and even incorporating the moon into other shots.
 | Free Download! Grab your free cheat sheet for Moon photography! Download Here |

The moon is bright, but it isn't bright enough to simply snap a photo if you're looking to see much detail in the moon. Moreover, the bright moon has different phases throughout the month and each moon phase will need a different exposure time because of the difference in brightness.
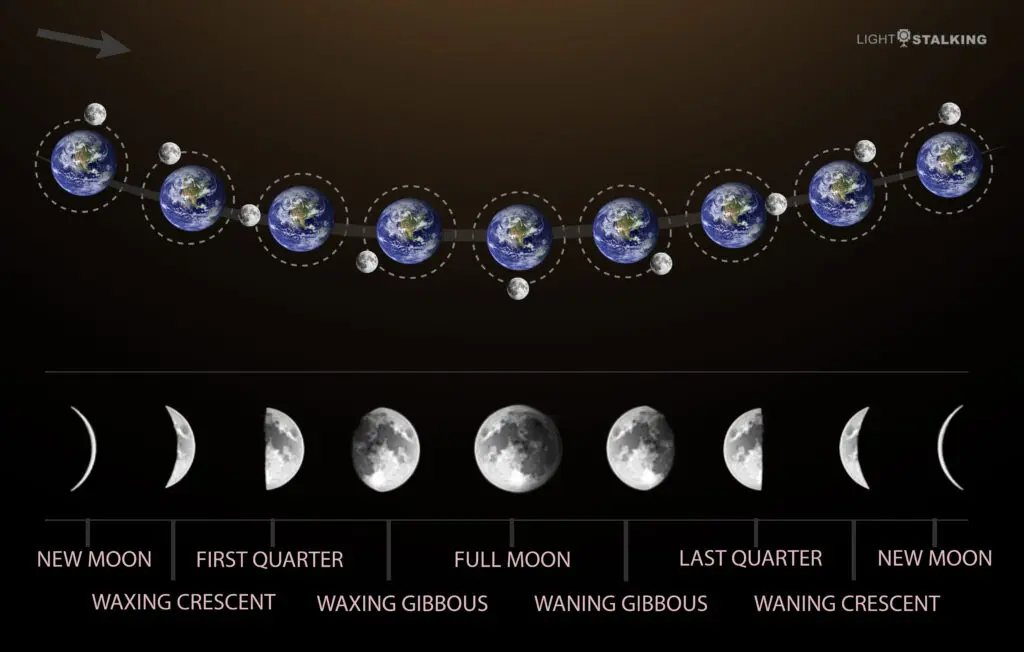
Many photographers are fascinated by the full moon and love to photograph it when it is full, but during the other phases, the moon is less illuminated because of its position relative to Earth and the Sun. The phases other than the full moon are because of how the moon is illuminated by the Sun and the shadows help exaggerate the surface features or details of the moon.
To achieve a nicely exposed photo, one where the moon doesn't appear flat nor like an out-of-place object and where you can make out some craters and whatnot, we need to consider many facts to get the exposure right for brilliant pictures of the moon. For example, a crescent moon requires a longer exposure compared to a half moon and a half moon requires slightly longer exposure compared to the full moon.
Attention: Grab your free cheat sheet for Moon photography! Click Here
Once you start to watch the moon, its position, and phases over a few months, you will be able to tell when there will be a full moon and when there will be a new moon. You will also know when to watch out for moonrise and moonset and also know the best times to photograph the moon at night or during the day. Moon rises can be especially a spectacular sight to photograph depending on the moon's position and the time it is rising.
If you still struggle with keeping track, there are various apps that will help you to plan when photographing the moon. We have discussed a few later in this article.
“The moon's a nice place to visit, but you wouldn't want to live there.” – John Grunsfeld
Planning For Moon Photography
Before photographing the moon decide on when you want to shoot the moon and how you want to shoot it – close-ups or moon in a landscape. Once you have decided on this, the next step is location scouting.
If you are in a relatively dark area and if you are looking for close-up shots, you can do it easily from your backyard, but if you are looking for a landscape along with the moon, then you need to scout for locations and choose a favorable one. Moonrise and moonset times are the best for moon photos with landscapes.
Decide on what phase of the moon you want to shoot. Depending on this, you will have to choose the time and date. Also, keep an eye on the weather so you have some clear skies to photograph the moon. Although scattered clouds can help create dramatic moon images, sometimes it can cause haziness and generate a noisy image.
To accomplish a great moon shot, let's first look at the basic gear you'll need.
The Best Camera Gear for Moon Photos
Knowing how to take a picture of the moon well, also requires knowing how to shoot with the gear you have and the importance of each piece. Let's take a look at each main piece.
Tripod
A secure base and workstation for your camera equipment are essential to capturing the image of the moon and avoiding camera shake. While you may be able to get away with hand-holding your camera, your best results will, without a doubt, come from mounting your camera on a tripod. (See our article on how to choose a tripod for some good tips).
A Telephoto Lens or Long Zoom Lens
To help fill the frame and properly show off the moon, the longer your zoom lens, the better. You don't necessarily need the fastest lens, because you'll be on a tripod, but it's best to use telephoto lenses, at least 200mm focal length or longer. Many beginners may also have a 70-300mm telephoto lens in their kit. So it can be a great one to use on crop sensor cameras as it will give an equivalent focal length of about 450mm.
Besides, a super telephoto lens can help to capture a close-up shot of the moon where you can image details of the craters on the surface of the moon. Make sure that you use a tripod when using super telephoto lenses to image the moon.
If you don't have a telephoto lens, but your lens can be used with teleconverters, then it is a cheaper option to increase the focal length of the lens effectively giving you a long zoom lens. If you don't have a lens that long, but want to capture some interesting moon shots, you might want to consider using shorter or wide-angle lenses by incorporating foreground elements into the shot (more on that below).

Shutter Release Cable
A remote shutter release or a cable release is a great accessory for moon photography. This is not an essential piece, but it's nice to have and helps avoid camera shake and capture better images of the moon. If you don't have one, you can cheat and use the self-timer function on your camera.
Camera
While almost any camera will work, point-and-shoots rarely produce top-quality photos of the moon, mostly due to the small size of the sensor and it overheating during longer exposures resulting in digital noise. That largely rules out smartphones and iPhones (to a degree). However, there are bridge cameras that come with very long focal lengths that can be used to photograph a better photo of the moon compared to a point-and-shoot, if you use it on a tripod.
A full-frame camera is usually preferred here with a telephoto lens on it. DSLRs, Mirrorless cameras or any interchangeable lens cameras are suitable for taking pictures of the moon. The make is not really that important – Canon, Nikon, Sony and many others all make very respectable cameras in this range that can take great moon shots. Cameras with smaller sensors make it tough, but they can still be used. Recent cameras with small sensor sizes have better low-light performance. Use the camera that you have in hand for a start.
The Best Camera Settings For Photographing The Moon
No preset or auto function of your camera will be able to properly meter the moon, so ideally you should consider shooting in full manual mode. At the very least, choose Aperture Priority mode. Also, your geographical location and the current phase of the moon will have an effect on what your camera settings will be, and you will need to adjust for the season of the year and the clarity of the sky. You will also need to take into account the potential for camera shake.
General Camera Settings
- Always shoot raw so you can get as many details from the moon and make adjustments to white-balance when post-processing.
- It is good to use manual focusing using the focus ring instead of autofocus. Zoom in on live-view and focus to get the images in sharp focus.
- Turn off image stabilization when the camera is on a tripod.
- If using a DSLR camera, make use of the mirror lock-up feature to avoid camera shake due to mirror slap.
ISO
Digital camera settings should be set to 100 ISO or lower. Film shooters should shoot film of 100 ISO or slower to eliminate noise and grain. Some cameras will have the lowest setting of ISO 200. If you are using a very long telephoto lens, you will need to make the shutter speed faster comparatively to avoid capturing the movement of the moon across the sky. In that case, or if the sky conditions are not too good, you may have to slightly increase the iso.
Aperture
Because you're after crisp, clean shots, shooting at f/11 to f/16, depending on your lens, will be the best place to start. Research your lens' sweet spot to find the sharpest aperture. Using narrow aperture values will require increasing the iso during the waning and waxing moon phases, especially when the moon is less than a quarter. When conditions are bad, you can open up the aperture to about f/8 or f/5.6 but make sure that the images are acceptably sharp.
Shutter speed
The variables are many and include those mentioned earlier, such as the phase the moon is in, geographical location and desired shot, but on a clear night starting at about 1/60th to 1/125th shutter speed on your camera settings should be a great starting point. Depending on the brightness and focal length as well, you will need to make adjustments to shutter speeds.
A slow shutter speed can cause images to become blurred especially as the focal length increases, when you are hand holding the camera etc., and also the moon moves across the sky. Some cameras even have a camera app that can be used to adjust exposure for the setting you are looking to use. Make sure you use a fast shutter speed to get the details sharp on the moon.
Attention: Grab your free cheat sheet for Moon photography! Click Here
What Is The Looney 11 Rule?
There is a “rule of thumb” that is easy to memorize and should get you close to good exposure of the face of the moon – the “Looney 11 rule.” This rule is a method of estimating correct exposures without a light meter. For daylight photography, there is a similar rule called the sunny 16 rule.
The Looney 11 Rule is a very simple guideline intended to give the photographer a baseline to start from when shooting the moon at night.
The Looney 11 Rule: For astronomical photos of the Moon's surface, set the aperture to f/11 and shutter speed to the reciprocal of the ISO setting.
For example: f/11 at ISO 100 and 1/100th second shutter speed.
Another example: f/11 at ISO 200 and 1/200 second shutter speed.
The Looney 11 rule is worth keeping in mind for getting good exposure when you photograph the moon.
Choosing A Location for Moon Photography
A word about where you choose to shoot. Picking a spot to shoot the moon is one of the most important factors in achieving a quality shot. Locations with minimal light and air pollution are the best for night sky and moon photography. Locations with higher elevations will help you to avoid low-lying clouds, fog, etc., so find those locations if possible.
Ideally, if you want to showcase the moon itself, which means the moon without any foreground features, you will want to avoid any other ambient light, including street lights and traffic. This may require you to go off on a remote road or into a public park after hours – your backyard may not be the best location for these types of shots, but if you are left with just the backyard for some reason, turn off all surrounding lights and position yourself in a comparatively dark location.
Besides the above, try to avoid days when there is moisture in the air, dust, and haze as these can make the moon appear wobbly without well-defined edges. If you wish to stack the moon, these factors can make it quite difficult or even impossible. Colder nights are the best for capturing close-up images of the moon.
On the contrary, if you are trying to include a city skyline under your moon shot, you'll need to find a lookout that allows for the twinkling lights below and do further test shots to nail the exposure properly for both the foreground and the moon (bracket your exposures).

The Best Mobile Apps To Choose Location And Time For Shooting The Moon
When you are photographing the moon, sometimes a handy app or two can make life easier and also help you make accurate plans for your photoshoot. So, here are some apps and websites that can help you plan your next moon shoot without any hassle.
PhotoPills
Photopills is an excellent iOS and Android app that can be used to determine the position and phase of the moon as well as the position and elevation of the Milky Way. So, besides photographing the moon, this app can also help with photographing any night sky objects. It also helps you to plan the position of the moon with respect to any foreground subject and this can be achieved using its augmented reality feature.
This night photography app is known for its constant upgrades and very useful functions. It is a great find for all astrophotographers. When it comes to moon photography in particular, it lets you see rise and set times, calendar, different moon phases, and Supermoon dates.
The Photographer’s Ephemeris:
iOS and Android users can also use another great photography planning app alternative which is The Photographer's Ephemeris. This is free for the desktop
Other Useful Apps:
- SunSurveyor – The interface of this app focuses on visualization rather than raw data, which can be extremely useful. It is available for both iOS and Android
- DeluxeMoon – This app visually defines the amount of light the moon will be reflecting in the sky. It also helps you check whether the chosen time of your photo shoot corresponds to the moon’s cycles.
- Sky Guide – This app for iOS gives accurate locations for objects in the night sky.
- Dark Site Finder – this helps to locate a dark sky area near you.
- Light Pollution Map – this helps you to explore areas with less light pollution
- Dark Sky Website – This website helps to locate a dark location near you.
Composition And Technical Tips For Your Moon Pic
The composition is just as important when you are taking shots of the moon as for any other type of photography, and you have some decisions to make. For starters, the decision to shoot just the moon or to incorporate elements such as landscape foreground into the shot. Knowing how to photograph the moon in the foreground requires a few different considerations.
Bear in mind that a compelling and sharp image of a lonesome moon is great, but once you’ve seen one – you’ve seen them all! It's important to master the perfect close-up of the moon, but you should also try to get creative by placing the moon within a more challenging composition. Your shots don't have to be boring and predictable!
For instance, you can try framing the moon behind trees and buildings, or reflecting it off the surface of a lake or sea! Placing other objects in the foreground gives the moon context and scale that it lacks on its own. It can be really useful if you can think of the moon as a single element which should be incorporated along with other compositional elements.

5 Steps for Photographing Just The Moon
Time needed: 5 minutes
How to Photograph Just the Moon:
- Select a long lens or Zoom In
Use a long lens (> 200mm) and zoom in as far as you can.
- Set the ISO
Set the camera to ISO 100.
- Choose aperture
Set the aperture to f/11 to f/16 (look up the sweet spot of your lens for sharpness).
- Choose shutter speed
Shutter speed around 1/60th to 1/125th.
- Set the focus
Manually focus on the moon or Manual focus set to infinity
How To Shoot The Moon With Foreground
When you photograph the moon with the foreground included, you will probably notice that you end up with the moon as a totally white blob with no detail. It is very difficult to expose both the foreground and the moon correctly in the same shot. For that reason, most of the photographs of the moon with a foreground that you see are actually composite images. There is a useful, if somewhat dated, tutorial on creating moon composites here.
- Use whichever lens allows you to get your composition (probably slightly wider than most telephoto lenses)
- ISO 100
- f/11 to f/16
- Bracket exposures to +2 and -2 (this may take some experimentation)
- Create a composite of images in Photoshop.
Post-Processing: How To Edit Moon Pictures
Post-processing your photos is really straightforward, and in most cases auto white-balance will do you just fine, however, photographs of the moon also make stunning black-and-white images. So consider how you want the outcome to look – have a play around in Lightroom and see what looks best – colour or black & white?
If you have photographed just the moon, when you import it into Lightroom, you are probably going to want to concern yourself mainly with the contrast and clarity sliders. These should get you close to a finished product without too many problems.
If you have included elements of the foreground in your moon image, then you will probably have bracketed your shots and will, therefore, have some work to do in Photoshop. There is a good tutorial on creating composite images of your moon photographs here.

While there is no specific workflow you have to stick to in the case of moon photography, there are a couple of things you should bear in mind.
Make sure to shoot raw and adjust the color temperature in Lightroom properly. The color temperature used for moon photography is tricky, and it takes a little playing around until you get it right.
Once you’re satisfied with your choice of color temperature (white balance), you can proceed to adjust saturation and vibrance. The moon photographs often look too desaturated, and you can make them much more vibrant in post-processing.
If you shoot with a low enough ISO, you can increase saturation without adding much noise. Even if you set your saturation slider at 100 and vibrance slider at let's say 80, you might end up with a noiseless image if you used the lowest possible ISO. This is a very useful trick for moon photography! If your image looks really bad after altering saturation and vibrance, it’s likely because your ISO was too high or your color temperature isn’t correct.

If you want to take it even further and print your moon photos, then you might like to look at our article on the best photo printer to use for the task!
If you are looking for creative ways to photograph the moon, here are some very interesting topics for you to explore:
- Photographing the moon along with a landscape can be any photographer’s dream and this gives rise to some of the most surreal images. Careful planning, patience and a lot of practice will help you master this art. Here is a very informative article on “How to Photograph Moonscapes.”
- Did you know that you can use just the moonlight to illuminate the landscape at night for dreamy photographs? Stay out in the night in a dark area and see how moonlight beautifully illuminates the landscape and try to photograph it too.
- When there is a total Lunar eclipse next time in your location, do not forget to get out and photograph. This is the only time when you can photograph the blood moon. If you want to photograph the blood moon, this article has all the necessary information on “How to Photograph a Total Lunar Eclipse.”
- Did you know that the surface of the moon has various minerals and these minerals contribute to some interesting colours on the moon? Next time, when the sky is very clear, zoom very close into the moon and observe the lunar surface. Besides the Maria and the Highlands you will be able to see some colours on the surface of the moon. You can even photograph details in the lunar surface. If you are interested in just stacking moon images for more surface details or to bring out those beautiful colours, check out this article that teaches “How to Photograph and Edit a Mineral Moon.”
- Lastly, if you are looking to photograph a perfect moonrise, this article has “3 Tips for Capturing a Perfect Moonrise.”
How To Photograph The Moon – Key Takeaway Tips And Ideas:
- Capturing the full moon is great, but the moon looks better with surface details when there are shadows on the moon's surface. So try photographing the moon during its various phases.
- Play with composition aside from shooting the moon on its own
- Get low and shoot through the rising stalks in a cornfield (for example) and create a composite
- Catch the reflection of the moon in the ocean while on the beach
- For extra-sharp detail, wait until the moon is at its highest
- Use a sturdy tripod
- Use manual focus
- Use low ISO to avoid noise
- Research the sweet spot of your lens
- Allow time to set up – you don't want to be moving once the moon is in position to shoot
Other Great Moon Photography Resources Online:
Here are a few links that you should definitely take a look at that don't repeat too much of what we have already covered. If you are serious about getting better at shooting the moon, they area good start.
Tools And Apps For Moon Photography:
Some Interesting Facts And Information For Inspirational Moon Photography
- Did you know that the moon is tidally locked to Earth? This synchronous rotation means that we get to see only one side of the moon all through the year. As a result, the far side is called the “Dark Side” of the moon but in reality, the far side of the moon is not in permanent darkness.
- Because of the moon’s elliptical orbit around the Earth, the distance between the moon and the Earth varies throughout the year. When the moon is at its closest point to the Earth called Perigee, the moon can look up to 10% larger and 30% brighter compared to when it is at the farthest distance away from the Earth called Apogee.
- There are different names for the moon depending on various occasions and the relative position of the moon with respect to Earth.
- Supermoon – this happens when the moon is closest to the earth
- Blood Moon – this happens during total lunar eclipses. The moon shines with a blood-red color when totally eclipsed by the Earth.
- Blue Moon – if there is more than one full moon in a month, the second full moon that occurs in the same month is called the blue moon.
- Full moons in each month have a name. Here is an interesting read about the special names for full moons and what they mean. Why not make it a project to photograph every full moon in a year?
As Inspiration, Here are 10 Great Examples of Moon Photography!


Don't forget to check out our other collection of inspiring moon photos.
Troubleshooting Your Moon Shots
Problem: The moon in my images appears too bright or a little bit overexposed.
Solution: Usually this means that you either have the ISO up to high or perhaps the shutter speed is too slow. The way around this is to try first to reduce the ISO. You can also reduce the shutter speed for stop. Or you can do a combination of both.
Problem: The moon in my images is blurry.
Solution: The first thing I usually check here is that my camera is actually properly stable. If your camera is on a tripod, often the wind can move the camera which is a problem when you are using a slow shutter speed. This is especially true if you leave the camera strap on as the wind can grab it and move it around.
The second thing you can try adjusting is to increase the shutter speed but this can also require you to increase the ISO which means your shots may be noisier.
Problem: My overall image is still too dark.
Solution: The main controls here at your ISO and shutter speed. Try increasing your ISO. You can also slow down your shutter speed. A combination of both is also something worth trying.
Problem: The moon in my image lacks detail.
Solution: The first thing is to check your focus.The next thing you may want to try is a longer exposure time to ensure that the camera can capture all of the details and the shadows.
Problem: My images are turning out too noisy.
Solution: The first port of call with noisy images is to reduce your ISO setting which may also require you to speed up the shutter speed. make sure you are shooting in raw so that you can also take advantage of noise reduction software or processes in your post-processing.
Problem: I am getting camera shake.
Solution: If you have a shutter release cable this is the time to use it. If you don't have one then you should also try using the timer that's available on most cameras to delay the shutter. Be aware that on windy nights even with your camera on a tripod the wind can cause movement for your camera which will be very easy to see in shaky shots. the solution here is to make sure your camera and tripod are as stable as possible. Try weighing down your tripod with something heavy ( most good tripods have a hook on the underside for this). Of course, you can also try to set up your tripod out of the wind Behind trees Hills or other types of windbreaks.
Also, try using a shutter release cable or the camera’s timer function to minimize movement when pressing the shutter.
FAQs
Start with the Looney 11 Rule settings of f/11 at 1/100th second shutter speed and ISO 100.
You're thinking of the Looney 11 Rule which starts with f/11 at 1/100th second and ISO 100.
Some people swear by a red or a green filter in clear conditions to get sharper shots.
Other Night Sky Photography Resources
Shooting the moon is only one part of night sky photography. You can take it a lot further with astrophotography, star trails, and perfect star shots too.
Attention: Grab your free cheat sheet for Moon photography! Click Here


48 Comments
Great stuff! I would like to add the following :o)
Awesome photos there Kerem! Thanks so much for sharing!
There’s this guy on Flickr who’s been shooting the moon for years, has some good stuff.
https://www.flickr.com/photos/26877148@N06/sets/72157615150085926/
@Michelle – Brilliant! Thanks so much for sharing! 🙂
Here’s my take…
Than you for the tips as I will be shooting the eclipse tonight!
I have had some success taking pictures of the moon w my iPhone 4
The Image Stabilization feature should be turned “off” when using I S lenses.
Here are my photos of the Super Moon.
https://www.facebook.com/photo.php?fbid=3002313866112&set=a.3002313066092.2115587.1510298589&type=1&theater
https://www.facebook.com/photo.php?fbid=3002313706108&set=a.3002313066092.2115587.1510298589&type=1&theater
https://www.facebook.com/photo.php?fbid=3002406548429&set=a.3002313066092.2115587.1510298589&type=1&theater
Use an exposure of about ƒ16 at the reciprocal of the ISO speed. In other words: make the ISO into a fraction. If the ISO is 100 —100 set the speed to 1/100th.
Reason: the moon is in sunlight and a light gray. So stop down from the same rule of thumb used in daylight photography here on earth.
Thanks for the tips, I did my first moon photo with the blue moon. Check it out @ https://majamaki.com/2012/09/blue-moon/
what camera did you use? I’m new to this
Here is a photo i shot of the moon
https://www.facebook.com/photo.php?fbid=343686885723974&set=a.257965394296124.59395.100002479961534&type=1&relevant_count=1
https://annamoritz.files.wordpress.com/2010/04/img_9308-hdr.jpg?w=600
Nice Shot !
The night beckons ..
Me and my husband were having such a hard time with this tonight until reading this post. I got an awesome clear and perfect shot of the moon. Thanks
I dont want to brag but with a point & shoot cannon SX160 I have better pics than most of you. im surprised with the clarity I have got with this basic cam.
So Mr author, P&S too, at times, can give you great pics of the Moon.
If they’re that great, lets see some of them.
f/11 at 1/60 with ISO 100 is just the “sunny sixteen” rule we learned in the old film days. We learned to shoot the moon using the same settings you would use on a bright, cloudless sunny day: f/16 at 1 over the ASA, which gives roughly the same exposure as the recommended settings.
Remember the moon is in full sunlight. Start by going into manual mode and set the camera as you would for taking a picture in broad daylight. ISO 100, f 16, 1/100 sec. Shoot, look, play with the light to get what you want.
This is really HELPFUL!!! THANK YOU 🙂
Good info here. Thanks!
A couple recent shots with my Sony A77ii.
https://flic.kr/p/Nt9266
https://flic.kr/p/MZw5qy
Regards
Mike
Nice! What lens did you use of that shot?
Thank you for the instructions! I wanted to get a decent photo of the moon this week and with your instruction so far I have been successful!! It would have been even better with a stronger telephoto lens.
I have found that you can get some good shots of the moon if you take them at dusk or dawn. The moon is not as bright then and is easier to not have a white blown out circle.
It’s only blown out because you’re not shooting in manual mode, or because you rely on your light meter. Your light meter is fooled by the big black darkness surrounding the little tiny over bright spot, and averages the light – blowing out the moon.
Shoot at a HIGH shutter speed – I shoot at 1/1000 of a second. You may be as much as 3 stops UNDER exposed in order to get the moon right. Take a shot, look at your result, and if it’s too bright, increase your shutter speed even more.
Thanks for the tips. I found it interesting and will try some of these tips next time I see the moon.
Moon videography requires telescope lens and a DSLR camera. Just took this video of the moon before clouds swallow it! https://youtu.be/KYE-q_tRtcs
Is it a good idea to use Mirror up? And what about “stabilization” button on the lens? On or Off?
Cheers
What are the best settings on the nikon d5300 for moon shots, I am planning on using my nikon 70-300mm lens
There are no “best settings” for one camera brand vs another. The key issue is the speed of the lens you are shooting. If you use a 70-300 lens, when fully extended, you’re likely shooting at higher than f5 – at best. This crap of shooting at f8 or f11 is NONSENSE. You don’t need depth of field for something so far away. If your lens is not clear at it’s fastest f stop, I guess you have to close it down.
Remember that cropped sensors have more noise – generally – than full sensors, so you may want to use a tripod (I never do as the shutter speed is so fast) and slow it down.
I never can get the moon framed with some trees. I always get just the moon, and no trees. Any suggestions?
I have the Nikon Coolpix P900 its a great camera for moon shots wildlife etc don’t need to change lens as its goy a built in lens of 24mm-2000mm x83 optical zoom heres some photos ive taken https://www.facebook.com/media/set/?set=a.10154857485641436.1073742694.716851435&type=1&l=ed27d06109
https://www.facebook.com/media/set/?set=a.10155231986066436.1073742738.716851435&type=1&l=1a0a7479c5
and a video https://www.facebook.com/peter.mcdonald.1297/videos/10155021480356436/
Check out the Android app “Moon Locator”, it predicts the Moon position and displays it in the Augmented Reality view. It’s very helpful to prepare for a photography shoot.
Here’s the link: https://play.google.com/store/apps/details?id=com.genewarrior.sunlocator.moon
have seen so many pics of the moon shot but most of these are superb by far 😀
For photos with foreground will it work to bracket the photos and assemble them using an HDR program?
Hi John, bracket exposures if you think there is loss of details in the shadow regions of the foreground. You also need to be quick in this process as the moon will be moving quicker across the sky than you think. Or, you will have to take 2 images – one exposed for the foreground and another exposed for the moon and then combine them using a post processing application. Hope this helps 🙂
Thank you for the tips. During the last 7 days I’ve tried different setups and compositions on test basis and came up with these conclusions:
1. If you want to capture a closeup image displaying all details of the moon alone; a long telephoto is appropriate. I used 400mm prime lens on a FF DSLR. Aperture f/5.6, ISO 50, Shutter speed: 1/30 seconds. The setup was mounted on a tripod. Result: Acceptable to me.
2. For an image including reflection in water and some foreground; these were my setup, again on a tripod. Please remember; in this case full details like option 1 above are not available. Focal length: 55 mm (could have gone closer had the moon been close to the water surface. I shot immediately after sunset), aperture f/4.5, ISO: 100, shutter speed: 1/3 second. Result: Below average.
Tomorrow is full moon and hope to try both the options with different settings provided the weather remains favorable. If possible, will share the findings.
Thank you.
Heading out to photograph the moon for the first time in a very long time. Live in the Midwest. Thinking of incorporating the cornfields in a few shots. Any advice/tips would be appreciated.
very good article, i will.. weather depending try to take some pics next sunday .
let’s see what happens, thanks for the article
Terrific article. Extremely useful information about moon photography. Greatly appreciate the Moon Photography Cheat Sheet! Many thanks.
Thank you for the great article Mike and Dahlia!
This is Rafael from PhotoPills… thanks so much for the mention. I just want you to give you an app update. PhotoPills is available also on Android 🙂
Thanks so much and keep up the great work!
Amazing and wonderful article, thank you for sharing. The links do not work for the Free Moon Photography Cheat Sheet.
Also, as often as I have shot the moon, mine always come out with a black sky, never like the ones you have here full of color. No matter it is not dark out, my surrounding color is always black. Hope I can learn to do this differently.
Thank you.
What a great article! And a huge one! So much information. Even though I live in Tokyo and light pollution here is quite bad, I’ve been wanting to do astrophotography for a very long time. This article has been bookmarked and will read it again a few times again before the weekend. Can’t wait to put this into practice!
Greta write-up – learned a lot – many thanks
And the pictures that you posted have no information on equipment or settings used and you know why that is? It’s because you have no clue and you suck!
You mentioned something about a good photo printer in your article, and would like to know which one that might be, please.