No matter what kind of photographer you are, amateur or professional or something in between, Lightroom tutorials can be incredibly useful for you!
Adobe Lightroom is one of the best and most versatile software for many photographers and it is loved by many professional photographers because of how quick it is from creating a Lightroom catalog with the raw images from a session or more, tagging, key-wording, labeling/flagging, sorting, post-processing, and finally exporting photos.

Editing photos in Lightroom can be really quick if you have a neat Lightroom workflow and you know what each slider and panel does. This way, you can add some pop to a dull image in a matter of a few minutes.
Lightroom has gone through a lot of improvements and updates over the past few years and is very simple to learn and master, unlike Photoshop. There are a lot of things you can do with Adobe Lightroom from basic adjustments like correct exposure, contrast, adjust white balance, to Panorama and HDR merge. The Lightroom Presets that come with the application can be helpful tools for anyone starting new, making Lightroom a great tool even for beginners in photography and post-processing.
Lightroom is one of the few applications that allows you to organize your photos and comes with other brilliant features like smart previews, local edits, virtual copies, and advanced export settings that include exporting files for various purposes like web, prints, etc. Besides, the Library and Develop Module help with almost all tasks that a photographer would need to carry out with their raw files.
You can also create any kind of look in Lightroom from moody to vintage, retro and cheerful effects. Knowing to make use of the various tools like the radial and adjustment filter effectively can even help you with improving skies and creating beautiful looks like lomo effect, film looks, and effects like fog, light leaks, sunlight, etc., in your images.
The adjustment brush that helps with local adjustments is another great tool for advanced editing features that allow the photographer to smooth skin, locally make adjustments to colours, exposure, shadows, highlights, etc., making Adobe Lightroom a great application for moderate retouching as well.
Working with Lightroom means your original file is not affected in any way when you edit your photos or raw files, and this makes Lightroom a great non-destructive editing tool. The newest version even comes with advanced colour grading tools that will help you to achieve many advanced colours and effects in a few minutes time. When you have a series of images from a scene, you can make edits to one image and then sync the edits quickly with a bunch of images from that series.
Adobe Lightroom requires a Creative Cloud subscription and allows you to use the app across your desktop and mobile devices. Depending on the plan that you purchase, you can use Lightroom on the desktop which is Adobe Lightroom Classic and Adobe Lightroom CC on desktop and mobile, mobile-only, or across multiple devices. In this article, we have a list of 20 Lightroom tutorials that will help you take your image to the next level in a matter of a few minutes.
List Of Lightroom Tutorials
1. How To Use The Adobe Lightroom Library Module – A Beginners' Guide
In Lightroom, when you initially start, you will be starting with the Library Module. The Library module is a key module that offers users a lot of features like import, keywords, copyrights, creating collections, and many more. This tutorial by Expat Lens shows how to use and how to get the most of Lightroom's Library Module.

2. Lightroom Tutorial Basics
This video goes into the basics of Lightroom and will help you get started with confidence on using Lightroom even if you are using it for the first time. If you are already using Lightroom, this can be a quick refresher! Coming to you from Sawyer Hartman, he takes you through every single panel in Lightroom, so you know what each panel and slider does, how to use them and by the end of the video, you will get an idea on how to make some professional edits on your images.

3. Lightroom Tips To Improve Your Workflow
As photographers it is important to always shoot in raw format, so you can use the file to bring out the best details and colors when post-processing. Raw files can look a bit dull and need to go through a few adjustments when post-processing to get the right colors and contrast. Besides, there are a few things that you need to take care of before finalizing your image for exporting or printing. This tutorial from Shotkit goes through some time-saving tips for Lightroom Classic.

4. How To Organize Your Photos In Lightroom
Organizing photos has never been easier and Adobe Lightroom is a digital asset management tool that can be used to organize, tag, search, cull, create collections, label and rate images, and many more depending on the photographer’s needs which will then help with seamless post-processing and exporting. What makes Lightroom unique is that it comes with great functionalities that are not found in most other software in the market. Thai tutorial from Digital Photography School will walk you through some of the tools inside Adobe Lightroom to help you organize your photos.

5. The Power Of Virtual Copies In Lightroom Classic
Virtual copies in Lightroom are copies of a file created within Lightroom and information relating to a virtual copy is stored within the Lightroom catalog thereby saving disk space. Using this feature, the photographer can create multiple copies of the original file so they can work on it differently, for example make different kinds of edits and later compare to see which look works best. This tutorial by Julieanne Kost discusses ten tips and shortcuts for working with virtual copies.

6. Simple Tips For Using The Lightroom Adjustment Brush Tool
We all come across situations when a global adjustment is just not going to help in certain areas of an image, because making changes globally can ruin the image altogether. Sometimes images need adjustments in specific areas or locally and Lightroom comes with an Adjustment Brush tool that will help you do just that. This tutorial from Cole's Classroom goes through some simple tips on using the adjustment brush tool.

7. How To Use The Lightroom Graduated Filter To Fix A Boring Sky
When shooting landscapes, where there is a huge variation in the intensity of light between the foreground and the sky, oftentimes, the sky looks a bit blown out or with fewer details especially if you do not use a graduated filter when shooting. Although nothing can replace an actual graduated ND filter, Lightroom's graduated filter is a great tool that can help fix sky issues. Besides landscapes, the graduated filter can be used for a lot of other purposes in various genres of photography. This tutorial from Digital Trends shows how you can expand your photo editing skill with the Lightroom graduated filter tool.

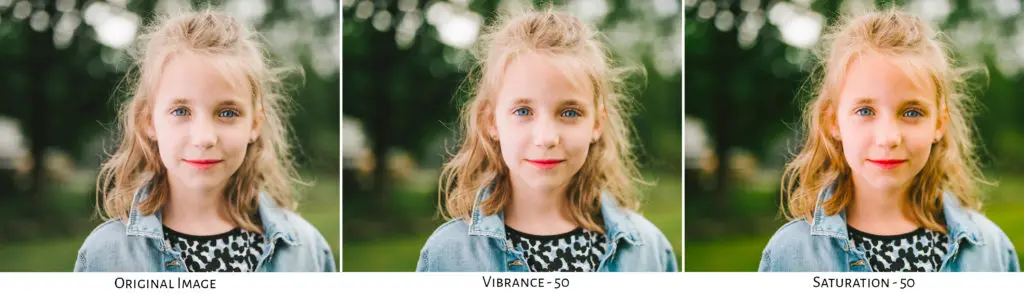
8. The Difference Between Vibrance And Saturation In Lightroom
When making basic adjustments, you will come across the vibrance and saturation sliders, and some beginners get carried away with these sliders or are quite confused about the purpose of these sliders. In order to use these sliders effectively, you need to know the difference between saturation and vibrance and what these sliders do. This tutorial from Pat Kay goes through the difference between vibrance and saturation in Lightroom.
9. Master The Lightroom Tone Curve For Much Better Photos
The tone curve in Lightroom is one of the most powerful features and it represents all the tones in your image. You can make adjustments to the RGB curve or select the curve for individual colors so you can fine-tune colors in the image. This article from The Lens Lounge discusses what the tone curve is, why you should use it, creating custom tone curves, etc.

10. Introducing Color Grading
The Color Grading panel in Lightroom has replaced the old Split Toning panel and is a more advanced tool that comes with a bunch of interesting tools that help with color grading your images on a totally different level. You can come up with a lot of looks that you can achieve using the Balance, Luminance control, Blending, and Midtone control tools. This tutorial from Adobe's Blog goes into every bit of detail on how you can use this panel to achieve various effects.

11. Understanding The HSL/Color Panel In Lightroom
Colour corrections can be done in Lightroom in many ways, but when you want to work on a particular color, the HSL panel is the best tool to make use of. This helps you achieve a professional look and gives more control over how you can make the final image look based on your creative vision. This tutorial from Captured Landscapes goes into details on what the sliders in the HSL panel do and into more specifics of how each section works.

12. How To Smooth Skin In Lightroom
Portrait photographers are most of the time looking for specific applications and plugins to smoothen skin when they have clients who request a bit more work on their photos besides the basic edits. Most people think that retouching requires complex software and consumes a lot of time, but Lightroom comes packed with certain tools that will help to make quick retouching on skin, eyes, lips, etc., in a few minutes. This tutorial from Photo Traces teaches a simplified portrait editing process to clean up the model’s skin and make it smooth and soft.

13. Correcting Lens And Perspective Distortions In Lightroom
Most images with buildings in them can always do better with some lens corrections and transform applied. Some images can look quite awkward and unreal with horizontal and vertical distortions in them. When it comes to architecture and cityscapes, there are times when you have to shoot from ground level and this makes the parallels converge. This tutorial from Digital Camera World shows how to apply lens profile and effectively use the transform tool in Lightroom
14. How To Create A Panorama – Lightroom Tutorials
Lightroom has been bringing in enhanced features in the past few years and one of those is the “Photo Merge” option that helps with creating panoramas and HDR images. Earlier, Lightroom users had to make use of another software to create a panorama and then import the image for post-processing into Lightroom. Since the release of this tool, creating panoramas inside Lightroom has been easier and this tutorial from Lens Craft explains how to use Photo Merge to create a panorama while also highlighting a few problems on how certain options could affect the quality of your panoramas.

15. Step-by-Step: HDR Merge Lightroom Tutorial
There are times when there is a huge variation in light intensity in a scene that you may want to bracket exposures and then blend them when post-processing. Lightroom has an HDR merge functionality that is very convenient and quick. It also does the job pretty neatly and this tutorial from Loaded Landscapes will take you through a step-by-step process of HDR merge using Lightroom

16. Exact Lightroom Export Settings Every Photographer Should Know
Once you have organized your images and made the required edits to them, you are ready to export your images. There are various settings that you will need to take care of when exporting images from Lightroom, depending on what you will be using the images for. For example, images that need to be printed will require exporting in high resolution, whereas images that will be shared on the web or social media can be of lower resolution. This detailed tutorial from Click It Up A Notch goes into details on selecting your images for export, exporting high resolution images, export settings for print, export settings for web and social media and also where to save the images on export.

17. Tips For Editing Black And White Photos In Lightroom
Black and white photographs are timeless and one that are loved by most photographers even though we have films and digital cameras that allow us to shoot in colour. For black and white photography, shoot colours images in raw format and then convert them to black and white so you have more details to work with. This tutorial from Photography Raw discusses two methods to convert images to black and white in Lightroom.

18. How To Use Lightroom Mobile In A Full Travel Workflow
Lightroom mobile just like the desktop version has evolved over time that even professional photographers use it on the go, so they can still maintain their workflow wherever they are. With the Creative Cloud subscription, you can make use of creative cloud so you can continue your work on a desktop when you get back home. It is easy to use and has most of the tools that the desktop version has. This tutorial from John Peltier shows how you can use Lightroom mobile while traveling.

19. Lightroom Calibration Panel Tutorial
Finally, the calibration panel in Lightroom, which not many users are aware of. Have you ever made use of this panel for improving colors in your images? It is the least talked about and used area in Lightroom by many users and it helps to fine-tune the colors and fix unwanted color casts in images. This tutorial from Signature Edits goes through the ways in which you can use Lightroom's Calibration Panel to correct colors and add creative colors to your photos.

Further Reading On Lightroom Tutorials:
- How to Use Lightroom’s Color Wheels To Grade Your Photos Beautifully
- Here Is A List Of The 25 Best Lightroom Plugins of 2021
- How A Little Clarity In Lightroom Can Improve A Portrait
- Lightroom’s Color Grading: Bring On The Wow Factor!
- How To Shoot a Stunning Blue Hour Photograph And Edit It In Lightroom


2 Comments
its great to see such good information about lightroom, i luckily found this article. now all my doubts are clear. thank you for sharing the tutorials
Hi Robert, glad that you found the information here helpful 🙂