Updated 16th January, 2020
Many of our customers have been asking us how to install Lightroom presets into Lightroom mobile and one of the most awesome things about all the Lightroom updates in the past two years is that you can now install your desktop presets into Lightroom mobile through just a simple process which is by syncing Lightroom presets into Lightroom mobile using the Lightroom Cloud Based Desktop Application called Adobe Photoshop Lightroom.
Note: The Lightroom Cloud Based Desktop Application which was originally called Lightroom CC has now been renamed to Adobe Photoshop Lightroom in the recent updates.
You need to have a Creative Cloud subscription in order to be able to sync your presets between desktop and mobile and this only works if you have Lightroom Cloud based version (Adobe Photoshop Lightroom) on your desktop. You need to be signed in with your creative cloud account on both your desktop and mobile for this “sync process” to work.
Can Lightroom Presets For Desktop Be Used In Lightroom Mobile?
We get asked all the time if the Lightroom presets for desktop can be used in Lightroom mobile because many of us are now looking to edit images on the go and because of the versatility of Lightroom, and various other brilliant features, most photographers prefer to use Lightroom across all devices.
Moreover, most photographers like to matchup or keep their editing work consistent – be it working on the computer or on the mobile. This is where using your desktop presets on your mobile device comes in handy.
So, the answer is, yes, the presets can be used in Lightroom on mobile and we will look at exactly how to install lightroom presets on Lightroom mobile. There are however two conditions that need to be taken care of.
- You need to have an Adobe Creative Cloud subscription
- You need the latest version of Adobe Photoshop Lightroom on your computer in order to sync the presets with Lightroom on your mobile devices.
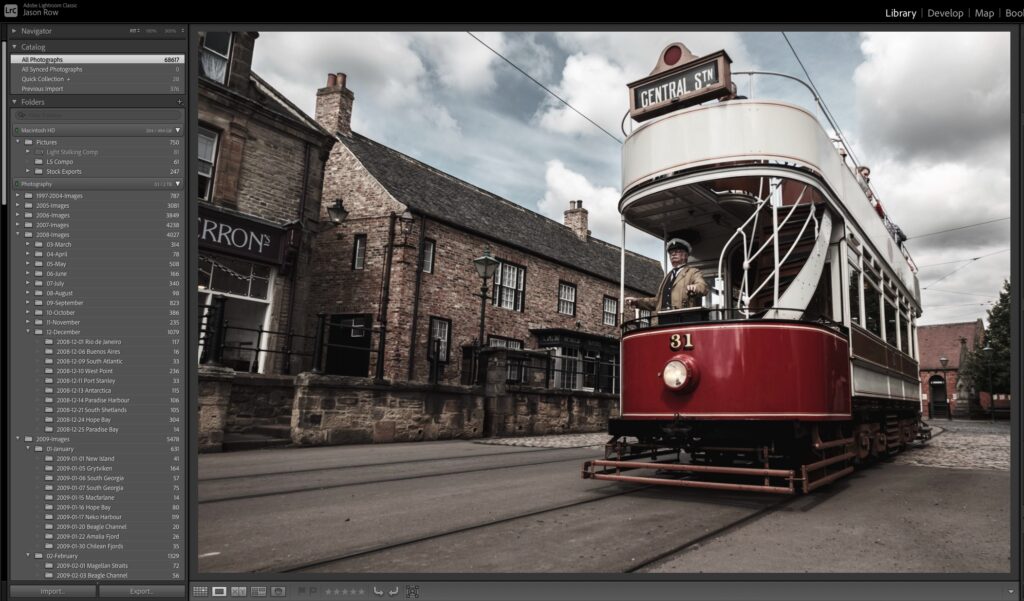
Note: If you only have Adobe Lightroom Classic on your computer, you cannot sync the presets with your mobile. You will need to download Adobe Photoshop Lightroom from Creative Cloud and then proceed with the sync process.
At the time of updating this article, the updated current version of Adobe Photoshop Lightroom was Version 3.1
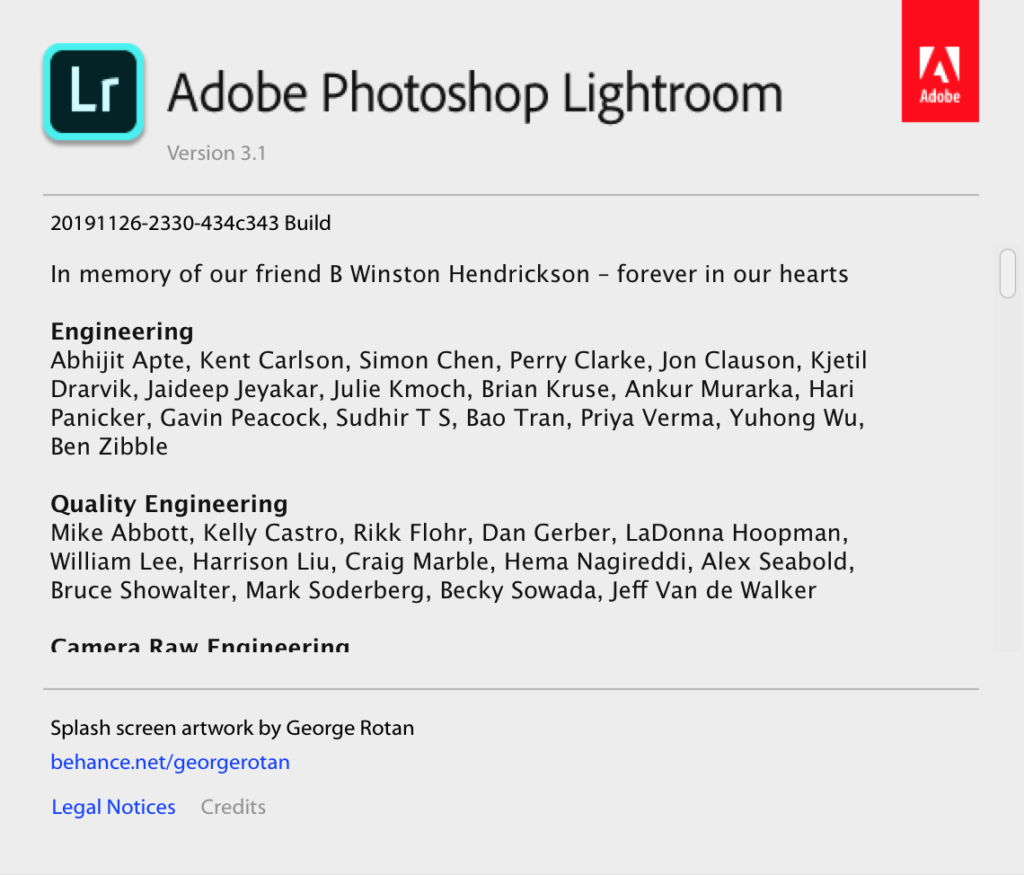
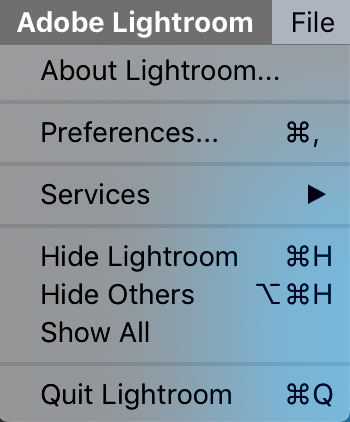
If you are unsure how to check this, click “Adobe Lightroom” on the Menu on top and Click “About Lightroom.”
How Does It Work?
With Adobe Creative Cloud, you have the option to sync your work, settings and presets between your devices, so any presets that you import into your Desktop version of Adobe Photoshop Lightroom will sync with Lightroom on your mobile. That way you can use the presets in your Desktop version of Lightroom, on your mobile version of Lightroom as well.
With the recent updates to Lightroom, this process has become pretty straightforward.
So Here It Is…How To Install Lightroom Presets Into Lightroom Mobile?
If you have already imported your presets to your Lightroom Cloud based version which is a Desktop Application, then after updating to the latest version of Adobe Photoshop Lightroom on Desktop and Mobile, you just need to open the Lightroom app on the mobile.
You can see that the presets which were imported into Adobe Photoshop Lightroom for Desktop will have now synced with Lightroom App for your mobile device. Make sure you have syncing turned on between devices.
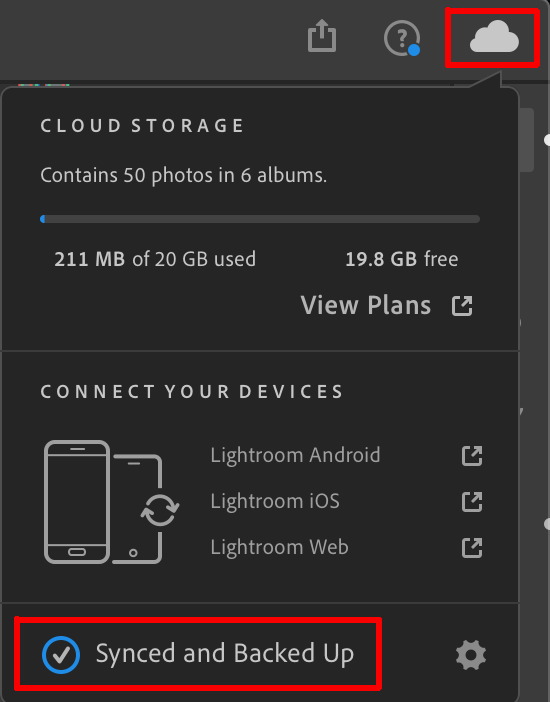
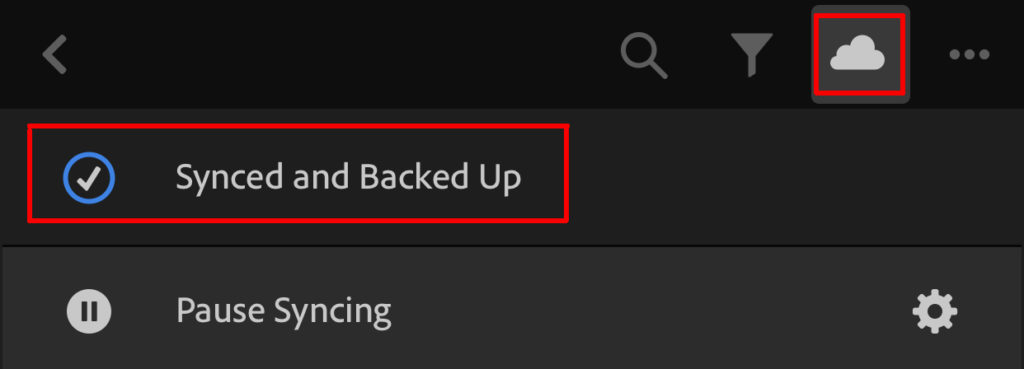
If you have not already imported the presets previously, here is how to install Lightroom presets into Lightroom mobile right from the first step:
I have used our most popular Pop Pack Set of Presets here as an example to show you how to install lightroom presets into Adobe Photoshop Lightroom for desktop and mobile.
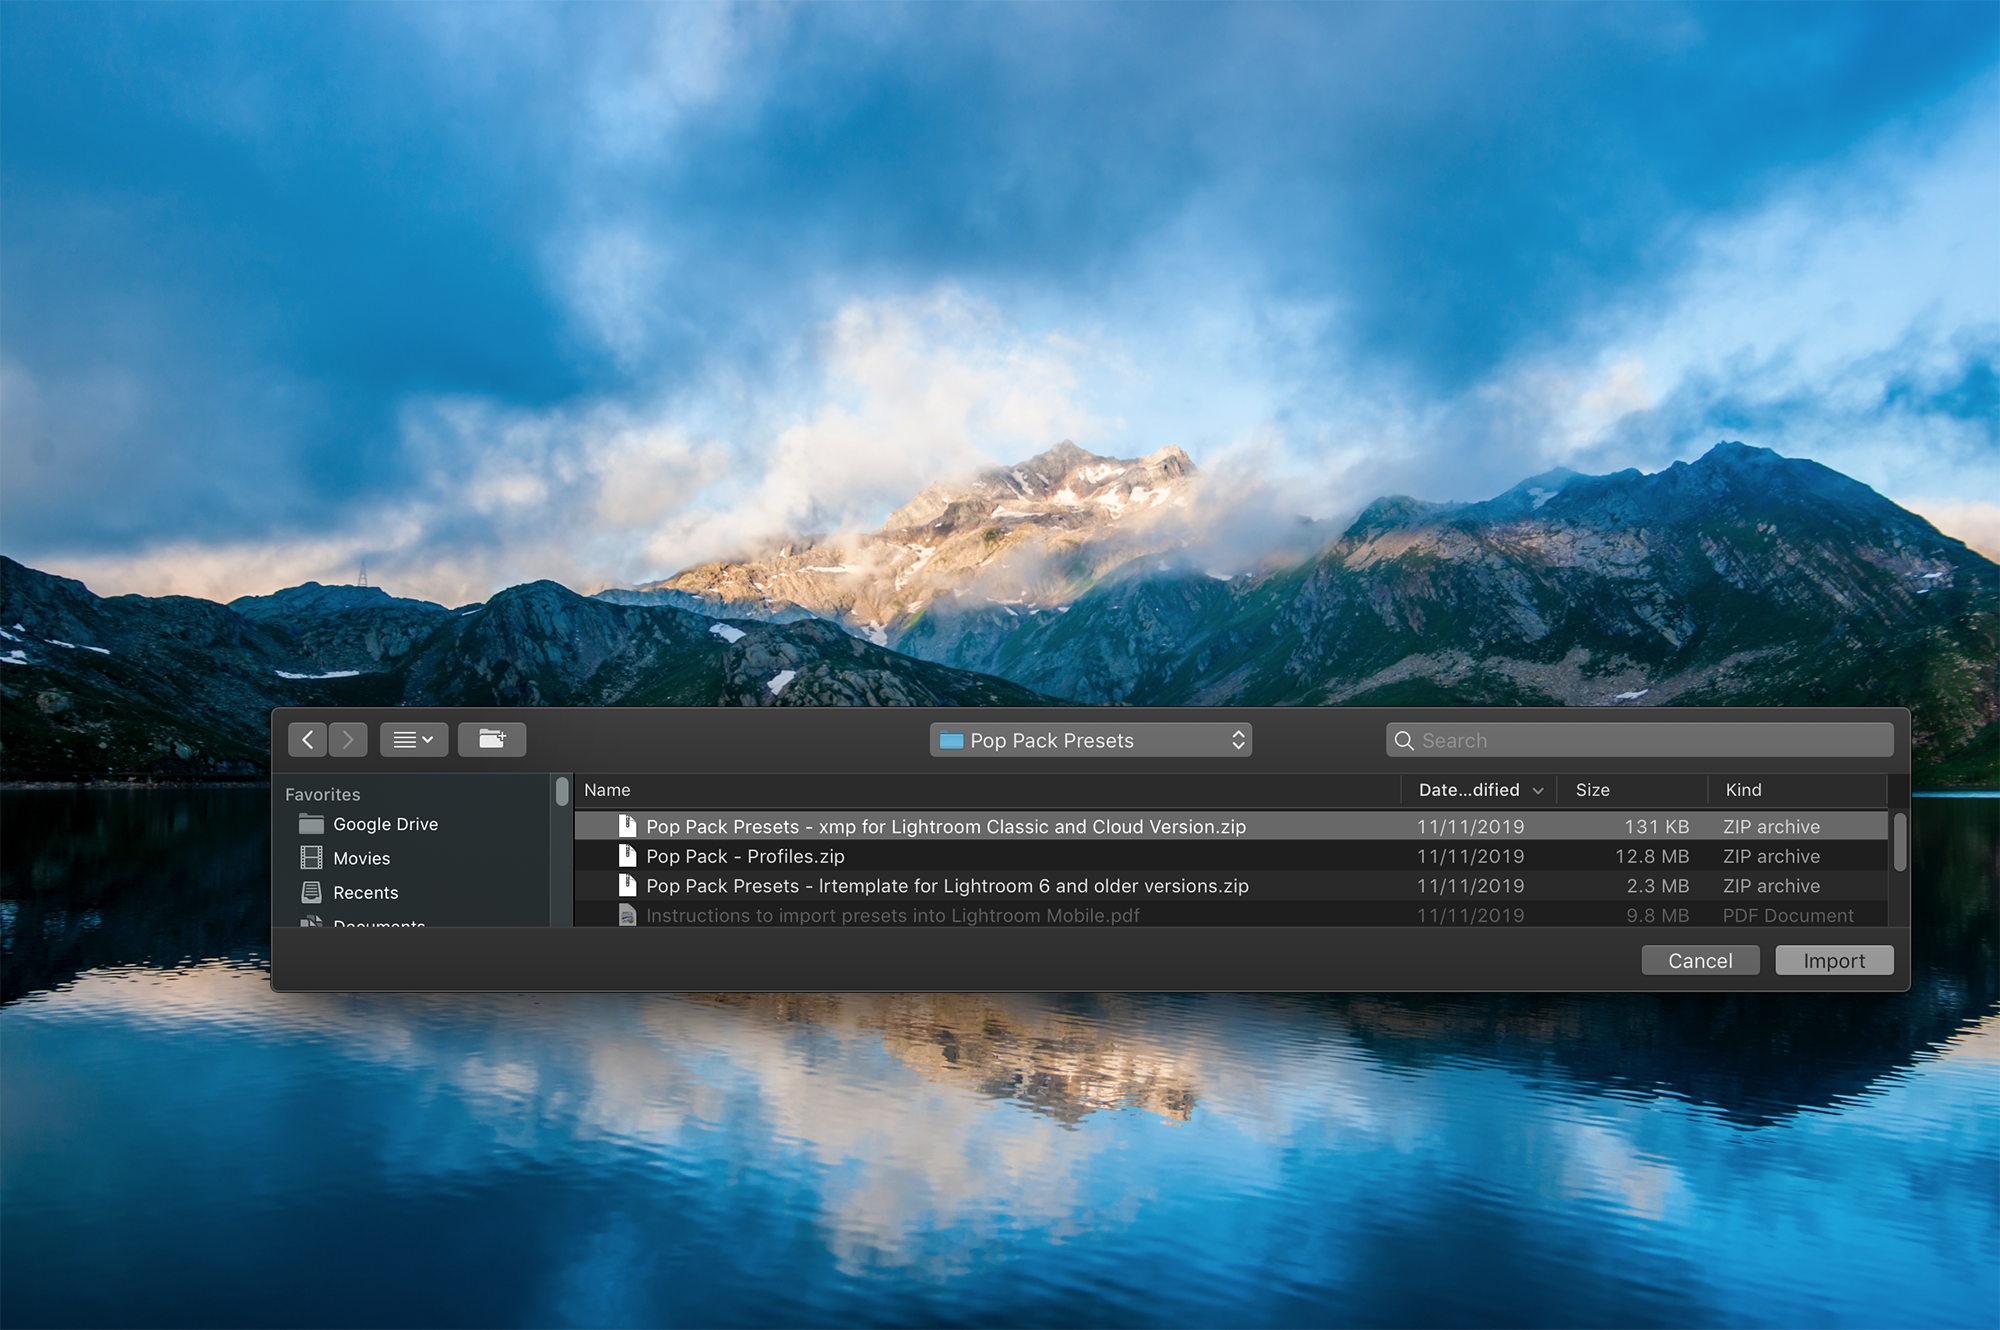
Once you have downloaded your presets that are in zip format, you do not need to extract (unzip) them. Use the .zip files so they go straight into relevant folders upon import.
1. Launch Adobe Photoshop Lightroom on your computer and click on “Presets” on the bottom right.
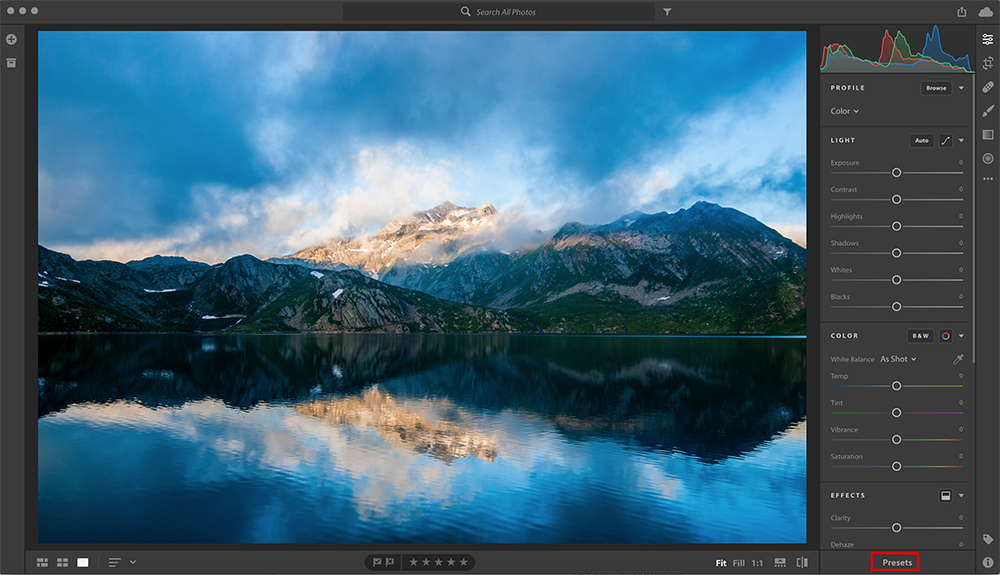
2. The Lightroom Presets panel will open on the right-hand side.
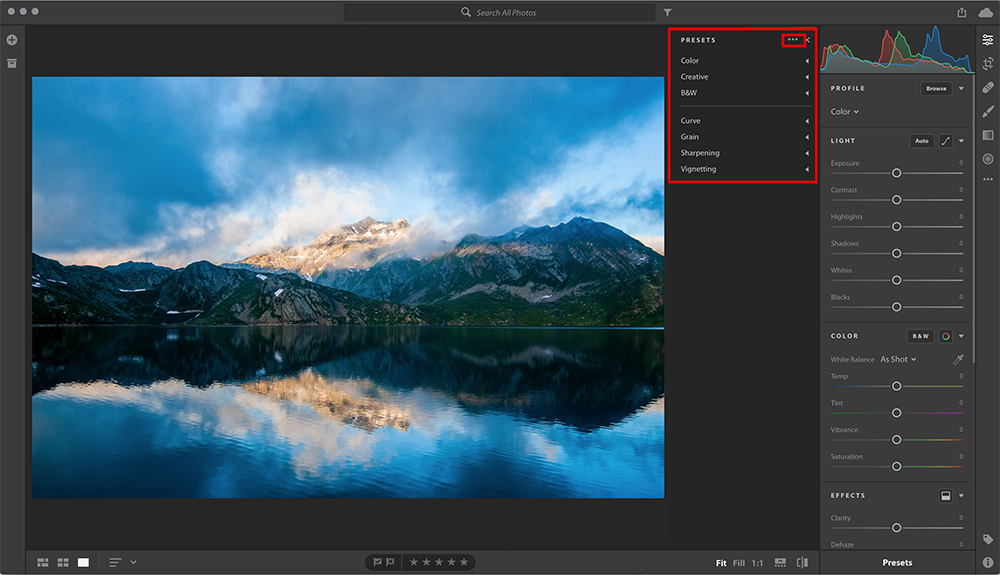
3. Click on the three dots “ … “ that you see on top of the panel and click “Import Presets”
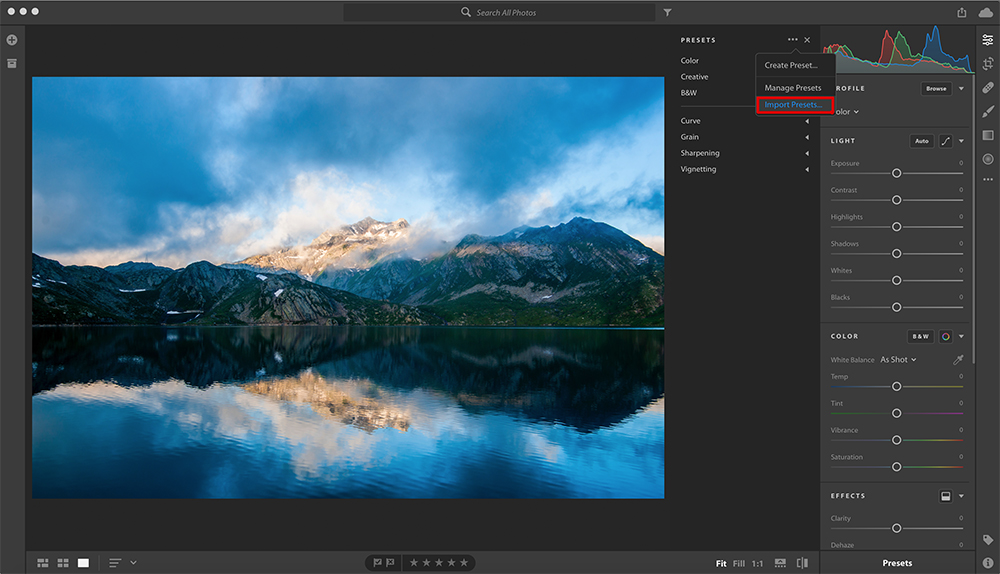
or click “File —> Import Profiles & Presets”
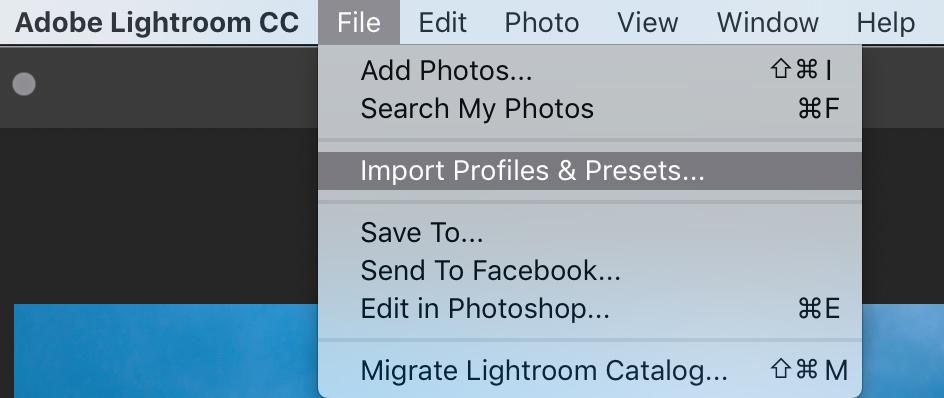
4. On your computer, browse to the location where you have downloaded the .zip file, select and click “Import.”
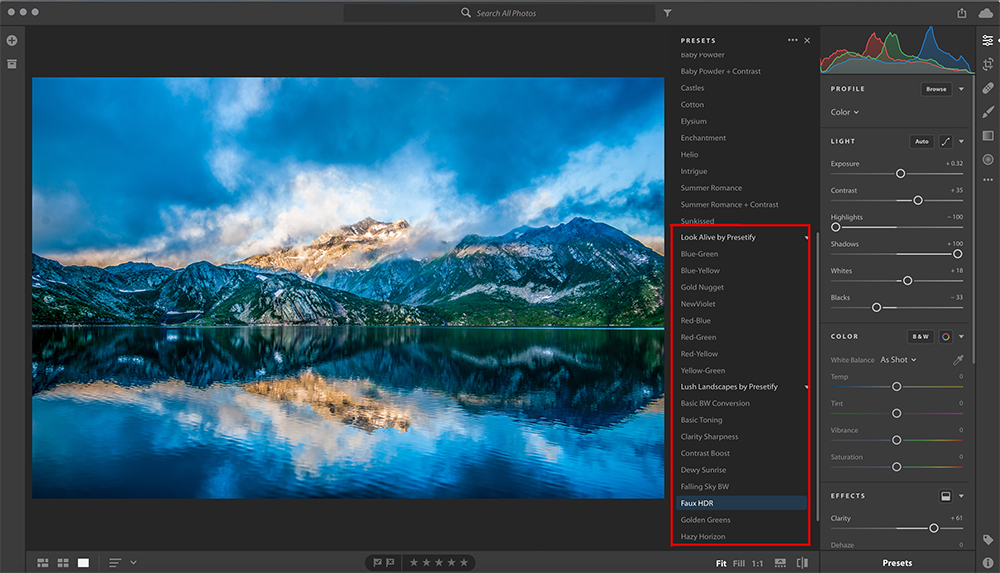
5. Now you should have all the presets in different folders in your Adobe Photoshop Lightroom Desktop Application.
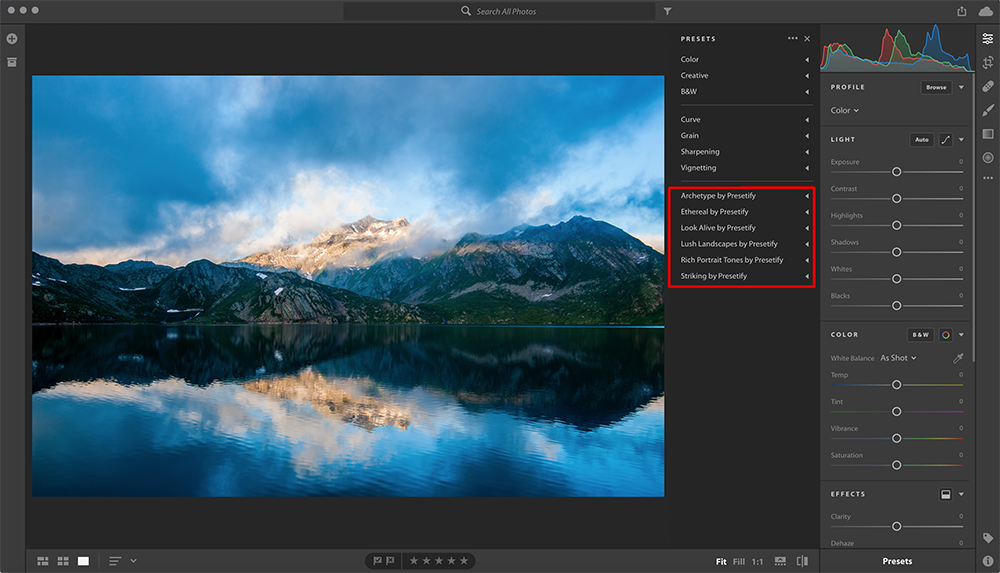
You can see the presets within those folders when you click on the small white triangle next to preset folder name.
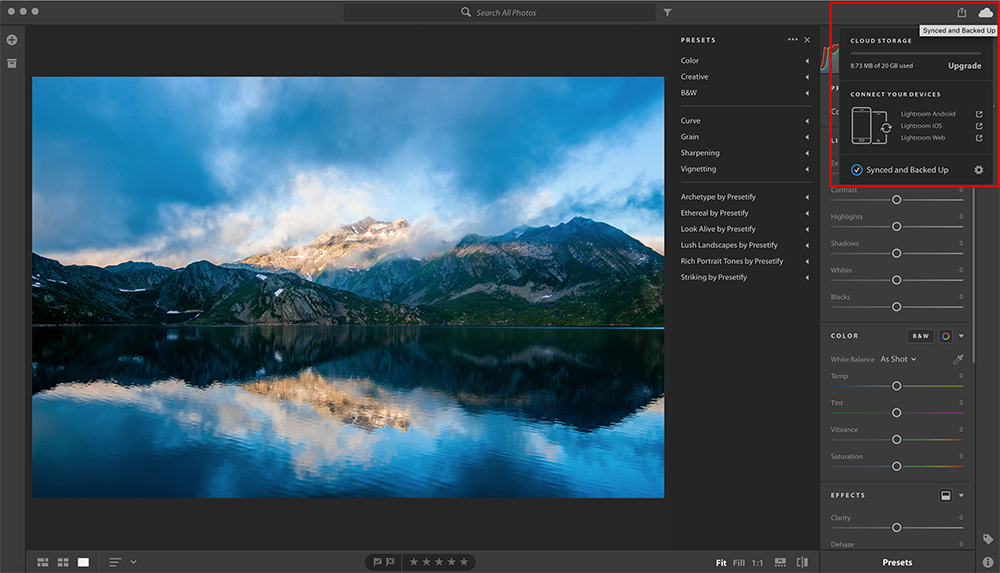
5. Also, make sure that cloud syncing is turned on (top right)
Here's How To Use Lightroom Presets In The Lightroom Mobile App
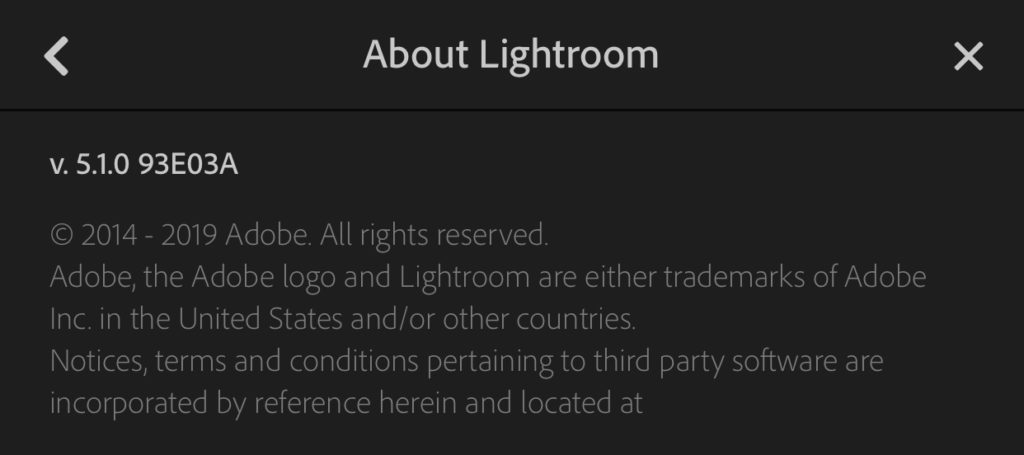
1. Open up the Adobe Photoshop Lightroom App on your Mobile. Here are the links for iPhone, iPad, and Android if you haven't downloaded one yet and make sure you have updated to the latest version if you already have a copy. At the time of updating this article, the updated current version is v.5.1.0
2. You will see that any images and presets you imported in the Adobe Photoshop Lightroom Desktop App would have now synced to the Lightroom mobile app as well. To indicate that, you can see that the cloud icon has a tick. Choose an image to edit.

3. On the top drop down menu, tap and choose “Edit” if another option was chosen by default.
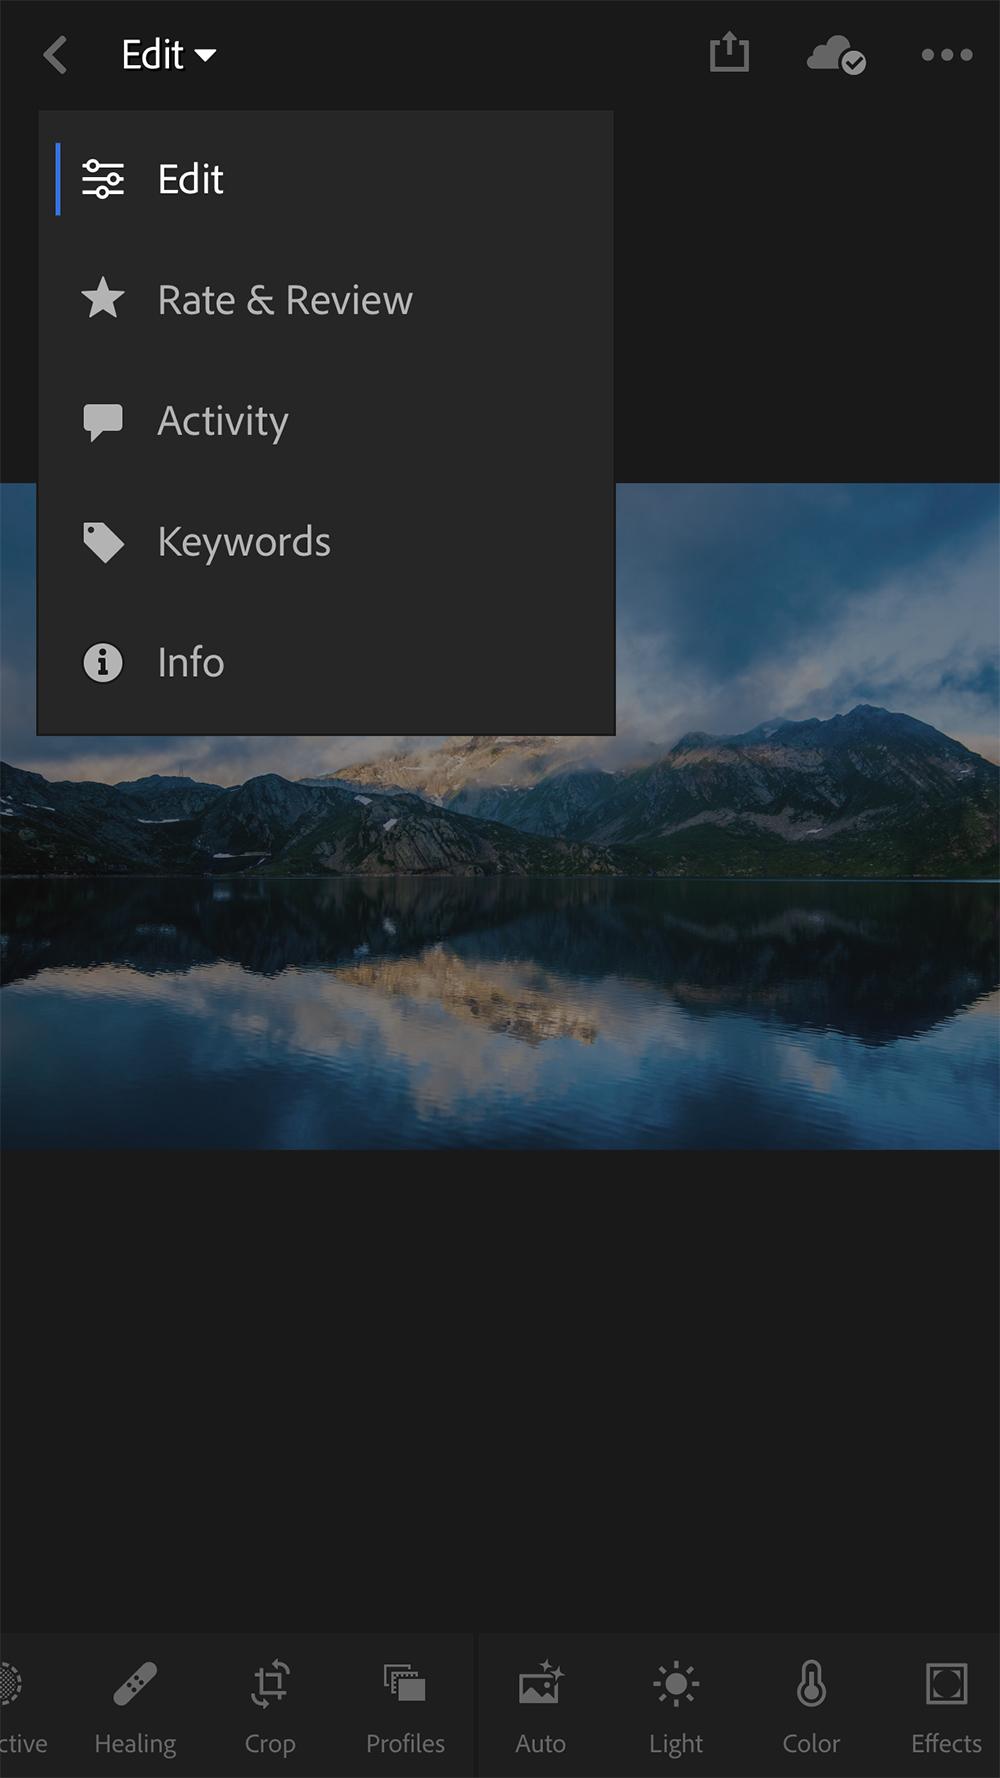
4. At the bottom of the app screen, you will see the presets icon. You may need to scroll to the right to find this.

5. When you tap on the “Presets” icon, the presets list opens.
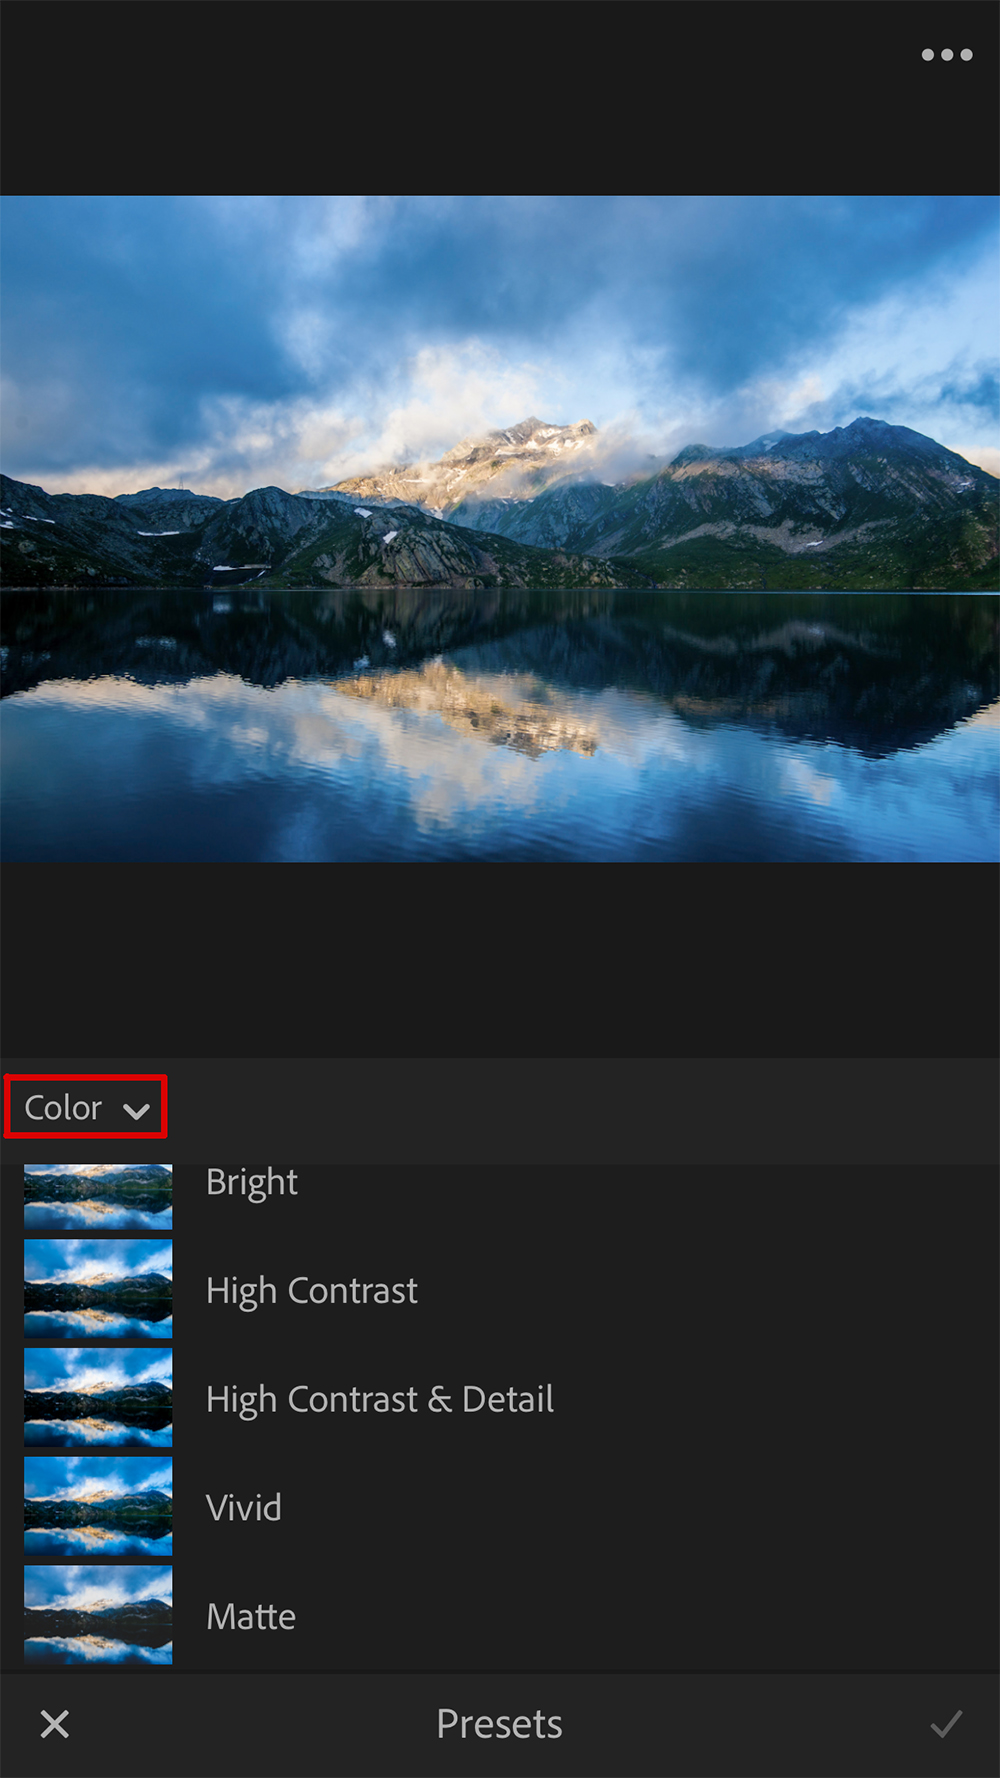
Note: When you tap the “Presets” icon for the first time, the default “Color” presets folder that came with the Lightroom Mobile App will pop up with the list of presets in it. Just press the small down arrow next to the word “Color” and you can see the list of imported preset folders. Remember, these are the preset folders that were imported into your Adobe Photoshop Lightroom Desktop application and they have successfully synced with your Lightroom Mobile App as well. How easy was that!
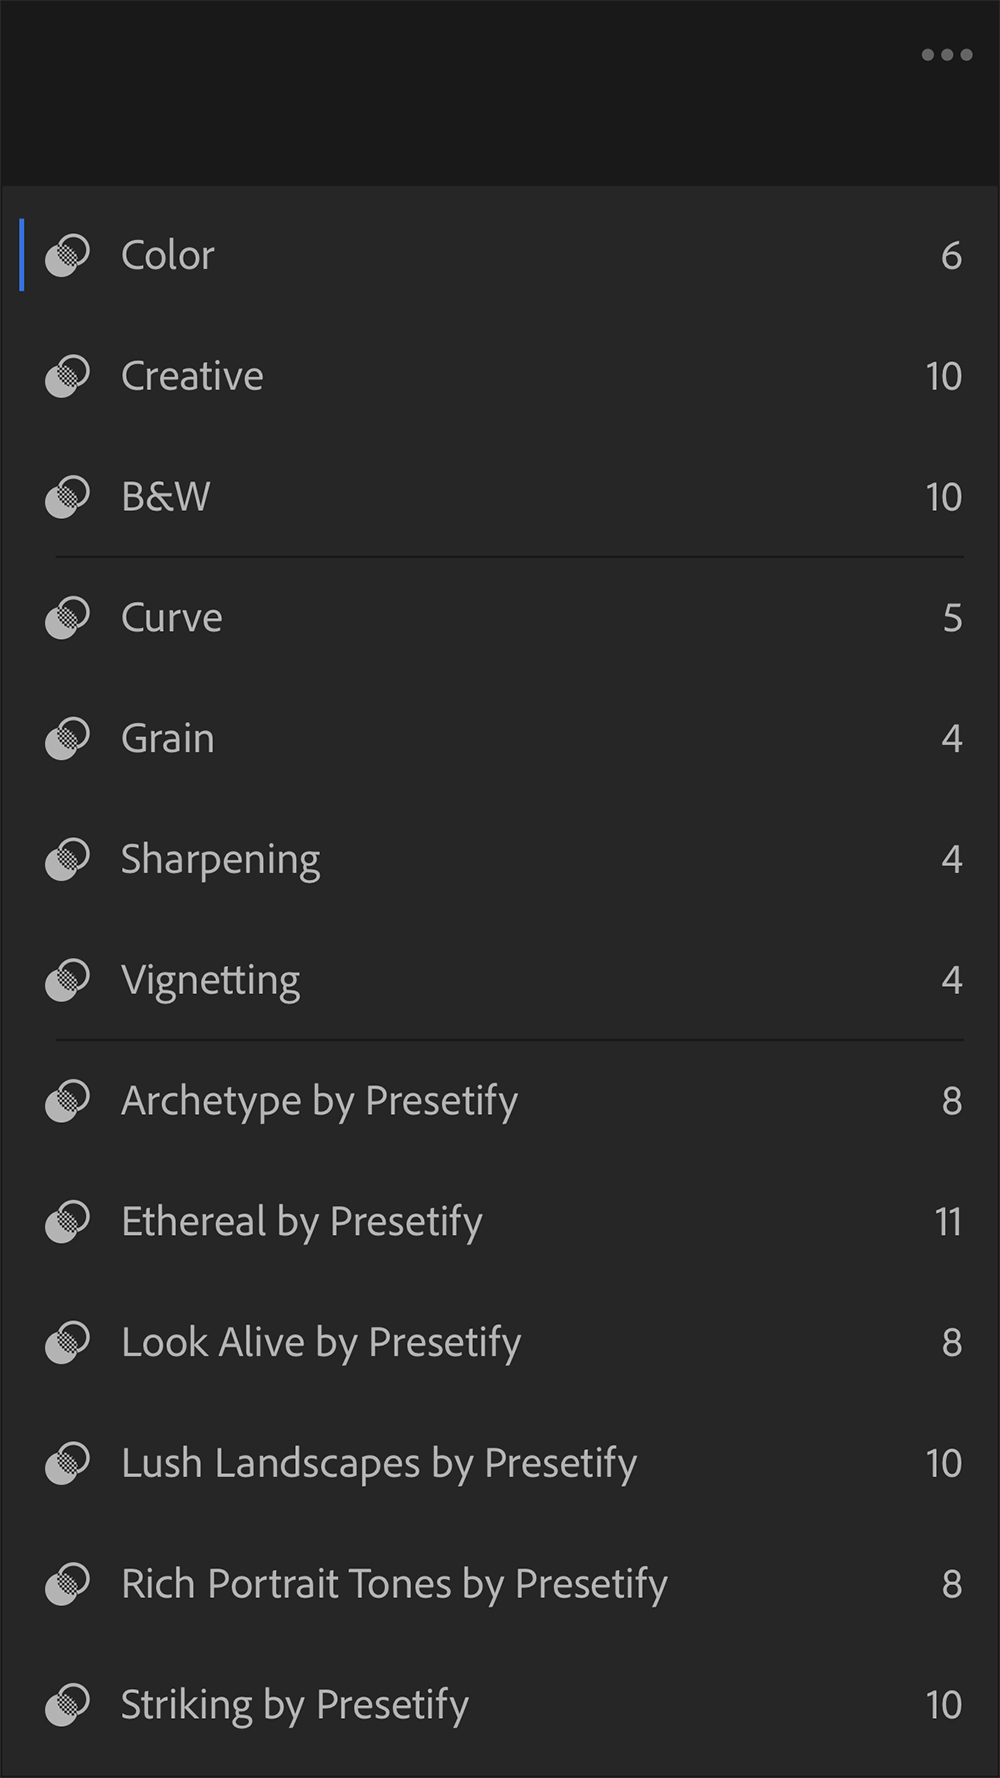
6. Tap on a folder to see the presets within that folder.
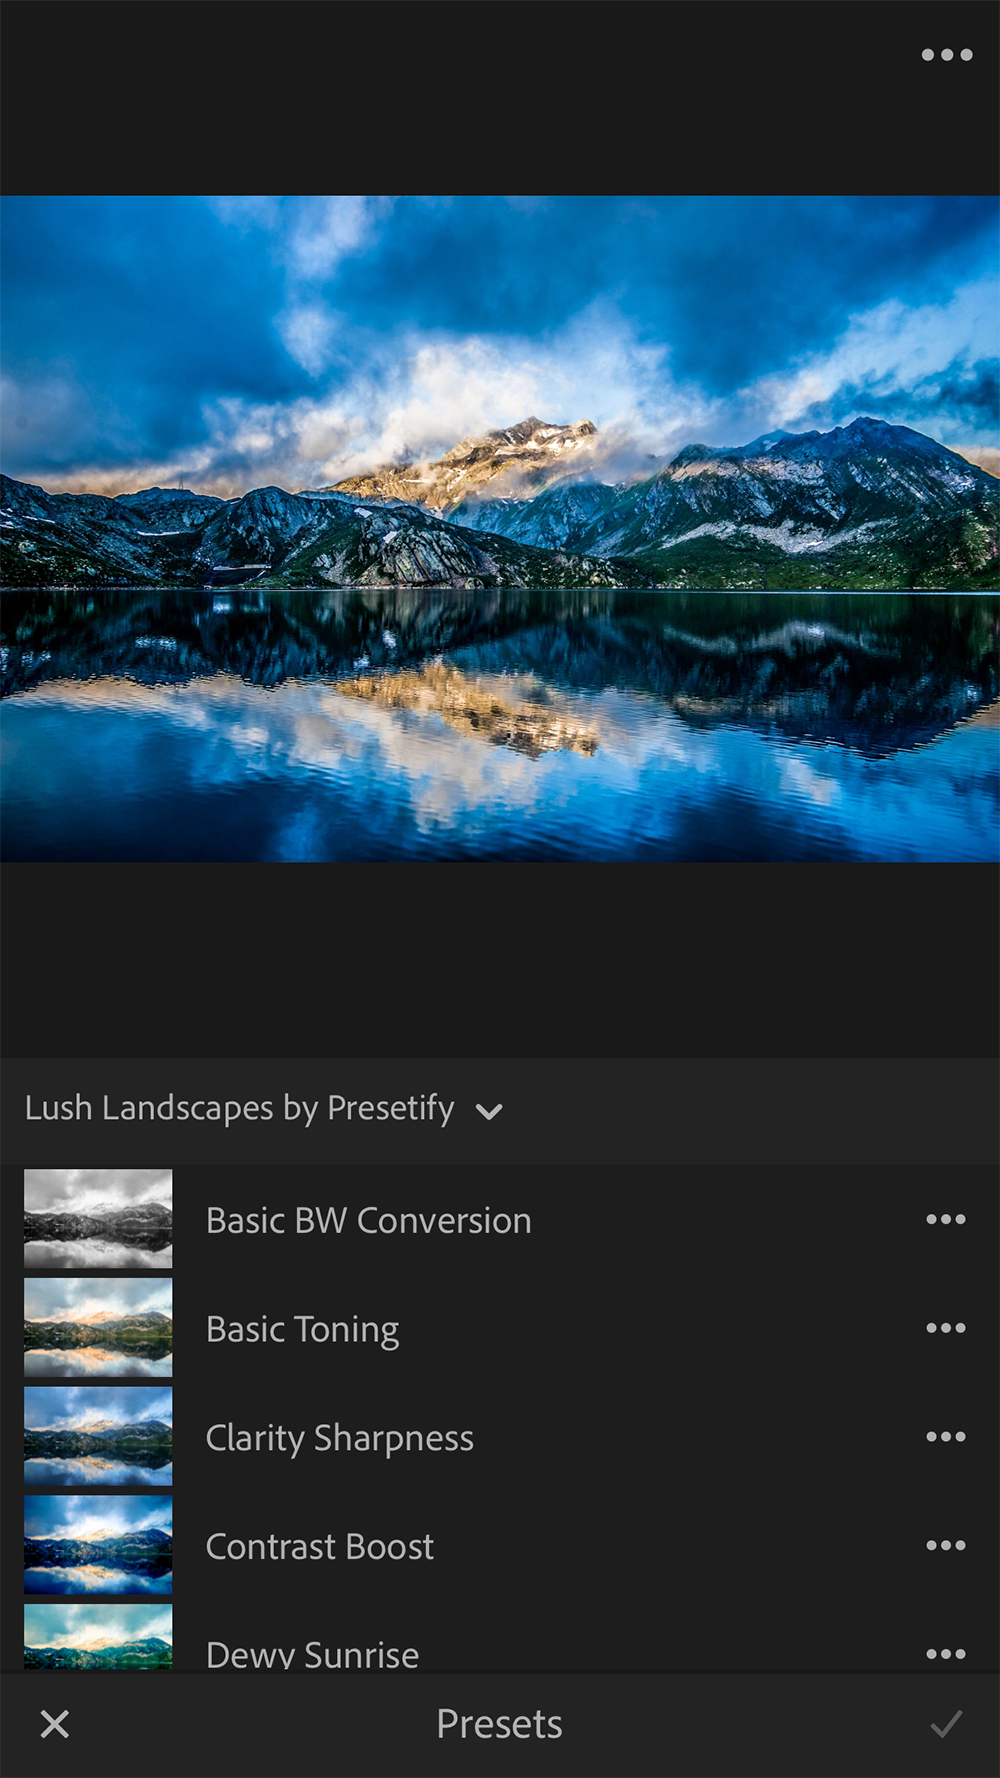
7. Next time you launch the app, the most recently used presets folder will show up, so tap on the small down arrow next to the preset folder name and choose the folder you wish to use.
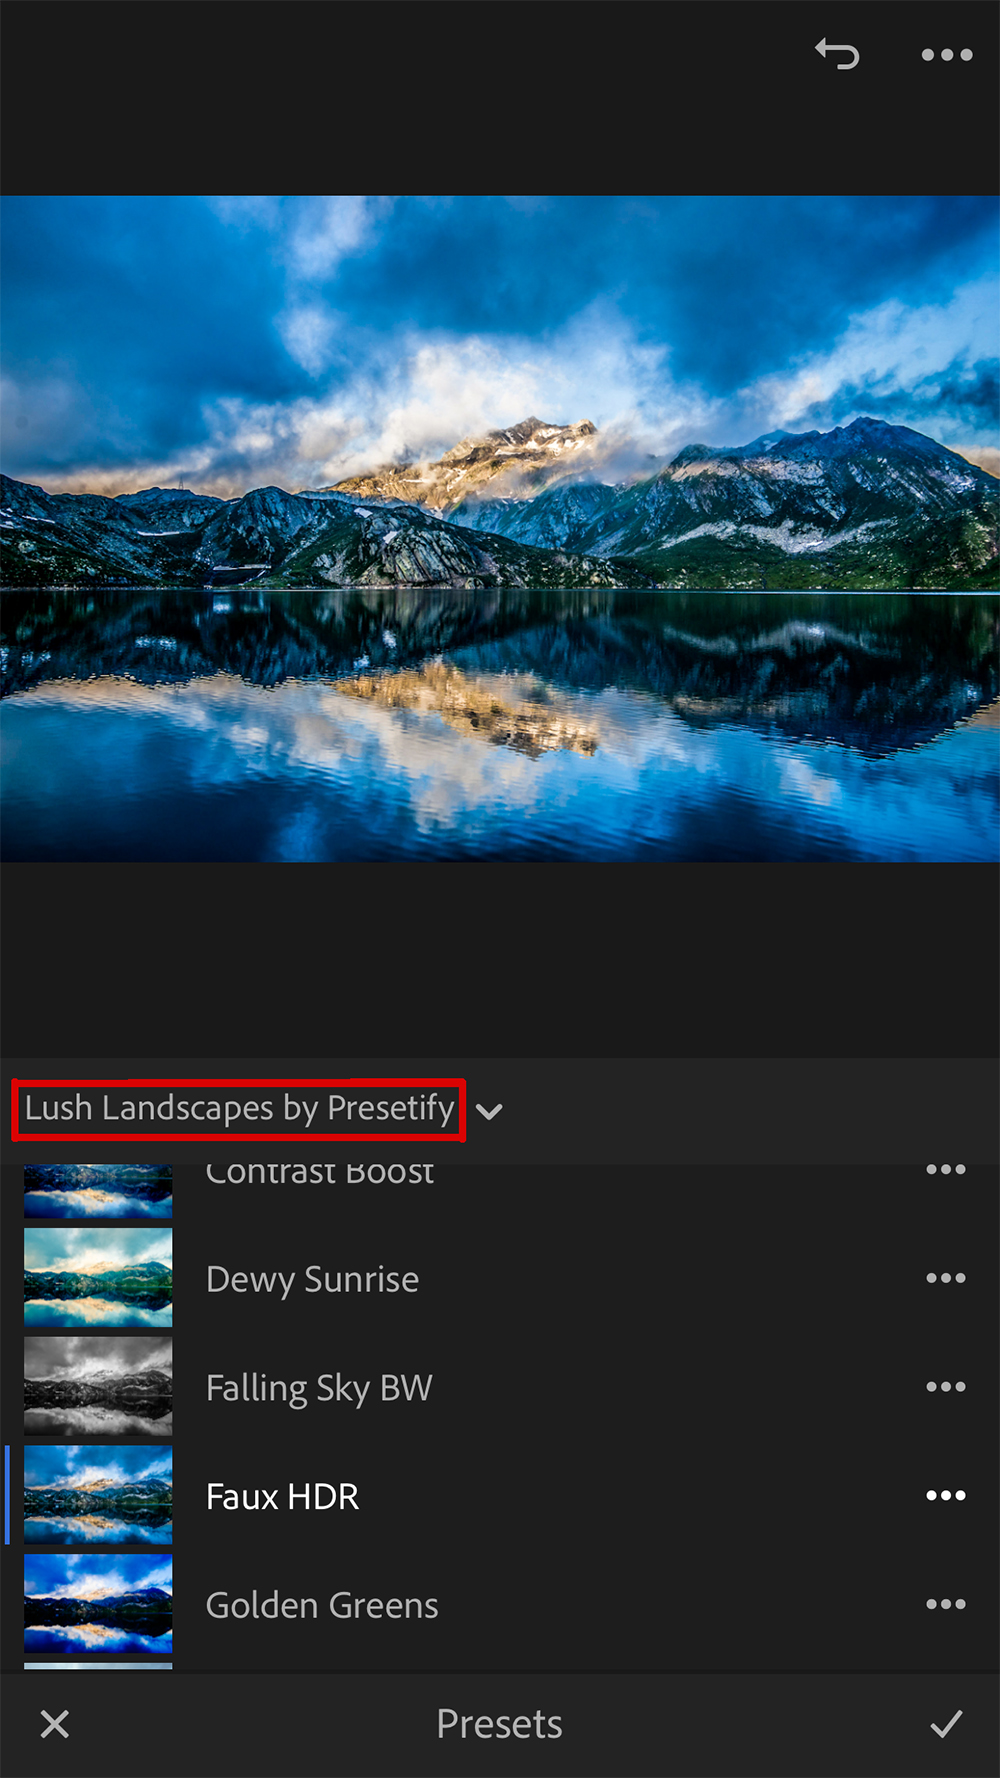
It is convenient if you rotate your mobile to landscape orientation and then work on Adobe Photoshop Lightroom for mobile. The screenshots below illustrate why!
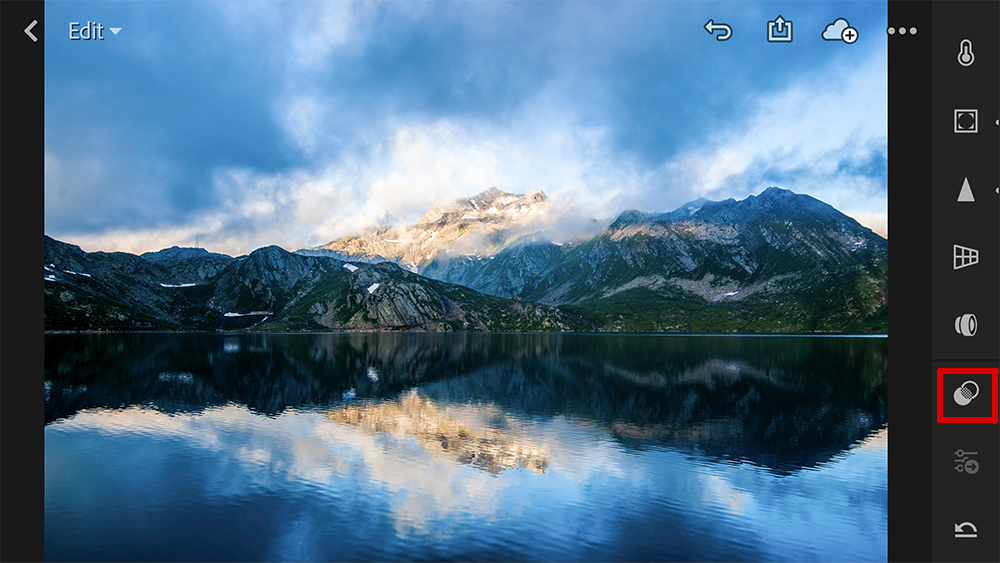
You have more space to work on the image and your presets/preset folders list shows up on the right hand side.
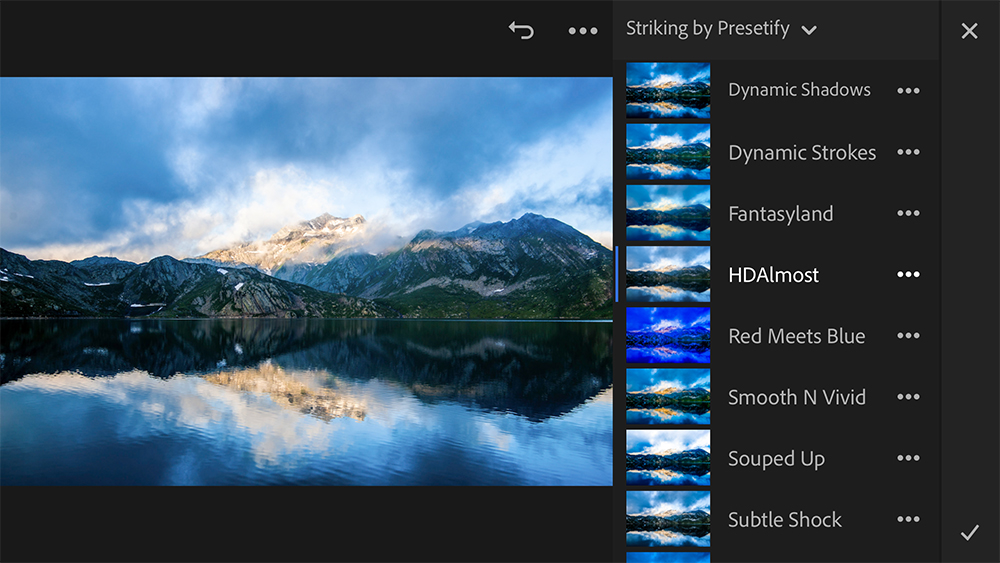
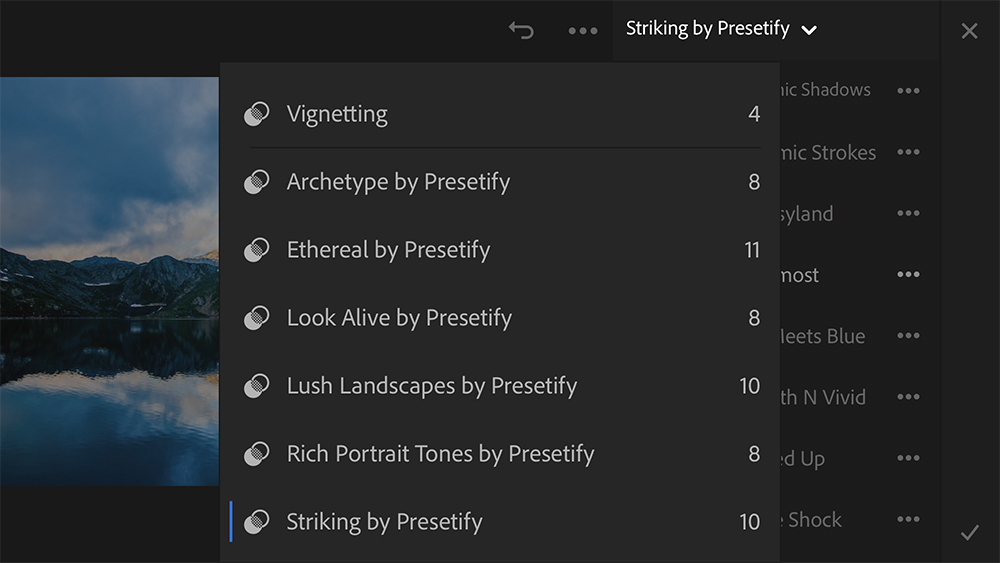
Just to make sure the syncing works across all devices that were signed in with the creative cloud account, I opened up the Lightroom CC App for iPad and checked to see if the presets had synced on the iPad as well and yes, they have. The edits made on the image had synced as well. Here are the screenshots for reference.
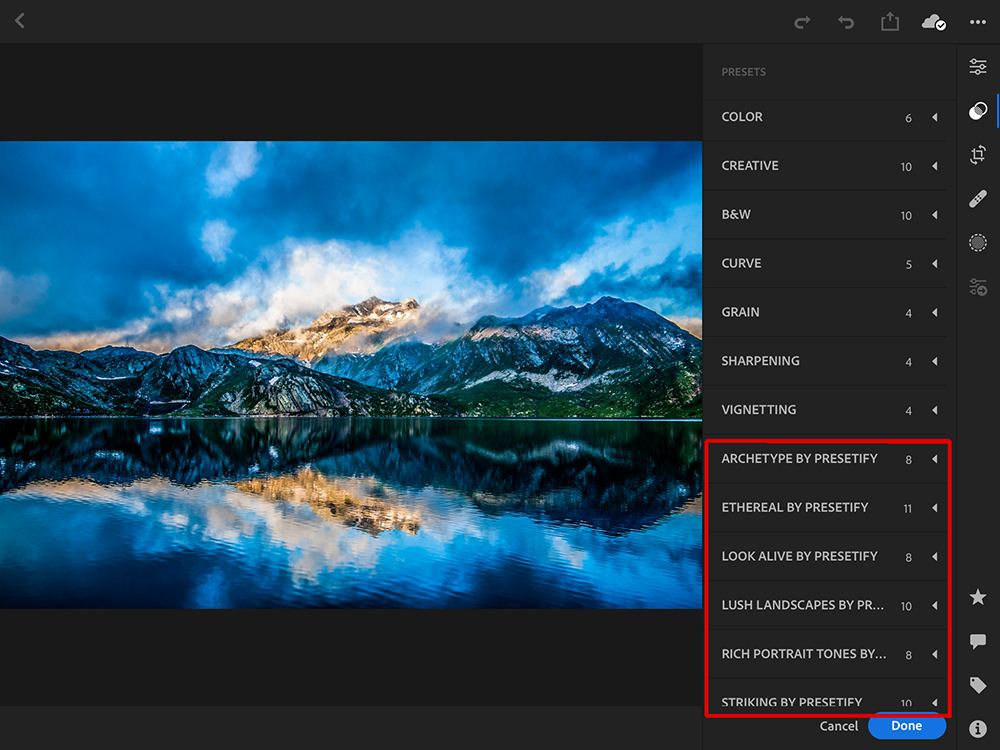
You can see the presets in the folders, just like you see them on the desktop version (on the right hand side panel), which is quite convenient. You can now make edits using your iPad or tablet as well if you need to.
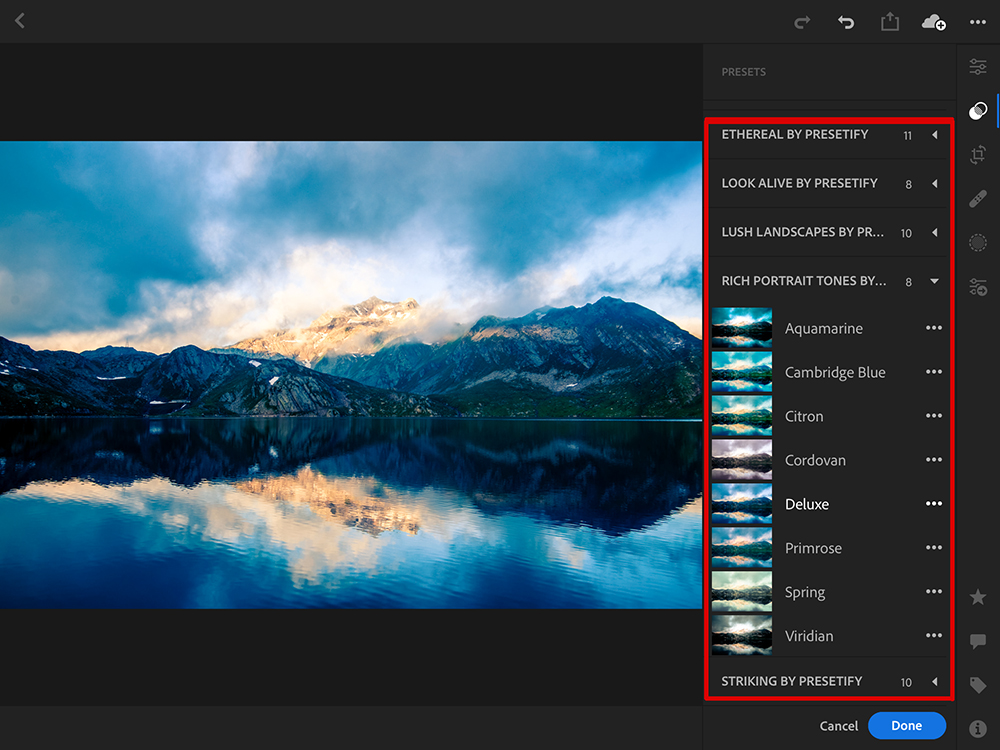
Your presets and work sync across all devices and this is a huge benefit for photographers who edit images on the go and like to maintain consistency in their post processing workflow – regardless of which device they are using.
A Tip On Managing Your Presets:
Now that we have looked into how to install lightroom presets into Lightroom mobile, let us also look into managing the presets in Lightroom desktop and mobile.
Once you've imported presets into Lightroom mobile, you'll then sometimes need to manage them. If you are someone who has quite a huge list of presets, while working on the mobile, it can be quite annoying to go through the long list to pick ones that you are looking for or to get to the favourite ones.
To overcome this, Adobe Photoshop Lightroom for Desktop and Mobile have an option called “Manage Presets.” You just choose which presets to show on the list by checking/unchecking on the desktop version or by switching on/off for the mobile version.
Here Is How To Manage Presets For Lightroom Cloud Based Version On The Desktop:
1. Click “Presets” on the bottom right

2. The presets panel opens. Click on the three dots on top “…” and choose “Manage Presets.”
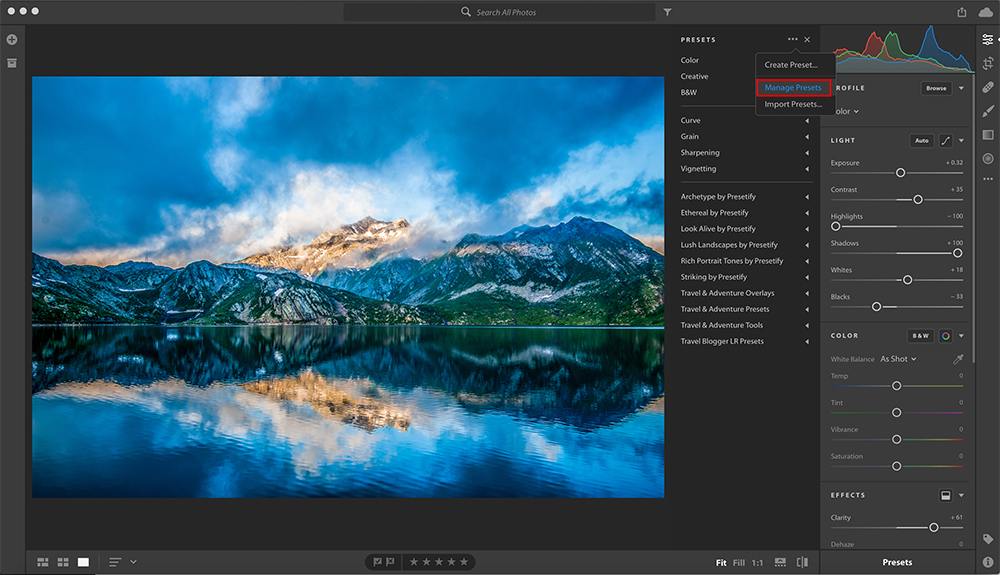
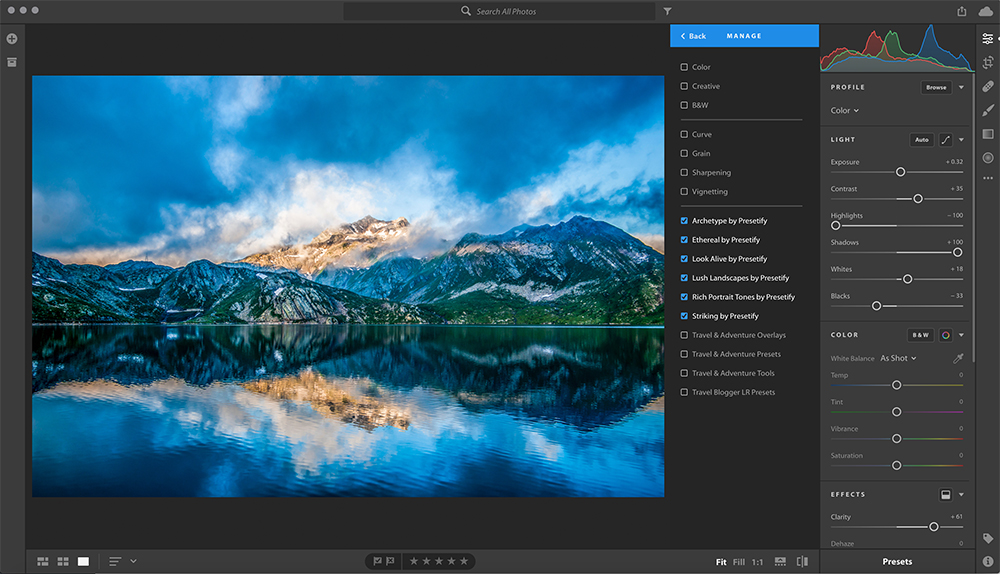
3. The list of presets that you have imported shows up. Just uncheck the ones that you do not want to show on the presets list. I have unchecked everything except the pop pack. Once you have chosen which ones to show, click “Back“
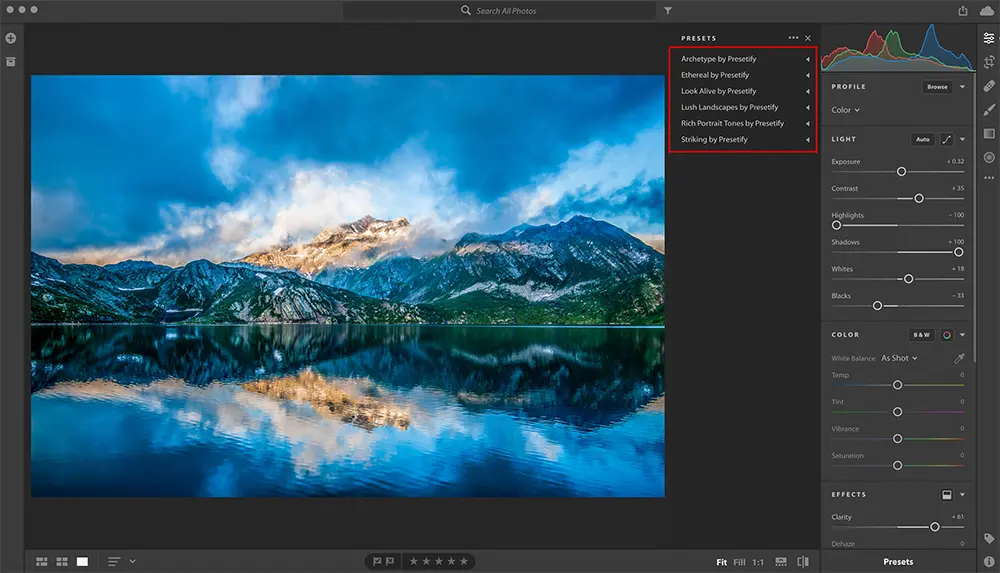
4. You can now see that only the pop pack presets are on the list!
Here Is How To Manage Presets For Lightroom App On A Mobile:
1. On the edit screen tap on the “Presets” icon (this is the screenshot with mobile in landscape orientation)
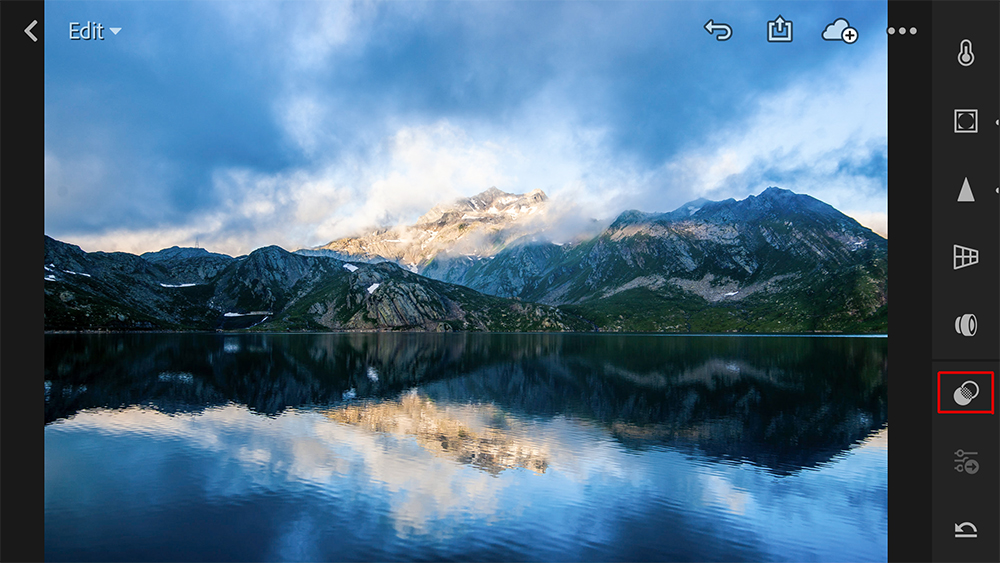
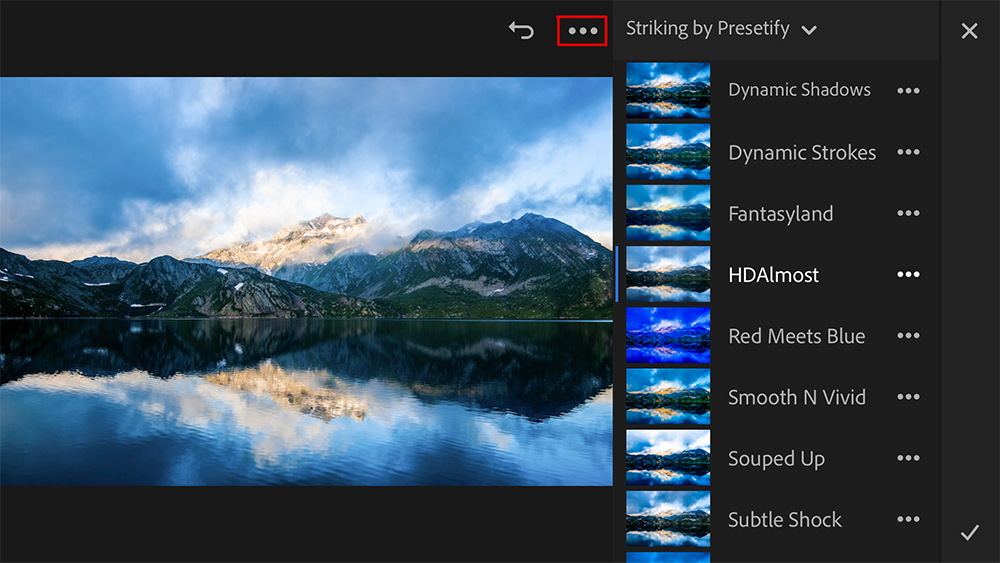
2. Your recently used presets folder pops up. Tap on the three dots “…” on top
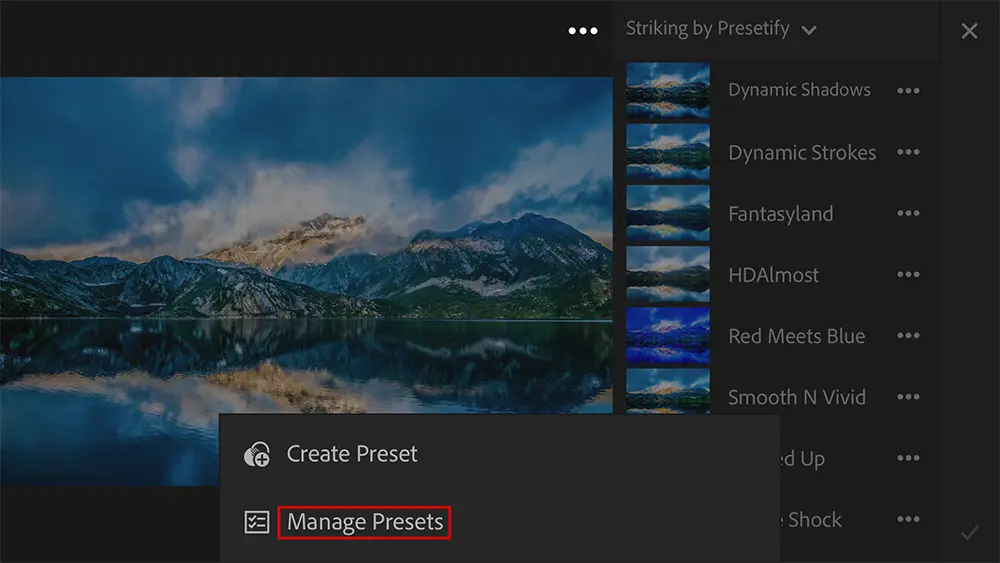
3. On the small menu that pops up, tap “Manage Presets”
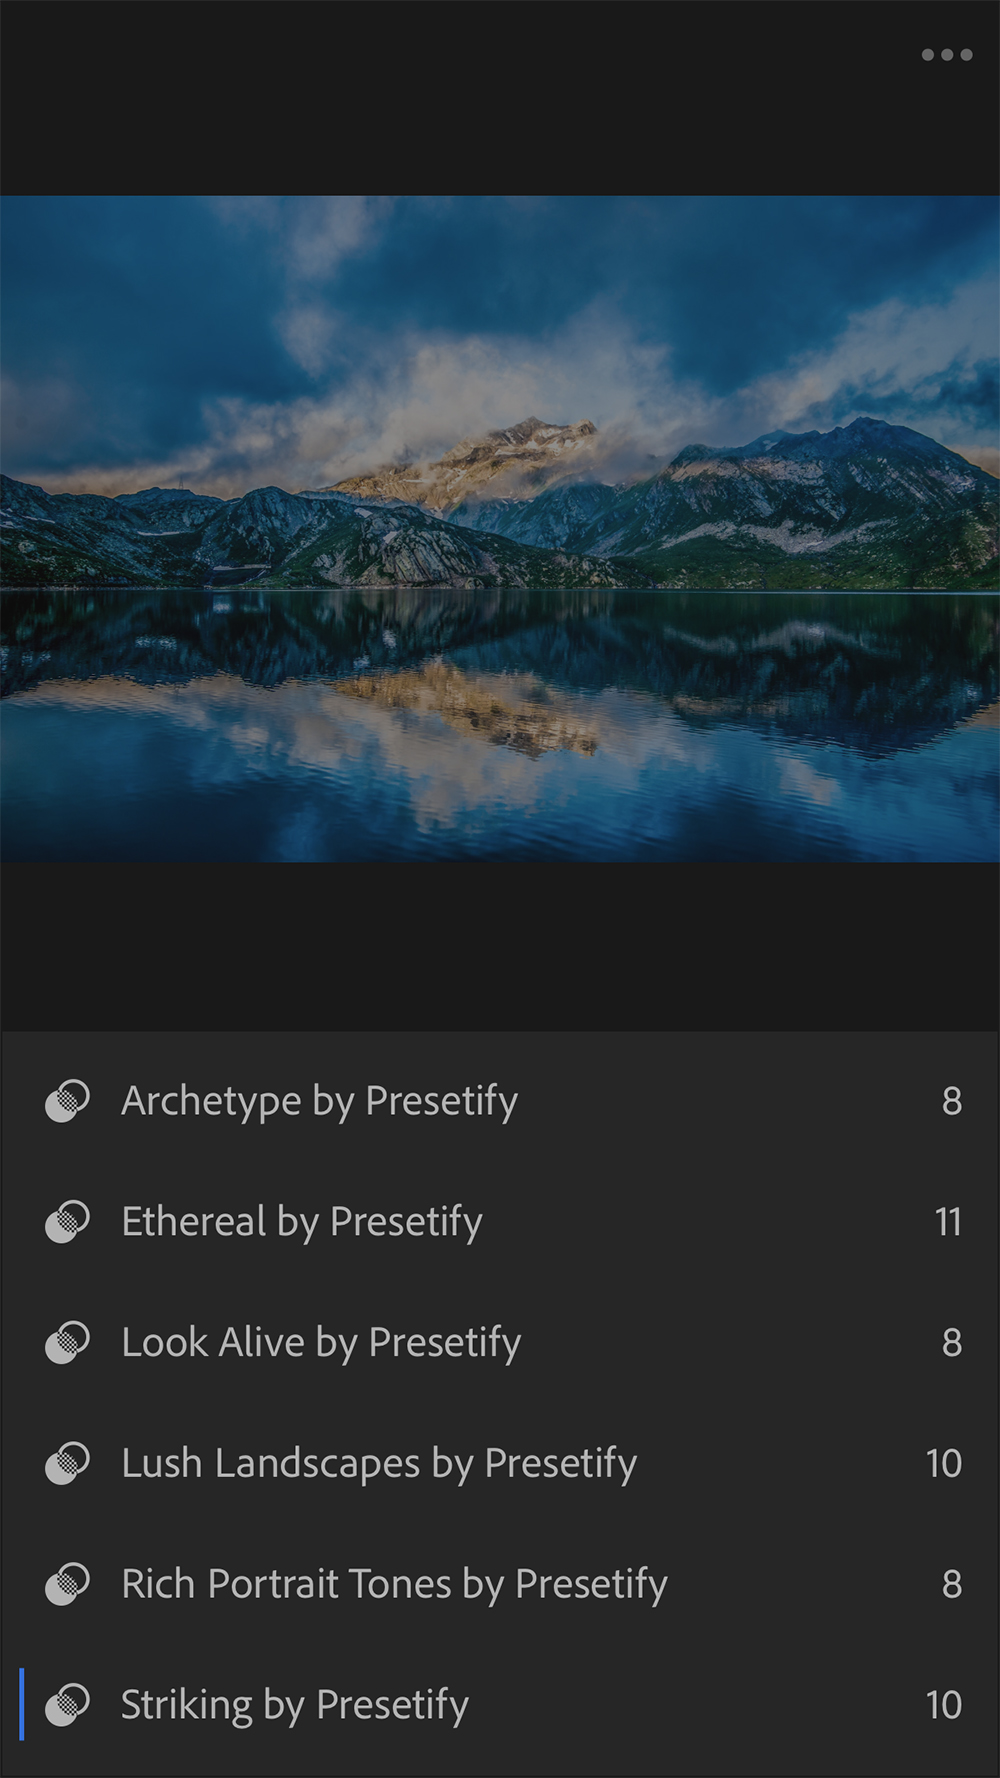
4. This will open up the long list of preset folders that have synced with your Lightroom for mobile. Just switch off the ones you do not want to see on the list and leave the rest on. Tap on “Done.”
5. The numbers that you see across each preset folder name, are the number of presets in each folder.
Some Frequently Asked Questions About Using Lightroom Presets On Mobile:
1. Can the presets be imported directly into Lightroom for mobile without a desktop app?
No, you need Adobe Photoshop Lightroom for Computer to sync the presets with Lightroom on mobile
2. Can I use any version of Lightroom for the syncing process?
No, You will need Adobe Photoshop Lightroom Desktop app which is available only through creative cloud subscription. This facilitates the sync process between different devices that are signed in with the same creative cloud subscription account and that way you can sync the presets between your desktop and mobile devices. Remember, you need to have cloud syncing turned on.
Hopefully you found this guide on how to import presets into Lightroom mobile useful. If you have any tips or questions, please feel free to drop a comment in the comments section below.
If you are looking for a simple way to edit your photos in Lightroom, so quickly and so beautifully, you should definitely check out Effortless Editing with Lightroom by Josh Dunlop.
Further Resources:
- These Are Amazingly Useful Tools We Have Loved Since Adobe Updated Lightroom Classic CC to 7.3
- How To Use The Basics Of Lightroom To Add More Punch To Your Photos
- How To Get Tack Sharp Images With Lightroom's Sharpening Panel
- Starting Over From Classic: Part 1
- 10 Tips For Wedding Photo Editing In Lightroom


