Sharpening photos is one of the most important steps in any photographers post-processing workflow. No matter how good you are at getting a shot right in camera, odds are you’re always going to want to apply some sharpness to your images. This isn’t a particularly difficult or labor-intensive task.
The main problem with sharpening is that it’s easy to go too far with it. Obviously, no one wants soft images, which is why you increase sharpness — you want your photo to be crisp and clear.
But over-sharpening can be as (or more) detrimental to the look of an image as no sharpening. Too much sharpening can introduce noise and a variety of other unwanted visual imperfections.
While every current photo editing application out there is capable of competently sharpening a photo, I want to take a look at the image sharpening options that are present in Adobe Lightroom. Lightroom actually sports quite a powerful set of sharpening tools, but exactly how to apply them has mystified some users.

Follow along as we cover the basics of sharpening photos in Lightroom.
Overview Of The Detail Panel
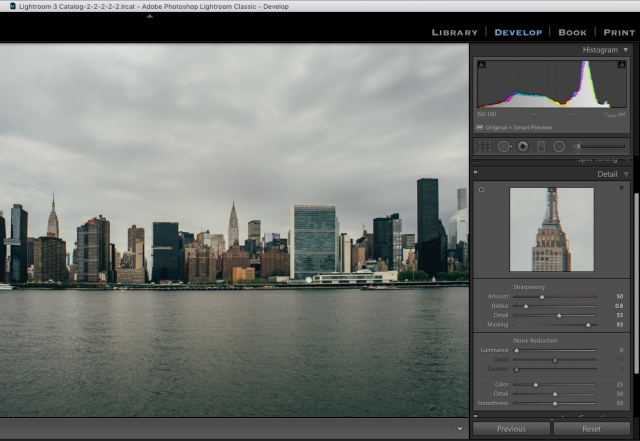
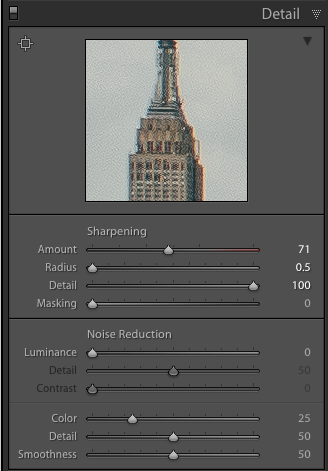
Lightroom’s Detail Panel will appear to the right of your screen when you navigate to the Develop module. The Detail Panel is divided into three sections — one that shows a magnified preview, one for sharpening and one for noise reduction. The sharpening section consists of four separate sliders — Amount, Radius, Detail, Masking.

- Amount: The Amount slider controls how much you want to sharpen an image, from 0 (no sharpening) to 150 (max sharpening). There’s no magic number that works for every photo. I’ve never encountered a situation that called for the Amount slider to be set to 150; I don’t typically go higher than 50.
- Radius: Radius controls how far beyond the original pixel boundary the sharpening is allowed to extend. A value of 1 means that the sharpening amount will extend out to 1 pixel around the edge of the original boundary. As you increase the Radius you will eventually begin to see the edges of various elements in your image thicken, so it’s wise to keep the Radius below 2.
- Detail: The Detail slider enhances the finer details within an image. Pushing the Detail slider will amplify the textures in items like strands of hair, feathers, any details that exist in the high frequency areas of an image. The slider ranges from 0 to 100 where, again, 50 is a setting that will work best in most cases.
- Masking: This slider allows you to control how much of the overall image will be affected by the three sharpening settings discussed above. When set to 0, sharpening settings apply universally to an image — every pixel is affected the same. As the Masking slider is increased, larger areas of similar pixels are masked out to achieve more refined, selective results (for instance, setting the Masking slider to 75 might sharpen only the eyes/face of a portrait while leaving the background untouched).
Look To The Alt/Option Key For Guidance
The changes that you make when sharpening your images can be difficult to visualize, especially once you start playing around with the Radius, Detail and Masking sliders. One way to better see the effects of sharpening is to view your photo at 100%. But sometimes the adjustments are so subtle that even zooming in doesn’t help as much as you’d like.
Say hello to the Alt (Win) or Option (Mac) key. Holding the Alt/Option key while moving any of the Sharpening sliders will display a grey representation of your image which allows you to see what changes are being applied at the pixel level. Without invoking the Alt/Option key, many of the adjustments you make in sharpening are immediately perceptible. The Alt/Option key helps eliminate the guesswork.
The screenshot below shows the Alt/Option key being depressed while moving the Detail slider.
The Alt/Option + Masking slider combo functions a bit differently. Instead of a grey screen, you’ll see an empty white screen, meaning all sharpness settings are applied evenly throughout the photo. As you move the Masking slider to the right, you will see areas of black begin to appear in the image. These are areas that are being masked out and are unaffected by the sharpening adjustments.
This selective sharpening process is perhaps the most important aspect of all Lightroom’s sharpening features, as it approximates what can be done in Photoshop while remaining easy to use.
Final Thoughts On Using Lightroom To Sharpen Images
If image sharpening has always been a matter of trial and error for you, knowing what each of the sliders in Lightroom’s Detail panel is designed to do and how each one affects an image should help remove some of the mystique surrounding this issue. Image sharpening is still largely a matter of taste and how much is needed can depend on a variety of factors (lens, subject matter, desired aesthetic), but knowing where to start will better help you achieve satisfying results.


