What do you think of when you hear the term “special effects”? Your favorite sci-fi movie or a state of the art video game, perhaps. Do you ever think of special effects as something related specifically to traditional photography? It seems that when some people think of special effects in the context of photography, they tend to make a connection with Photoshop. Given the ubiquity of “Photoshopped” images in our culture, I suppose we have to forgive people who immediately and singularly relate photographic special effects to digital manipulation. In instances such as these, the best thing to do is spread a little knowledge.
In a pre-Photoshop world, photographers had to endure hours of darkroom work in order to achieve the look they desired for their photos. These days any one of us can totally transform an image in a matter of a few keystrokes and mouse-clicks. But there are, in fact, special effects of a certain kind than can be achieved in-camera — no fancy software needed.
Panning
Panning is rarely referred to as a “special effect” and is often called an “advanced” photographic technique; admittedly, it does take practice and patience, but it isn’t as complicated as some might think. And yes, panning can legitimately be referred to as a special effect if you like. Panning is simply the horizontal movement of the camera as you follow a moving subject. The goal of this particular method is to get a blurred background and a sharp, in focus subject; the effect creates the impression of movement, as demonstrated in the photo below.
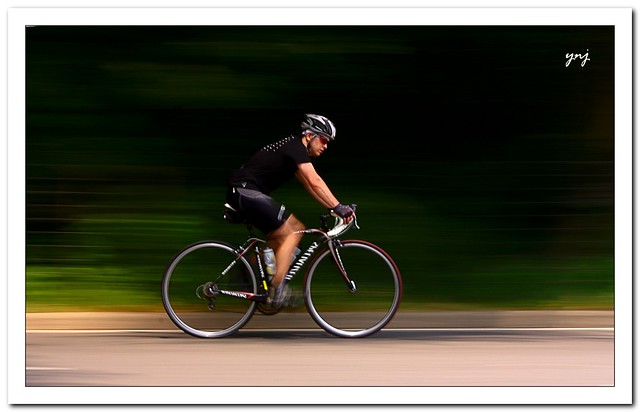
Photo by Yogendra Joshi
Keep the following guidelines in mind as you try your hand at panning:
- Set your shutter speed between 1/30 and 1/60 sec. Aperture and depth of field are not much of an issue here, as the background will be blurred.
- Make sure you aren't too close to the subject. Use at least an 85mm focal length.
- Make sure that you position yourself so there are no obstructions between you and the subject.
- Set your AF mode to AI servo/continuous focus mode.
- Aim at your subject and press the shutter button halfway to get an exposure reading.
- Be sure to stay with your subject’s movement and track as smoothly as possible.
- Press the shutter button completely while panning the camera along with your moving subject and continue tracking even after the shot is completed. Following through in this manner will help ensure the motion blur in the shot is smooth from start to finish.
Panning tends to work best with subjects that are moving along a straight trajectory, otherwise the blur winds up looking chaotic and the overall image fails to convey motion in the desired way. Mastering the panning technique takes patience and practice (and more practice), but it is a worthwhile skill to develop; while a similar look can be accomplished in Photoshop, doing it in-camera lessens your post-processing workload and strengthens your skill set.
Zoom Effect
Aside from being another in-camera special effect, the zoom effect is also akin to panning in the sense that it conveys a sense of motion, albeit in a more three dimensional manner. In contrast to panning, zooming creates the impression that the subject is moving either toward or away from the viewer.

Photo by Chuttersnap
The basic idea of how to achieve the zoom effect is to set a slow shutter speed and then zoom your lens in or out while the shot is being taken. To avoid making this sound overly simplistic, let’s take a look at some tips that, after some practice and experimentation, will produce spectacular results with the zoom effect.
- Since you will need a relatively slow shutter speed, it is important to keep the camera as still as possible; camera shake is not a good substitute for the zoom effect. If you need to, use a tripod.
- If possible, avoid brightly lit environments. A lot of light and a long shutter speed will lead to an overexposed shot. If you’re shooting in daylight, you may be able to get away with using slightly faster shutter speeds (something around 1/50th, perhaps), or you might try cutting the light via a neutral density filter.
- But don’t avoid light altogether. Shooting around city lights at night, for example, can create some really amazing results and serve as a prime location to get in a lot of practice.
- This effect works best with a zoom lens (a lens whose focal length can be changed by twisting the lens barrel), but if you don’t have a zoom lens you can still get the effect by manually moving your camera toward or away from the subject during exposure. You’ll likely incur some camera shake unless your technique is flawless; otherwise you might try using a monopod for stabilization.
- To get well-defined motion lines in your image, be sure your zooming motion is smooth and uniform (same speed throughout).
- Zoom lenses with particularly long zoom ranges (28-200mm, for instance) can pose some challenges: it may be difficult to maintain a smooth zooming motion over the entire zoom range, and such a wide zoom range may prove to inject an overwhelming amount of motion into the image. In such as case, simply use a smaller range of your lens’ zoom (100-200mm).
As with panning, you’ll only discover the true potential of the zooming technique by practicing and experimenting.
Filters
During film photography’s heyday, filters were an indispensable part of any photographer’s gear; filters were a necessity when trying to accomplish a certain visual effect or refine a photo in some way. When shooting black and white film, for example, a photographer could use color filters to enhance the tonal range of their photo. While color filters have been rendered virtually useless in the digital age, not all filters have gone the way of the dinosaur.
Neutral density filters
You may have heard a neutral density filter described as “sunglasses for your lens.” It’s a common analogy and one that is used because it is easily relatable. But it isn’t entirely accurate to simply say that a neutral density filter acts as a lens’ sunglasses. As you know, the sunglasses you put over your eyes are likely to be tinted; if you were to place those sunglasses in front of a camera lens, the resulting photo would also be tinted, and that is not usually what a photographer is going after. Photographers tend to want the scenes they capture to be free of any colorcast; the goal is to create an accurate, true to life representation of the actual scene — or at least as close as possible.
A neutral density filter just allows us to decrease the volume of light entering a lens without altering the color rendition.
The most sought after special effect created by the use of a neutral density filter is the silky smooth look of flowing water commonly seen in waterfall photography, an effect accomplished by the joint forces of a neutral density filter and slow shutter speed.

Photo by Vinoth Chandar
Infrared filters
Infrared photography is sort of like discovering a new world, or a different version of the world we’re so accustomed to seeing. The human eye can’t see the infrared (IR) range of the light spectrum, but that doesn’t mean there’s nothing there. Infrared photography allows us to see this hidden realm.
If you want to try this out for yourself you’ll need to use a special IR filter. IR filters present a number of challenges, not the least of which is a dark viewfinder, as these filters block much of the visible light around you. You will have to check for things like composition, depth of field, and focus before placing the IR filter on your lens. You will also have to rethink metering; your best bet will be to use a handheld meter, though there are some newer digital cameras that reportedly handle metering quite well even through dense IR filters. Using a high ISO in tandem with a camera’s Live View feature is another way to tackle metering. You can also choose to have your camera’s sensor modified so that you don’t need to use an IR filter.
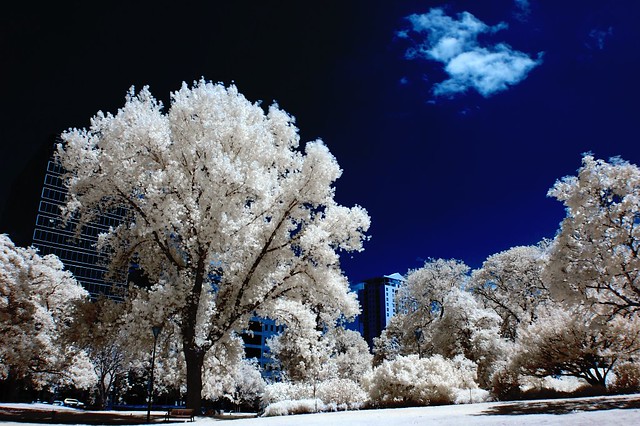
Photo by Jes
Once again, this is an effect that could easily be achieved in Photoshop but, perhaps, wouldn’t produce the same degree of authenticity in the end.
Conclusion
As you’ve seen, you can create awesome special effects right in your camera. These effects are fun, creative, cost-effective ways to add a new touch to your work. Optimal results won’t come about as quickly as they might in Photoshop, but the time and effort you put into expanding and mastering your skill set as a photographer will be greatly rewarding.


3 Comments
Thanks for these excellent and simple ideas.I will give them a go in the coming weeks.
Johnnie123
Thanks for reading!
I always enjoy your articles. Can’t wait to try some of these techniques.