Some of the most inspiring images that we see are created through long exposure. Using a slow or even ultra slow shutter speed adds a sense of motion to a still image. It also contrasts between the permanent and the temporary. A classic example would be the solid permanency of a building contrasted by fleeting clouds passing over.
As photographers many of us aspire to capture the juxtapositions that long exposure affords us. We know the many technical details on how to achieve these shots, yet are often somewhat disappointed with the end results. That’s because there are a number of potential pitfalls that can trip you up. Today we are going to look at some of them.
What Is Long Exposure?
There is no hard and fast definition of a long exposure. Personally I would say any shot that is below 1/30th of a second shutter speed is a long exposure and below one minute is ultra long exposure. If you are trying to capture motion in the daytime, such as waves on a beach or passing clouds, the exposure required might be in excess of five minutes.
However you define it, a long exposure is almost certainly going to need a tripod. It will also need some careful technical considerations.

How to Avoid Camera Shake in Your Long Exposure Photos
You might think that a tripod will solve all the issues in long exposure photography. This however would be a misplaced assumption. One of the weakest points on the shooting chain is you. No matter how solid your tripod is, if you physically press the shutter button, you stand the chance of introducing camera shake. For this reason an electronic or cable remote is highly recommended.
For DSLR users, mirror slap is also a potential pitfall. This is a vibration cause when the mirror moves up and down during exposure. This can be countered by using mirror lock up or your camera’s live view. Mirrorless users will not have this pitfall.

Using Neutral Density Filters in Long Exposure Photography
If you are trying to shoot long exposure images at any time other than night, chances are you will need to use neutral density filters. These filters are either screw in or part of a square filter system. They reduce exposure in one stop increments. The most common NDs are:
- 1 Stop – ND 0.3/ND2
- 2 Stop – ND 0.6/ND4
- 3 Stop – ND 0.9/ND8
- 6 Stop – ND 1.8/ND64
- 10 Stop – ND 3.0/ND1000
When shooting in twilight, you might only need around 3 stops of exposure reduction. However shooting in the daytime you may require 15-16 stops of exposure reduction. That in itself can lead to some unforeseen pitfalls that we will cover below.

What You Should Know About Colour Shift and Exposure
The first of these pitfalls is a shift in colour and exposure. Camera meters will find it increasingly difficult to measure exposure accurately the more ND filters you have. To get around this, you should measure your exposure without the ND filters attached. Then either mentally calculate the exposure or use a long exposure app.
Colour shift is another potential problem. The longer the exposure, the more likely the colour will shift away from what you expected. To counter this shoot in raw or raw/JPEG. This will allow you to correct the white balance in post production.
How to Avoid Noise In Your Images
Conventional wisdom would suggest you shoot at the lowest ISO and this would be correct. However, there is a type of noise that can creep into long exposure shots even at base ISO. It’s called thermal noise. It occurs because the sensor is effectively on for a very long period of time. This cause it to heat up and introduce noise into the image.
Most cameras have a long exposure noise reduction setting to eliminate this problem. It works by shooting a black frame directly after the original exposure. The downside of this of course is that it doubles your exposure time.
This may not be an issue with “shorter” long exposures but could definitely become time consuming as your exposure creeps up to several minutes. An exposure of 5 minutes could double to 10 with long exposure noise reduction on. In this case it might be more worthwhile dealing with the noise in post production.
How to Deal With Internal Reflections
As mentioned, shooting in daylight you may need up to 16 stops of exposure reduction. Whilst there are filters that go either darker than this, most of us will need to stack our ND filters, for example a 10 stop with a 6 stop.
This creates another pitfall – internal reflections.
Because you are adding two or more glass elements in front of the lens, the light can bounce around between these. It’s very difficult to see when composing the image. It’s also very difficult to remove in post production.
Square filters are more prone to the problem. This is because there are gaps between each filter that light can get into. Also dirty filters can accentuate the issue, even with the screw in type.
As a rule of thumb use the lowest number of ND filters as possible and make sure they are spotlessly clean.

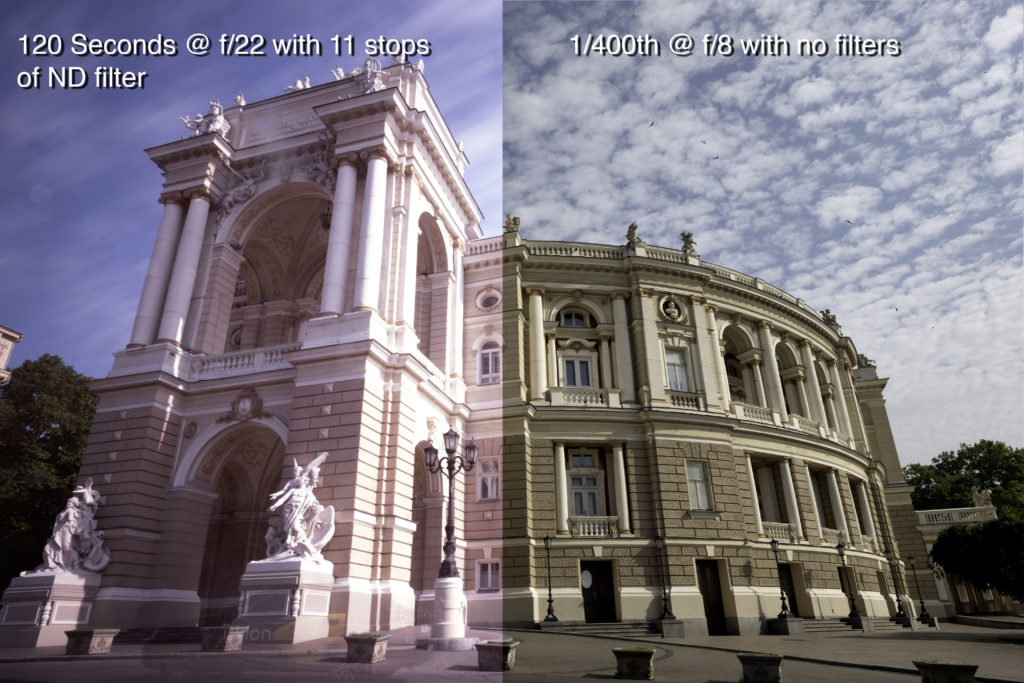
The Diffraction Issue
In our everyday shooting we rarely come up against diffraction. Long exposures, however can drastically increase the chances of it becoming visible in our shots. So what is it?

In short, the smaller the set aperture, the more the light waves are bent on their way to the sensor. If those waves hit the sensor at too steep of an angle, the start to reduce the sharpness of the overall image.
Diffraction starts to occur earlier, the smaller the sensor. Each camera/lens has a sweet spot for aperture, after which diffraction begins to creep in. For most shots/apertures, it will not be an issue. However shoot f/22 for 5 minutes, you will most certainly start to see a loss of sharpness due to it.
So how do you avoid diffraction?
Aim for the sweet spot on your lens, probably around f/8 then use the minimum number of ND filters required to get the shutter speed you need.
Final Thoughts
Long exposure is an incredibly rewarding genre of photography. With a little planning and armed with knowledge of the potential pitfalls listed here, you should be able to capture some stunning ultra slow shutter speed images.


2 Comments
Conventional wisdom is always to use a cable release for long exposures. But suppose I’m doing, say, a two-minute exposure and I press the shutter release with my finger instead of using a cable release. How much effect will two seconds of vibration have on two minutes of exposure? I would say essentially no effect. Am I wrong?
Probably not, however, many cameras do not allow exposures of more than 60 seconds through the shutter speed settings. For very long exposure the only option in bulb. If you are shooting bulb by pressing the shutter, then you have to keep your finger on the shutter. If you are using a cable release or electronic remote you can lock the shutter open or specify an exact shutter time